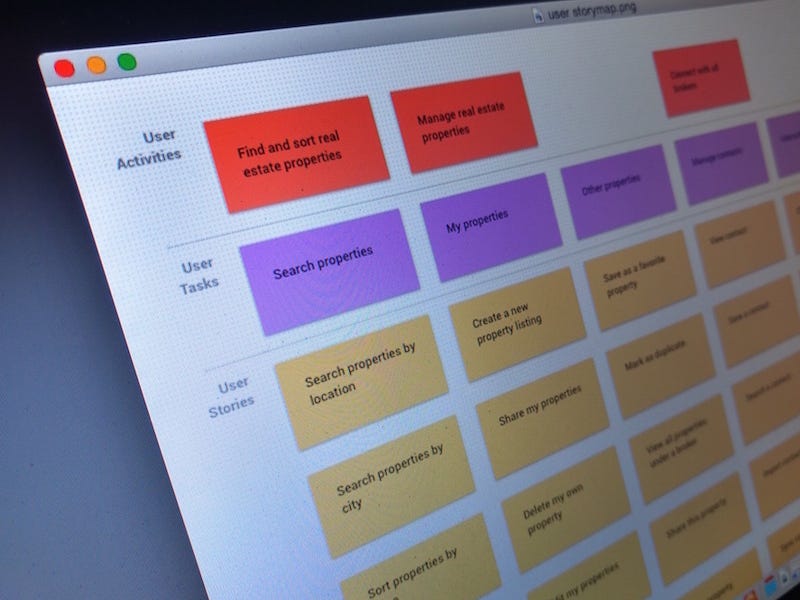
User story mapping
User story mapping
О важности User Stories
Здравствуйте, уважаемые читатели.
Сегодня мы хотели бы поговорить с вами о важном аспекте гибкого управления проектами, но не о чистом Agile, а о планировании проекта и итераций. Речь пойдет о жанре «Пользовательских историй», которым посвящена очень успешная на Западе книга Джеффа Паттона с предисловием Мартина Фаулера:
В статье, текст которой вас ждет под катом, мы перевели «User Story Mapping» как «визуализация функционала». Вариант взят из очень интересной книги Бориса Вольфсона «Гибкое управление проектами и продуктами», также выходившей в нашем издательстве.
Итак, автор статьи прочитал труд Паттона и решил, что так должен поступить каждый. Насколько убедительные примеры он привел — судить вам.
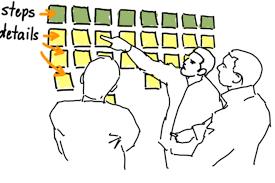
Одна из ключевых целей при планировании проекта – общими усилиями собрать требования. Но зачастую бывает сложно решить, с чего начать и на чем сосредоточиться. Визуализация функционала (story mapping) – увлекательная работа, где все члены команды участвуют в формировании списка требований (бэклога) – расклеивают карточки на стене, а не пишут скучную 100-страничную спецификацию.
Такой способ визуализации функционала изобрел Джефф Паттон, а мне об этом рассказал Шираг Доши. Я считаю, что это очень эффективный и полезный способ фиксации требований на этапе продумывания проекта.
Чертим карту функционала
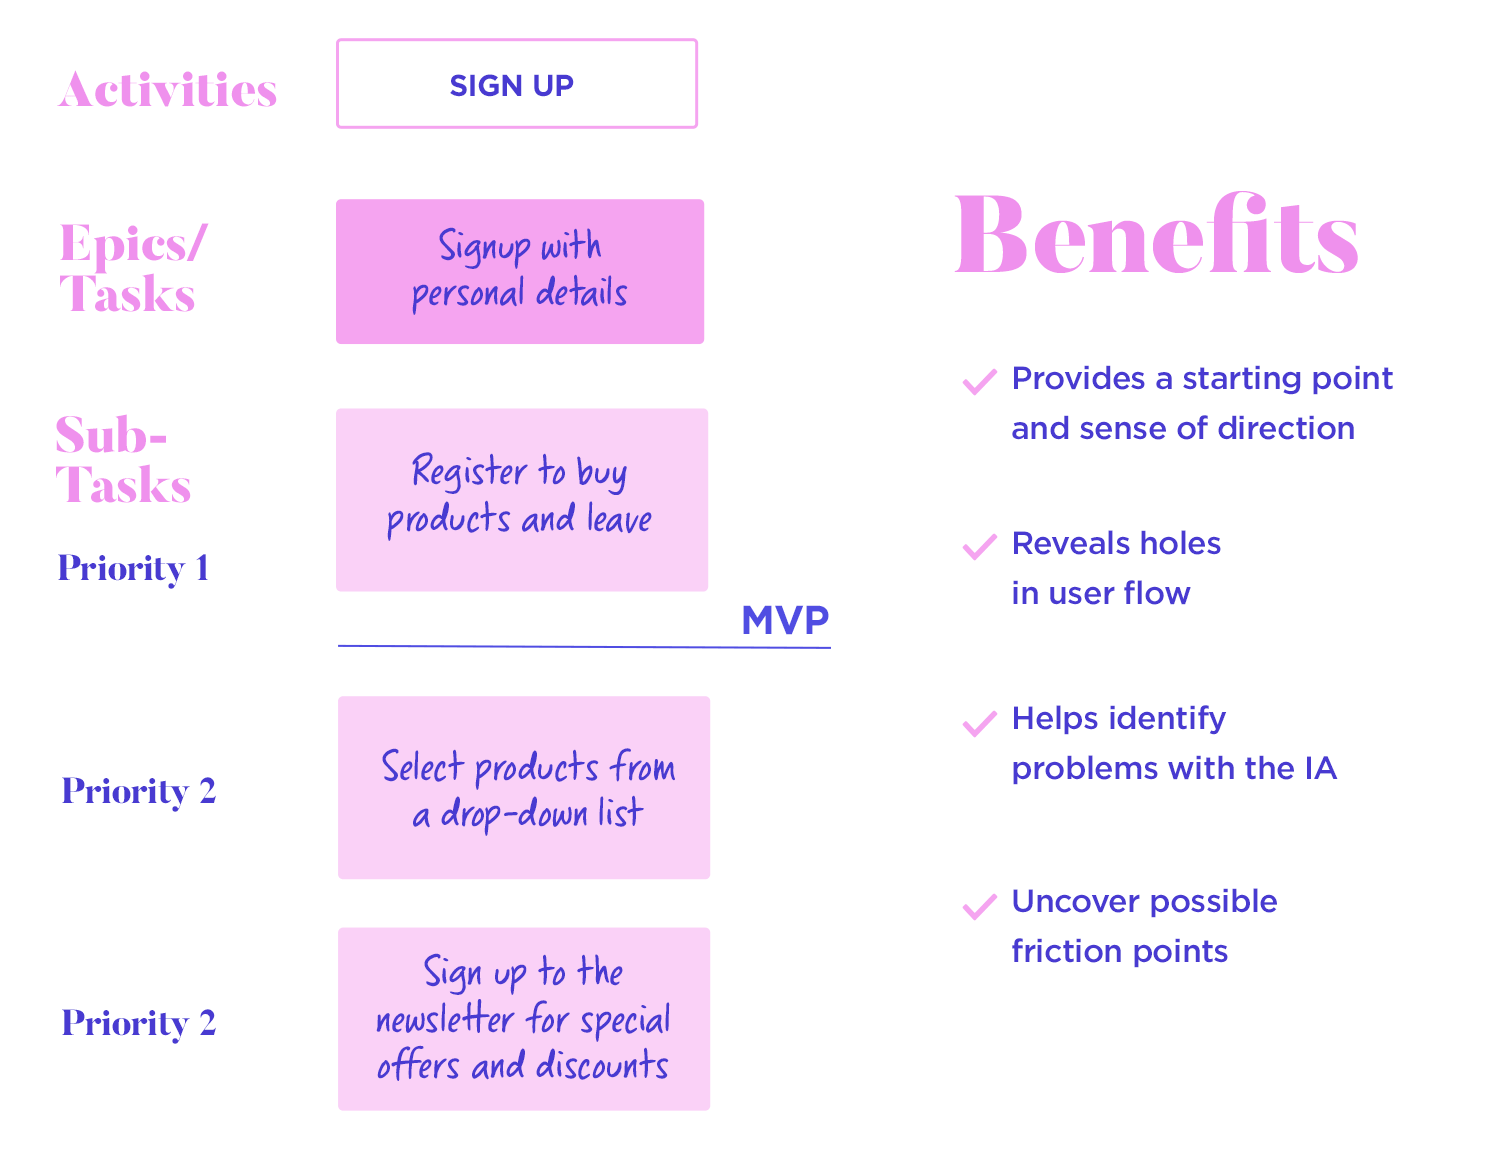
Визуализация функционала — это нисходящий способ сбора требований, которые представляются в древовидной форме. Перед началом визуализации нужно обрисовать себе весь проект целиком. Для этого расставляются цели. Для достижения цели нужно выполнить те или иные действия. А для выполнения действия пользователь должен решить задачу. При разработке ПО конкретные задачи могут быть сформулированы в виде пользовательских историй.
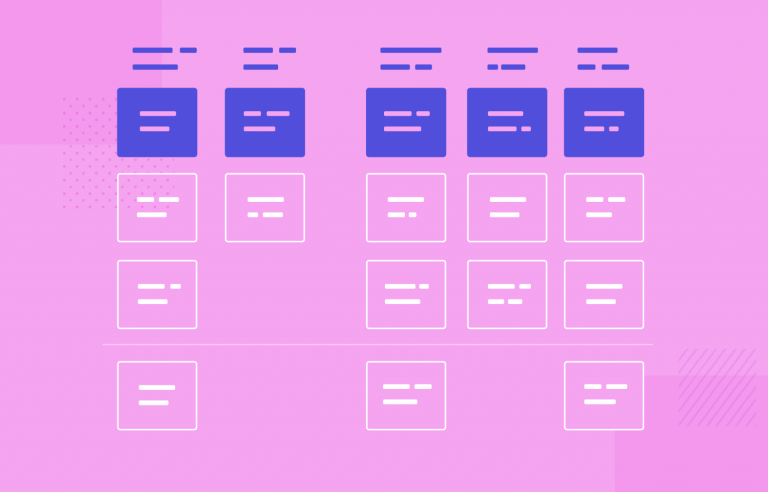
Структура карты: Цели — Действия — Задачи — Истории
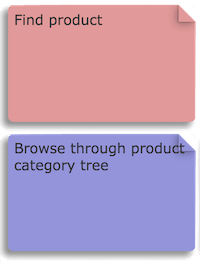
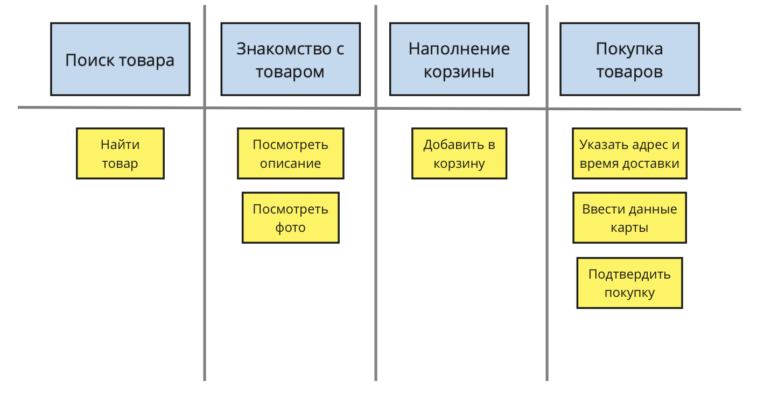
Рассмотрим для примера приложение для работы с интернет-магазином, в рамках обращения с которым выделим конкретную цель:‘найти товар’. Чтобы лучше понять весь процесс, визуализируем этот функционал на карте.
Достичь цель ‘найти товар’ можно несколькими способами, например, ‘просмотреть дерево с каталогом товаров’, ‘воспользоваться текстовым поиском’, ‘посмотреть промо-товары’. Остановимся на втором варианте – «просмотрим дерево с каталогом товаров» и визуализируем такой функционал. ‘
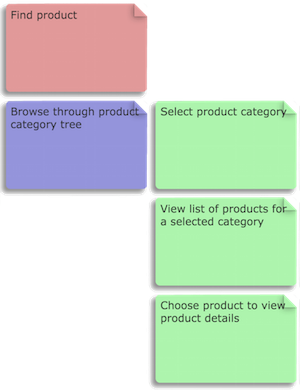
Далее, чтобы добраться до желаемого товара, пользователь должен выполнить определенные задачи,
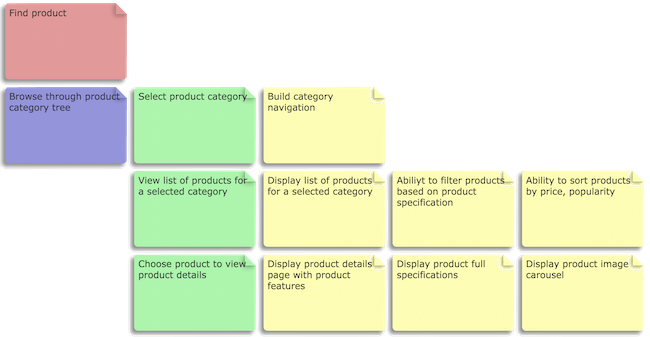
А теперь эти задачи можно сформулировать в виде пользовательских историй и перейти к разработке программы.
Так и продолжаем подробно прорабатывать каждую ветку функционала, начиная с целей и достраивая целостную карту. По моему опыту, на полную визуализацию функционала может уходить от трех дней до двух недель в зависимости от размера и сложности проекта.
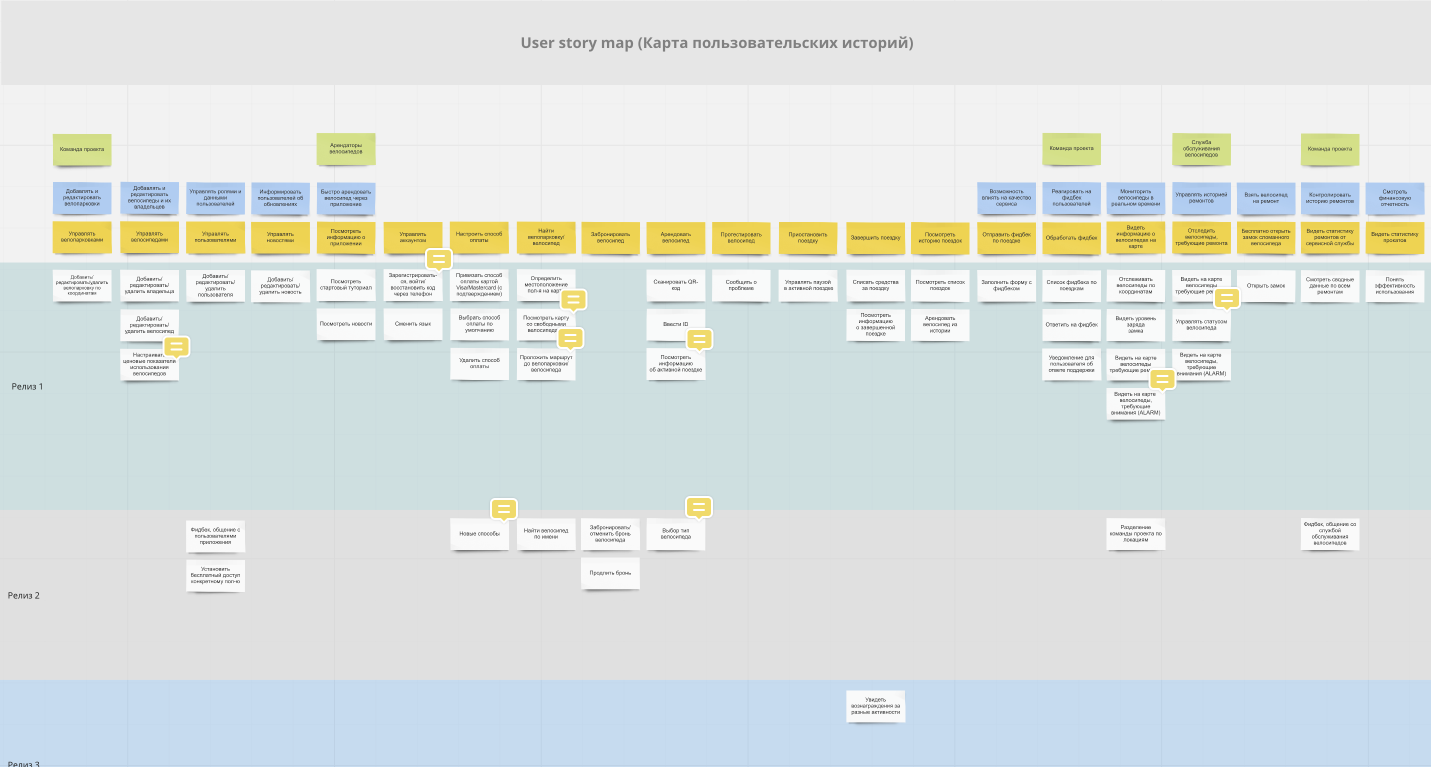
Для справки: вот «ветка» из одной визуализации функционала, взято из реального проекта,
А вот как выглядит вся карта после пяти дней работы:
Итак, разобравшись с визуализацией функционала, давайте обсудим, каковы достоинства такого подхода.
Преимущества визуализации функционала
Обогащаем получившуюся карту дополнительной информацией
Иногда требуется зафиксировать на карте проекта сравнительно много информации – например, пометить вопросы, возникшие в ходе работы, альтернативные подходы… все это также попадает в визуализацию. Вот несколько практических примеров:
На маленьких стикерах ставим пометки, записываем предположения, предварительные выводы или вопросы
Альтернативные способы визуализации функционала
При визуализации функционала важно сначала определиться со структурой, а затем дорабатывать ее по мере необходимости. Необходимо уже в самом начале работы представлять себе структуру проекта и отталкиваться от нее. Иногда целостная структура получается только спустя две-три итерации.
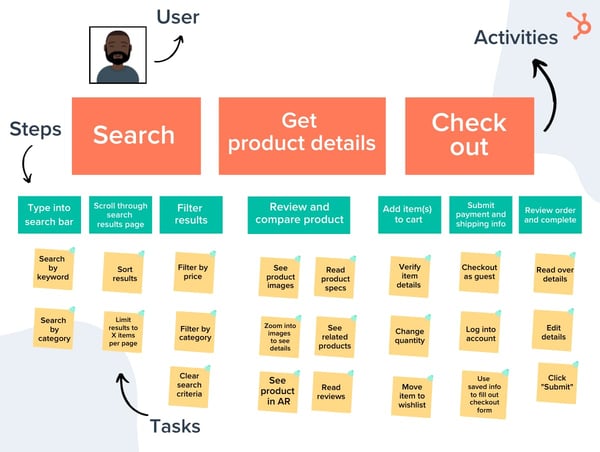
Один вариант альтернативной структуры называется‘пользовательские путешествия’. Такой подход помогает определиться с требованиями с точки зрения пользователя – например, покупателя, продавца, администратора, т.д. В таком случае визуализация приобретает вид Пользователь — Цели — Путешествия — Действия — Истории.
Другая альтернатива, особенно при разработке NFR (нефункциональных требований) может быть такой:
NFR — Требование — История.
Полная карта больших проектов может содержать до шести уровней. Однако в типичном проекте обычно достаточно 3 уровней.
Подготовка к визуализации функционала
Итак, вы твердо намерены начинать следующий проект с визуализации функционала. Вот что для этого потребуется:
Визуализация функционала – эффективный механизм продумывания требований к проекту, поскольку он очень нагляден. Такой подход помогает прийти к общему пониманию проблемы, выделить имеющиеся пробелы в бэклоге, уловить взаимозависимости, точнее оценить относительные размеры этапов проекта. В дальнейшем такая визуализация помогает правильно сегментировать проект и адекватно спланировать время на подготовку всех релизов.
Руководство по сбору требований в формате User Story Mapping: Пользовательская история, 1/3
Инструменты проектирования
Что больше всего отличает опытного дизайнера и проектировщика от начинающего, так это способность грамотно «снимать задачу с клиента». Навык этот совокупный, нарабатывается, как и прочие, многократным подходом к снаряду. При этом ни новичок, ни опытный не защищены от ошибок. Хорошая методология помогает их избегать, делая обозримым то, что без неё с трудом влезало в голову.
В этой серии статей я хочу поделиться опытом применения наиболее крепкого и полезного, на мой взгляд, метода сбора требований к будущему цифровому продукту. Метод со мной уже девять лет. Работает прекрасно как в заказной, так и в продуктовой разработке. Я провёл сотни часов с заказчиками, записывая требования именно по этой методологии, поэтому в этих статьях содержится не только метод, но и рекомендации как проводить сессии с заказчиком.
Мне есть с чем сравнить. Приходилось писать и пространные ТЗ, и оттачивать запись полезного действия в формате понимания задачи, составлять дотошные сценарии использования, строить UML-диаграммы. С точки зрения выживаемости описанный ниже метод в моей личной практике обошёл все остальные.
Суть метода и его место
Цикл продуктовой разработки состоит примерно из следующих этапов.
Первая фаза с обнаружением продукта чаще всего не заканчивается с началом разработки, и осознание продукта длится на протяжении нескольких, а то и всех циклов его эволюции. Тем, кто работает над проектом, важно разделять общее видение, договорённости о целях, ценностях и способах их достижения. Все эти сведения я буду называть для краткости требованиями.
User Story Mapping, далее USM или сторимаппинг — это метод сбора требований и планирования релизов программного продукта. Он сконцентрирован на пользовательских историях и задачах, связанных с ними.
На входе метода: гипотезы состава стейкхолдеров, их интересов и основных планируемых эффектов ближайшего релиза. Их важно получить заранее. Хорошо, если предварительно было сделано картирование процессов в форматах Customer Journey Map и/или Service Blueprint.
На выходе: набор задач на проектирование и разработку, привязанных к потоку пользовательских историй.
Метод предлагает фиксировать требования в виде двухмерной карты, где карточки с пользовательскими историями располагаются в хронологическом порядке, а соответствующие им задачи для команды разработки расположены под ними согласно росту глубины проработки. Принципы сбора требований и планирования на основе такой карты описаны ниже, а пока пару слов о том откуда появился метод.
USM пришел из IT-сообщества, развивающего принципы Agile, в ответ на проблему, связанную с трудностями приоритезации и планирования работ над бездной историй. Первая версия метода описана в статье Джеффа Паттона — автора метода, проектировщика интерфейса, а ныне консультанта по работе над продуктами.
Карта историй создаётся преимущественно для нового продукта, продукта, который мы собираемся сделать. Впрочем, карта может быть составлена и для действующего продукта, когда вы хотите его частично или полностью переделать и требуется описать объём имеющейся функциональности.
Структура пользовательской истории
Разберёмся с атомом USM — пользовательской историей. Это одна из нестрогих форм записи функциональных требований к программному обеспечению.
Классически история записывается на самоклейку Post-it, чтобы не быть сложносочинённой — размеры бумажного формата помогают не растечься мыслью по древу. Запись ведётся в процессе беседы команды со всеми важными стейкхолдерами. Чтобы избежать фантазий проектировщиков и разработчиков, все участники беседы должны прийти к соглашению, что зафиксированная история отвечает целям и интересам всех стейкхолдеров.
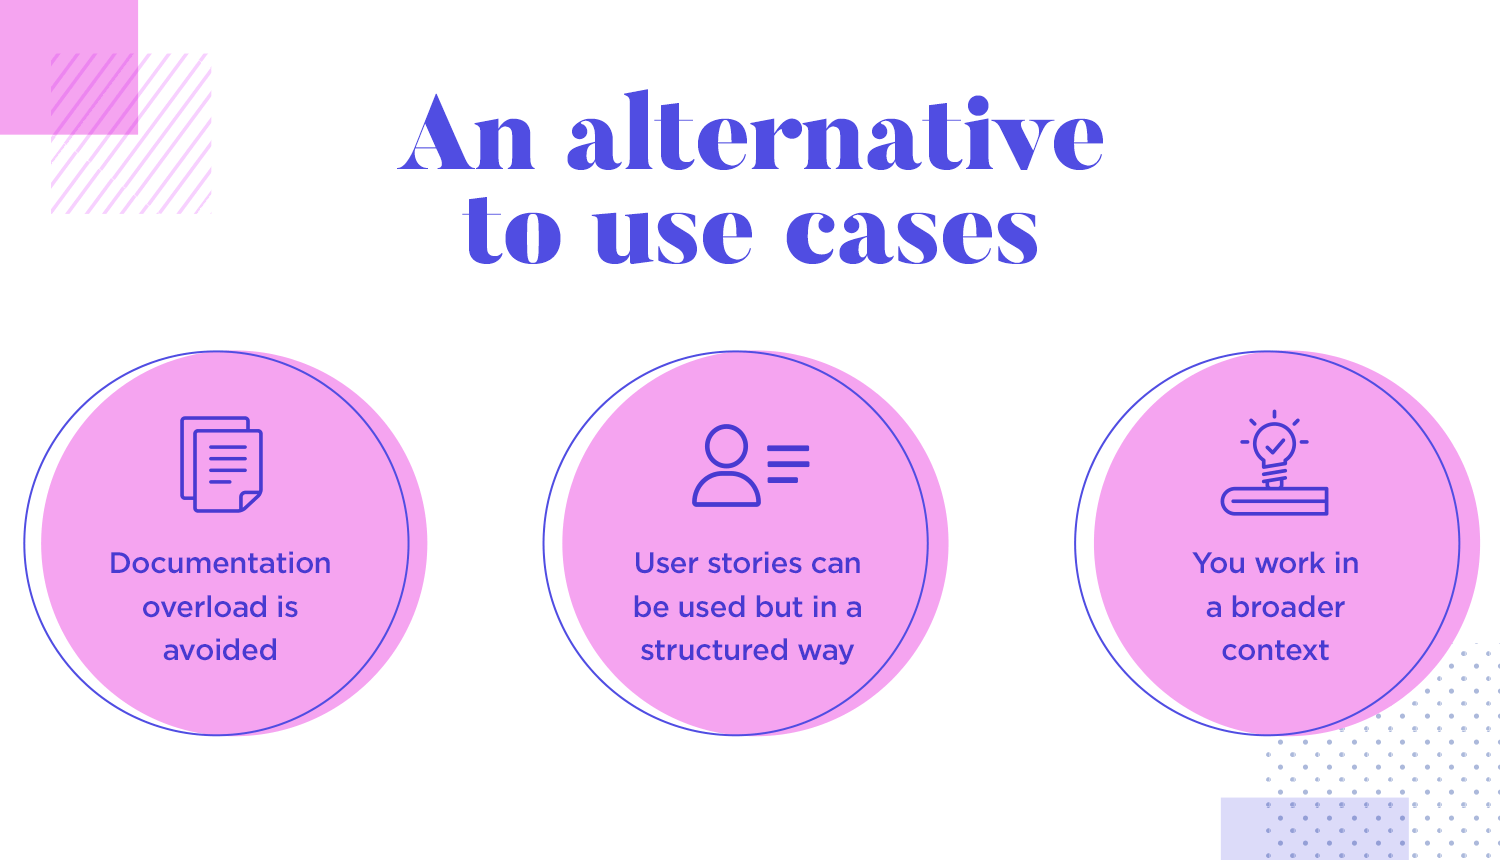
До появления пользовательских историй использовался формат сценариев использования (Use Cases). К сожалению такие сценарии, лишены эмпатии к человеку, для которого создаётся программа. В сценариях использования его обычно называли презрительным и обезличенным «юзером». Чтобы исправить эту ситуацию апологеты гуманности в парадигме User Centered Design сместили акцент на роль человеческого фактора. Появился метод персон, помогающий создать модели групп будущих пользователей и хоть как-то передать команде разработки понимание целей, задач и чаяний людей, для которых создаётся продукт.
Любая пользовательская истории записывается для персоны или функциональной роли в системе. Самый просто пример двух различных функциональных ролей: продавец и покупатель. Иногда несколько ролей могут объединяться в одном человеке.
Не стану приводить в этой статье примеры персон и способов их создания на эту тему написано достаточно. К тому же, насколько могу судить из опыта сообщества и собственного, персоны трудны в создании и валидации, они содержат множество лишних предположений. Мы, в Byndyusoft, преимущественно используем функциональные роли при записи историй. Далее буду обозначать субъекта истории действующим лицом — под ним может пониматься как персона так и функциональная роль.
Классический шаблон
Вернёмся к историям. Классическим форматом является следующий:
Действующее лицо, способ достижения, ценность
Важно понимать для какого действующего лица записывается история. Обычно действующее лицо «выносят за скобку», чтобы не повторять его в каждой карточке. Для этого над историями вешают карточку с изображением функциональной роли или персоны и подписью.
Истории, записываемая для понятной всем роли или персоны, состоит из двух частей: ценности и способа её достижения.
Самая важная часть истории — ценностная. «Я как такой-то хочу сделать то-то, чтобы что?». Последняя часть рисует образ полезного действия, достигаемого в истории. Полезное действие помогает увидеть главную цель действующего лица, и направляет проектировщика на способы достижения этой цели.
Без ценности в историю можно записать любую ерунду, и это не будет заметно. Ценность — как лакмусовая бумажка для истории. Пока записываешь ценность, несколько раз переформулируешь и всю историю.
Например, кто-то формулирует историю как-то так.
Образа решения не возникает, видение ситуации не передано. Почему здесь важна мгновенность? На этот вопрос нужно получить ответ в процессе сбора требований и записать его в виде ценности в историю. Например, выяснится, что заказ могут передать другому продавцу, если вовремя не отреагировать. Тогда впору записать историю так:
Если вопрос «зачем мгновенность» оставить без ответа, история будет содержать скрытый риск, который весьма вероятно увеличит количество итераций переделки. Лучше выяснить это до начала проектирования и разработки, иначе у вас история с миной замедленного действия:
Избегание излишних ограничивающих подробностей
Часть с описанием способа достижения полезного действия наиболее вариативна. Здесь в запись историй прокрадывается дизайн. Фиксируя определенный образ достижения полезного действия, мы постулируем один из вариантов работы системы. Важно это понимать и не привносить в историю излишне жестких ограничений. Ограничения важны для проектирования, однако лишние ограничения, возникшие из фантазий, отсекут хорошие решения. Излишняя детализация здесь возникает из-за того, что людям проще мыслить готовыми решениями. Пользователи будущей системы и стейкхолдеры выдают на-гора конкретные варианты того как именно должно быть исполнена история. Важно уйти от излишней конкретики и записать историю без подробностей реализации.
Чтобы избежать лишних подробностей и ограничений на уровне языка интерфейса, рекомендуется избегать названий интерфейсных элементов и паттернов в тексте историй.
Ниже плохой вариант истории:
Плохой, потому что содержит излишнее ограничение на уровне подходов в реализации: пуш-уведомление — это конкретный приём подачи сообщения на мобильных устройствах.
Выбор конкретных способов реализации зависит от имеющихся технологических и временных ресурсов. Лучше записать ту же историю более обще:
Предъявление и изменение данных — вот и весь ваш хвалённый IT
С точки зрения технических систем, любой интерфейс — это трансмиссия — то, что передаёт информацию от передатчика к получателю и обратно.
Я заметил, что все истории в разработке программного обеспечения распадаются на два класса. Все они про предъявление данных и манипуляцию ими. Мы либо что-то показываем, либо влияем каким-то образом на систему, либо делаем и то, и другое.
Исходя их вышесказанного, чаще всего одни и те же слова попадают в запись историй. Вот примеры глаголов, которые мы чаще всего используем в записи историй:
У каждого проектировщика или команды может сложиться свой набор.
Полезные форматы историй
При записи историй удобно придерживаться шаблонов. Это помогает не упустить важного и окупается когда вы, зная форматы, расходуете меньше внимания на поиск того как записать только что озвученное. Особенно это важно, если вы только начинаете использовать картирование историй для сбора требований. Вот несколько форматов, которые показали себя хорошо на практике.
Классический укороченный
В этом шаблоне как и во всех остальных далее действующее лицо вынесено за пределы карточки. В формате также опущен глагол «хочу», записывается сразу действие и ценность.
Вопросы и утверждения
Большинство историй на демонстрацию и изменение данных будет казаться неуклюжими для записи в классической форме из-за того, что записываемая ценность кажется самоочевидной. Если записывать по классике, получается масло-масленное:
В этих случаях хорошо себя показали истории-вопросы и истории утверждения. Пару примеров историй-вопросов:
Здесь ценность очевидна, а суть истории в том, что человек получает ответ на волновавший его вопрос.
Для сравнения ниже одна и та же история в классическом формате и формате истории-вопроса:
То же самое относится и к историям про модификацию данных. Для простоты записи мы иногда используем такую форму утверждения:
Истории про изменение
Зачастую ценность описать проще, если показать два состояния системы: текущее с проблемой и новое — лишенное проблемы. В этом случае пригождается формат историй на изменение:
Историю про рекламодателя можно переписать в формате изменения:
Этот формат истории легко запомнить, представляя схему перехода от вреда к пользе: Бесконтрольные траты (вред) → расходы только на выбранные тематики (польза).
Критерии готовности истории
Как понять, что история закончена? Я смотрю на следующие индикаторы.
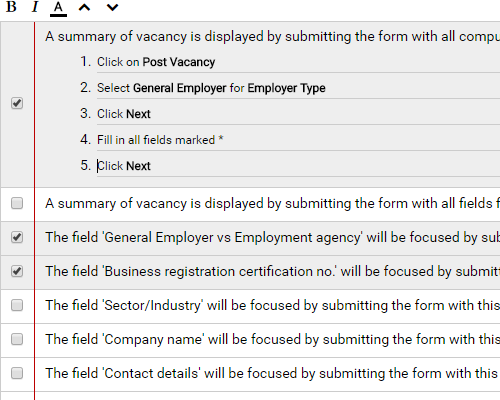
Как понять, что история спланирована или реализована полностью в определенной версии программного продукта? Здесь есть два способа. По одному из них на обороте стикера с историей записывают перечень критериев её готовности (Definition of Done). Другой — фиксировать все подробности отдельными карточки с детальными задачами под историей. Достижение полноты проверяется по этому перечню или набору карточек.
Как устроена концепция “User Story Mapping” и как интегрировать карту историй с Канбан-доской программистов
Чтобы начать запускать проекты по системе Канбан, проектная команда должна переосмыслить привычных способ учета требований и шагнуть в сторону более структурированного подхода. Для начала крупномасштабные проекты нужно разложить на функции, с каждой из которых мы будем работать независимо.
Ищите системное погружение в тему? Загляните в блог для дизайнеров.
Во многих организациях требования к продукту изложены в виде формального документа. Обычно бывает так:
У нас был достаточно интересный опыт использования карт историй, чтобы помочь командам справиться с трудностями, которые они обычно возникают при работе со стандартным документом с требованиями. Мы интегрировали метод карты историй с Канбан, чтобы команды с первого дня использовали гибкий подход к работе.
1: Создание функций — это совместное упражнение, в ходе которого проектная команда и все заинтересованные лица составляют список функций и формируют последовательность событий, которые несут ценность с точки зрения пользователей.
2: Функции, соответствующие каждому действию, располагаются по приоритету.
После того, как мы расставили функции по приоритету, команда может приступить к созданию MMF-ов ( Minimum Marketable Feature ( MMF)— минимальный состав продукта, ценный для потребителей). Для этого “разрезаем” карту горизонтальными линиями.
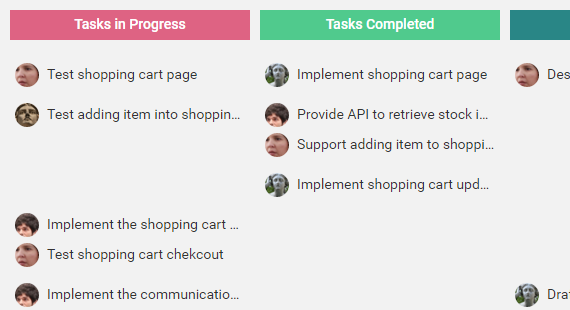
3: Расставленные по приоритету функции и MMF-ы из карты историй можно использовать для наполнения Канбан-доски.
Процесс составления карты историй помогает команде увидеть всю картину и рамки проекта. В результате, эта техника помогает проектным командам комплексно планировать функции и релизы с учетом всего проекта целиком.
Если вам понравилась статья и перевод, дайте нам знать — нажмите 👏 (можно “хлопать” несколько раз!)
А если у вас есть на примете какая-нибудь классная статья по UX и не только — скиньте нам ссылку, и мы будем рады над ней поработать.
Мобильное приложение «Заметки о психике» | Mental Notes
Подкидывает идеи как привлечь, удержать и направить внимание пользователя
Mental notes — это колода из 53 карточек с описанием психофизиологических моделей поведения людей, которые лежат в основе принципов веб-дизайна. Они помогают дизайнерам, проектировщикам лучше понять поведение пользователей и найти эффективные решения при создании дизайна интерфейсов.
Видеокурсы и практика по дизайну интерактивных систем: ux/ui, веб-дизайн и бренд-дизайн
Вас ждет плотная проектная практика по анимации интерфейсов, дизайну сайтов, а также мобильных и веб-приложений. Под руководством наставников в стиле «смотри и повторяй»!
Breezzly — это среда для тренировки digital-навыков. Здесь вы встретите комплекты видеокурсов в актуальных инструментах интерактивного дизайна, среди них Figma, Principle и Invision Studio. А каждый проект — это живой кейс с историей, собранной по горячим следам!
Как построить карту историй (user story mapping), если проект уже в работе
(Мы продолжаем переводить цикл статей по продуктовому дизайну. Полную подборку можно найти в коллекции « Инструменты продакта»)
Если вы читали пост Дэвида про story mapping, то, скорее всего, загорелись идеей попробовать новый метод на практике. Обычно в этот момент начинают выползать самые разные страхи и сомнения.
Скорее всего вы думаете: “Проект уже запущен, неужели нужно все начинать сначала? И выбросить на ветер всю проделанную работу?” И вот вы все размышляете, как story mapping мог бы усилить ваш проект, и стоит ли оно того…
Что ж, ребята, хорошие новости! Даже если ваш проект уже в работе, вы все еще можете воспользоваться методом story mapping. Честно. Конечно, придется поработать, но оно того стоит.
Ищите системное погружение в тему? Загляните в блог для дизайнеров.
Шаг 1. Строим карту (story map)
Начните с того, что имеете
Для начала, соберите в кучу те пользовательские истории, которые у вас уже есть. Изучите истории, над которыми сейчас работают другие команды и поместите их на свою доску. Только пообещайте, что не будете воровать у них карточки: перепишите все по-честному на новые карточки. Если вы используете JIRA, VSTS/TFS или какой-то другой инструмент, просто распечатайте все свои тикеты. Да, даже закрытые (поймете, зачем они нужны, когда мы дойдем до шага “Заполнить пробелы”).
Далее, нужно рассортировать истории по группам, чтобы при необходимости вы быстро могли найти нужную. Не очень-то удобно перебирать стопку из 150 карточек в поисках той самой истории.
Сразу предупреждаю: пользовательские истории обычно бывают фичами/существительными, а нам для построения карты историй нужны глаголы/действия/шаги. Поэтому не стоит брать за основу существующий бэклог: лучше начать с создания простейшей карты пути пользователя.
Создайте карту пути пользователя (journey map)
Эта карта (journey map) будет скелетом карты историй (story map). Вам будет проще, если вы начнете работать с укрупненной картой пути пользователя, пока не вдаваясь в детали. Наша первая цель — наметить общий маршрут.
Возьмите пачку стикеров, маркер и изоленту и забейте кусок стены. Для начала спросите себя: какой путь проходит пользователь в продукте? С чего он начинает? Самый простой подход — взять за основу путь основного персонажа. Каждый шаг пути мы будем писать на отдельном стикере.
Используйте существующие тикеты
Если вам встретятся какие-то шаги, которые уже есть в карточках пользовательских историй, не дублируйте их на стикерах, а просто приклейте карточки на скотч. Возможно, большинство шагов у вас уже есть. Если так, круто.
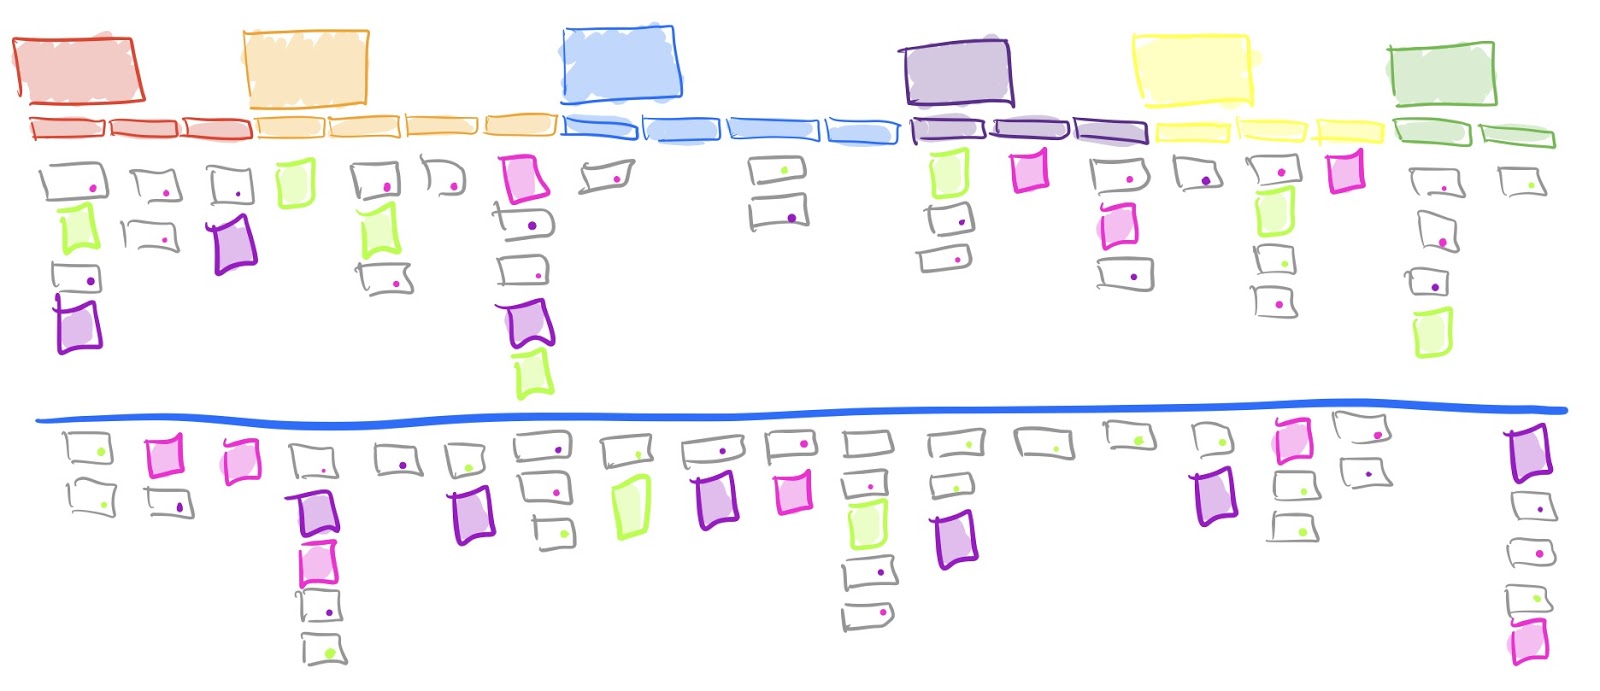
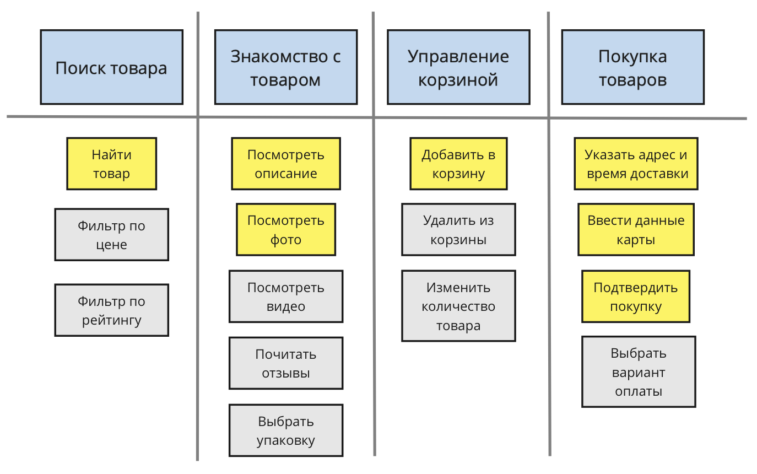
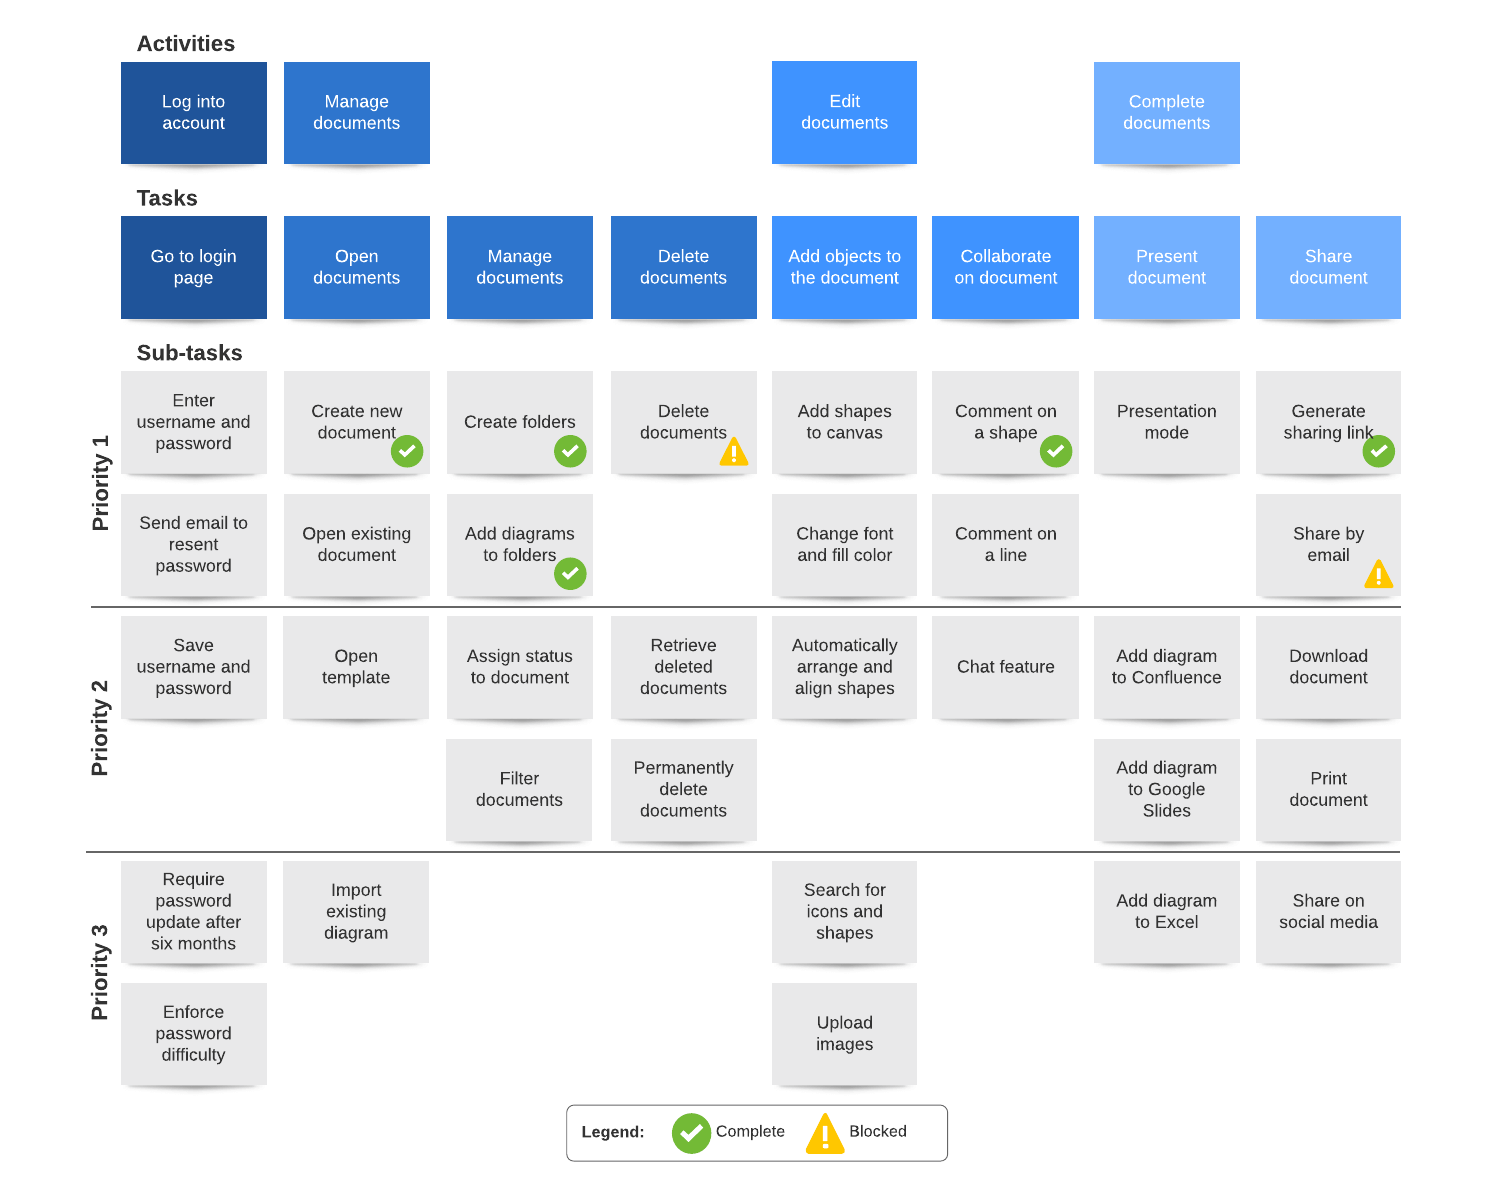
Вот так будет выглядеть ваша карта. Белые карточки — это распечатанные пользовательские истории из физического бэклога или из JIRА. Цветные квадратики — это новые стикеры.
Заполните пробелы
Скорее всего вы обнаружите пробелы в вашей карте историй. Или может оказаться, что вы упустили некоторые важные действия, шаги или мелочи, которые любят всплывать перед самым релизом.
Тут-то и происходит все волшебство. Проблема бэклога на 150 тикетов в том, что все они разные по размеру и очередности. Здесь мы берем за основу 150 историй и равномерно распределяем по пути пользователя. С таким подходом легко обнаруживаются проблемные места. Вещи, которые мы считали никак не связанными, на самом деле оказываются взаимозависимыми. Мы обнаруживаем небольшие истории, которые можно объединить и легко закрыть в пределах одного спринта — и создать полезную фичу.
Как только соберете всю карту, начните искать темы, или, как мы называем их, “действия”. Это такие большие задачи, которые может осуществить пользователь и которые могут включать множество шагов. Сюда относятся такие крупные вещи, как “управлять письмом” или “обновить”.
Определите состав “релиза”
Да, релиз в кавычках. Все потому, что мы хотим разделить планирование и релизы. Слово “релиз” — это просто понятие, которое я использую чтобы разграничить интервалы планирования. Можете называть это “маркетинговыми релизами” или точками отсчета. Это не обязательно физические релизы. Вы можете постоянно совершенствовать продукт и копить “релизы”, а потом выпустить все большим блоком. Или вы можете потихонечку, без огласки выпускать мелкие улучшения и постепенно тестировать их на пользователях. Не важно какой вариант вы выберете, главное, чтобы он подходил вам и команде.
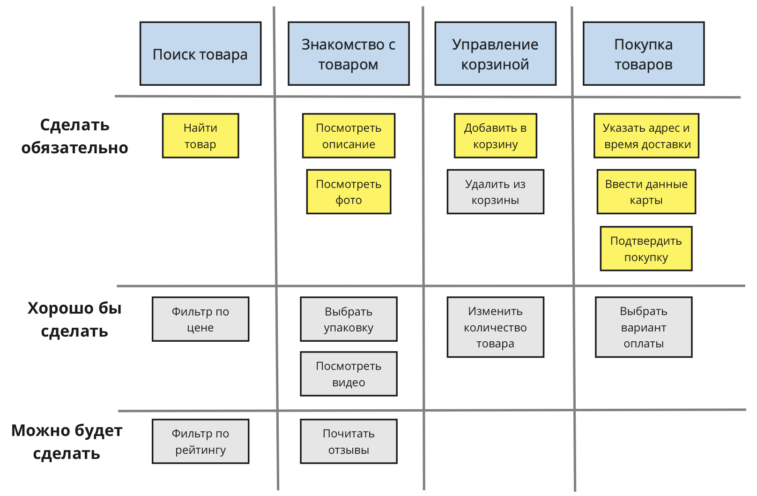
Итак, для начала убедимся, что этапы по каждому шагу расставлены по приоритету: маст-хэв опции должны быть сверху, а приятные мелочи — снизу. Затем возьмите изоленту и разметьте, какие этапы войдут в состав первого “релиза”.
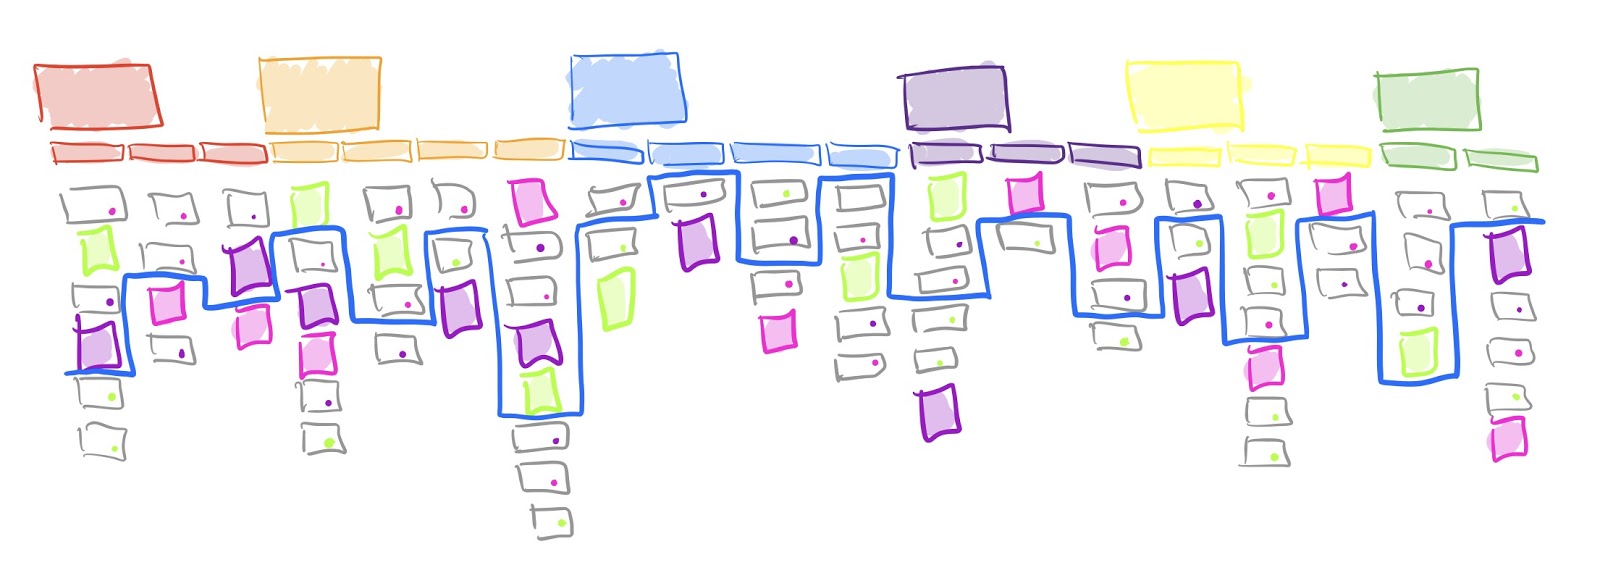
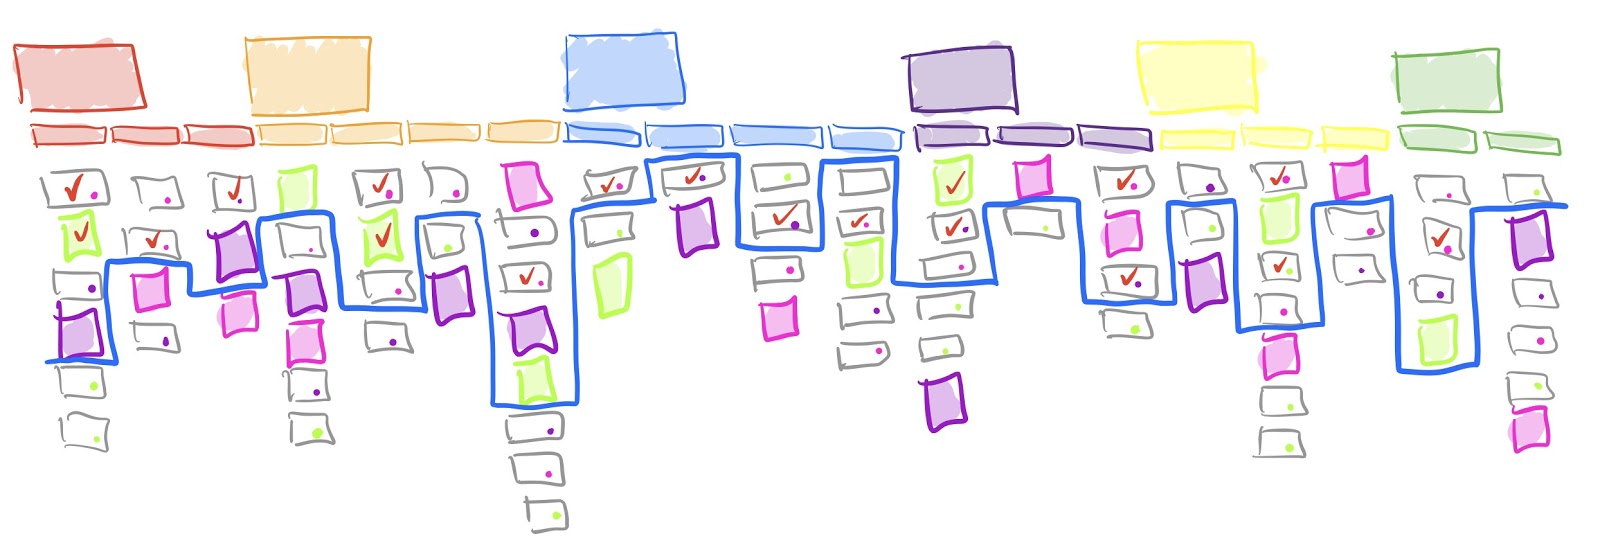
Если вам кажется, что в таком виде ничего не понятно, можно провести изолентой прямую линию и разместить все, что не вошло в первый релиз, под линию. Примерно так:
Шаг 2. Упорядочиваем хаос
Очень важно правильно организовать карту, чтобы вы могли ее читать. Просто слова на стене выглядят слишком хаотично. Нужно, чтобы на основании карты вы могли рассказать простую историю, вдаваясь в детали только при необходимости, если это важно.
Эпик vs. История vs. Задача
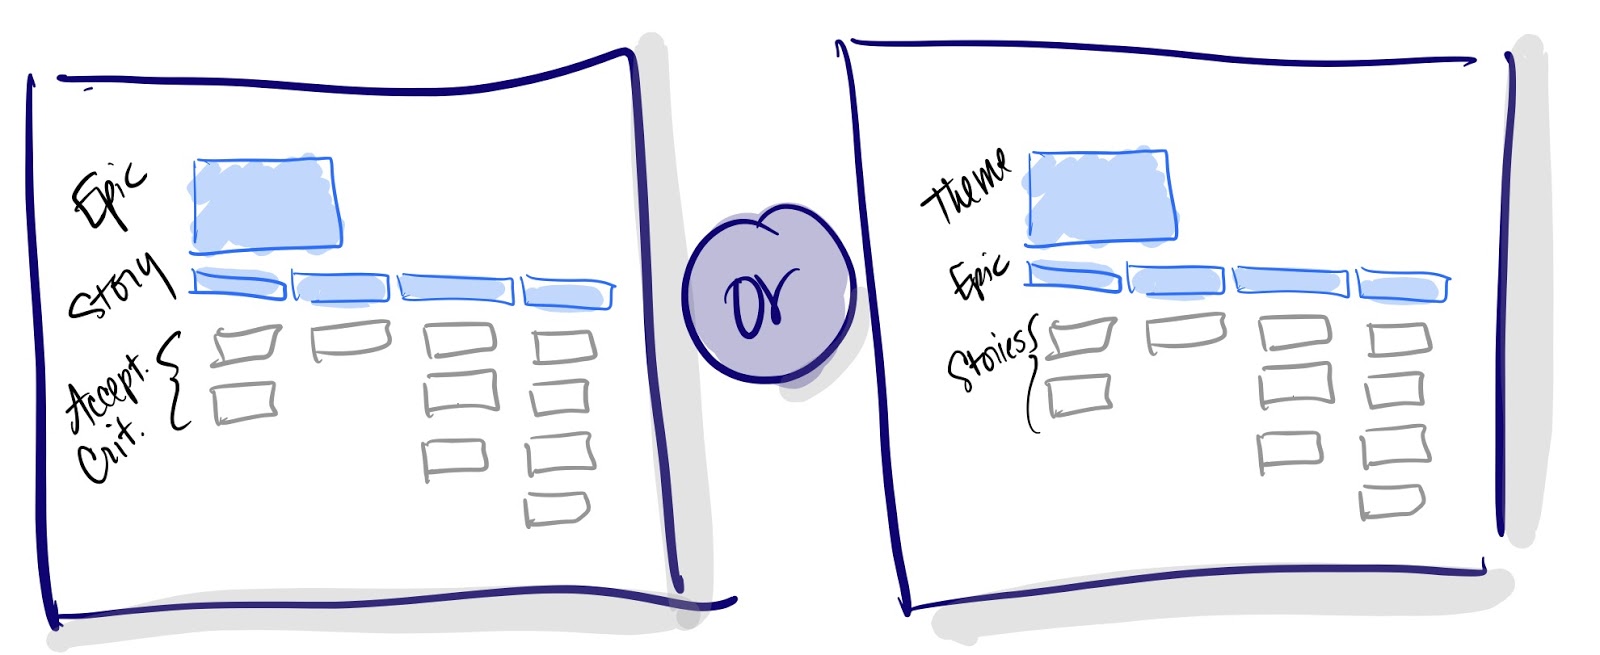
Итак, действия в верхнем ряду считаются эпиками, “шаги” — историями, а то, что ниже — задачами? Или верхний ряд это что-то еще, а шаги — это эпики, а опции — истории? Короче, это не важно. Делайте так, как удобно вашей команде и как правильнее для вашего продукта. Если “шаги” можно завершить в рамках одного спринта, то они ближе к историям. А если они огромные и могут растянуться на 2–3 спринта — то это скорее эпики. Повторюсь, делайте так, как лучше вашей команде.
Цветовое кодирование персонажей
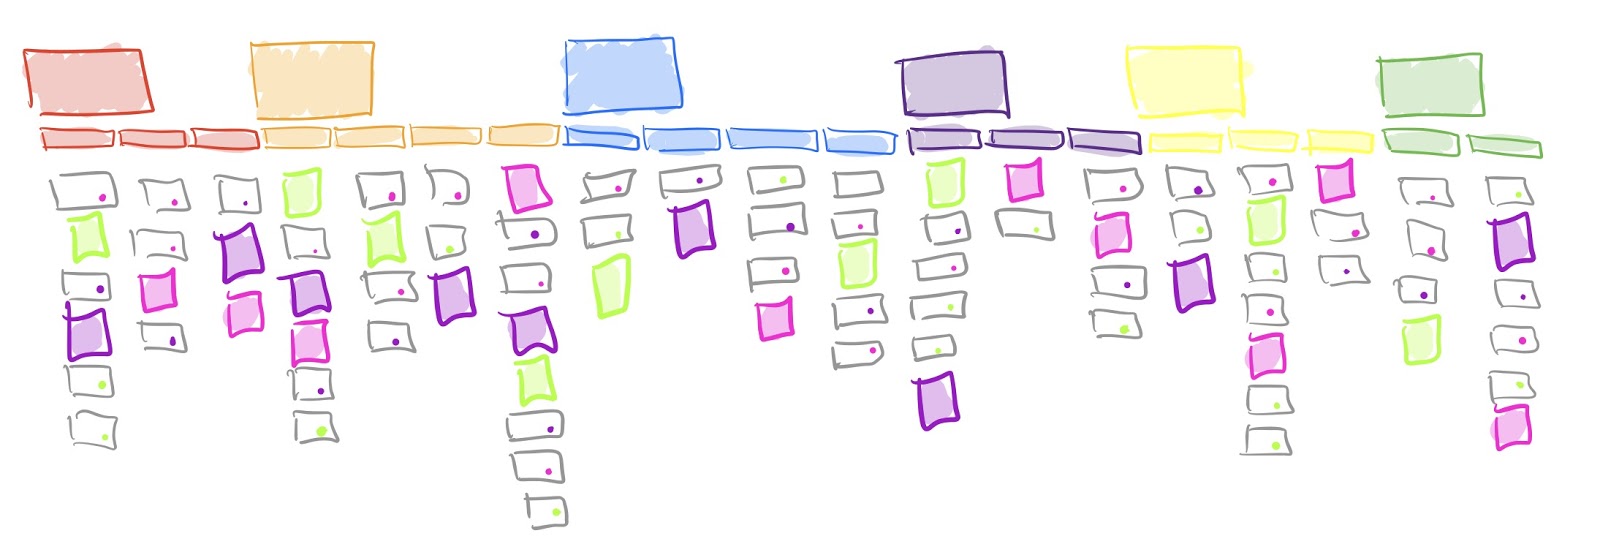
Цветовое кодирование пригодится, если вы разрабатываете продукт под разные сегменты пользователей или под разных персонажей. К примеру, вы создаете решения под веб, мобильные устройства и обращения по телефону. Цветные стикеры помогут внести ясность и сегментировать карту, как на рисунке ниже. На распечатанных тикетах можно ставить цветные точки. Не забудьте добавить легенду, чтобы ваша система кодирования была понятна всем и сразу.
Поддерживаем актуальность карты
Как и все в этом мире, карта со временем теряет актуальность. Нужно обновлять вашу карту историй на протяжении всего проекта. Когда вам в голову придут новые шаги и детали, добавляйте их на карту, обновляйте приоритеты, показывайте прогресс. Отличный способ продемонстрировать прогресс — отмечать сделанные карточки яркой галочкой.
Ну, вот и все. Несколько простых шагов — и вы превратили переполненный бэклог в живой ресурс, по которому ваша команда и все заинтересованные лица могут отслеживать развитие проекта. И все это мы сделали, когда проект был уже в работе! Надеюсь, это поможет вам и вашей команде создать более качественный продукт и реализовать правильные функции — на каком этапе работы вы бы ни находились.
Если вам понравилась статья и перевод, дайте нам знать — нажмите 👏 (можно “хлопать” несколько раз!)
А если у вас есть на примете какая-нибудь классная статья по UX и не только — скиньте нам ссылку, и мы будем рады над ней поработать.
Мобильное приложение «Заметки о психике» | Mental Notes
Подкидывает идеи, как привлечь, удержать и направить внимание пользователя.
Mental notes — это колода из 53 карточек с описанием психофизиологических моделей поведения людей, которые лежат в основе принципов веб-дизайна. Они помогают дизайнерам, проектировщикам лучше понять поведение пользователей и найти эффективные решения при создании дизайна интерфейсов.
Видеокурсы и практика по дизайну интерактивных систем: ux/ui, веб-дизайн и бренд-дизайн
Вас ждет плотная проектная практика по анимации интерфейсов, дизайну сайтов, а также мобильных и веб-приложений. Под руководством наставников в стиле «смотри и повторяй»!
Breezzly — это среда для тренировки digital-навыков. Здесь вы встретите комплекты видеокурсов в актуальных инструментах интерактивного дизайна, среди них Figma, Principle и Invision Studio. А каждый проект — это живой кейс с историей, собранной по горячим следам!
User Story Mapping | Планирование релизов при помощи карты историй
Такая вещь как “бэклог” в Скраме — это список пользовательских историй, которые команде предстоит реализовать, расставленных по приоритету. Такая система отлично помогает организовать работу команды на ближайшую перспективу, к примеру, во время планирования спринта. На одной из встреч по Скраму в Орландо Джефф Паттон описал метод составления карты историй. Это способ организации историй, который дает более широкий контекст и помогает в планировании релизов.
Ищите системное погружение в тему? Загляните в блог для дизайнеров.
Джефф не первый раз рассказывает о картах историй. Он уже писал об этом в 2005 и в 2008. Во время встречи по Скраму в Орландо, в ходе открытой сессии Джефф поделился своими свежими наработками по этому методы. Продуктовый бэклог — в сущности достаточно ограниченный инструмент. Пользовательские истории в нем расставлены по приоритету: высшего к низшему. А карта истории работает сразу в двух изменениях: показывает не только приоритет историй, но и то, как они связаны между собой и с более крупными задачами пользователей. Карта помогает команде понять, как можно скомпоновать истории, чтобы получить продукт, готовый к релизу.
Процесс начинается с того, что мы даем определение пользователям системы и перечисляем действия, которые они будут осуществлять. В своей статье 2005 года Джефф приводит пример софта для розничного магазина. Основные действия пользователей в этом примере следующие:
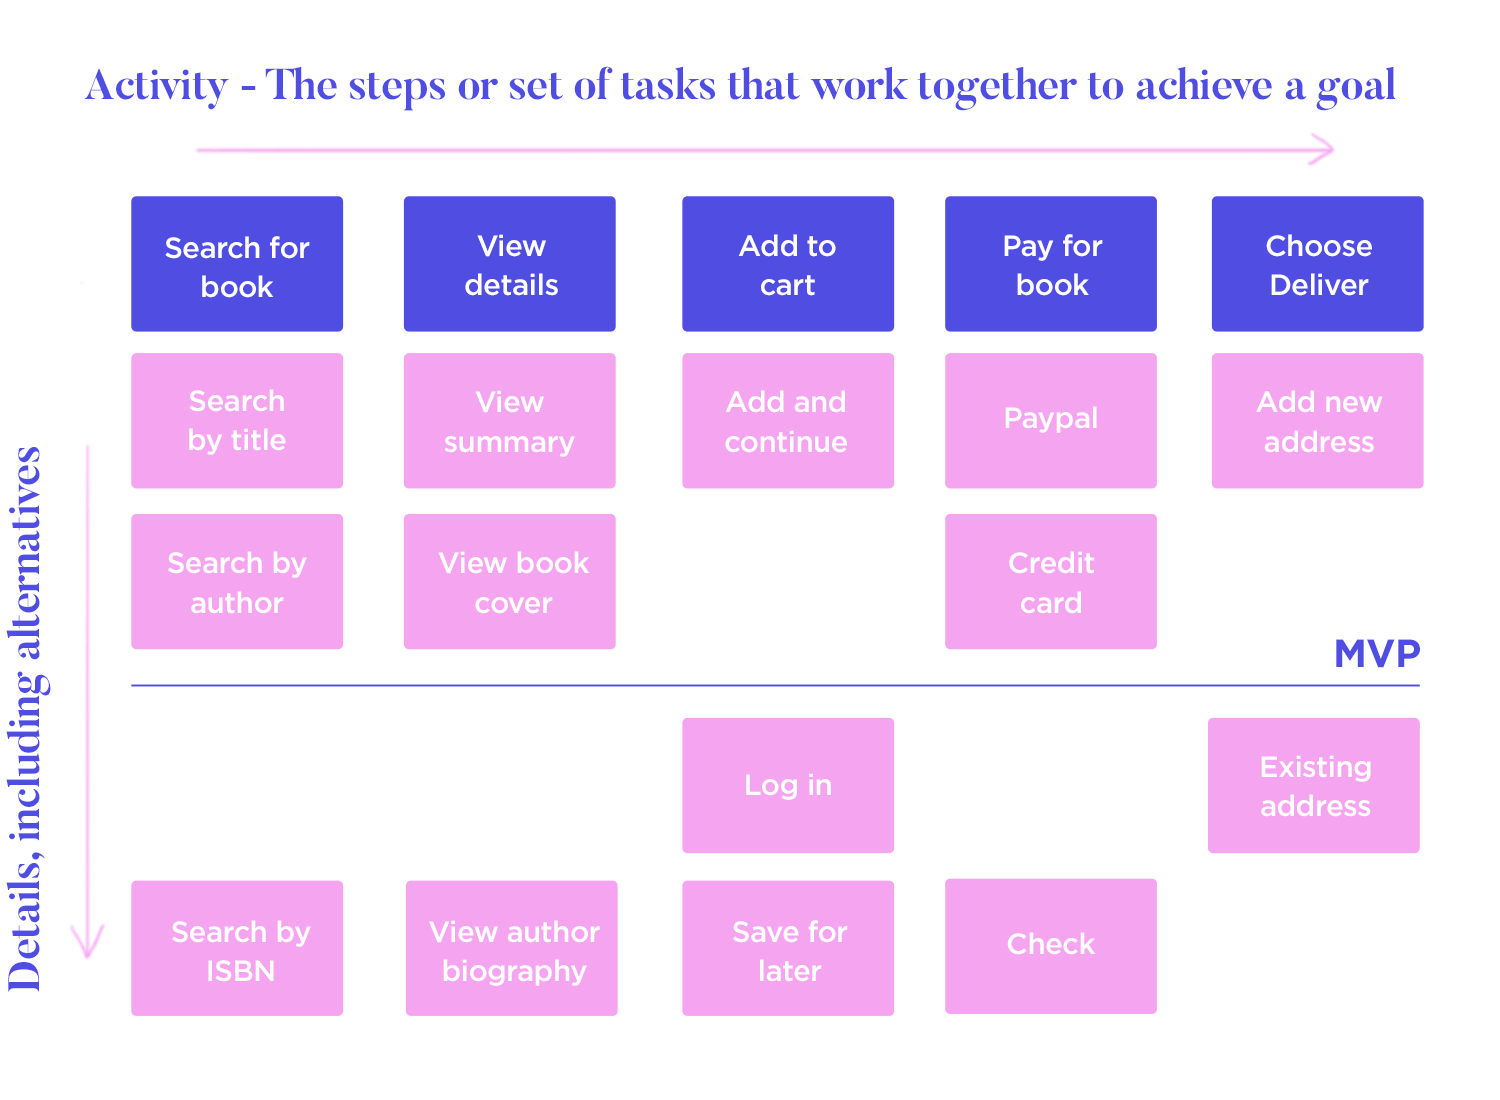
Майк Кон называет такой список действий “эпиками” (epics), а Джефф — хребтом карты историй. Эти действия описывают, не вдаваясь в подробности, всё, с чем система должна помочь пользователю. Записываем действия на карточках и выстраиваем слева направо в такой последовательности, как они обычно случаются в реальности. Джефф рекомендует расставлять действия в том порядке, в каком вы упоминаете их, когда рассказываете человеку со стороны про ваш бизнес.
Под каждым действием размещаем связанные с ним пользовательские истории — причем, чем важнее история, тем выше мы ее размещаем. Итак, на нашем хребте появились ребра. Каждая история ассоциируется с определенным действием пользователя и имеет приоритет. Чтобы визуально представить план релиза, нарисуем горизонтальную линию слева направо. Истории над линией войдут в релиз, а те, что ниже линии — нет. На самом деле, так можно планировать несколько релизов, разделяя карту на этакие “плавательные дорожки”.
А какие техники или инструменты используете вы, чтобы планировать релизы и при этом учитывать контекст, в котором существуют истории. Оставляйте комментарии и делитесь статьей.
Если вам понравилась статья и перевод, дайте нам знать — нажмите 👏 (можно “хлопать” несколько раз!)
А если у вас есть на примете какая-нибудь классная статья по UX и не только — скиньте нам ссылку, и мы будем рады над ней поработать.
Мобильное приложение «Заметки о психике» | Mental Notes
Подкидывает идеи как привлечь, удержать и направить внимание пользователя
Mental notes — это колода из 53 карточек с описанием психофизиологических моделей поведения людей, которые лежат в основе принципов веб-дизайна. Они помогают дизайнерам, проектировщикам лучше понять поведение пользователей и найти эффективные решения при создании дизайна интерфейсов.
Видеокурсы и практика по дизайну интерактивных систем: ux/ui, веб-дизайн и бренд-дизайн
Вас ждет плотная проектная практика по анимации интерфейсов, дизайну сайтов, а также мобильных и веб-приложений. Под руководством наставников в стиле «смотри и повторяй»!
Breezzly — это среда для тренировки digital-навыков. Здесь вы встретите комплекты видеокурсов в актуальных инструментах интерактивного дизайна, среди них Figma, Principle и Invision Studio. А каждый проект — это живой кейс с историей, собранной по горячим следам!
Руководство по User Story Mapping: Чистка требований, критика метода, 3/3
Инструменты проектирования
В третьей статье серии поговорим о чистке требований и ограничениях User Story Mapping. Суть метода и пользовательская история описаны в первой статье, алгоритм и рекомендации ведущему — во второй.
Чистка историй от ложных требований
Как бы нам не хотелось иного, но, опыт показывает — большинство из нас небрежно формулирует свои мысли и невнимательно к мыслям других. Из-за этого при записи в истории проникают лишние требования. В одних случаях бизнес будет излишне фантазировать о реальности, и записывающий истории может этого не заметить. В других пользователи будут перечислять свои хотелки в той мере, в которой смогут фантанированить готовыми решениями, увиденными в других продуктах, и записывающий истории может это пропустить. Технологи пронесут в истории свою жажду игры в новые технологии или страхи, и записывающий истории опять же может этого не заметить. Поэтому так важен этап с чисткой историй.
В чистке требований помогает углубление в понимание ценности каждой истории. Давайте разберём это на примере хотелок пользователя. Вот вымышленный пример чистки требований:
Клиент: Я хочу более быстрого коня. (Кто-то записал бы это в карту историй, но не мы).
Изобретатель: Хм… Какая интересная мысль. Скажите, а почему скорость коня так важна для вас?
Клиент: Я хочу доезжать до дома не за 2 часа, а за 15 минут.
Изобретатель думает: «Вот это уже задача». Ему грезится автомобиль или телепорт, но он продолжает: Кажется, кое-что начинает проясняться. Скажите, а почему важно доезжать именно за 15 минут?
Клиент: Ну… Понимаете, моя жена ненавидит, когда я приезжаю вспотевшим. Мне не хочется её расстраивать, душ я не люблю, да и некогда, сменных рубах немного, и времени стирать их нет. Я думаю, за 15 минут на скаку моя рубашка не успеет взмокнуть.
Изобретателю впору подумать о новом виде одежды?
Пример надуманный, но отражает суть процесса чистки требований. В череде бесед и интервью вы исследуете существующие нежелательные эффекты, и это путешествие может вас привести к неожиданным открытиям. Истории с требованиями к будущей системе при этом скорее всего значительно преобразятся.
Внимательный читатель конечно же заметил, что я поставил некоего «изобретателя» в роль сборщика требований. Это сделано намеренно. По моему убеждению лучшие результаты и меньшие потери информации достигаются, когда проблему постигает и ставит задачи тот, кто их будет решать. Так мы делаем в Byndyusoft, когда привлекаем всю команду проекта целиком к этапу аналитики будущего продукта (Product Discovery). Мы часто слышим от других участников рынка, что это утопия, что это не работает на масштабе, однако именно такое положение вещей помогает нам достигать качества.
История с авторизацией
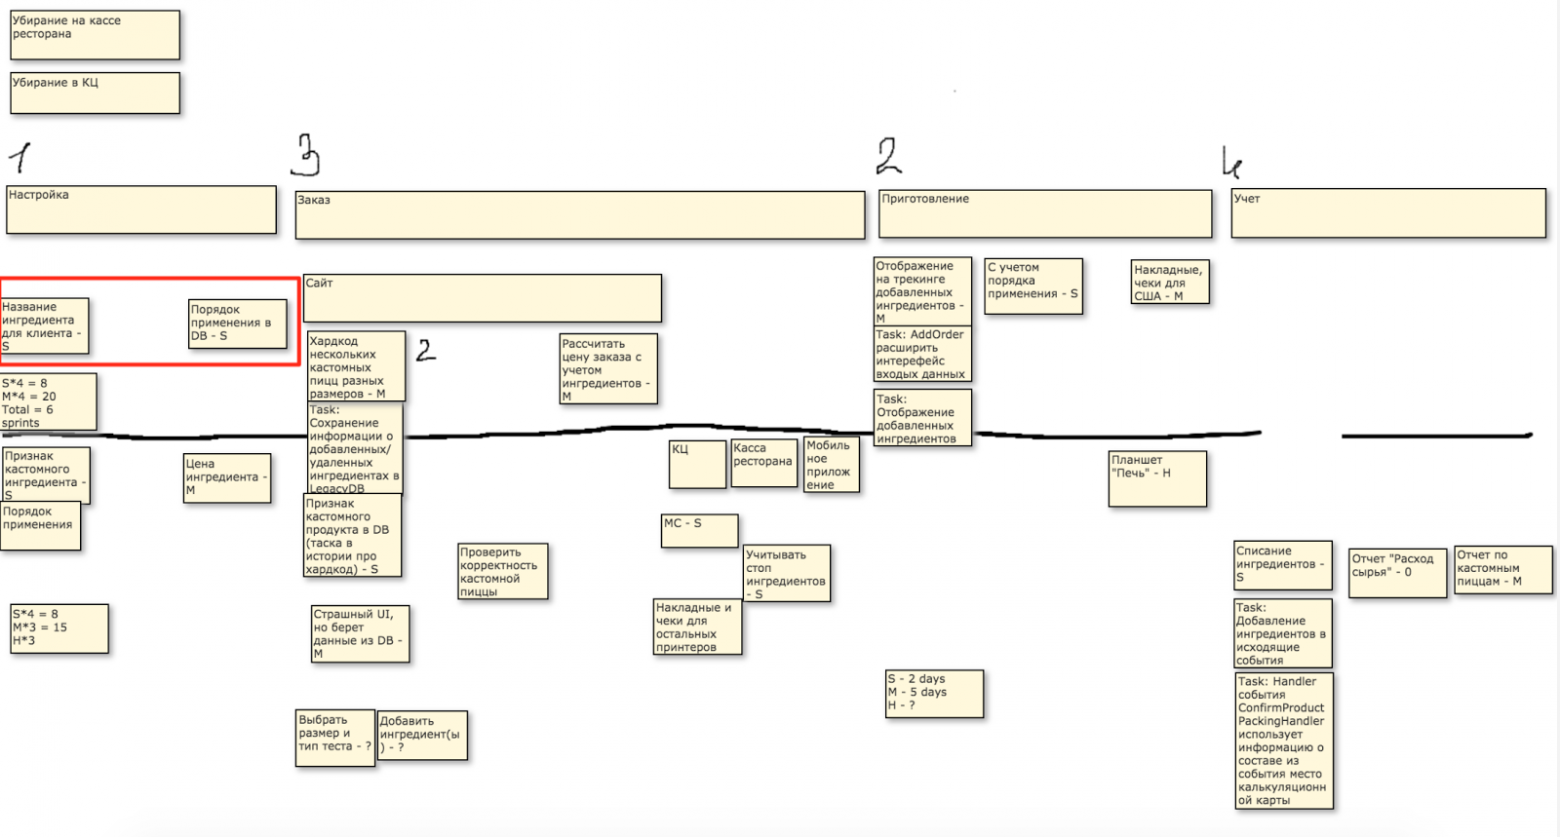
Возьмём кусочек карты с историями для разработки системы для организации хранения грузов на внешнем складе. Две представленые на картинке истории записаны для работника склада, использующего терминал сбора данных (ТСД). Терминал показывает предстоящие задачи на размещение и извлечение грузов и помогает регистрировать перемещения грузов.
Рассмотрим первую историю: «Работник склада авторизуется на терминале, чтобы начать работу» и попробуем потестировать выбранное действие и ценность на обоснованность. Сразу отмечу, что истории про авторизацию многим кажутся самоочевидными, их редко подвергают сомнению, полагая, что регистрация и вход настолько естественны для любого цифрового приложении, что тут и думать нечего. Подобная предвзятость угрожает в лучшем случае потерей хороших решений, в худшем — наградит вас всеми последствиями культа карго.
Для проверки истории мы задаём серию вопросов. Процедура похожа на метод «пяти почему». Проверим причинно-следственную связь между действием и ценностью. Пойдём от обратного: «Если работник склада не авторизуется, почему он не сможет начать работу»? Например, нам отвечают так: «потому что без указания того, кто взял устройство, мы не узнаем какие задачи, ему предложить. Кроме того, мы хотим относить проделанную работу к сотруднику, чтобы вести аналитику по каждому из них». Этот ответ точнее описывает ценность, чем предыдущее «чтобы начать работу», историю уже можно уточнить. Но мы продолжим беседу. «Почему важно разделять предстоящие задачи между сотрудниками заранее?». «Потому что из-за специфики бизнеса каждый водитель-экспедитор развозит свою кучку грузов по своим клиентам, и каждый работник склада собирает какое-то количество таких кучек. Два разных работника склада никогда не собирают одновременно одну и ту же кучку грузов». Вы можете пойти дальше с вопросами «В чём заключается специфика бизнеса, что требует разграничения между экспедиторами» или «Почему существующий процесс исключает перекрёстную работу сотрудников склада?». Либо можете остановиться здесь, решив, что пока не хотите изменять ту часть системы, и записать новую историю: «Работник склада берёт только свои задачи, чтобы не делать лишнего и отвечать за то как они сделаны».
Обратите внимание на то, что произошло. Для этой истории теперь можно предложить варианты решения, отличные от авторизации через пару телефон-пароль. Например, мы можем ввести принцип, по которому и клиенты системы, и сотрудники склада будут распределены к зонам погрузки. Тогда работник склада, принимаясь за работу, укажет на ТСД свою зону и получит свои задачи. Либо мы можем выбрать вариант исполнения истории с входом. Важно, что история продвинулась на один уровень понимания глубже и лишилась излишних предписаний.
Что мы ещё здесь видим. Что на подобные вопросы зачастую не ответить без экспертов со стороны бизнеса, для которого разрабатывается решение. Делая USM в одиночку, вы рискуете перефантазировать. Даже если вы хотите позже проверить карту в кругу стейкхолдеров, потеряется самое главное — процесс рассуждений. Вам придётся его воссоздать заново, то есть потратить больше времени.
История с кнопкой
Давайте разберёмся со второй историей. Изначально она звучала так: «Работник склада синхронизирует ТСД, чтобы получить задания с сервера». Как мы сразу замечаем здесь две подробности, недопустимые на уровне историй: «ТСД» и «сервер». Им место в карточках детализирующих задач на релиз, но не в истории. Оставляя такие детали в истории, мы надеваем шоры, мешающие находить хорошие решения.
Сейчас этап чистки, самое время отказаться от лишних ограничителей. Переписываю историю «Работник склада запрашивает синхронизацию, чтобы получить новые задания». Если присмотреться, то мы «программируем» этой историей такую последовательность точек принятия решений:
Другими словами, человеку каждый раз потребуется понимать пора ли подавать команду, затем таки подавать её и, наконец, дождавшись результата, вернуться в исходную ситуацию. Как человек поймёт пора ли подавать команду? Если ответа на этот вопрос нет у проектирующих, это останется загадкой и для пользователей системы. Описанная последовательность имеет несколько лишних точек принятия решений. В точке 1 человек может не понять, что пора подавать команду — в описанной версии истории критерий наступления нежелательного состояния невидим. В точке 2 — человек может не нажать кнопку, потому что будет занят в этот момент чем-то более важным, или его отвлекут.
Почему бы не отказаться от лишних точек принятия решения? Например, перейдя к последовательности:
Запишем новую историю: «Работник склада понимает, что задачи подозрительно долго не обновлялись, и что предпринять, чтобы исправить ситуацию».
История лишилась лишних деталей и полностью поменяла способ работы системы, уйдя от «кнопочного» варианта.
Критика метода и его ограничения
Связанность требований с решениям
Как вы могли заметить, в разборе двух историй выше этап чистки требований содержал не только сбор требований, но и подбор подходящих решений. Смешивание сбора требований с процессом проектирования несомненно затрудняет создание карты, но и приводит к лучшим результатам.
Такое положение вещей — следствие формата историй, то есть сразу заложено в методе. Истории содержат «действие», и иногда выбор подходящего действия —трудная задача. В моей практике встречались истории-тупики типа этой:
Что именно должен делать логист к моменту записи истории было решительно непонятно. В этом состояла задача на проектирование.
Со временем я пришёл к мысли, что это нормальная ситуация, и можно жить с неполными историями. Такие неполные истории формулируют будущие задачи на проектирование.
Неформальность и неоднозначность
К минусам метода можно также отнести его неформальность и, как следствие, нетребовательность к отточенным формулировкам. Карты, созданные двумя разными группами, работающими параллельно, скорее всего получатся сильно разными. В первой статье серии я постарался дать как можно больше конкретных примеров историй и нотационных договорённостей, которые помогают избежать недостатков в форме.
Никакая карта не гарантирует однозначности её прочтения. Одна и та же карта, составленная до уровня историй, будучи выданной двум разным командам, будет прочитана по-разному, что приведёт и к двум разным реализациям. В последнем однако нет большой беды, так как никто заранее не знает каким должен быть разрабатываемый софт, лишь бы решал поставленные задачи. Обе команды смогут прийти к успешным решениям, если продолжат общение с заинтересованными лицами и дополнят своё понимание их ответами.
То есть с этими недостатками легко бороться, вовлекая команду во встречи со стейкхолдерами и создание карты.
Краткость
Этот недостаток является и несомненным плюсом метода — прочитать карту гораздо быстрее, чем изучить талмуд технического задания. Краткость проявляется как недостаток тогда, когда в проект приземляется новый человек. Метод не требует доскональных формулировок, а люди устроены так, что часть «внутренних» знаний о бизнесе, окружении системы и прочем не попадают в запись, потому что присутствовавшие при её создании разделяли общее информационное поле. Человек, читающий карту, но не создававший её, может не погрузиться в дискурс. Кому-то из команды придётся погружать его, рассказывая более подробные истории.
Опасность излишнего постулирования
Как и любой метод моделирования реальности User Story Mapping помогает нам придумывать модель, но важно не забывать, что это модель, а не реальность. Сторимапинг базируется на модели пользователя, придуманной нами. Содержит предположения проблем пользователя — тоже модель. Содержит предположения о решениях этих проблем — еще одна модель. Модель на модели и моделью погоняет. Важно не забывать этого и проверять их на адекватность реальности.
JTBD vs USM
Один раз нас спросили, почему мы пользуемся «устаревшими» пользовательскими историями, а не методом JTBD и свойственной ему Job Story. Методы имеют сходства и различия, но речь не идёт о том, что один устарел, а другой пришёл ему на смену. Давайте разберёмся.
Когда презентуют метод JTBD чаще всего критикуется модель персоны, «не помогающую» ухватить суть почему люди предпочитают одни продукты другим. Важным прорывом JTBD стало перевод фокуса с модели персоны на контекст.
И конкурирующими решениями этой задачи будут вязкие молочные коктейли, «длинный» кофе, пачка снэков, злаковые батончики. При этом ничто не мешает использовать более узкий контекст в момент планирования отдельных частей продукта. Например, для людей пользующихся площадками с онлайн-курсами, могут быть такие разные контексты входа:
Обратите внимания, здесь нет никаких характеристик персон, здесь их отношение, контекст, в котором легко может оказаться любой человек.
Если присмотреться, центральная часть как в JTBD, так и в USM — ценностная, то есть важнее всего полезное действие, которое необходимо человеку в той или иной ситуации. Оба метода способны работать как на микро уровне — истории, описывающие часть программного обеспечения, так и на макро — истории, описывающие продукт целиком. Поэтому можно выбирать любой из методов или сочетать их, применять сильные стороны каждого.
Для людей более глубоко изучивших JTBD дам ещё несколько пояснений. Вы ничего не потеряете пропустив эту часть статьи, если только начинаете применять один из методов. Я буду детальнее рассмотривать возражения против пользовательских историй одного из апологетов Job Stories, критикующего User Story.
Как построить карту историй (user story mapping), если проект уже в работе
Копирайтер, UX-писатель, редактор и контент-стратег. Увлекается переводами в tech-тематиках. Помогает собрать гибкую контент-стратегию, улучшить коммуникации с пользователями и проработать tone of voice. Работала с UsabilityLab и «iSpring».
Авг 12, 2018 · 6 мин читать
Скорее всего вы думаете: “Проект уже запущен, неужели нужно все начинать сначала? И выбросить на ветер всю проделанную работу?” И вот вы все размышляете, как story mapping мог бы усилить ваш проект, и стоит ли оно того…
Что ж, ребята, хорошие новости! Даже если ваш проект уже в работе, вы все еще можете воспользоваться методом story mapping. Честно. Конечно, придется поработать, но оно того стоит.
Шаг 1. Строим карту (story map)
Начните с того, что имеете
Для начала, соберите в кучу те пользовательские истории, которые у вас уже есть. Изучите истории, над которыми сейчас работают другие команды и поместите их на свою доску. Только пообещайте, что не будете воровать у них карточки: перепишите все по-честному на новые карточки.
Интересуетесь свежими статьями по продуктовому дизайну (UX/UI)? 🚀
Если вы используете JIRA, VSTS/TFS или какой-то другой инструмент, просто распечатайте все свои тикеты. Да, даже закрытые (поймете, зачем они нужны, когда мы дойдем до шага “Заполнить пробелы”).
Далее, нужно рассортировать истории по группам, чтобы при необходимости вы быстро могли найти нужную. Не очень-то удобно перебирать стопку из 150 карточек в поисках той самой истории.
Сразу предупреждаю: пользовательские истории обычно бывают фичами/существительными, а нам для построения карты историй нужны глаголы/действия/шаги. Поэтому не стоит брать за основу существующий бэклог: лучше начать с создания простейшей карты пути пользователя.
Создайте карту пути пользователя (journey map)
Эта карта (journey map) будет скелетом карты историй (story map). Вам будет проще, если вы начнете работать с укрупненной картой пути пользователя, пока не вдаваясь в детали. Наша первая цель — наметить общий маршрут.
Возьмите пачку стикеров, маркер и изоленту и забейте кусок стены. Для начала спросите себя: какой путь проходит пользователь в продукте? С чего он начинает? Самый простой подход — взять за основу путь основного персонажа. Каждый шаг пути мы будем писать на отдельном стикере.
Используйте существующие тикеты
Если вам встретятся какие-то шаги, которые уже есть в карточках пользовательских историй, не дублируйте их на стикерах, а просто приклейте карточки на скотч. Возможно, большинство шагов у вас уже есть. Если так, круто.
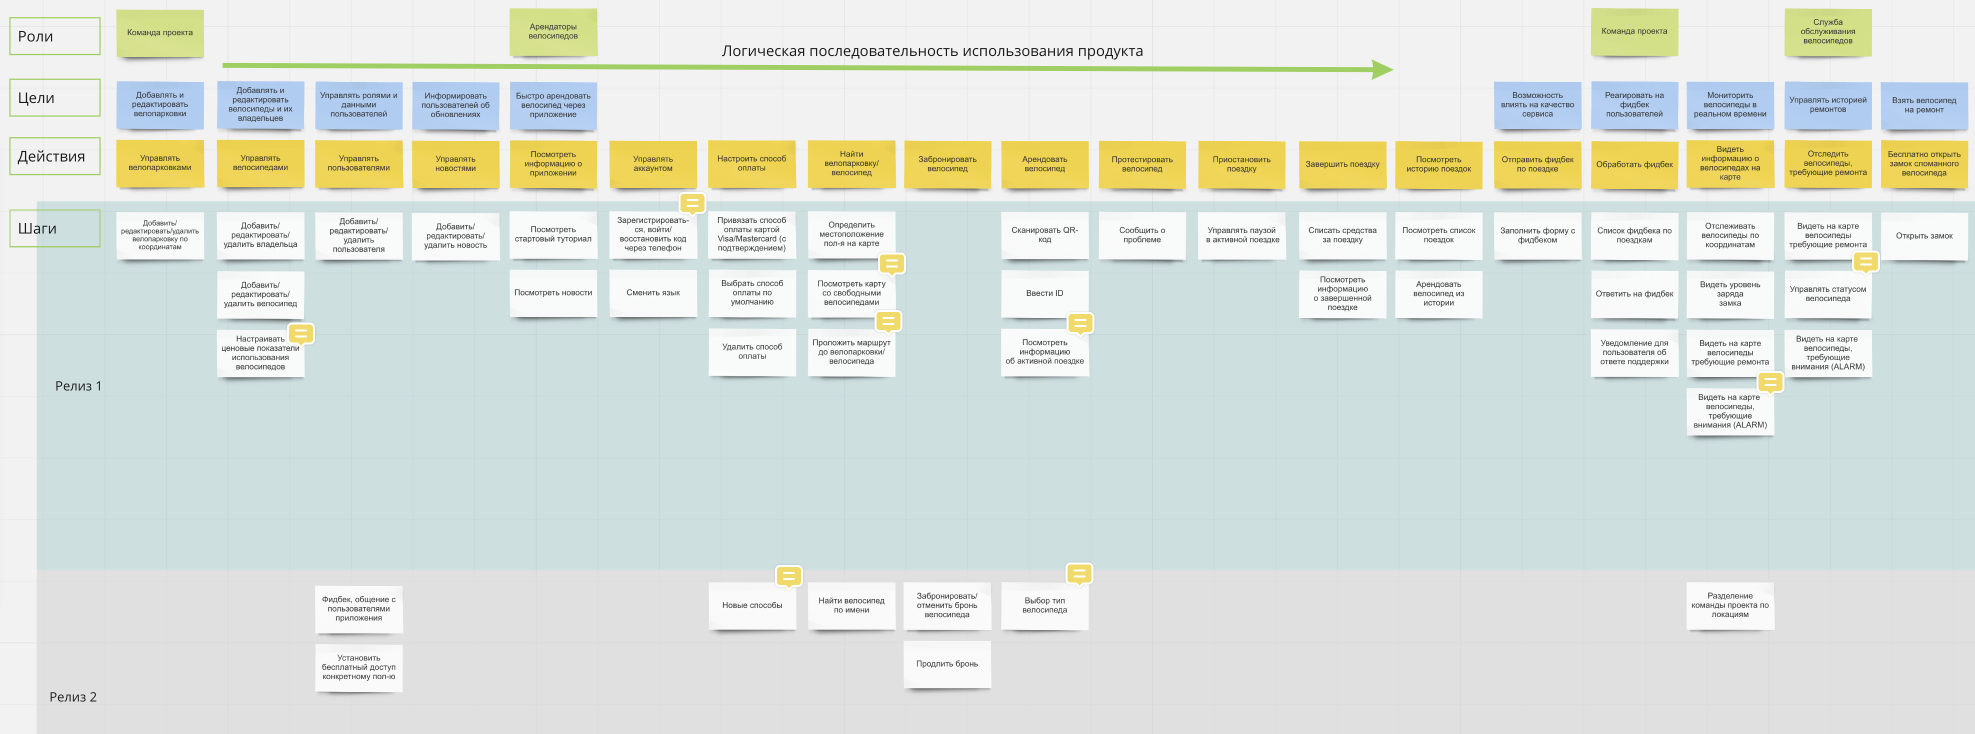
Вот так будет выглядеть ваша карта. Белые карточки — это распечатанные пользовательские истории из физического бэклога или из JIRА. Цветные квадратики — это новые стикеры.
Заполните пробелы
Скорее всего вы обнаружите пробелы в вашей карте историй. Или может оказаться, что вы упустили некоторые важные действия, шаги или мелочи, которые любят всплывать перед самым релизом.
Тут-то и происходит все волшебство. Проблема бэклога на 150 тикетов в том, что все они разные по размеру и очередности. Здесь мы берем за основу 150 историй и равномерно распределяем по пути пользователя. С таким подходом легко обнаруживаются проблемные места. Вещи, которые мы считали никак не связанными, на самом деле оказываются взаимозависимыми. Мы обнаруживаем небольшие истории, которые можно объединить и легко закрыть в пределах одного спринта — и создать полезную фичу.
Как только соберете всю карту, начните искать темы, или, как мы называем их, “действия”. Это такие большие задачи, которые может осуществить пользователь и которые могут включать множество шагов. Сюда относятся такие крупные вещи, как “управлять письмом” или “обновить”.
Определите состав “релиза”
Да, релиз в кавычках. Все потому, что мы хотим разделить планирование и релизы. Слово “релиз” — это просто понятие, которое я использую чтобы разграничить интервалы планирования. Можете называть это “маркетинговыми релизами” или точками отсчета. Это не обязательно физические релизы. Вы можете постоянно совершенствовать продукт и копить “релизы”, а потом выпустить все большим блоком. Или вы можете потихонечку, без огласки выпускать мелкие улучшения и постепенно тестировать их на пользователях. Не важно какой вариант вы выберете, главное, чтобы он подходил вам и команде.
Итак, для начала убедимся, что этапы по каждому шагу расставлены по приоритету: маст-хэв опции должны быть сверху, а приятные мелочи — снизу. Затем возьмите изоленту и разметьте, какие этапы войдут в состав первого “релиза”.
Если вам кажется, что в таком виде ничего не понятно, можно провести изолентой прямую линию и разместить все, что не вошло в первый релиз, под линию. Примерно так:
Шаг 2. Упорядочиваем хаос
Очень важно правильно организовать карту, чтобы вы могли ее читать. Просто слова на стене выглядят слишком хаотично. Нужно, чтобы на основании карты вы могли рассказать простую историю, вдаваясь в детали только при необходимости, если это важно.
Эпик vs. История vs. Задача
Итак, действия в верхнем ряду считаются эпиками, “шаги” — историями, а то, что ниже — задачами? Или верхний ряд это что-то еще, а шаги — это эпики, а опции — истории? Короче, это не важно. Делайте так, как удобно вашей команде и как правильнее для вашего продукта. Если “шаги” можно завершить в рамках одного спринта, то они ближе к историям. А если они огромные и могут растянуться на 2-3 спринта — то это скорее эпики. Повторюсь, делайте так, как лучше вашей команде.
Цветовое кодирование персонажей
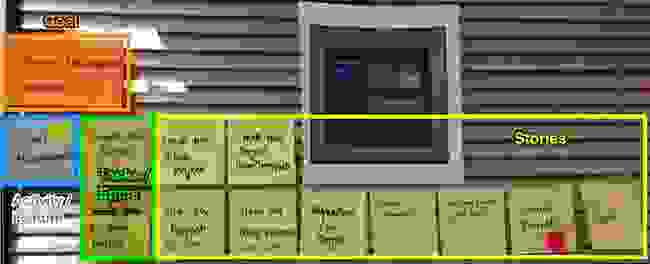
Цветовое кодирование пригодится, если вы разрабатываете продукт под разные сегменты пользователей или под разных персонажей. К примеру, вы создаете решения под веб, мобильные устройства и обращения по телефону. Цветные стикеры помогут внести ясность и сегментировать карту, как на рисунке ниже. На распечатанных тикетах можно ставить цветные точки. Не забудьте добавить легенду, чтобы ваша система кодирования была понятна всем и сразу.
Поддерживаем актуальность карты
Как и все в этом мире, карта со временем теряет актуальность. Нужно обновлять вашу карту историй на протяжении всего проекта. Когда вам в голову придут новые шаги и детали, добавляйте их на карту, обновляйте приоритеты, показывайте прогресс. Отличный способ продемонстрировать прогресс — отмечать сделанные карточки яркой галочкой.
Ну, вот и все. Несколько простых шагов — и вы превратили переполненный бэклог в живой ресурс, по которому ваша команда и все заинтересованные лица могут отслеживать развитие проекта. И все это мы сделали, когда проект был уже в работе! Надеюсь, это поможет вам и вашей команде создать более качественный продукт и реализовать правильные функции — на каком этапе работы вы бы ни находились.
User Story Mapping – инструкция по применению
USM на примере: как построить и как использовать для формирования бэклога продукта. Четвертая статья из серии инструкций по инструментам, которые помогут сделать лучше ваши продукты и жизнь клиентов.
User Story Mapping (USM, карта пользовательских историй) – инструмент целостного проектирования продукта на основе пользовательского пути.
Для чего применяется USM?
Как построить User Story Mapping?
Для построения USM вам потребуется:
Ваша задача — спроектировать по шагам действия пользователя в продукте на основе его реального сценария.
Описания продуктовых практик и подходов, сгруппированные по 7 темам, от Дмитрия Кустова
Темы: анализ рынка, сегментация, описание и исследование клиентов, проектирование решений, управление бэклогом, управление продуктом, метрики.
Рассмотрим USM на примере
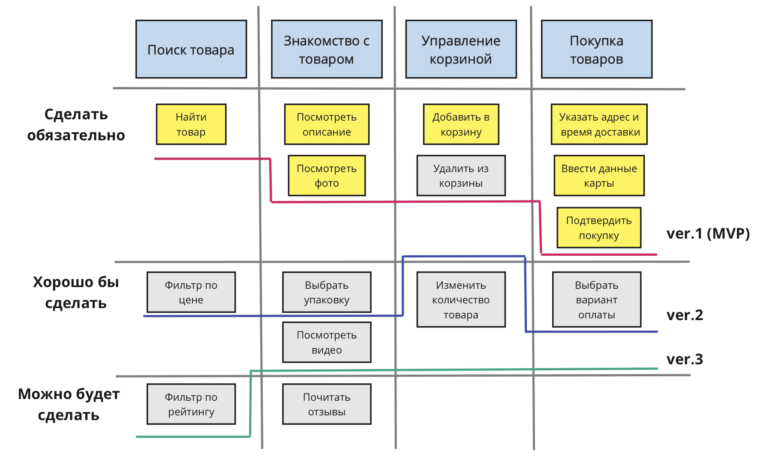
Магазин цветов решил запустить сайт. Визуализируем опыт клиентов с помощью техники USM.
Обратите внимание, что итоговый приоритет определяется сценарием пользователя. Мы идем слева направо, и только затем по версиям – ведь мы хотим принести больше ценности пользователю. А для пользователя, как правило, ценность тем выше, чем более полно наш продукт закрывает его сценарий.
User Story Mapping – мощный инструмент, позволяющий команде разработки за пару часов взглянуть на бэклог продукта глазами пользователя.
Мы учим строить USM на тренинге «Владелец продукта: краткий курс выживания».
P.S.: Серию статей про продуктовые инструменты Роман Баранов и Дмитрий Кустов пишут, используя технику pair writing.
Подключайтесь к Telegram-каналу, где Дмитрий делится практиками и опытом.
The Ultimate Guide to User Story Mapping [2021 Guide]
Whether you’re planning your first user story mapping session or you’ve got a few under your belt, it can be a little overwhelming 🤯
Most product managers and Agile teams could benefit from a deeper understanding of user story mapping so they can create a more customer-centered view of the work that needs to be done.
Plus, over the last 15 years (since user story maps started to become a thing thanks to Jeff Patton), some of the processes and terms have evolved and there are new tools and apps that can make your life a whooooole lot easier.
We’ve put together this ultimate guide with all the info you need to get up to speed on the latest user story mapping definitions, techniques, and tools. Let’s start with some basics 👇
What is user story mapping?
Here’s a super simple user story mapping definition:
User story mapping is a visualization of the journey a customer takes with a product, from beginning to end. It includes all the tasks they’d typically complete as part of that journey.
To expand on that, user story mapping takes all your user stories (across all your persona types) and assigns them to epics in the order that delivers the most value to the customer. From there, stories are prioritized and mapped to releases.
“User story mapping is a facilitated, curated conversation that brings everyone along for the journey. It’s an opportunity for the product manager to brain dump their insights (who is deep in this stuff day in, day out) and get it into the minds of the team who are about to deliver on it.”
What isn’t user story mapping?
While user story mapping might have a few things in common with other methods, it’s not the same as journey mapping or event storming.
User story mapping vs journey mapping
Journey mapping is a UX tool that helps teams visualize the journey a customer needs to take so they can accomplish a goal. Journey maps focus on the journey for a single persona or customer, based on the persona’s specific scenario and expectations. This is useful for aligning the team, getting them focused on the user experience, and basing decisions. Unlike user story mapping, it’s focused on the user experience and the vision for the product.
User story mapping vs event storming
Event storming involves running a workshop with key business stakeholders present. The attendees write down business events (things that happen), commands (things that trigger the events), and reactions (things that happen as a result) on sticky notes. These notes are organized sequentially to map out the business processes. Unlike user story mapping, which is focused on refining the backlog to deliver a working product for the user, event storming is more high-level and done early in the product planning process.
User story mapping for agile teams
User story maps can be useful for all agile teams, whether they’re full SAFe or Kanban, but especially if they’re working on a complex product.
User story mapping is a useful technique for agile because it can help your teams deliver working software and respond to change.
This fits right in with the Agile Manifesto.
And let’s not forget the number one agile principle:
“Our highest priority is to satisfy the customer through early and continuous delivery of valuable software.”
User story mapping puts the focus on the user, ensuring that the backlog contains stories that add real value to the customer by helping them achieve their goals.
Plus, story mapping allows your team to plan and order their work so that it delivers the highest value to customers first.
The anatomy of a user story map
User stories
A user story is a goal, from the user or customer’s perspective. It’s an outcome they want. It’s also the smallest unit of work in an agile framework with the purpose of articulating how a piece of work will deliver value back to the customer.
User stories usually follow the structure:
As a [persona type], I want to [action] so that [benefit].
For example:
Tip: it’s a good idea to focus on just one type of user/persona during your user story mapping session. If it’s your first session, choose your most ideal customer type and write our user stories that will deliver value to them. You can always come back to your other users in future.
Epics
Stories can be associated with epics.
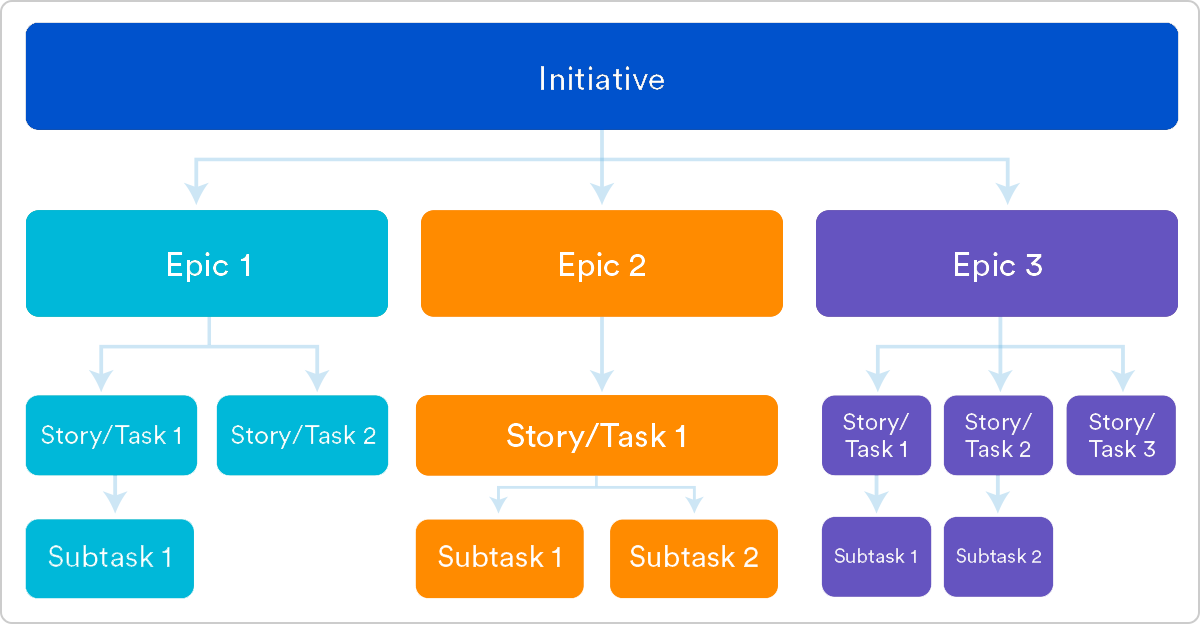
Epics have different meanings depending on who you talk to. But for the sake of this article, we’ll define epics as bigger, overarching stories or steps in the journey that contain user stories. An epic on its own isn’t small enough to become a work item or development task, but the stories it contains probably are.
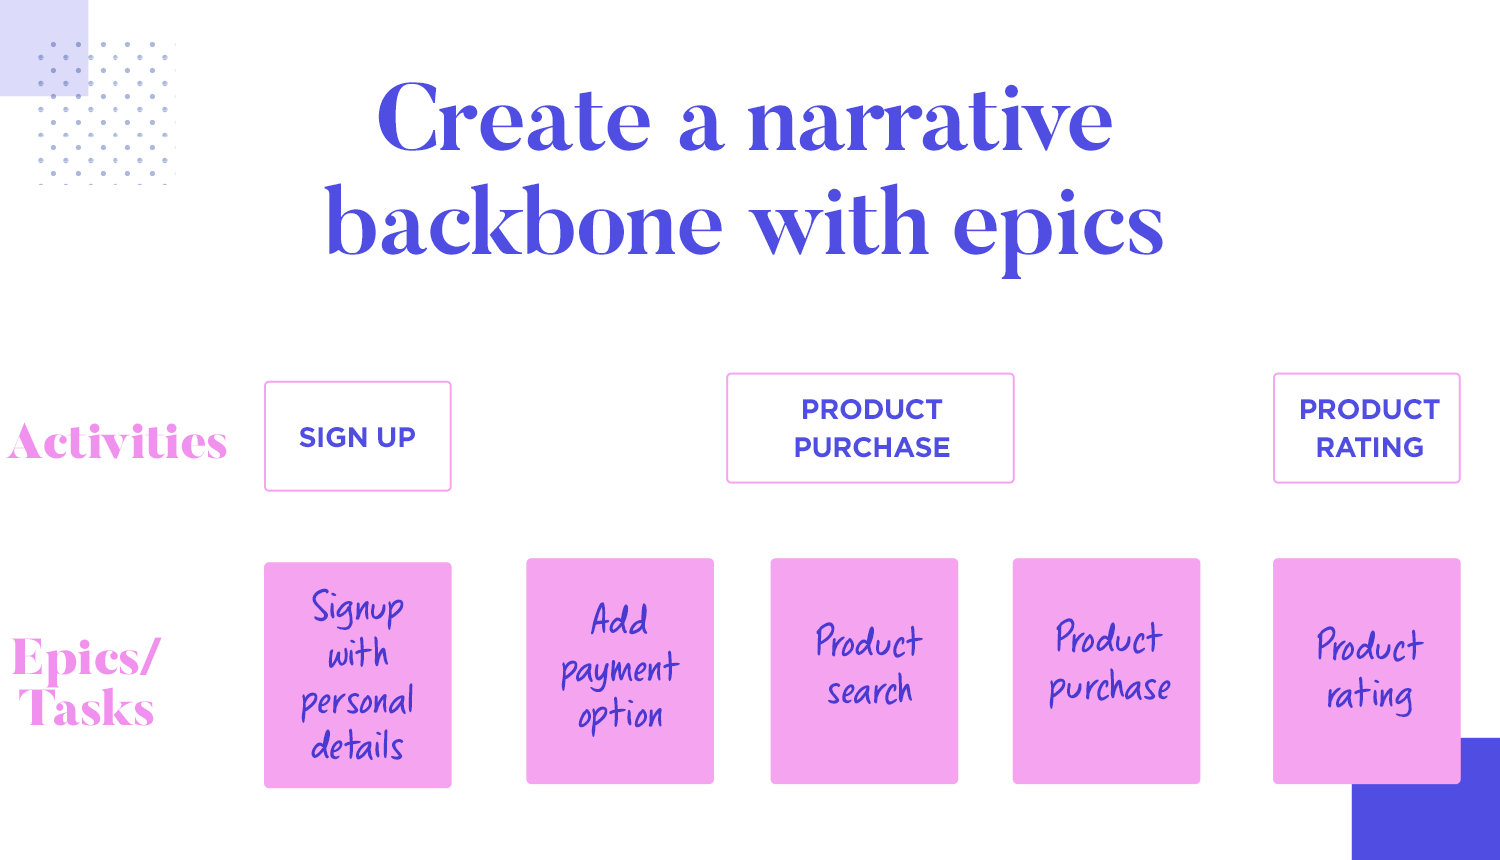
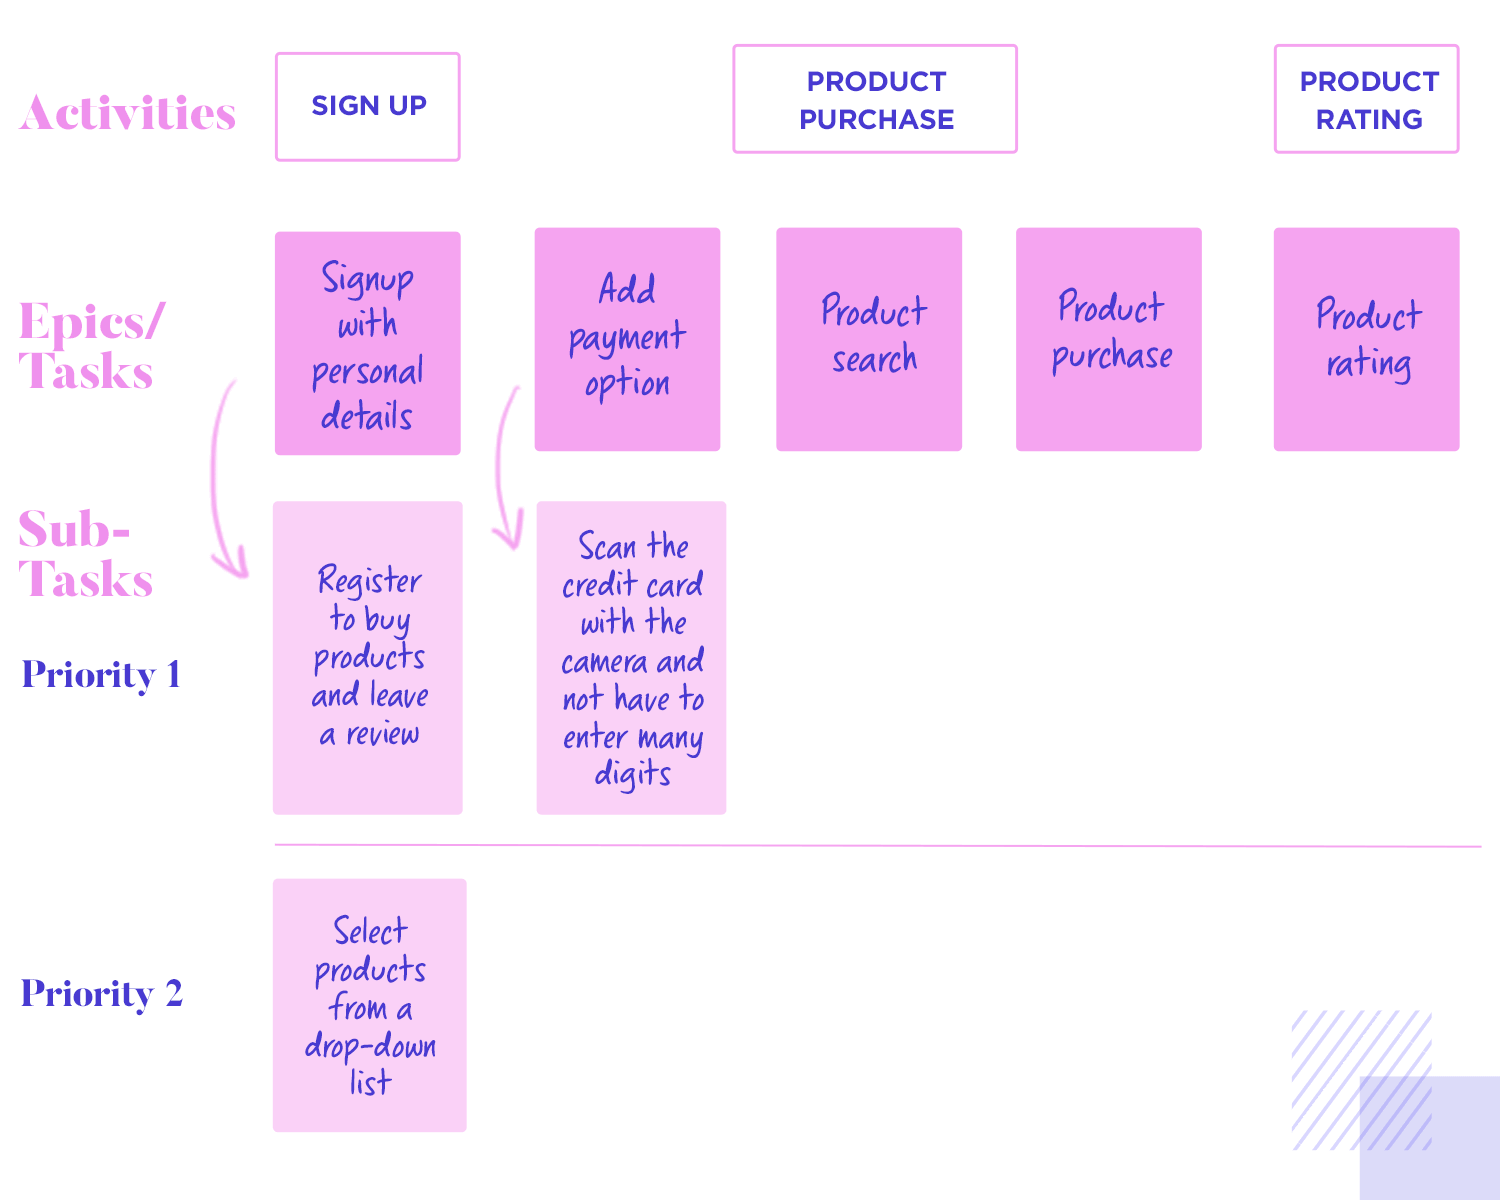
For example, the epic “Sign up” might contain the following user stories:
The backbone
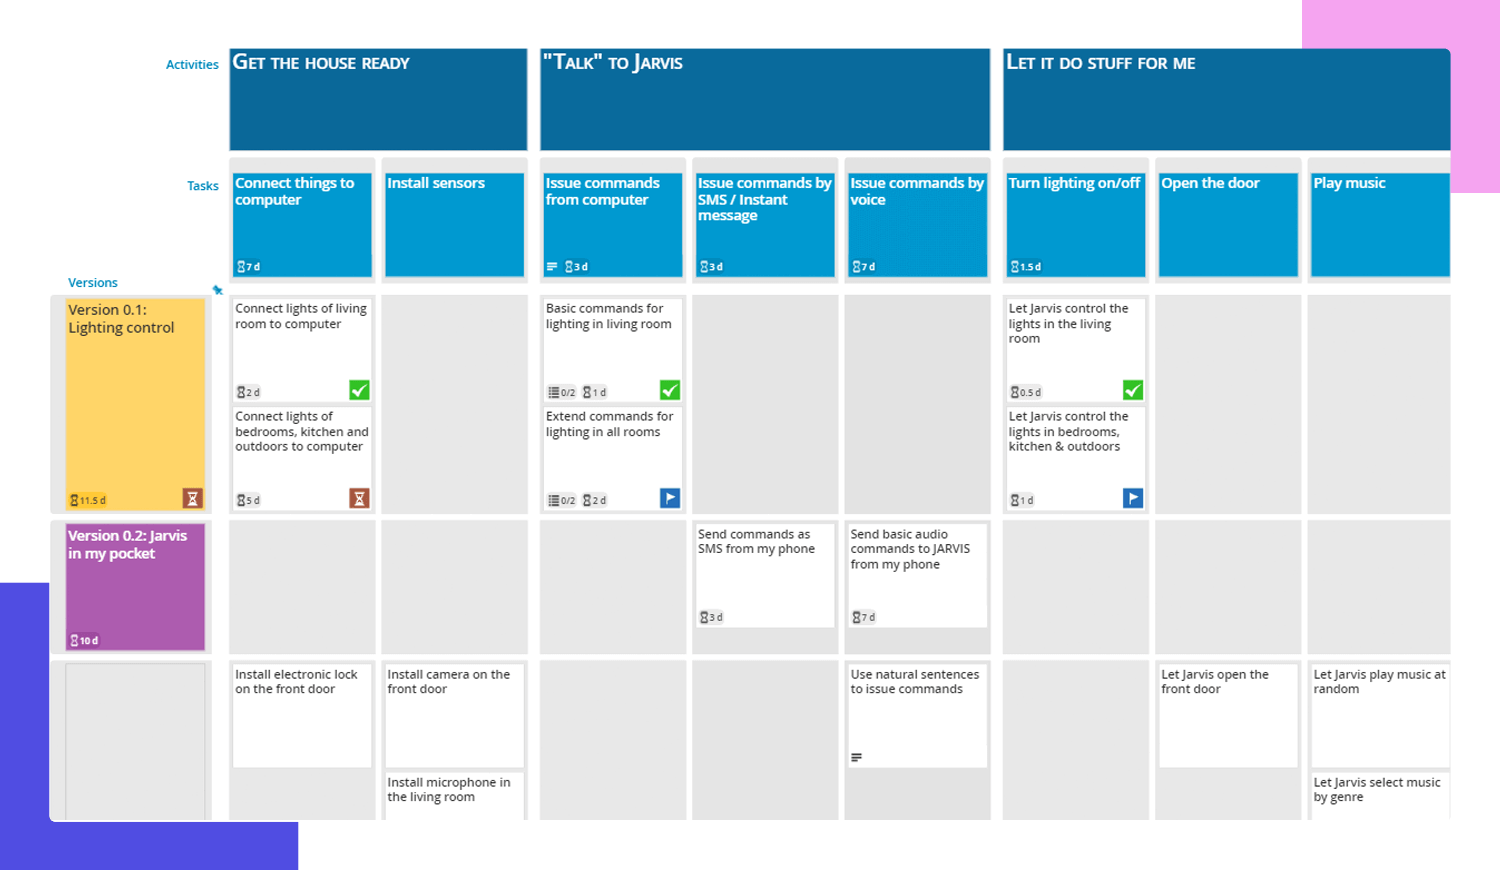
The backbone is the top row of your user story map. It outlines the essential capabilities the system needs to have.
Your backbone should show the customer journey or process from beginning to end, including all the high level activities the customer will complete while using your product. Depending on how you use your backbone and story map, it could be made up of epics.
The backbone is critical because it gives your team the “why” behind the journey, even if they’re just focused on a single step. It takes away ambiguity around what might lead up to that step and what might follow it, which gives important context for creating a smooth customer journey.
Why do user story mapping?
The purpose of user story mapping is to make sure you understand the problem the customer has, and then find a solution to that problem.
You’ll know the answer to:
This will help align your teams, groom the backlog, and more quickly deliver a product that your customers want and need.
John Walpole explains the value of user stories beautifully:
“[There’s] one technique and tool which time and time again I’ve gone back to when I felt like a project maybe isn’t thoroughly understood by the team, or I’m worried that we’re going to end up shipping software that isn’t going to delight customers. This is my go-to technique. I believe it’s going to help you ship software that will delight your customers.”
Without user story mapping, there’s a much greater chance that your team will come up with complicated, non-customer-focused solutions to a problem.
User story mapping helps ensure the team is aligned around what problem the customer has, and how you, as a team, are going to try and solve that problem.
It will keep you focused on delivering the highest impact and greatest value pieces first, enabling you to iterate based on feedback.
Benefits of user story mapping
There are so many benefits to user story mapping, like:
User story mapping helps your team understand the bigger picture, the why, and the end-to-end customer journey before they dive into the what and how.
The flat backlog vs user story mapping
Before we had user story mapping, we had the flat backlog. Actually, a lot of agile teams still use the flat backlog (no judgement if this is you!). So, let’s talk about what that looks like and how user story mapping has improved this practice.
What’s a flat backlog?
Essentially, it’s a to-do list. It includes all the items your team needs to do so they can provide value to your customers, ordered from most valuable to least valuable to the customer. The backlog may be split into current and future sprints to show what outputs are likely to be delivered when.
But I like our backlog!
A simple to do list might be fine if your product is simple, your team is small, and your to-do list is very short. But most products are complex, with multiple teams working on it. And most of the time, the backlog is massive (and constantly growing and changing).
You might like it less as you grow.
User story maps were designed to overcome these challenges and restructure the backlog to add context, make it easier to prioritize, and put the focus on the customers’ needs. It introduces the X axis, with the backbone at the top to show the customer journey, and the user stories below.
When you go from a flat backlog to multiple axes, your team (and the rest of your organization) can understand what value we intend to deliver to the customer and when.
When is user story mapping done?
So, when do you actually run a user story mapping session?
Generally, a team will collaboratively create a story map at the start of a project or product. It might be an entirely new product, or the product manager might want to pursue a new idea or feature as part of an existing product.
This involves getting subject matter experts and team members together to run a session where you look at your personas and overarching customer journey, then brainstorm ways you can provide the most value to customers. Then you’ll write user stories for each of your persona types and each step of the journey, based on their needs.
As we’ve already mentioned, it’s best to focus on one persona type per story mapping session to avoid confusion. So, start with the persona who is the best fit for your product or likely represent the largest chunk of your audience first.
Overall, the process could take several days or even several weeks, depending on the complexity of your product (and therefore, the number of steps in the customer journey) and the number of personas.
Getting the most out of User Story Mapping
Who should be involved in user story mapping?
Some folks you might invite to your user story mapping party session include your:
Tip: Try to keep your numbers below 10 participants. Diverse perspectives are useful, but any more than that and it can get tricky to manage and get input from everyone. All the people present should be able to contribute insights into the personas/product/business, or help estimate how long tasks will take to complete.
Mapping the user stories
Once the backbone is established (and your team agrees on the order), you can put the flesh on it. Under each item in the backbone, go the user stories (steps, processes, and details) that support that activity. This involves some brainstorming and creative thinking.
Encourage your team to imagine the different options available to the user, how they might want to experience each step in the backbone, and actions they might take. It can’t hurt to do a paper prototyping session alongside your user story map to mock up ideas as you go. Or perhaps that step will come later, depending on the scenario and maturity of your team.
Sequencing
Then you can put your user stories in a sequence to deliver maximum value to the customer as quickly and consistently as possible. So, put the most important user stories at the top, and the least important ones at the bottom.
Cut lines or swimlanes
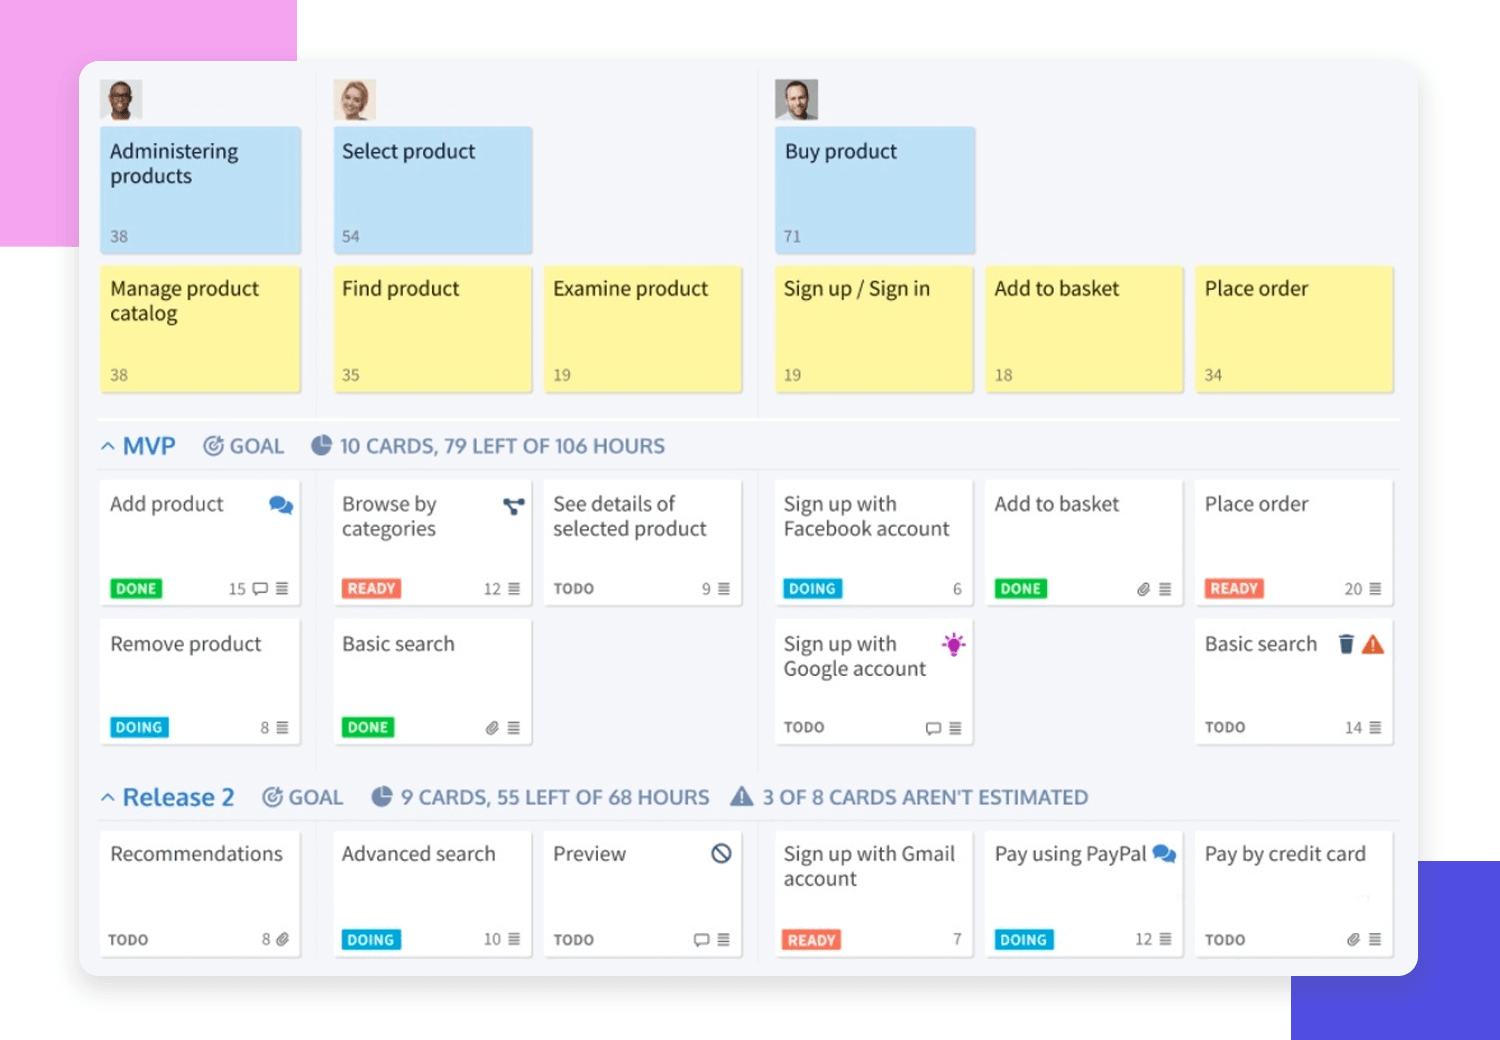
Your team will get together and discuss and estimate the work involved in each user story. After that, you can add cut lines (usually sprint or version lines) to mark out what your team will deliver and when. At this point, you might shuffle some stories around if it makes sense for the user to get them in the same release.
Tips for successful user story mapping
Involve the right people
Break it up
“Typically, I’d run these things to try and get as much of the planning, personas, and backbone done on day one as possible. By that point, most people are tapped out because the cognitive load is high. Then the team can go away and sleep on it. Once they’ve had time to reflect on it, they’ll come back with other ideas for user stories and thoughts about how they’d do the work before they start sequencing.”
You don’t have to do your whole user story mapping session in one go. Depending on the size, complexity, and phase of your product, you might not be able to fit it into one day, either.
Instead, break your session up into 2-3 hour chunks and do it over several days. You might do the first session in the afternoon and the next session the following morning. This comes with a few advantages:
A single facilitator
While you DO want all your team and stakeholders at your user story mapping session, you don’t want everybody driving the discussion (too many chefs in the kitchen = not a good idea). Instead choose one person to facilitate the session. Sometimes it even works better if you can choose a product manager from another team to run things.
No phones/laptops
For in-person user story mapping sessions, only your designated facilitator is allowed their device. To avoid distractions, ask folks to leave their phones and laptops in a stack at the door. That way, your team can be fully present for all discussions.
Start with data and evidence
So, create your personas before you build out your customer journeys. That way, you’ll understand how your users will engage with the product, and you’ll be able to write user stories that more accurately reflect reality.
User Story Mapping Approaches
User story mapping example
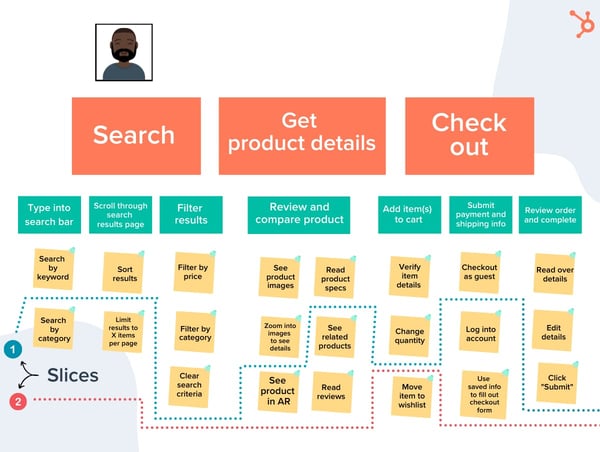
Let’s go through an example of user story mapping to help you visualize the process for your own product.
In this example, our product is a free online educational kids game. The outcome is for the user to find and play the game.
For example, searching for a game could include the following options:
Value is identified from analytics on usage patterns, customer interviews, and other insights.
Your team might check feedback forms to see what parents’ top requested features are, and prioritize these first. That way, they’ll deliver more value, more quickly.
Sequence the work so you know what to deliver and when
Split it up over releases or sprints
The team sets your cut lines (for the sprint or version), allowing them to distinguish what they think they can deliver in that sprint/version. This will be based on their capacity and what they need to deliver to users for a minimum viable product (MVP).
A user story mapping… story
During his time at Twitter, our Co-Founder, Nicholas Muldoon, facilitated a session for another team whose goal was to figure out how they should fix an issue with the app. This example (in Nick’s words) shows another interesting application of user story mapping, including the types of issues you might work through and how you can hone in on a particular persona or subsection of your audience.
Step 1: Kick off
The product manager kicked off the session by explaining the situation: “A whole chunk of users are having trouble getting into the app because they can’t remember their password. But in order to get them to go through the tedious password reset process, we want to give them value first to show that it’s worth doing. How?”
Step 2: Persona identification
To figure out the next steps and do user story mapping, we needed to narrow down the audience so we could use it as a framing reference or persona. After all, we were looking at a huge audience of 30 million people, not a single persona.
So we asked: who are we not targeting? Then we were able to take out any pro users and government users, which brought the audience size down to 28 million.
Next we asked: what’s the easiest place to experiment and test this? At the time, there was a feature we couldn’t access on IOS, so we went with Android. Plus, we had great relationships with the US-based phone carrier, AT&T. So we looked at our audience of Android users on AT&T in the US, which left us with a much more reasonable audience size of 3 million people.
We used this persona to experiment with this particular feature without touching all the different use cases.
Step 3: The big steps
Once we’d outlined the persona we were going to focus on, we could talk about what’s in or what’s out. So, we talked about the big steps, like:
Plus, in this session, we also included technical epics for stuff we needed from other teams at Twitter. For example, this team didn’t control all the authentication, so they added a technical epic to have a conversation with another team to get that piece on their backlog so they had everything they needed for the experiment.
Step 4: The stories
As we fleshed out the epics, we built out the user stories below each of them.
Step 5: Cut lines
Typically, your team would do estimation and cut lines at this point, but we didn’t need to because timing was less relevant. We had to include all the essential stories to successfully run the experiment.
We did our user story mapping physically on a whiteboard, so we used tape to separate what was in and out of sprint one, two, and three. We had the backlog on the right hand side, which consisted of anything we’d discussed that we couldn’t include this time, but we wanted to come back to later. Maybe some items weren’t applicable to this persona, or we’d come back to it for IOS.
In other scenarios, we’d order the stories based on what we understood would provide the most value, estimate with story points, and then plan the capacity for a week or fortnight of work, based on historical velocity. Then we’d sequence the stories into sprint and versions. Sequencing might involve moving up something of lower customer value because you can fit it in. You might also need to break down a bigger or riskier story and split it into two user stories.
If someone was being quiet, I’d pull them into the discussion and ask them for their thoughts directly. It’s important to pull in from different participants to get a holistic vision or understanding. Because at the end of the day, the purpose of user story mapping is to get the team on the same page. If the team sets off and they haven’t bought into the vision, they’ll soon find that everyone has a different understanding of what’s meant to happen. It’s less about the process, and much more about the alignment of the team.
Results 🏆
As a result of this user story mapping process, the project took a new direction where the app would use the device identifier along with the username to figure out who the user was before they log in. This would allow them to get straight into the timeline so they can get value.
But if they wanted to complete any actions (like Tweet, RT, or like a Tweet), they’d need to put in a password (and would hopefully be engaged enough to complete the process). Overall, it was a very successful user story mapping session!
Physical vs digital user story mapping
So, now that you know the steps in user story mapping, how do you actually implement them?
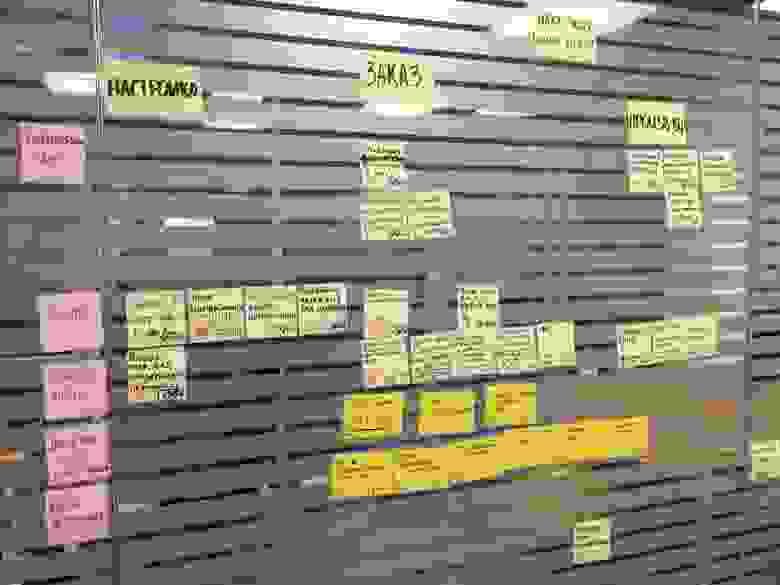
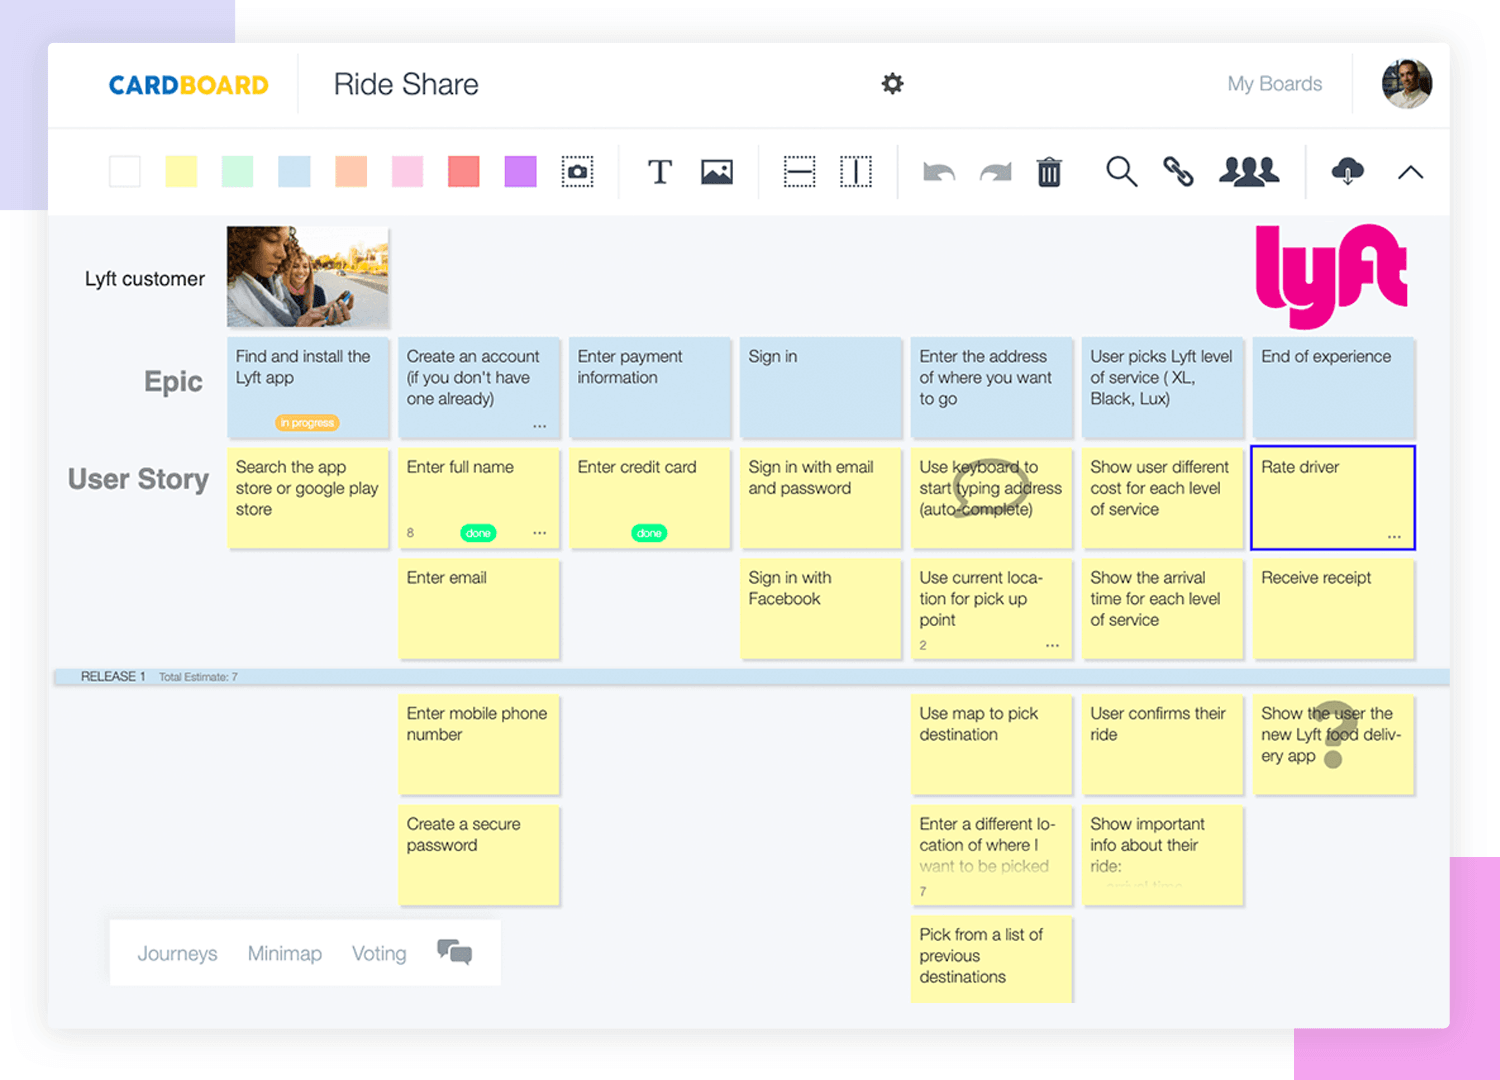
Traditionally, user story mapping is done physically. You get your team in a room, write out the backbone and user stories on post-it notes, arrange them on a wall, and use a string to represent the cut lines or swimlanes.
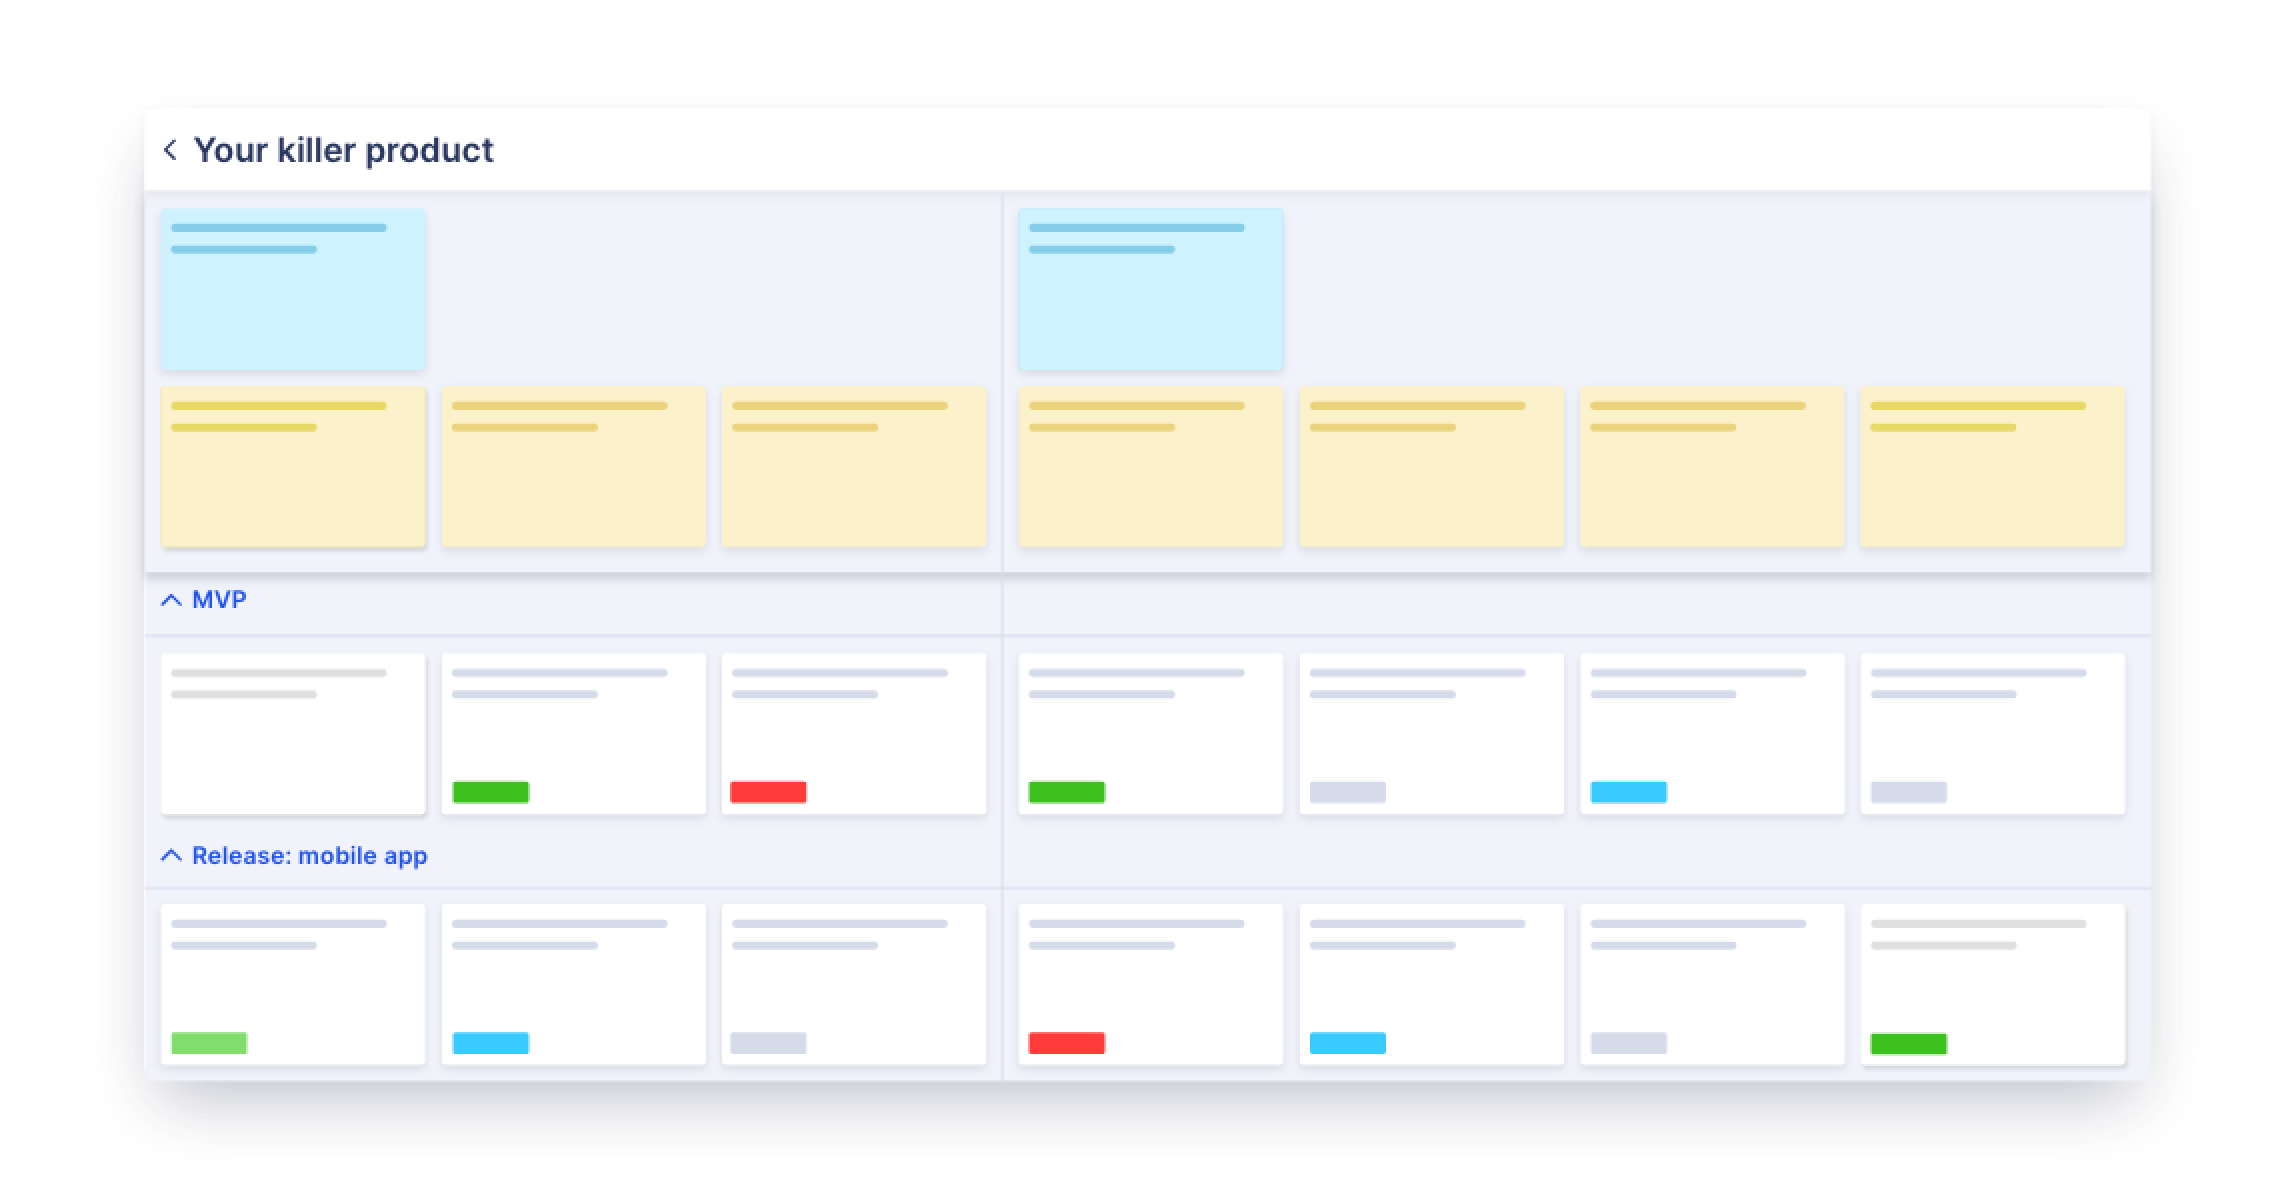
It might look a bit like this:
But this process does come with some challenges:
“When I worked at Twitter, they tried to do physical user story mapping over video conferencing to include distributed team members. It was challenging. There’d be a lot of ‘Hey Nick, what does this say?’ and I’d need to read it out or type it out on chat.”
That’s why it’s often better to use a tool or app to do your user story mapping digitally.
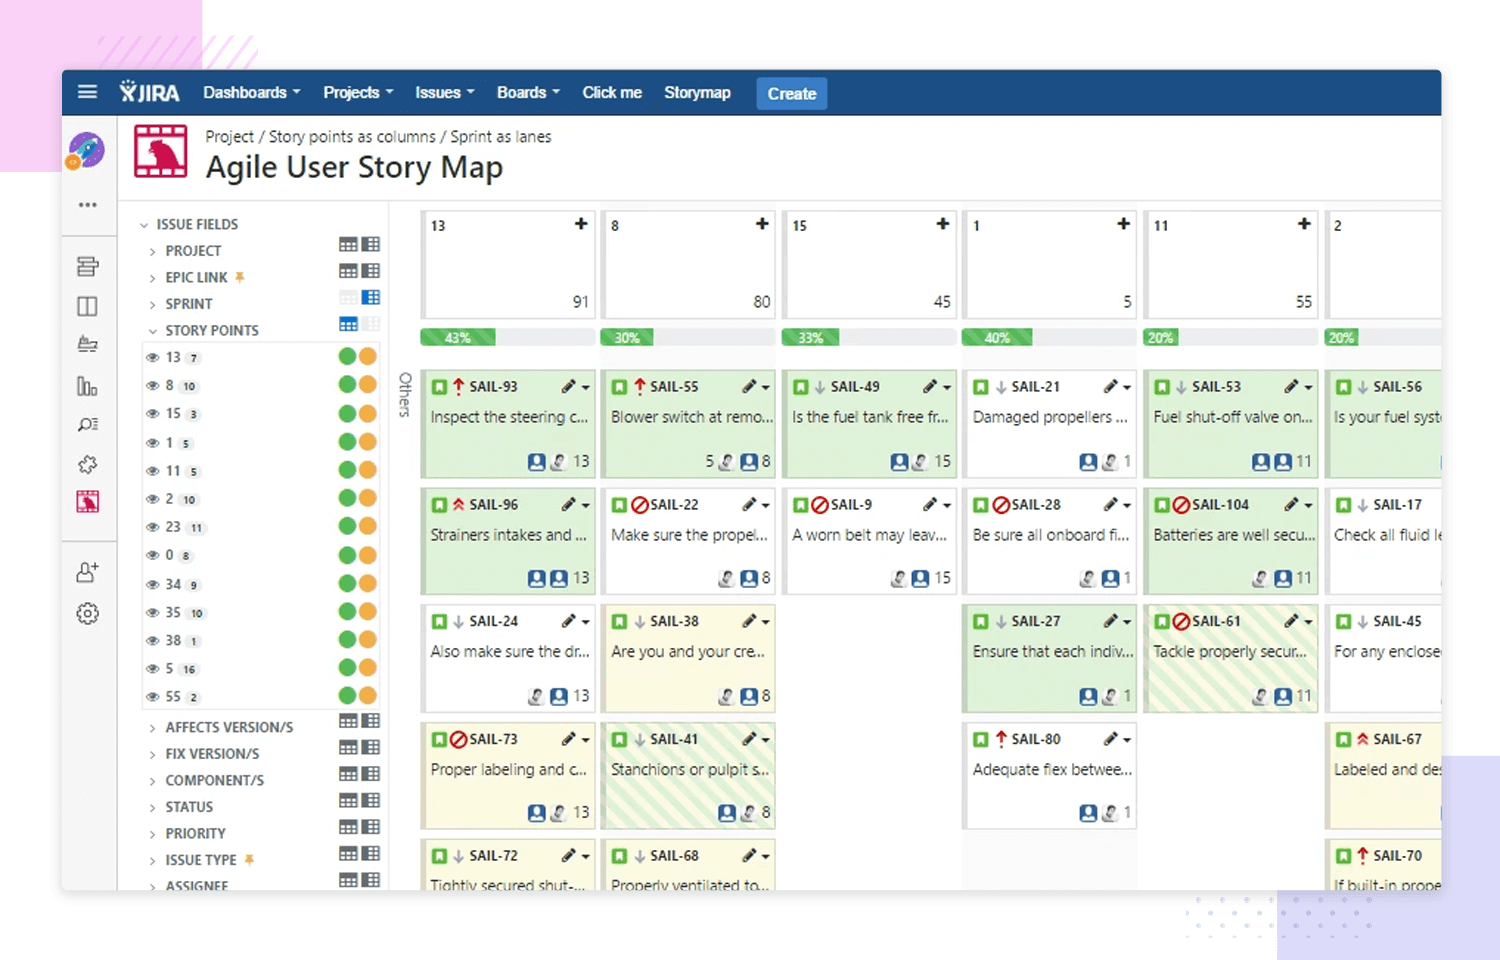
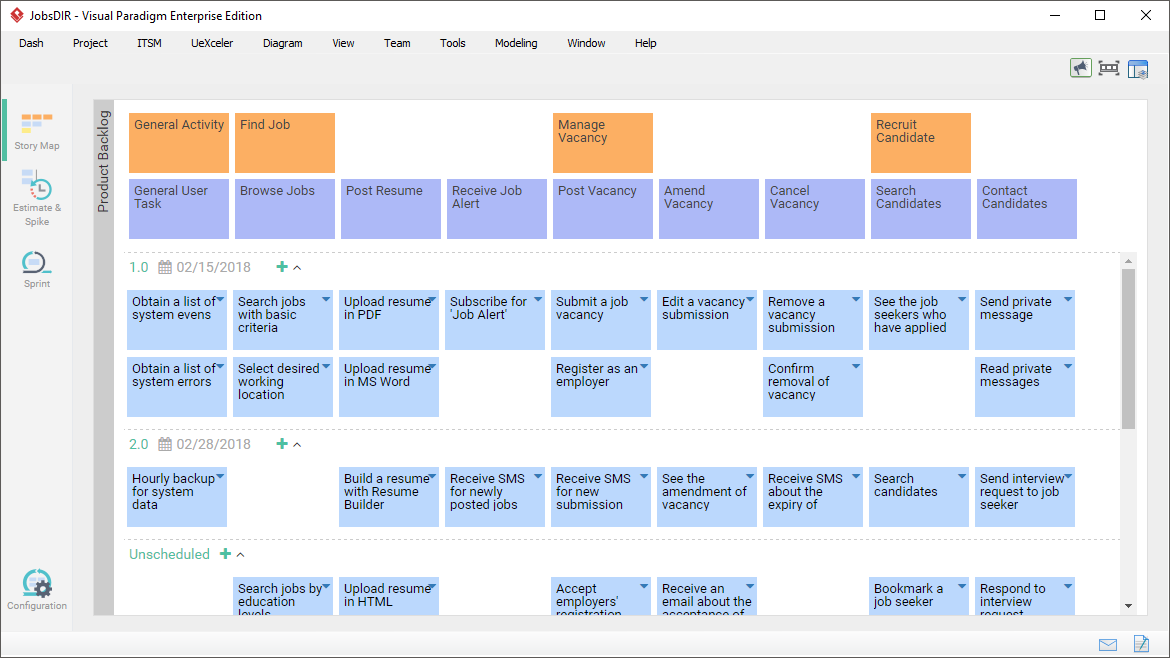
While there are a couple of user story mapping apps and software options, the most efficient approach is to use a user mapping tool that integrates directly with Jira.
If the last year is anything to go by, read more on: User Story Mapping for Remote Teams
Jira + Easy Agile TeamRhythm
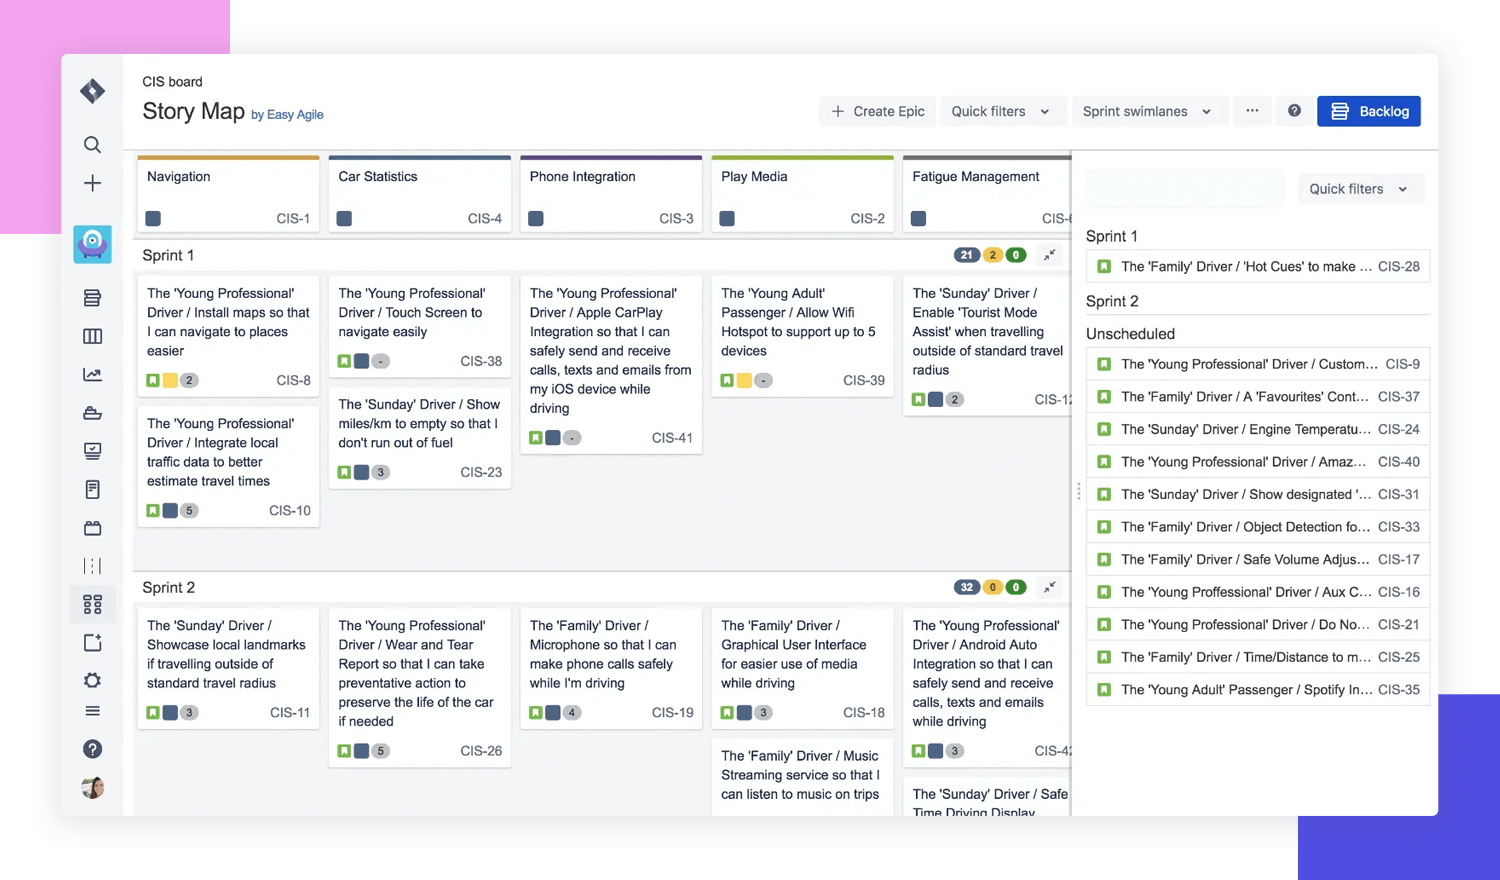
Fortunately, you can run a digital and collaborative story mapping session right inside Jira with Easy Agile TeamRhythm, which is an add-on for Jira.
Here’s how it works:
Add user story mapping capabilities to Jira
Add Easy Agile TeamRhythm to your Jira account. You can get started with a free 30-day trial.
Set up your backbone
Across the top of the board you’ll create a horizontal row of epics (if you already have epics associated with your board, this will be pre-populated). Each epic represents an activity of the users flow through the product. This is often referred to as the ‘backbone’ of the story map.
These epics can be dragged and dropped and the order of the epics will be reflected on the backlog using Jira ranking.
Creating new epics right inside the story map is simple with Easy Agile. Simply click the “Create Epic” button in the top right of the screen. Add the name and description, then click “Create”. Scroll to the far right of your story map to find your new epic.
Don’t worry about getting everything perfect right away. You have the ability to edit them in-line later.
Add the flesh (or stories!)
You can also drag issues in from the backlog panel.
And just like epics, you can edit your stories in-line by clicking on the name of the issue.
Order your epics and stories
Now, put your epics and stories in order. Your epics should reflect your customer’s journey from beginning to end. And your stories should be ordered by the value they deliver to customers.
In Easy Agile apps, you can click and drag to rearrange your stories and epics. And if you move an epic, the associated stories underneath will move with it.
Estimate work
Hover over the estimate field (the gray number on the bottom of each story item). Click to add or edit story points.
Add and arrange swimlanes (version/sprint)
Now it’s time to decide what issues your team will tackle when by horizontally slicing up the work. Click on the swimlanes button in the top right. You can choose to sequence work by sprints or versions (depending on whether you’re Scrum or Kanban*). Your sprints or versions will appear in chronological order on the story map, and there’s an “add sprint” button at the bottom of the story map where your team can add additional sprints and versions.
* With Kanban, you’d typically sequence work into versions, as there is no sprint. This can help your team whittle down the long list of stories into the ‘now’ and ‘future’ buckets.
You can easily drag and drop stories, mapping them to the appropriate swimlane.
Check team velocity to avoid over committing your team during each sprint or version. Hover over the “Not started”, “In progress”, and “Done” indicators on the far right of the sprint or version swimlane to see how your story points are tracking across all the stories and issues. If you have too many story points, you can move some stories to the next sprint or version.
Try out different views
You can search or create a Quick Filter based on a text search (e.g. contains «As a parent»). Or if you’re using our other product, Easy Agile Personas, we have a tutorial on how you can create a Quick Filter by persona. That way, you can refine your story map and narrow in on what’s really important to you.
Get to work!
All changes made inside the story mapping session are automatically reflected in Jira, so your team can leave the story mapping session ready to start their work.
Get started with Easy Agile TeamRhythm
Easy Agile TeamRhythm works out of the box with your existing backlog (so getting started is super quick and simple). But it gives you that extra dimension to help bring your backlog to life. It’s aliiiiive!
Want to check it out for yourself? We have two options:
OR play around with our demo (no installation or sign-up needed) 🙂
But don’t just listen to us. Here’s what some of our customers have to say:
We’ve found that Easy Agile User Story Maps brings the team together in one room. As a result, we find ourselves mapping more as a group, which creates a common understanding. Since using the add-on, we’ve been able to speed up planning and more efficiently conduct large story mapping exercises.
Since using Easy Agile User Story Maps, we’ve improved our communication and team alignment, which has helped give us faster results.
Easy Agile User Story Maps has helped us visualize our workload and goals, as well as speed up our meetings. We love the simplicity!
See what all the fuss is about
Start your free 30 day trial
Psst: It’s the fastest growing and highest-rated story mapping app for Jira! You’re going to love it.
6 ways to keep your story map alive
Speaking of bringing things to life, we’ve got a few final tips.
Your user story map is designed to be a living, breathing thing so that it can help your team continuously deliver value to your customers. But you’ll miss out on these benefits if your team doesn’t continually use it, reflect on it, and refine it.
Here are 6 ways you can keep your backlog alive:
1. Progress tracking
As your team delivers releases, they can visually track their progress against the user story map. With Easy Agile User Story Maps, updates in Jira are reflected directly in the user story map so you can check what percentage of work has been completed. This enables you to identify problems early on and adjust your team’s workload (and future versions/sprints) if needed.
2. Backlog grooming
The purpose of backlog grooming is to maintain a healthy, up-to-date product backlog, ready for efficient sprint planning. A few days before your sprint planning meeting, your product manager will:
It’s much easier to do this using Easy Agile User Story Maps (rather than a flat backlog) because your product manager and team can see all the contextual information. They can shuffle the order around by clicking and dragging, and can quickly update issues with in-line editing.
3. Sprint/release planning
Sprint planning is done at the beginning of every sprint. It’s designed to help your team agree on a goal for the next sprint and the set of backlog items that will help them achieve it. This involves prioritizing backlog items (this should be straightforward, thanks to backlog grooming) and agreeing on what items your team has capacity for during the sprint. Sprint planning sessions tend to run a lot more smoothly when you refer to your user story map. With Easy Agile User Story Maps, you can update your story map with backlog items as you go, and all your changes are reflected in Jira so your team can start work on the sprint straight away.
4. Sprint reviews
At the end of each sprint, your team will do a sprint review to see whether the goal was achieved and that your increment led to a working, shippable product release. Your product manager will look at the “Done” items from the backlog, and the development team will demonstrate the work they’ve done.
The team talks about what went well, any problems, and how they were solved or could be solved. They review the timeline, budget, and potential capabilities for the next planned product release, which puts the gears into motion for the next backlog grooming and sprint planning session.
In Easy Agile User Story Maps, you can easily filter your view to show “done” issues, see sprint statistics, and update story point estimates. That way, you can do a quick and collaborative sprint review meeting, right inside Jira.
5. Roadmaps
You can use your story map to communicate your roadmap with stakeholders and share the product vision. With your upcoming releases and sprints mapped out, it’s easy to see which parts of the customer journey are going to see an update or improvement, and when.
6. Retrospectives
Retrospectives are often held at the end of your sprint or release. Or you might hold them after an event, presentation, every month, or every quarter. Retros are used to help your team reflect on what’s gone well, what could have gone better, and what they’d do differently next time. Your user story map can give your team a visual point of reference during retrospectives, and help them stay focused on the user.
How to learn more about user story mapping
We’re almost at the end, but don’t stop here! There’s so much more to learn if you want to go deeper with user story mapping.
Here are some resources worth looking into:
User story mapping books
User story mapping articles
Here are some articles written by us over the last few years:
That’s it! You’ve finished the user story mapping ultimate guide! 👏
You have all the tools and info you need to…
Go forth and story map! And let us know how you go.
If you have any questions about user story maps, we’d love to hear from you. You can contact us or send us a tweet @EasyAgile. We’ll update this guide as we come across more user story mapping tips, techniques, and frequently asked questions.
User Story Mapping
User Story Mapping – простой метод визуализации пользовательских историй и проектирования продукта. Составляя карту, мы как будто делаем раскадровку шагов или функций, которые выполняет пользователь.
User story mapping поможет выделить ценные функции с точки зрения пользователя и приоритизировать бэклог. Сначала user story mapping поможет с пониманием MVP, а потом можно прикручивать остальные фичи и улучшать сценарий пользователя хоть в режиме non-stop.
Как картировать опыт?
1) Выстройте шаги пользователя в вашем продукте в логическую последовательность. Используйте реальный сценарий. Например, найти товар>выбрать нужную категорию товаров>посмотреть товары со скидкой>ознакомиться с товаром>проверить срок годности>положить в корзину>оплатить.
3) Заполните пробелы в сценарии. Дополните каждый этап шагами или функциями, которых не хватает и хорошо бы добавить. Например, этап «Поиск товара» можно дополнить фильтрами или функцией «Добавить в избранное».
4) Приоритизируйте бэклог. Внутри каждого этапа выделите must have функции продукта и поместите их вверх. Вниз поместите приятные фичи, которые хорошо бы сделать, но пока продукт может обойтись и без них.
Где картировать опыт?
В Miro или на стене со стикерами.
Если ваши пользователи из нескольких сегментов, то сделайте USM под каждую группу пользователей. Удобно иметь карту под рукой и добавлять туда стикеры с идеями по доработке продукта. User Story Mapping – универсальный инструмент, который можно использовать вечно, если поддерживать актуальность карты.
User Story Mapping
A model for working with Scrum User Stories.
What is it?
A user story map arranges user stories into a useful model to help understand the functionality of the system, identify holes and omissions in your backlog, and effectively plan holistic releases that deliver value to users and business with each release.
How does it work?
User story mapping consists of ordering user stories along two independent dimensions. The “map” arranges user activities along the horizontal axis in rough order of priority (or “the order in which you would describe activities to explain the behaviour of the system”). Down the vertical axis, it represents increasing sophistication of the implementation.
Given a story map so arranged, the first horizontal row represents a “walking skeleton”, a barebones but usable version of the product. Working through successive rows fleshes out the product with additional functionality.
User Story Mapping и функциональная архитектура
Каждый, кто запускал IT-проекты или участвовал в продуктовых исследованиях, наверняка слышал про метод персон Алана Купера и User Story. И пусть некоторые считают персон нерабочей и устаревшей методологией — я убеждён, что это всего лишь результат многолетней вандализации метода.
В этой статье я хочу рассказать о том, как «продолжение» User Story может не только улучшить UX продуктов, но и решить кое-какие фундаментальные проблемы их разработки.
Цифровые продукты редко запускаются гладко. Правки к сценариям, функциональности и макетам зачастую возникают прямо в процессе реализации. Никто никогда не в курсе, куда несётся поезд продуктовой разработки — а обратное чувство, чаще всего, обманчиво.
Персоны и User Story — это такая прикольная штуковина для того, чтобы погрузить всех участников в проектный процесс, выявить и подсветить истинные задачи пользователей. Однако сами по себе персоны практически не влияют на процесс создания продуктов, лишь на их функциональность. Чего нельзя сказать о следующем этапе развития пользовательских историй — о User Story Mapping.
Об этом подходе написано уже немало, в том числе и на русском языке. Но большинство таких статей (на мой субъективный взгляд) либо весьма поверхностны, либо имеют серьёзный перекос в сторону именно UX, практически игнорируя аспект управления и развития продукта. Однако я искренне благодарен авторам таких статей, ибо понахватал оттуда приличное количество тезисов и умозаключений.
§ Проблемы
Для начала давайте разберём некоторые глобальные трудности и барьеры, возникающие при создании цифровых продуктов.
§ Требования к продукту плохо структурированы по отношению друг к другу
Нет иерархии и последовательности требований. Не всегда понятно, какая задача какую блокирует и от какой зависит. Чаще всего зависимость задачи проставляется исключительно командой разработчиков или тимлидом — но они не владеют общим видением продукта, руководствуясь только своими представлениями о локальном участке архитектуры. То есть они не видят всю связь, весь flow бизнеса и пользователя целиком. Не тот уровень абстракции.
Это, разумеется, влияет на глобальную архитектуру, на качество кода и самого продукта, на динамику разработки. Что, в свою очередь, приводит к многократному увеличению стоимости поддержки и развития.
Каждое требование — это определённая функция или функциональный раздел продукта. Если команда разработки не понимает взаимосвязи между функциями в создаваемой ими системе, то такие проекты гарантированно обречены на «историческое» развитие. Так рождаются огромные «монолиты», которые очень и очень быстро переходят в разряд с трудом поддерживаемых «legacy».
§ Требования к продукту не приоритизированы с точки зрения ценности для пользователей
Порядок реализации задач формируется по наитию, по сложности разработки, по желанию клиента, по чему угодно — но только не по важности для пользователей. В итоге разработка и выпуск новых версий затягиваются.
Ядро функциональности, пресловутый MVP, собирается, исходя из представлений команды о продукте. Даже если команда думает, что полагается на результаты исследований — на сложных проектах эти результаты ещё необходимо как-то структурировать и визуализировать. Иначе высока вероятность «рассинхрона», отсутствия единого информационного поля внутри команды.
Последствия в этом случае весьма печальны, вплоть до полной невостребованности продукта аудиторией.
§ Отсутствует единое понимание стратегии разработки, последовательности и состава релизов
Отсутствие стратегического подхода влечёт за собой не только архитектурные ошибки (опять), но и заставляет нервничать стейкхолдеров и владельцев продукта. Прогнозы в такой ситуации строить крайне сложно.
Как это решается в большинстве случаев? Продуктовая команда либо строит лишь краткосрочные планы, либо составляет план релизов буквально «наугад». Однако инвесторы не любят неопределенности. Если вы не можете предоставить им хотя бы примерный таймлайн или просто последовательность и функциональный состав релизов, то у меня для вас плохие новости. Ваш проект рискует остаться без финансирования.
Кто-то мне скажет, что это не всегда возможно. Часто исследования идут бок о бок с разработкой. Те же гибкие методологии, в конце концов. Однако даже здесь нужно опираться на определённый фундамент, базис. Ну и кроме того, гибкие методологии имеют весьма ограниченный ореол применения.
§ Функциональные границы проекта очерчены слишком высокоуровнево или даже вовсе отсутствуют
Бизнес требует внедрения всё новых фич, разработка затягивается, бэклог растёт, команда выгорает. Продукт получается, мягко говоря, странным.
Случалось ли у вас, что клиент/начальник/инвестор начинал каждую неделю приносить новые функции в проект? И обычный вначале лендинг в итоге превращался в космолёт-монстр, с админкой, функцией телепортации и собственным мобильным приложением?
Фичи должны добавляться последовательно и обоснованно (см. предыдущие проблемы). Функция не может жить «сама по себе», в отрыве от остальных частей продукта. И вот конечный порядок и взаимосвязь функций системы, состав её компонентов — это и есть границы проекта.
§ User Story Mapping
Как я уже сказал, все эти проблемы (и не только) решают карты историй. Вот вам хорошее определение USM:
Карта историй работает сразу в двух измерениях: показывает не только приоритет историй, но и то, как они связаны между собой и с более крупными задачами пользователей. Карта помогает команде понять, как можно скомпоновать истории, чтобы получить продукт, готовый к релизу.
Крис Симс (в переводе Ольги Жолудовой и Рината Шайхутдинова)
По факту, карта историй — это набор упрощённых User Stories: собранные, отсортированные и приоритизированные. Сама методология простая, на высоком уровне с ней справится даже новичок. Но если копнуть глубже, то там окажется целое поле работы для исследователей, продактов и архитекторов.
В этой статье в качестве иллюстрации для составления USM мы будем использовать небольшую браузерную игру с программой лояльности какого-нибудь банка. В ней есть регистрация, игровой персонаж, его убежище, сражения и баллы лояльности.
Следующие ниже изображения-схемы могут быть не очень хорошо читаемы на небольших экранах мобильных устройств. В этом случае рекомендую посмотреть их на десктопе или перевернуть смартфон в «ландшафт».
§ Шаг 1. Выявляем активности
Сначала нужно собрать список основных активностей пользователей. В нашем примере игры их пять:
Это — ключевые, главные «категории» действий пользователя в игре. Они включают в себя всю остальную деятельность. Если использовать терминологию функциональной архитектуры, то здесь мы создаём глобальные функциональные разделы.
§ Шаг 2. Разворачиваем активности в задачи
Разбивка активностей на задачи
Теперь мы раскладываем их (активности) на задачи. Например, активность «Регистрация и логин» превращается в три задачи:
Заметьте, здесь нет отдельно «логина» или «регистрации». Это более глубокий уровень, задачи же — это такие «категории» пользовательских историй. В функциональной архитектуре это тоже функциональные разделы, но уже не глобальные, а обычные.
§ Шаг 3. Задачи детализируем до конкретных историй
Детализация задач историями
И, наконец, истории (жёлтые карточки) — они расположены в порядке приоритета — сверху критичные, внизу наименее важные. Приоритет обычно выстраивается, исходя из нескольких условий:
Именно в таком порядке: сначала пользователи, потом бизнес, потом технологии. Понятно, что зачастую бизнес-задачи оказываются важнее пользовательских, и в этом случае карточки немножко двигаются. Иногда реалии рынка действительно сильнее влияют на продукт, чем желания пользователей. Аккуратнее с этим, руководствуйтесь здравым смыслом.
В случае нашего примера, задача «Регистрация и логин через e-mail» разложилась на 2 истории:
Истории — это функции будущей системы. У них есть взаимосвязи и порядок. Например, мы не можем реализовать функцию «Выбор навыков аватара для улучшения» по результатам сражения до того, как, собственно, реализуем сам «Подбор параметров аватара» в момент создания персонажа.
В результате этапа мы понимаем, какая задача из каких историй состоит и к какой она относится активности. Мы понимаем, какие истории нужно сделать в первую очередь. Мы можем планировать спринты и релизы.
§ Шаг 4. Делаем из приоритетов схему релизов
Разделение задач на релизы
Напомню, что истории — это всего лишь функции будущей системы. Понимая это, мы просто переносим те истории, которые не критичны или требуют на этом этапе слишком много ресурсов, в следующий релиз. Точно так же можно выделить MVP.
Например, нам проще сделать логин и регистрацию через соцсети — и регистрацию через e-mail мы отодвигаем на второй релиз. Пользователям не так важна покупка амуниции — и она тоже вылетает из MVP.
§ Дополнительно: цветовая индикация и структура
Структура User Story Mapping
Принято разделять USM на две структурных части:
И да, цветом стикеров можно помечать отдельные категории событий/действий, дополнительную важность (например, для бизнеса), типы пользователей и так далее. Всё, что посчитаете важным.
С помощью User Story Mapping можно не только планировать новые продукты, но и улучшать уже существующие — например, приоритизировать бэклог.
USM позволяет на очень простом визуальном языке донести до всех участников команды не только функциональный состав продукта, но и порядок проектирования и реализации. Если вы хотите выполнить глубокое функциональное проектирование будущего продукта, то User Story Mapping — отличное начало для этого.
Помните только, что слепое следование методологиями убивает профессионализм. Комбинируйте, не бойтесь отойти от канонов, если уверены в своих действиях.
Описанный подход к проектированию уже несколько лет успешно применяется в стенах нашей Цифровой Артели Eleven, а мой партнёр, Вадим Митякин, даже пишет об этом книгу.
Все свои материалы я аккумулирую в своём tg-канале, подписывайтесь.
User story mapping на практике
Вы уверены, что общая картина проекта одна из самых ценных задач для UX? И думаете, что она не появится без совместного участия команды разработки и команды продукта со стороны бизнеса?
Тогда вам, скорее всего, знаком метод создания карты пользовательских историй (User story mapping). Поделюсь опытом, как мы используем его при разработке продуктов в студии Molinos.
Для тех, кто считает, что время на разговоры тратятся впустую предлагаю выполнить короткое упражнение: попросите группу людей нарисовать на бумаге дом за одну минуту. На выходе у каждого будет свой рисунок с домом.
Взгляните, каких только домов вы не встретите: большие окна в пол, изогнутые стены, цветы на крыше и с гаражом сразу на три машины. Часто у нас у всех уникальное представление чего-либо. Это классно, но в разработке нужно уметь работать с этим на пользу проекту.
А еще, жизненно необходимо, чтобы все в команде разработки понимали, над чем и как мы работаем, а также как именно наши задачи вписываются в общую картину проекта.
И чтобы эта картина появилась, нужно выделять время на ее формирование и на то, чтобы все участники одинаково ее понимали.
Три важных преимущества юзер стори мэппинга, помимо простоты техники, отчуждаемости результата и эффективности самого процесса:
Из чего состоит карта?
Визуально простая структура с которой удобно считывать информацию:
Горизонтальная ось отвечает за логическую последовательность повествования. Например, чтобы написать комментарий, пользователю нужно зарегистрироваться. Вертикальная ось для приоритизации, чем выше, тем важнее для бизнес-целей продукта.
Помимо обязательных составляющих, карта может содержать дополнительную информацию по продукту: тезисы из результатов исследований ЦА, технические вопросы, эскизы пользовательского интерфейса и т.д. Например, мы используем Realtimeboard за удобную систему комментариев и стикеров.
Цели и действия это верхнеуровневые сущности, они образуют сам продукт. У нас в студии, действия по уровню декомпозиции равны эпикам, а шаги пользовательским историям, которые разработчик может раскладывать на задачи и брать в работу.
Шаг может быть задачей технического плана, когда система совершает какое-то действие. Но не стоит углубляться на карте в технические детали, расписывая пошагово интеграцию с каким-нибудь сервисом. Если что-то вызывает много обсуждений, скорее всего, оно требует дополнительной декомпозиции. Еще бывает, что-то отмечается, как шаг, но позже оказывается самостоятельным действием пользователя со своими шагами.
Очень важна взаимосвязь и последовательность всех сущностей на карте. Они должны образовывать единое повествование. Если нет, значит у продукта есть пробелы, которые в будущем приведут к плохому пользовательскому опыту.
Как построить?
1. Подготовка
2. В начале воркшопа
3. Мозговой штурм
Начинайте с вопроса: Что бы пользователь сделал с продуктом? Выделите время, чтобы каждый самостоятельно ответил и записал результат.
Спустя минут 10 начните совместное обсуждение результатов. Необходимо прийти к единому флоу, действия которого понятны всем участникам.
4. Придумайте цели и задачи, соотнесите их друг с другом
Будет классно, если на этом шаге будет как можно больше обсуждений, чтобы все не только пришли к единому флоу, но и прониклись им, разделяли его.
Иногда, действия могут приводить сразу к нескольким целям. Это нормально, размещайте их в той группе, где у них наибольшее влияние.
5. Декомпозируйте на шаги
Самая длительная часть. Каждое действие нужно декомпозировать до шагов, которые вместе приведут пользователя к выполнению желаемой активности.
Прежде, чем обсуждать каждое действие совместно, выделите время для самостоятельной проработки. Этот процесс может занять много времени, поэтому контролируйте тайминг. Именно декомпозиция действий способствует генерированию идей по возможностям достижения целей и помогает всем прийти к единому видению.
Как записывать шаги на карту? Готово шаблона нет.
На этом этапе карта становится все больше и больше, причем иногда в неожиданной для вас части. Это не значит, что растут размеры самого продукта, растет ваше понимание его.
6. Приоритезируйте
Кажется, что сделать это просто, но обычно эта часть вызывает множество споров 🙂 Расставьте стикеры с шагами по вертикальной оси в порядке приоритета для бизнес-целей.
7. Задавайте этапность
Теперь на карте есть цели, действия, шаги и приоритетность. Определите этапность реализации, что попадет в первый релиз, будет ли у вас MVP и т.д. Важно, чтобы каждый релиз помогал достигать определенных бизнес-целей.
Используйте горизонтальную линию, чтобы отделять релизы. Над линией, что сделаете в этом релизе. Под, что пойдет в следующий.
Скорее всего, к этому моменту команда будет утомлена, подбодрите всех участников и объективно взгляните на полученный результат. Например, проверьте все действия на соответствие поставленным перед продуктом бизнес-целям и вообще на реализуемость (в разумных пределах, поскольку это не полноценный технический анализ).
8. Проведите ревью
Вместе еще раз проверьте весь флоу: каждый шаг соотнесен с действием, которое соответствует конкретной пользовательской цели. Все это имеет последовательное повествование.
9. Используйте карту
Если есть идеи, как можно использовать User story mapping продуктивнее — смело пишите. Реально интересен сторонний опыт, так как в рунете практической информации маловато.
What is User Story Mapping? Steps, Examples + Best Tools Available
Picture this: You’re a product owner and your team has a backlog of features to implement.
The problem is: Your team is overwhelmed and no one is sure where to start and how to prioritize the tasks. Well, this is where user story mapping can come in handy.
Keep reading to learn how user story mapping is helping product teams get a better understanding of consumer needs and prioritize tasks with a user-first approach.
What is user story mapping?
User story mapping is an exercise in which you visualize a user’s journey through a product. It helps product teams better understand customers, identify friction points in the journey, and prioritize what will improve the user experience.
Before we get into user story mapping, let’s go over the basics. A user story is a short and simple description of a feature told from the perspective of the user. For example, «As a user, I can add items that I’m not ready to purchase yet to my wishlist.»
It forces product teams to build with a user-first approach. A user story map takes this a step further by visualizing the steps a user takes to complete an action.
When product managers, designers, and developers work on a product, sometimes they focus too much on feature specifications. User story mapping gets them out of this framework and redirects them to focus on consumer needs and desired outcomes.
In addition, a user story map will help break down the customer journey into bite-size pieces that teams can tackle and ensure nothing gets lost in the process.
But to be clear, the mapping process isn’t solely for product teams. It can be a valuable cross-functional exercise that helps align marketing, engineering, UX/Design teams along with other departments.
In addition to getting everyone on the same page, creating a user story map also helps:
Is agile story mapping different?
The short answer is no because user story mapping is used within an agile framework.
User stories are used in an agile framework as a way to provide context using simple and natural language. They also represent the smallest unit of work, just as sprints and epics are other measurements.
So, it’s agile story mapping is another way to describe the process of mapping a user story.
How to Create a User Story Map
User story mapping typically happens at the beginning of a project, as it helps offer structure and get everyone on the same page. However, it can be used at any phase of the project to help identify roadblocks and reprioritize.
Set the frame.
Before you start mapping the story, you’ll want to narrow the scope. Otherwise, you may quickly start feeling overwhelmed and unable to start.
Here are some questions you should be asking:
Once you answer these questions, put it in user story format: «As a [user], I want to be able to [filter my search] results so that I can [quickly find what I’m looking for.»
Following this approach will help you approach the problem tactically.
2. Map out the activities and the steps in the story.
In this step, you want to create a general roadmap for how the user would access and use this feature. Those are your main activities.
The goal here is to outline the big steps necessary to get from start to finish. From there, you lay out the steps.
Following the same example from the previous section, here’s how it could look:
As you’ll notice, story mapping requires going from macro to micro.
You’ll likely use input from your participants to map out these details. You want your map to paint an accurate and full picture of what does (and can) happen in this story.
So, you’ll want to lean on your team for input in this step.
3. Group and define the tasks.
Once you’ve mapped out the big details, this is where the collaboration takes off.
Under each step, you should highlight the key actions involved in each activity.
For instance, when a user is in step 5, which is selecting an item and placing it in their cart, there are several substeps they will follow, including viewing the image, reading reviews, scanning related items.
All of these should be mentioned under the big activity groups, also known as the steps. The goal is to identify any gaps in the features of your product currently.
By adding a must-have, could-have, and should-have options in your map, you can rank features by priority. Here’s what you want to consider:
This will require a collective effort from your various teams to figure out what’s realistic and what’s doable. For instance, an engineer might point out that a particular task is too big to count as one iteration. Your user researcher could highlight an important step in the process that you guys hadn’t considered.
4. Slice your tasks and get your minimum viable product.
Once everything is laid out, you and your team can start to move through the map to prioritize a list of tasks and cut them into slices.
Each «slice» will include tasks from each activity to create a viable end-to-end experience. It should have a clear outcome as well as a way to measure success. This will be important later when testing and tracking user behavior.
You will continue to separate your slices until you include all the tasks and have a clear plan to move forward.
User Story Mapping Example
In this example, the user story is as follows: «As a user, I want to buy a product easily on this website.»
Once you have all those details, then you can create your map.
Once you’ve added the activities, steps, and tasks, now you can figure out your slices.
For instance, in this example, the first slice would skip two tasks in the «Search» activity, skip three in the «Get product details» one, and three in the «Check out» section.
The second slice would include features like «Search by category» and «See product in AR.» Once you have all your slices, your team is ready to get to work.
User Story Mapping Tools
When it comes to user story mapping, there are a lot of ways you could do this.
The most straightforward way is with a conference room, a whiteboard, and a whole lot of sticky notes. That way, you can easily move pieces around as you work and make it a collaborative effort.
Now, if your team is remote, you’ll have to rely on online tools to assist you in this process. Many agile project management software have story mapping features, such as Atlassian’s Jira.
Additional online tools for user story mapping include Featmap, Miro, and Avion.
If your product team can’t agree on where to start for an upcoming or ongoing project, consider creating a user story map. It may take some time away from building but it will definitely pay off down the line.
Originally published Jan 10, 2022 7:00:00 AM, updated January 10 2022
Руководство по сбору требований в формате User Story Mapping: Дисциплина метода, 2/3
Инструменты проектирования
Во второй статье серии мы сосредоточимся на порядке создания карты. В предыдущей подробно рассмотрен центральный элемент карты User Story Mapping — пользовательская история.
Понадобится пример. Давайте представим, что собираемся улучшить работу аэропорта, а именно, повысить качество такого сервиса как туалет. Я намеренно опущу вводные по целям. Выбранный пример хорош тем, что прост, вне области информационных технологий и будет понятен большинству.
Пространственная структура карты
Карта User Story Map состоит из четырёх слоёв: действующих лиц, активностей, историй и детализированных задач.
Этап 1. Запись историй
Порядок действий
Принципы и рекомендации
Типичные ошибки
Этап 2. Планирование релизов
Порядок действий
Принципы и рекомендации
Этап 3. Ведение проекта по карте
Несомненно трекинг проекта по карте — занятие для дисциплинированных команд. На моей практике редкие проекты доживали до второго-третьего релиза с первозданной картой. Обычно поддерживать карту ленятся. Истории на грядущий релиз либо собирают в кучку из бэклога, либо строят новую мини карту. Если вы решились вести проект как положено, вот некоторые руководства.
Порядок действий
Принципы и рекомендации
Рекомендации для ведущего
Как вы могли заметить, метод требует дисциплины и умственного напряжения. Без хорошего ведущего сессия сбора требований рискует затянуться, либо выжать из участников все соки. Ниже несколько рекомендаций для ведущих сессий в формате ответов на вопросы моих коллеги.
С чего начинать
У нас карта историй, и любая большая история с чего-то да начинается. Вопрос «С чего всё начинается?» — отличная отправная точка.
Какие вопросы задавать
Теоретически вы можете обойтись формальным набором вопросов, типа «А что происходит дальше?», который рекурсивно будет вести вас вдоль хребта карты. Однако вряд ли вы так достигнете глубины, и уж точно поверхностными вопросами не добиться расположения и должного участия других участников сессии.
Работа над картой USM — это продолжение беседы, начавшейся в момент выяснения целей проекта и знакомства с процессами как они есть, если уже существует некоторая система. В ходе этих первых встреч вы формируете базис для понимания, откуда сможете черпать вопросы. Если таких встреч не было, придётся сымпровизировать и провести их подобие в начале сессии USM. Задача-минимум здесь — понять очертания бизнес-ландшафта: цели бизнеса, гипотезы их достижения.
Когда вам будут рассказывать истории, ваша основная работа разложить задачи и мотивацию действующих лиц. Для этого важно вытащить и записать истинную ценность рассказываемых историй. Участники, не со зла, будут изображать не проблему, а варианты решения — так уж мы, люди, устроены. Чтобы разобраться в том, что под всем этим лежит, придётся заглубляться. Скорее всего, вашими рабочими лошадками будут «Пять почему», «Зачем?», «Чтобы что?». Ну и конечно, терпение и юмор.
Что делать если «идёт с трудом»
Начинающих ведущих беспокоят паузы с неловким молчанием, либо наоборот чересчур активные стейкхолдеры, за которыми трудно поспеть. К тому же в области ближайшего развития люди всегда испытывают синдром самозванца, и неоправданно много волнуются.
Я рекомендую ведущему снять с себя ложное убеждение о важность «держать лицо», и делать видимой каждую проблему, которую вы встречаете. Задумались — скажите над чем вы задумались или, лучше, пригласите к этому всю команду. Так не возникнет ожидающей паузы, и вы не потеряете динамику. Не знаете куда двигаться дальше — так и скажите: «Коллеги, похоже мы в тупике и вот почему…».
Как понять успешно ли я веду?
Если вы всё верно организовали, то дело обстоит так. Льётся интересная беседа, на доске появляется карточки историй, вокруг них возникает дискуссия, карточки переписываются, все участники вовлечены. К концу сессии пройден некоторый участок карты в требуемом вам формате. К концу нескольких сессий получена карта, обладающая известной на текущий момент полнотой.
Как определить готова ли карта
Как понять, что полнота достигнута и можно остановиться? Это трудный вопрос. Пуленепробиваемых рекомендации здесь нет, есть несколько уловок.
Полноты трудно достичь, наблюдая за тем, что уже найдено. Когда вы спросите участников, «всё ли здесь учтено» и получите ответ «да», важно понимать, что это значит «мы посмотрели на эти истории и не вспомнили ничего нового». Ключами для поиска отсутствующих историй могут быть память участников и системная логика, проверяющая целостность и работоспособность описываемой системы. Некоторые истории удаётся обнаружить только когда кто-то начал работать над реализацией и посмотрел на историю с другого угла, либо когда недостающие истории были встречены позже в жизни. От этого никак не уберечься. Важно быть готовыми принимать изменения и новые требования в любой момент работы над продуктом.
И всё же, как понять, что сейчас можно остановиться. Как ведущий, я обращаюсь к участникам и спрашиваю «что мы ещё не учли»? В поиске пропущенных историй помогает общий пересмотр карты, когда громко озвучиваются активности и истории из хребта USM. В это время и по ходу записи я сам слежу за системной сборкой — чтобы всё было непротиворечиво, а записанные ценности обеспечивали работоспособность историй. Когда все участники выражают ощущение достижения полноты, сессия завершается.
Как сторимэп помогает не завязнуть в разработке нового продукта на годы
«Додо Пицца» развивается в США. В середине 2016 года мы открыли доставку в Оксфорде и быстро поняли, что предпочтения клиентов в США и России отличаются. Американцы — индивидуалисты. Они привыкли, что можно собрать пиццу из любых ингредиентов: пусть даже бекон с шоколадным соусом. Поэтому нам надо было сделать такой функционал для американских Додо. Мы назвали проект «Своя пицца».
Разработчики сказали, что на задачу потребуется минимум полгода. Но это слишком долго, бизнес бы терял деньги. Нам надо было ускориться и сделать продукт за пару месяцев. Но задача выглядела огромной, никто не знал, как к ней подступиться.
Чтобы разобраться, мы использовали сторимэп. Этот инструмент помог спланировать работу и запустить «Свою пиццу» за 2,5 месяца. В статье рассказываем, как применяем сторимэп.
Что нужно было сделать
Чтобы клиенты могли собирать пиццу из ингредиентов, нужно было поменять Додо ИС:
Все изменения мы свели в одну доску:
Разработчики заявили, что на такую работу уйдет полгода или больше. Но нам надо было успеть за два-три месяца. Поэтому мы решили сфокусироваться на главном и сделать только то, что нужно для запуска минимально работоспособного продукта, а всё остальное отложить на потом. Отделить важное от неважного помог сторимэп.
Что такое сторимэп
Сторимэп — это доска с карточками, которая помогает рассказывать истории, как пользователи взаимодействуют с продуктом. Истории еще называют сценариями. Этот инструмент предложил Джеф Паттон в книге «User Story Mapping».
Сторимэп помогает разбить сложный сценарий на множество простых историй, визуализировать объем работы и спланировать, что и когда делать. Разработчики не хватаются за голову, когда им говорят, что за два месяца предстоит сделать огромную работу. По сторимэпу они понимают, что понадобится для запуска продукта, а что пока можно отложить.
Мы используем сторимэп во всех наших задачах. Берем карточки с историями и располагаем их на доске:
Для «Своей пиццы» мы расположили слева-направо крупные шаги: настройка — заказ — производство — учет. Вот что получилось:
По этому сторимэпу мы проверили, всё ли логично в наших размышлениях.
Сначала надо настроить админку, потом клиент должен сделать заказ, мы его приготовим, а потом запишем в учет израсходованные ингредиенты. Это большие шаги. Разбиваем их на более мелкие: что сделать в админке, какими способами клиент делает заказ и так далее. Так мы проверили весь процесс изменений.
Что нужно сделать, а что можно отбросить
Когда увидели общую картину, мы начали двигаться по сторимэпу и задавать себе вопросы. На первом этапе нам нужно убрать всё, без чего мы можем запуститься.
Что нужно, чтобы запустить новую систему и приготовить первую пиццу? На первом этапе нам не нужна админка. Ингредиенты возьмем из базы или пропишем их прямо в коде.
Как проще всего сделать заказ? Через мобильный сайт, там простой интерфейс:
Что нужно, чтобы приготовить пиццу? Показать на трекинге состав пиццы.
Это первый тест трекинга с кривой версткой. Если в пицце было много ингредиентов, их не было видно. Мы это быстро заметили и исправили
Без чего можем обойтись? Не печатать ингредиенты в чеке, не вести учет и отказаться от статистики.
Как двигались по задаче
Ответы на вопросы помогли определить минимальный набор историй, без которых мы не можем запуститься. Задача перестала быть сложной и пугающей.
Каждую историю мы разбили на мелкие части. Например, для конструктора пиццы:
можно заказать свою пиццу, но ничего нельзя в нее добавить;
↓
можно добавить один ингредиент;
↓
добавить несколько ингредиентов, но из одной группы. Например, мясо или овощи;
↓
добавить ингредиенты из разных групп: мясо, овощи, соусы.
Вот, как шла работа:
Мы протестировали систему и проверили весь процесс в нашей американской пиццерии. На фотографии Алена объясняет, как пользоваться планшетом «печь» в момент запуска системы:
Тест мы прошли без сбоев.
С таким функционалом мы были готовы принимать заказы от клиентов. Но руководители решили, что нет смысла запускать «Свою пиццу» только в мобильной версии сайта. Нужно было сделать изменения в десктопной версии, мобильном приложении и на кассе. После десктопного сайта можно будет запускать «Свою пиццу» в Оксфорде, там только доставка, а после кассы — в новом ресторане в Саутавене. На эти изменения и тесты ушел еще месяц.
Через 2,5 месяца после начала работы мы запустили «Свою пиццу». Сейчас она
на втором месте по популярности после пепперони. Вот Алена приложила скриншот статистики: 
Значит, мы не ошиблись в своих предположениях, и американцы правда любят экспериментировать и собирать пиццу из своих ингредиентов.
Собрать и протестировать минимальную версию продукта, запустить его и только потом делать доработки
Почему не используем онлайн-инструменты
Сторимэп — инструмент для общения, поэтому лучше всего для него подойдет стена и стикеры. Их удобно создавать, выкидывать, дописывать. На них можно показывать пальцем.
Онлайн-решения — плохой вариант, с ними сторимэп не сработает. Доска нужна, чтобы стоять вокруг нее и обсуждать. Это самое ценное в инструменте. В онлайн-инструмент общение не получится. Один будет двигать карточки, другие смотреть или отвлекаться.
Даже если команда работает в разных городах — это не оправдание, чтобы заводить онлайн-доску. Наш бизнес-аналитик Полина живет и работает в Сыктывкаре. Во время обсуждения «Своей пиццы» она прилетела к нам, и мы вместе строили сторимэп. А потом она у себя в Сыктывкаре сделала себе такой же, только маленький:
Если мы что-то меняли в сторимэпе, тут же передавали Полине, и она меняла у себя.
После решения задачи доску можно сфотографировать, оцифровать, положить в CRM — пусть там лежит для истории. Но в качестве рабочего инструмента — только доска и стикеры.
Шпаргалка по сторимэпу
Когда без сторимэпа не обойтись:
Вот наши правила по работе со сторимэпом:
Что нужно, чтобы быстрее запустить продукт? Без чего можно обойтись? — два вопроса, в которых помогает разобраться сторимэп
A Quick Guide to User Story Mapping (Template Included)
Table of Contents
The idea of user story mapping can be traced back to Jeff Patton. He literally wrote the book about it, It’s All in How You Slice It, which came out in 2005.
Patton is a consultant who does story mapping in a way that’s more focused on improving the product development process, not just improving production speeds. He does this through a mixture of agile project management, lean and leads, UX design and design thinking startup frameworks. His holistic approach focuses on user story mapping without forgetting the product or software development roadmap.
What does that all mean? It sounds nice enough. Everyone likes stories, including product managers. Story mapping is how user stories are used in product management and software development. But before we define story mapping, we first need to understand what a user story is.
What Is a User Story?
The idea of a user story comes from software development and product management. A user story is a product feature described from the user perspective. It’s meant as an informal description of one or more product features, spoken in plain English.
Project management software captures user stories for teams. ProjectManager is a cloud-based work and project management software that has multiple project views. Managers can plan on Gantt charts and teams can use task lists or kanban boards to manage their backlog and collaborate on sprints. Get started with ProjectManager today for free.

What Is Story Mapping?
Story mapping takes the user stories and places them on a graph, called a user story map. The graph is a two-dimensional visualization of the product backlog. The top of the story map shows headings under which complex user stories known as epics are grouped. These epics are user stories that can’t be completed in a single product release and need to be broken down into smaller user stories. Those user stories are collected vertically, under each epic theme and ordered by priority. This allows product managers to describe many product features without losing the big picture.
User story mapping is then a way to organize and use those user stories in an agile product development environment in a simple yet effective method. It helps development teams envision the entire product or service in terms of a series of product features that are created based on customer requirements and end-user feedback.
How to Create a User Story Map
Follow these steps to create a story map for your product development projects.
1. Define Product Features
Identify the key features of the product or service you’re creating. These will be your product development epics. Each of those epics is a heading to the story map you’re creating. They run horizontally across the top of the graph.
2. Group Related User Stories
Then underneath each of these epic headings come the user stories that are related to them. The user stories don’t have to be very well-developed yet or even prioritized at this point. You just want to collect them under the correct epic.
3. Prioritize User Stories
As more research is done, more customer feedback is gathered and more user stories are added to the story map. Now you need to prioritize user stories and identify task dependencies.
4. Share the Story Map
It’s at this time that the order of those user stories will reflect the order in which they occur in the user journey. Your story map is ready to be shared with the product development team.
Story mapping, like the larger agile framework, is an iterative process. It comes from conversations between team members, customers and stakeholders on ways to best deliver more value for the end-user and the business. This dialogue starts early, and the story map captures that product development conversation in an actionable format.
Story Mapping Template
Our product development template has everything you need to create a story map and a product development roadmap. You can use our kanban board to create a dynamic story map that allows you to collaborate with team members in real time.

Then underneath each of these feature topic headings come the user stories that are related to it. The user stories don’t have to be very well-developed yet or even prioritized at this point. You just want to collect them under the correct heading. As more research is done, and more direction comes from the stakeholders, more detail is added to the user story. You’re refining the user story by breaking each one down into smaller pieces or tasks. It’s at this time that the order of those user stories will reflect the order in which they occur in the user journey.
Story mapping, like the larger agile framework, is an iterative process. It comes from conversations between team members and stakeholders on ways to best deliver more value for the end-user and the business. This dialogue starts early, and the story map captures that conversation in an actionable format. Use our Gantt chart view to keep track of your epics, user stories and product releases.

The Importance of Story Mapping & Its Benefits
A user story map is a helpful tool for many reasons. As noted, it provides a space to collect the conversation between the stakeholders and the team to figure out what is important in developing the product. It then allows for those user stories to fall into the context of the bigger story, so that they’re positioned in order or importance.
Here are some of the main benefits of using the story mapping technique for product development.
Story Maps Work as a Status Report
The story map, like the product, should be a work in progress. It’s like a snapshot of what the team is thinking at that moment in the project. Therefore, it’s a means to validate assumptions about the project and make sure that the team is progressing in the right direction. It acts not only as an organizational tool; it also repeats a statement back to the person who spoke it to ensure both parties understand one another.
Story Mapping Is a Visual Aid
It’s also a visual way of thinking, which is helpful for people on the team and stakeholders who process things better this way. Because it is a visual tool, it allows one to see the whole picture at a glance and where the smaller parts fit into that whole. This also makes it obvious to team members when there is a hole in the process.
Story Mapping Helps with Prioritization
Because the user stories are collected in a user story map, they can be moved around to see which sequence would best serve the process. This sequencing allows the team to figure out what user stories must be included in an incremental manner.
Prioritizing, which is a major part of user story mapping, helps with efficiency and productivity. This helps to avoid wasting time by focusing on features that are not critical to the end-user. That’s because you’re not only prioritizing but also keeping in mind the big picture, which keeps teams out of the weeds.
Story Maps Enable Communication
There’s also the communicative democracy of the user story map. It facilitates communications and provides a shared understanding of the project for teams and stakeholders. No matter where you stand in the project, you can look at the user story map and know the big story down to the smaller parts that make it up and how that all relates to the product roadmap.
Story Mapping Challenges
Many of the downsides to user story mapping are related to errors in execution. We’ve listed a few below.
Story Mapping FAQ
Story mapping doesn’t have an ending. There’s always more to learn. Do you have more questions about user stories? We answered some of the questions readers have below.
What Is the Purpose of Story Mapping?
The main purpose of story mapping is to allow managers to visualize the product development process. This is done by breaking down the work required to develop a product into action items known as user stories.
What Is a Story Mapping Session?
A story mapping session or story mapping workshop is a cross-functional story mapping exercise where the product development team meets with members from different departments to create user stories together.
Who Invented Story Mapping?
User story mapping was invented by Jeff Patton, who first described story mapping in his 2005 article “It’s All in How You Slice it”. Since then he continued to develop the idea until he wrote the book “User Story Mapping: Discover the Whole Story, Build the Right Product” in 2014.
If you’re looking for ways to communicate and break down your project so it better serves the end-user, then you need a tool that has the power to make communications seamless and organize your tasks on a shareable platform. ProjectManager is a cloud-based project management software that gives your team the collaborative tools they need to run agile projects. Try it today with this free 30-day trial.
User story mapping
Еще один модный инструмент?
Убедить участников процесса в потенциальной пользе — одна из самых сложных задач при внедрении чего-то нового. Особенно сложно с картой пользовательских историй, поскольку основным преимуществом метода является не сама карта, а единое понимание проекта целиком, формируемое в ходе обсуждений при создании карты.
Некоторые считают, что время на разговоры тратится впустую. Предлагаю им короткое упражнение, которое поможет взглянуть на это под другим углом: попросите группу людей нарисовать на бумаге дом за одну минуту, чтобы у каждого был свой рисунок с домом.
Результат реально крут, каких только домов вы не встретите: большие окна в пол, изогнутые стены, цветы на крыше и с гаражом сразу на три машины. Часто у нас у всех уникальное представление чего-либо. Это классно, но в разработке нужно уметь работать с этим на пользу проекту.
Синхронизация внутри команды
Вы можете сказать, что между рисованием домиков и разработкой ПО нет прямой аналогии. Верно, обычно, при разработке ПО у нас уже есть информация о разрабатываемом продукте. И в процессе разработки мы постоянно взаимодействуем с другими участниками, синхронизируясь. Жизненно необходимо, чтобы все в команде проекта понимали, над чем и как мы работаем, а также как именно наши задачи вписываются в общую картину проекта.
И чтобы эта картина появилась, нужно выделять время на ее формирование и на то, чтобы все участники одинаково ее понимали.
Создание карты, как способ формирования единого понимания
Прийти к единому взгляду не просто, но это действительно одна из самых ценных задач для UX, которую необходимо совместно решить команде разработки и команде продукта со стороны бизнеса. Создание карты пользовательских историй отличный инструмент для этого за счет простоты техники, отчуждаемости результата и эффективности самого процесса.
Анатомия карты
Визуально простая структура с которой удобно считывать информацию:
Горизонтальная ось отвечает за логическую последовательность повествования. Например, чтобы написать комментарий, пользователю нужно зарегистрироваться. Вертикальная ось для приоритизации, чем выше, тем важнее для бизнес-целей продукта.
Помимо обязательных составляющих, карта может содержать дополнительную информацию по продукту: тезисы из результатов исследований ЦА, технические вопросы, эскизы пользовательского интерфейса и т.д. Например, мы используем Realtimeboard за удобную систему комментариев и стикеров.
Цели и действия это верхнеуровневые сущности, они образуют сам продукт. У нас в студии, действия по уровню декомпозиции равны эпикам, а шаги пользовательским историям, которые разработчик может раскладывать на задачи и брать в работу.
Шаг может быть задачей технического плана, когда система совершает какое-то действие. Но не стоит углубляться на карте в технические детали, расписывая пошагово интеграцию с каким-нибудь сервисом. Если что-то вызывает много обсуждений, скорее всего, оно требует дополнительной декомпозиции. Еще бывает, что-то отмечается, как шаг, но позже оказывается самостоятельным действием пользователя со своими шагами.
Очень важна взаимосвязь и последовательность всех сущностей на карте. Они должны образовывать единое повествование. Если нет, значит у продукта есть пробелы, которые в будущем приведут к плохому пользовательскому опыту.
Составление карты
На каждом проекте процесс по своему уникален. Мы отметим общие моменты:
1. Подготовка
2. В начале воркшопа
3. Мозговой штурм
Начинайте с вопроса: Что бы пользователь сделал с продуктом? Выделите время, чтобы каждый самостоятельно ответил и записал результат.
Спустя минут 10 начните совместное обсуждение результатов. Необходимо прийти к единому флоу, действия которого понятны всем участникам.
4. Придумайте цели и задачи, соотнесите их друг с другом
Будет классно, если на этом шаге будет как можно больше обсуждений, чтобы все не только пришли к единому флоу, но и прониклись им, разделяли его.
Иногда, действия могут приводить сразу к нескольким целям. Это нормально, размещайте их в той группе, где у них наибольшее влияние.
5. Декомпозируйте на шаги
Самая длительная часть. Каждое действие нужно декомпозировать до шагов, которые вместе приведут пользователя к выполнению желаемой активности.
Прежде, чем обсуждать каждое действие совместно, выделите время для самостоятельной проработки. Этот процесс может занять много времени, поэтому контролируйте тайминг. Именно декомпозиция действий способствует генерированию идей по возможностям достижения целей и помогает всем прийти к единому видению.
Как записывать шаги на карту? Готово шаблона нет.
На этом этапе карта становится все больше и больше, причем иногда в неожиданной для вас части. Это не значит, что растут размеры самого продукта, растет ваше понимание его.
6. Приоритезируйте
Кажется, что сделать это просто, но обычно эта часть вызывает множество споров 🙂 Расставьте стикеры с шагами по вертикальной оси в порядке приоритета для бизнес-целей.
7. Задавайте этапность
Теперь на карте есть цели, действия, шаги и приоритетность. Определите этапность реализации, что попадет в первый релиз, будет ли у вас MVP и т.д. Важно, чтобы каждый релиз помогал достигать определенных бизнес-целей.
Используйте горизонтальную линию, чтобы отделять релизы. Над линией, что сделаете в этом релизе. Под, что пойдет в следующий.
Скорее всего, к этому моменту команда утомлена, важно подбодрить всех участников и объективно взглянуть на полученный результат. Например, проверьте все действия на релевантность поставленным перед продуктом бизнес-целям и вообще на реализуемость (в разумных пределах, поскольку это не полноценный технический анализ).
8. Проведите ревью
Вместе еще раз проверьте весь флоу: каждый шаг соотнесен с действием, которое соответствует конкретной пользовательской цели. Все это имеет последовательное повествование.
9. Используйте карту
Как команда может использовать карту?
Более того, пригласив в студию коллег из коммерческого отдела или клиента, можно наглядно показать им стратегию, которой мы придерживаемся при разработке.
Создавайте
Карта пользовательских историй универсальный инструмент, но он не будет работать, если вы создали карту и забыли про нее. Внедряйте инструмент в ваши процессы разработки, чтобы карта была на виду на протяжении всей разработки.
Работайте сообща, визуализируйте результаты работы и создавайте полезные продукты!
Появились вопросы по созданию карты пользовательских историй? А может у вас есть идея и вы хотите реализовать ее с нами?
User Story Mapping: как построить карту пользовательских историй
В работе над крупными и сложными проектами многие сталкиваются с проблемами оценки этапов, расстановки приоритетов, распределения обязанностей и так далее. Для их решения существует особый инструмент — User Story Mapping. Мы расскажем вам, что собой представляет карта пользовательских историй и как ее строить.
Что такое User Story Mapping
User Story Mapping (USM) – это инструмент целостного проектирования продукта на основе пользовательского пути. В дословном переводе – «карта пользовательских историй».Простыми словами, это визуальный путь пользователя по продукту.
Основу USM составляют следующие инструменты:
С помощью карты пользовательских историй вы можете взглянуть на свой продукт глазами пользователя. Дело в том, что при создании продукта многие разработчики концентрируются исключительно на его функционале, теряя из виду реальные цели людей. В результате между разработчиком и клиентом возникает недопонимание, а продукт оказывается неспособным удовлетворить потребности пользователя.
Как построить карту пользовательских историй
Над USM обычно работает владелец продукта или команда разработки. При необходимости привлекаются дополнительные специалисты – например, маркетологи, дизайнеры (UX/UI), аналитики и т.д. Важно, чтобы команда не только отлично разбиралась в продукте, но и могла воспринимать его на уровне пользователя.
Для создания карты пользовательских историй необходим инструмент визуализации. Вы можете использовать следующие варианты:
Теперь самый сложный этап – построение карты пути клиента. Вы должны спроектировать по шагам действия клиента при использовании продукта на основе реального сценария. Ниже мы рассмотрим конкретный пример. Для этого необходимо понимать преследуемые цели, предпринимаемые действия и шаги. Можно разделить создание USM на этапы.
Этапы работы над USM
Подключите телефонию МТТ для проведения переговоров Упростите сбор мнений клиентов с помощью телефонии
User Story Mapping – пример
Предположим, вы запускаете свой интернет-магазин. В первую очередь, на карте пользовательских историй вы расписываете действия клиента по шагам – от поиска товара до его оплаты. Например:
В этот момент карта пользовательских историй будет выглядеть следующим образом:
Нередко в карте может быть звонок оператора с помощью телефонии. Это также стоит предусмотреть, в зависимости от ваших сценариев. Теперь вы должны сгруппировать эти действия в этапы. В данном случае можно выделить 4 основных этапа взаимодействия с сайтом:
Распределяем действия по этапам и преобразуем карту:
Теперь необходимо заполнить пробелы: добавить действия, которые может совершить пользователь на каждом этапе взаимодействия с сайтом. Например, во время поиска товаров он может настраивать фильтры по цене, по рейтингу и так далее, а при изучении информации о товаре – смотреть видео, читать отзывы и пр. Добавляем эти действия в карту:
Теперь необходимо расставить приоритеты внутри каждого этапа. Например:
Для этого нужно поменять местами действия и распределить их по группам приоритета:
Остается лишь выделить релизы. Для этого отделите линиями разного цвета версии интернет-магазина в порядке их реализации. Таким образом, на заключительном этапе карта пользовательских историй будет выглядеть следующим образом:
После этого при желании можете сформировать бэклог своего проекта (интернет-магазина). Для этого необходимо выстроить по порядку все действия с учетом этапов слева направо. В данном случае это будет выглядеть следующим образом:
User Story Mapping: как построить карту пользовательских историй
Если вам сложно оценить этапы проекта, в бэклоге появились пробелы и кажется, что запланированный релиз вот-вот сорвется, значит, пришло время познакомиться с новым инструментом – картой пользовательских историй. С ее помощью вы увидите целостную картину проекта, разделенную на отдельные спринты от момента создания идеи до ее реализации.
Рассказываем, для чего используется User Story Mapping, в чем преимущества этой техники и как ее реализовать в уже запущенном проекте.
Что такое User Story Mapping и для чего используется
Карта пользовательских историй – инструмент комплексного проектирования продукта исходя из пользовательского пути.
Создание карты – отличный способ собрать всех специалистов, заинтересованных в развитии проекта, составить и обсудить предстоящие задачи. Но главное, что делается при разработке USM, – визуальное отображение путешествия пользователя по продукту.
В основе пользовательской карты лежат три инструмента:
За разработку User Journey отвечают специалисты, которые работают непосредственно с пользователями. Это маркетинговые и продуктовые команды, UI- и UX-дизайнеры, аналитики, UX Research специалисты, менеджеры проектов.
Преимущества USM
Три основных преимущества использования User Story Mapping – это:
Что такое кросс-маркетинг и как его использовать
Что такое кросс-маркетинг и как его использовать
Из чего состоит карта
Карта пользовательских историй должна быть визуально понятной и наглядной. Важно, чтобы в ней легко считывалась следующая информация:
Чтобы повествование было последовательным и логичным, на карте прочерчивается горизонтальная ось. Еще есть вертикальная, которая отвечает за приоритизацию действий: чем выше на карте находится конкретный шаг, тем более значим он для бизнес-целей продукта.
В USM могут присутствовать дополнительные элементы:
Как построить User Story Mapping
Этот процесс осуществляется в 8 шагов:
Подготовка
Прежде всего, решите, где будете строить карту – в онлайн-сервисе или на бумаге.
Обсудите предстоящую работу с представителями бизнеса и разработки. В создании USM обязательно должны участвовать менеджер продукта, менеджер проекта со стороны разработки, аналитик, технический и дизайн-лиды.
Выделите время для предстоящей работы. В среднем, на создание USM уходит до двух дней. Если на обсуждение деталей проекта требуется больше времени, значит, концептуальная сторона продукта требует доработки.
Мозговой штурм
Он необходим для того, чтобы ответить на главный вопрос: что пользователь хотел бы сделать с продуктом? Каждый из участников мозгового штурма думает и записывает свои мысли по следующим пунктам:
Через 10-15 минут, когда у команды будут готовы ответы, начните совместный разбор результатов. В ходе обсуждений важно прийти к единому флоу, этапы которого понятны для всех участников мозгового штурма.
Постановка целей и задач
Здесь, как и в случае с мозговым штурмом, требуется сперва индивидуальная, а затем коллективная работа. Сначала каждый участник дискуссии записывает свои мысли. После этого они озвучиваются и обсуждаются. Чем большей идей будет предложено, тем лучше. Это поможет команде не только прийти к единому флоу, но и проникнуться выбранными решениями.
Схема подготовки целей и задач:
Цели и действия, которые вы обозначили в ходе User Story Mapping, – и есть ваш вероятный флоу. Важно, чтобы при чтении карты слева направо получалась единая, логичная история использования продукта. Проговорите ее вслух – это позволит убедиться в правильности разработанной схемы.
Иногда одно и то же действие приводит к реализации сразу нескольких целей. Это нормально. Такие действия следует располагать в той группе, где они имеют наибольшее влияние.
Декомпозиция на шаги
Это самый длительный этап процесса создания пользовательской карты.
Каждое действие разделяется на отдельные шаги, которые в совокупности приводят пользователя к достижению желаемого результата.
Сначала каждый член команды выполняет эту работу самостоятельно. Затем выделенные шаги обсуждаются, неудачные решения отсеиваются, удачные – фиксируются на карте. Именно декомпозиция действий помогает генерировать новые идеи по возможностям достижения целей и позволяет команде прийти к единому решению.
Для записи шагов на USM чаще всего используют глаголы: они помогают сфокусироваться на пользовательских действиях и достижениях, а не на функциях продукта.
На этом этапе карта увеличивается в размерах. Зачастую рост наблюдается в неожиданных для создателей местах. Увеличение USM свидетельствует о том, что команда начинает лучше понимать свой продукт и его целевую аудиторию.
Расстановка приоритетов
На этом этапе часто возникает масса споров. Обсудите с командой каждый из выделенных шагов и расставьте стикеры с номерами по вертикальной оси в порядке увеличения приоритетности действия для бизнес-целей.
Определение этапности
Итак, на вашей карте отмечены цели, действия и шаги, расставлена их приоритетность. Пришло время определить этапность реализации проекта: что будет в первом релизе, что во втором, нужно ли создавать MVP и так далее. Учитывайте, что каждый релиз должен помогать в достижении конкретных бизнес-целей.
Отделяйте релизы на горизонтальной линии. Над каждым выделенным участком кратко запишите, что будет сделано в этом релизе. Ниже укажите, что пойдет в следующий релиз.
Проверка
Еще раз просмотрите флоу целиком. Убедитесь, что каждый шаг соотносится с действием, которое соответствует определенной пользовательской цели. Готовый флоу должен иметь последовательное и логичное повествование.
Использование карты
Чтобы карта пользовательских историй всегда была перед глазами у команды, распечатайте ее и повесьте на стену.
Со временем результат ваших совместных усилий может потерять актуальность – в этом случае необходимо обновить USM в соответствии с новыми данными. Приготовьтесь к тому, что карту нужно будет пересматривать и корректировать на протяжении всего проекта.
Коротко о главном
Вот так, в несколько простых шагов, переполненный бэклог превращается в живой ресурс, при помощи которого вся ваша команда сможет отслеживать развитие проекта.
Создавать карту можно в любое время, но наибольшую пользу она принесет на начальных этапах разработки продукта, когда перед вами еще стоит масса открытых вопросов.
A Quick Guide on User Story Mapping
Reading time: about 6 min
Posted by: Lucid Content Team
How to Create a User Story Map
The end user should be the priority of any development team. By anticipating user needs and preferences, you can create a better experience for your users and encourage continued use of your product. But how do you start?
User story mapping could be the answer. This article will show you how to build user story maps, most often used as part of agile software development, and use them to plan a more effective user experience.
What is a user story?
A user story is aВ short, simple descriptionВ of a product feature from the perspective of the person who wants to use the new feature, usually a user or customer of the product. User stories might sound something like this: «As an email user, I want to be able to search my email by keywordВ so that I can quickly find the information I’m looking for.»
Product managers rely on user story mapping—visualizing user stories and showing how they can be accomplished within a sprint—as a compass of sorts to keep everyone on the right track through development. Production members leverage user story mapping to understand what the customer wants from the product—how they wish to interact with or use it.
The customer-focused approach of user story mapping leads to more satisfied customers because the development team considers their needs from the beginning.
How is user story mapping helpful?
User story mapping offers the following benefits to help teams build a product or service that users will enjoy.
Prioritizes work
Because user story mapping gives teams a holistic view of the user experience, team members can easily determine essential tasks and organize work into sprints or releases.
Puts an emphasis on user value
By building the story from the user’s perspective, the development team identifies how users interact with the product and what requirements need to be met to facilitate those interactions.
Highlights roadblocks
User story mapping illuminates any issues, risks, or problems by providing a high-level view of the product. It saves time by helping teams working through anticipated problems before they arise.
Ensures team unity
True to its name, user story mapping creates a map that the team agrees on and follows throughout the build. The team can refer back to the map anytime they are unsure of where to go next.
Allows for constant improvement
A well-defined user story map groups stories by priority, which, in turn, can be batched out in iterations to gather feedback earlier in the process and make improvements as the project moves forward.
How to createВ a user story map
To begin the process of user story mapping, the development team first decides how to format their story map. Traditionally, user story mapping takes the form of notecards on a whiteboard or wall, with each notecard representing a story or activity, but with Lucidchart, you can tailor a user story mapping template or use our sticky note shapes to collaborate in real time and document your brand’s specific user stories.
Follow these steps to write a clear and useful user story.
1. Understand your users
Who do you see as the primary audience or audiences for your product? While there may be several different types of users, identifying the primary audiences will keep development on the right track to deliver a successful product. Focus groups and A/B tests can give insight into what your users do when interacting with your product. When planning a new project, look at past results along with industry research to make sure you’re putting the user first.
2. Identify the problem
What problem is your service or product helping the customer overcome? Keep a user-first mindset during this step to visualize how the end user will experience the product. If you’re stuck, remember this format: “As a user, I want to [the action], so that [the benefit] happens.”
3. Map user activities
Interaction with your product will come in the form of user activities. These activities act as anchor points as you create your user story map. They should be fairly broad, as more specific user stories will make up the actions behind each activity.
4.В Map user stories under user activities
Under each activity, a series of user stories create the larger customer journey. In the example of the video streaming website, under the user activity of choosing a video, a user story might include searching for a video and then filtering or editing the search results to clarify.
5. Prioritize
After you identify and map out user activities and their corresponding stories, the production team can start prioritizing user stories. Rank stories vertically from most important to least important to help the production team understand which stories have the most impact in the customer journey.
6. Identify roadblocks
As the user story map takes shape, the team may begin to spot areas of missing information, bottlenecks, or other issues that might slow down production. Use this step to identify solutions and workarounds.
7. Plan the sprint
All the mapping work comes to fruition in the project planning phase (learn more about sprints and sprint planning in our blog post about Scrum methodology). After user activities and stories are prioritized, they can be batched out into sprints, where each piece of the user story map is assigned to a member of the production team with a clear explanation of how it should be completed.
Next steps after user story mapping
Once the user story mapping exercise is complete, relevant stakeholders will usually review the mapped activities and stories. Remember that nothing is set in stone—you can and should make changes where needed. After all involved parties have agreed on a final user story map, the production team can begin development.
To get started, you can leverage any of the following diagrams and processes :
User story mapping is a useful practice to visualize what work needs to be executed on first to create the most effective end product. The end user is the focus throughout the entire process, with an emphasis on multiple iterations and incorporating feedback. An effective user story map is fluid and can be updated as the project needs change or new stakeholders are introduced.
Sign up for Lucidchart to take advantage of our user story mapping templates—you’ll need them to navigate the road to success.
Create your own user story by filling out a blank user story map, tailored to the journey of your users.
Browse All Topics & Authors
All Article Topics
Recent Articles
Authors
Mapping User Stories in Agile
Summary: User-story maps help Agile teams define what to build and maintain visibility for how it all fits together. They enable user-centered conversations, collaboration, and feature prioritization to align and guide iterative product development.
By Anna Kaley
on 2021-01-24 January 24, 2021
Topics:
Share this article:
In traditional product-development processes, teams often rely on wasteful and lengthy business requirements documents and functional design specifications to move from a vision for a digital product to outlining what it should include and how it should work. Instead of having an ongoing conversation about users, problems, ideas, and solutions, teams expect distributed documentation to suffice.
However, these documents usually fail; no one has the time or attention to read them, and even those who do read them end to end will likely come away with vastly different interpretations of what to build. Rather than propelling productivity, these heavy documents stifle creativity, communication, collaboration, and innovation from the start. As an alternative, user-story maps work much better as lightweight representations of the digital product that an Agile team intends to build.
User-Story Mapping Defined
Definition: User-story mapping (also known as user-story maps, story maps, and story mapping) is a lean UX-mapping method, often practiced by Agile teams, that uses sticky notes and sketches to outline the interactions that the team expects users to go through to complete their goals in a digital product.
Jeff Patton popularized the method, which replaces the lengthy, technical requirement gathering and siloed updating processes found in waterfall development. Story maps are intended to spark collaboration and conversation among Agile team members, while providing them with the bigger picture of how the digital product flows and fits together. This latter quality of story maps is important in the Agile environment, because losing sight of the product as a whole is a common challenge, likely to arise when teams work from a discrete list of user stories in a backlog.
A user-story map depicts 3 types of actions at different granularity: activities (the most general actions), steps, and details (the most specific actions). User activities and steps display horizontally across the top of the map, and the details stack vertically underneath their respective steps in priority order. To define each level of a story map, we’ll use a feature for depositing checks through a bank’s mobile application as an example:
Why It’s Called User-Story Mapping
If you’re new to the concept of user stories, they are informal, natural language descriptions of features, UI elements, or tasks, written from the perspective of the user. They’re intended to get the team talking to each other about solutions in the context of end users and the benefit they’ll receive. These conversations help everyone arrive at shared understanding much faster than reading a requirements document. User stories can be written at a high level to describe a full product or feature and what it enables users to do or at low level, to outline an interface element and its value. For example:
Agile teams commonly rely on small, high-value user stories to plan and estimate what to work on each sprint. In the user-story map, activities, steps, and details are captured as short, succinct verb phrases representing user actions. These serve as the basis for the first half of the user-story format, describing what the user needs or wants to do. The story can then be elaborated upon to include the key benefit to complete the second half of the narrative. Thus, the mapping method is called user-story mapping because it can be used to evolve the verb phrases captured on the map into fully fleshed-out user stories that can be discussed further, eventually paired with acceptance criteria, and added to the product backlog for prioritization and estimation.
When and How to Create a User Story Map
Story maps can be used at any point in the product-development process to drive discussion and align the team. You can create a story map to plot the experience for a new product, after initial discovery work, or for an existing product, after usability testing. In either case, the story map begins to illustrate solutions to the problems uncovered in the research. Once created, teams will maintain and refer back to their story map over time; they add to it, modify it to reflect the actual state of the product, and use it to guide what to work on and release in subsequent sprints.
Story maps are best constructed by small teams with representatives from product, UX, development, and QA working collaboratively to discuss and shape the product plan. It’s important to establish the following context before beginning:
To create a story map, in-person teams use sticky notes, white boards, and open wall space; remote teams can take advantage of video conferencing and collaborative spreadsheets, presentation slides, or web-based programs. Everyone should work together on the map; no one person or role should dominate the others.
Assign differently colored sticky notes (whether real or virtual) to each row of activities, steps, and details to keep the story map visually organized. It’s also important to frame your activities, steps, and details by what the user is doing at that particular point in the product, not what the product is technically doing for the user. For example, if you were creating a digital product using artificial intelligence and machine learning, a step in the story might display as Share preferences, not Train the AI.
Teams working remotely can rely on videoconferencing and collaborative, web-based tools such as CardBoard, spreadsheets, or even presentation slides to create a story map together.
User-Story Mapping vs. Customer-Journey Mapping
When I introduce user-story mapping during our UX Conference course Lean UX & Agile, practitioners often ask how it differs from customer-journey mapping. The key differences are that each map type is visualized from a different perspective and they’re used for a different purpose. A customer-journey map takes the user’s perspective, showing the steps she goes through to complete a goal, coupled with her thoughts, emotions, channels, and devices used along the way.
A user-story map takes the perspective of the product. It aims to guide the planning and implementation of features and functionality to solve users’ problems. Put simply, a user-story map connects what we uncover in customer-journey mapping to what we’re going to intentionally do about it in the product we create, beyond listing out general ideas and opportunities.
A customer-journey map can easily evolve into a user-story map by adding the activities, steps, and details. Similarly, a user-story map can morph into a customer-journey map if the users’ context, thoughts, and feelings are added. These two map types can work well when combined, but are also effective when used independently, as the research methods used to inform and create each of them are often the same.
Customer-journey maps are from the perspective of a person, depicting the journey she goes through to complete a task, along with her thoughts, feelings, and channels used. User-story maps are from the perspective of the product and communicate users’ granular interactions therein. They’re used for alignment and tactical planning for developing and releasing features and product iterations that aim to solve the problems uncovered in the journey map.
User-Story Maps in Agile
User-story maps support the success of Agile product-development teams for several reasons:
Conclusion
Story maps encourage productive, user-centered discussions about product creation, improve visibility for the backlog, and allow teams to see the bigger picture. If done properly, user-story maps reveal logical and releasable slices of product increments that meet users’ needs, while uncovering impacts and areas of risk ahead of development. This allows teams to learn early and often what works and what does not. Savvy teams use this knowledge to drive decisions about where to focus their time to maximize usability, value, and feasibility in subsequent iterations.
And finally, because Agile is all about embracing and reacting to change over following a concrete plan, story maps better facilitate efficient adaptation; it’s far easier to swap out sticky notes than it is to revise hefty requirements documents. Learn even more about how to create a user-story map, the benefits of collaborative user-story mapping, and how to use these maps in your Agile product-development practice in our Lean UX & Agile course at the UX Conference.
References
Patton, J., & Economy, P. (2014). User Story Mapping: Discover the Whole Story to Build the Right Product. Sebastopol: O’Reilly Media, Inc.
A Complete Guide to User Story Mapping: Process, Tips, Advantages, and Use Cases in Product Management
There are basic things in the world almost everyone knows how to do. Think of making an egg – an elementary culinary act that nourishes while requiring little skill. But while you may think it’s a no-brainer, ask ten people to make an egg, and you’ll get ten different dishes.
Planning a software product is a lot like asking people to make an egg. If there was a product backlog for a meal made of eggs, it would probably include user stories like:
#1. As a user, I want my meal to be filling, so I can eat it as a complete meal;
#2. As a user, I want my meal to be solid, so I can eat it using a fork;
#3. As a user, I want my meal to be highly seasoned, so I can eat it without adding spices;
#4. As a cook, I want a meal that takes no longer than 10 minutes to make, so I can prepare it fast;
#5. As a cook, I want a meal that consists of few ingredients, so making it takes less effort.
Our example is minimalistic, but it is kind of a usual flat backlog, right? Now, can you tell what type of meal we’re talking about here? Is it an omelet, a hard-boiled egg, or a poached one? The stories are written in the vertical order, meaning that the most important items are on top. But is nutrition value really more important than taste qualities?
Product backlogs were created to communicate product requirements and vision. While a flat product backlog is a common practice for any agile project, in its traditional form, it has lots of limitations. In 2005, agile practitioner, Jeff Patton, developed a new way to arrange user stories in a backlog. The approach named User Story Mapping as described in Jeff’s book quickly became a widely used practice in product development. So, in this article, we will look at the main advantages of story maps, how they are built, and in which cases you definitely need it.
The Problem with a Flat Backlog
As in the egg example, structuring your user stories in such a manner provides little context to clarify what you are building, how, and why. So, utilizing a flat backlog for product development may have some challenges:
User story prioritization. User stories describe specific tasks or features, representing functional requirements requested by users. To work on a product, a development team needs to set priorities on what stories are more important to be released earlier. Prioritization techniques like MoSCow or Eisenhower Matrix are used to define levels of value to ease release planning. But, at the same time, stories written in a top-down fashion cause a conflict of priorities.
Contextual lock. Each story describes a piece of future functionality, which is okay on its own. However, a software program broken down into small pieces doesn’t show the big picture. Thus, your team is risking putting too much attention on isolated features, instead of the product as a whole.
No shared vision. Consequently, the lack of general context also doesn’t help share a product vision. Stories are translated into tech tasks, providing instructions on what to build right now, without telling what’s coming next in the long run.
Doesn’t depict user journey. While a backlog is not a UX user journey map, it needs to depict what users can do with the system. In the format of a flat backlog, describing general user activities is difficult: epics (big stories describing general activities, e.g. authorization) tend to be decomposed into smaller, doable stories. As a result, the visibility of user activity is dimmed.
Considering existing backlog problems, Jeff Patton offered a story map as a way to visualize and structure stories. Story mapping soon became a popular technique used for managing agile projects. So now, let’s look closer at how story maps are built and what their real advantages are over a flat backlog.
What is Story Mapping?
User story mapping is a technique developed by Jeff Patton during his long practice as an Agile product owner/scrum master. A story map received its name because it helps map out user stories and other backlog items visually. Items are arranged in two dimensions: The vertical one denotes priority, while the horizontal one represents steps a user takes to perform actions in the system (user journey). Story maps as described by Jeff include such structural elements as:
Backbone. The backbone is the basis of the map. It consists of epics or themes, which describe overall user activities in the system, e.g. search products. Epics are arranged in a horizontal order as they represent steps a user takes while interacting with the product, which is basically a simple display of the user journey.
Stories. Unlike a flat backlog structure, user stories are arranged in both vertical and horizontal dimensions. User stories are grouped under corresponding epics, describing more specific tasks a user may require. If an epic describes a search phase, it may include stories like basic search, filtering products, advanced search, etc. When stories are prioritized vertically, they can be divided into releases.
User personas are fictional representations of people that will use the product/perform steps described in user stories. Created by UX specialists after user interviews, personas provide descriptions on who the users are, and how they might like to interact with the product. On the story map, personas are bound to dedicated epics they will be involved in.
Ideas and nice to have. To depict a full picture, a story map may also include sections like ideas or nice-to-have features. These will keep in mind user stories that are not required yet or not stated in initial requirements, but still add value to the product.
A sample story map for a commerce product
The mapping approach also stimulates productive conversation within a development team. While it can be managed by a Product Owner (PO) or Product Manager, the map itself is created in a story mapping workshop as a collaborative effort. During the workshop, members of the team can ask questions like “why do we need this story?” or “why are these stories more important than those?” This guarantees mutual understanding of development goals and the context of each story. Further, the map helps depict all the additional details about the product and communicate this information across the team.
An illustration from Jeff’s book showing the concept of the story mapping process
Source: Patton, J & Economy, P, 2014, User Story Mapping book
In the most basic form, it can be built on a blackboard or table using colorful sticky notes. Story mapping as an alternative way to show what you are building helps overcome challenges presented by a flat backlog. Let’s quickly sum up the strengths of story maps.
What are the Advantages of Story Mapping?
The approach described by Jeff Patton is just one of many ways to structure the story map. In any case, the manner in which we organize backlog items inside the map offers the following benefits:
Clear priorities. The general approach of how a story map is structured makes it easy to prioritize each story, preserving the connection between big and small items. “Prioritization becomes easier as a story map begins with the backbone that is not prioritized. You need all of those things since they are required to create an MVP to start off with something. By using the backbone, it’s easier to see where stories or tech tasks belong and where the gaps in functionality are,” explains Vlad Khilchenko, a product manager at AltexSoft.
Built-in user journey. The backbone of a story map is an oversimplified version of a user journey map. While they are structured differently and are used for different purposes, the product team will be able to navigate the backbone’s steps. Additionally, each step can be widely expanded by stories, providing more context to each piece of functionality.
Visible product goals and vision. A story map is a dynamic document that will expand as the product grows. Having a bird’s-eye view of the project, and understanding where it starts and where it ends, the team can grasp the vision of the product and how to implement it on a technical level.
Helps to avoid backlog grooming. Large-scale projects may last years. As the product moves closer to its release, items in the backlog may lose their relevance, and thus should be reviewed. The act of backlog “cleaning” is called a grooming or refinement session. If you structure your backlog as a story map, items are always placed according to their priorities.
Better communication. Product backlogs are created by a single person, a product owner. Contrary to that, story maps are done during the mapping workshop that involves many team members. This facilitates discussion about the product right from the beginning.
As we can see, the practice of story mapping is a much more flexible and transparent approach to communicate product ideas. As any document in agile, it’s done with the purpose of building working software. That way, a map can be built in any way you want, given that you stick to the main idea.
What are the Best Use Cases for Story Mapping?
As a technique, story mapping is a good fit to solve the following problems:
Outlining Minimum Viable Product. One of the biggest challenges occurring because of the odd prioritization in a flat backlog is defining what goes in MVP. Story mapping was created with this problem in mind, as it allows the team to identify what’s important now and put those items into the MVP release. Managing a more mature product, it’s better to use a product roadmap, as it offers similar capabilities without relying on the backlog changes too much.
Slicing large requirements into smaller items. Requirement documents often contain verbose descriptions that are hard to understand. They have too many technical solutions/integrations. Story maps are perfect for decomposing large tasks into smaller pieces, making them digestible for a team.
Improve communication with stakeholders. Understanding stakeholder’s requirements can be a pain. In the case of story mapping, not only does it support healthy discussion inside the product team, but also helps product/project managers involve a stakeholder (business owner) in the process. The business owner is one of recommended participants to include in mapping workshops. Facilitating the dialogue between the team and the customer makes it a lot easier to understand desired output.
Now that we’ve reviewed story map functions and advantages, let’s look at how we can approach story mapping in our own project and the viable steps to make it work.
The Process of User Story Mapping
How to approach user story mapping? The way you can implement it as an ongoing practice will differ depending on the size of your team, the scope and duration of a project, and the phase of the product’s maturity.
The best time to start with story mapping is when you’ve gathered all the product requirements, and team for the project is defined. The map itself can be either built on the basis of existing backlog(s) or as a standalone document.
Pre phase: Gather Documents and Choose the Mapping Tool
If you already have usable technical documentation for a project, take it with you. You ‘ll definitely need to look at the Product Requirement Document (PRD), standards, and estimates. Also, you should take a look at user personas prepared by a UX researcher.
Then, answer a simple question: What type of a story map are you going to build? The old school pen-and-paper method is easier, so if you decide to write by hand – prepare a blackboard, lots of sticky notes, felt-tip pens, markers, adhesive tape, and coffee.
If you plan to use a digital product, make sure it has a sharing function as a part of free/paid functionality, if you want the map to make sense. Today, there are many digital products that help teams either as a web-based shareable document or inbuilt CRM solution:
Expected output: Technical documentation is gathered and reviewed. Tools for story mapping are chosen.
Step 1: Select Members of a Story Mapping Team
Before you start, define the people you are going to build your map with. Story mapping is done in the form of a workshop that involves all the key persons from different departments. The outcome of this phase should provide a clear list of people who will participate.
In practical terms, you should consider only those people that can make decisions and take an active part in the discussion. Here is a hint: The workshop may include no more than 10 participants. Once the team gets bigger, you won’t be able to provide enough time to each participant. The fewer people you choose, the easier it will be to initiate a discussion between them.
Recommended as the head of the workshop: product owner/product manager/scrum master.
Recommended roles that should participate: engineer, UX designer/researcher, project manager, stakeholders (business owner or investors), marketing representative, business analyst, sales representative.
Expected output: the list of participants.
Step 2: Set the Frames of a User Story Map and Define Goals
As in the case of product roadmaps that pursue similar goals, a story map should have strict borders outlining what you are discussing at this moment. There is no need to cover those parts of the system that are not required yet. You may mention them in the ideas section. The best practice is to focus first on bringing a minimal viable product to life.
A Minimal Viable Product or MVP can be defined as an early version of a product that possesses the most important features only. Here’s an example. Imagine that you are forging a knife. Because a knife can be used for a variety purposes, it can have a lot of different features, including decorative ones. But the core use case of a knife is to cut or slice something. So, an MVP of a knife is a tool that has a handle, a blade, and a sharp edge.
Those three knife features that are allocated to the release of an MVP are not prioritized between each other. Why? Because the lack of even one feature makes the product value to zero. Jeff Patton suggests using the term Minimum Viable Solution instead of MVP. So, the definition for it is: “The minimum viable solution is the smallest solution release that successfully achieves its desired outcomes.” Focusing on MVP in scope definition for the map will guarantee that you include the required basis for the product.
At this phase, you should also define what will be put on the map. User personas, user stories, and epics are the must-haves to build a proper map, as well as a release outline. But you should also determine whether you need some additional sections such as:
The next step is to understand whether you must mark what is done on the map and whether you want to provide even more context to the stories or divide them into different types by user personas. Of course, it can be done right at the workshop: Different explanatory items can be easily added to the map with the help of color-coding. But, it’s better to be defined at this stage of planning.
Expected output: the scope and format of the map.
Step 3: Implement User Personas
Provided by the UX or marketing department, user personas will serve as a basis for your map. Without knowing who your users are, you won’t be able to understand the epics of the product, and so will miss the whole point of story mapping. Having user personas or talking to UX staff, you can define who the people are that will perform certain actions in the system.
Expected output: User personas are defined and listed.
Step 4: Appoint the Meeting and Onboard Participants to Story Mapping
When all the participants are accounted for and you have prepared everything on the practical side, it’s time to explain to the members what you are going to do. Start with a warm-up and just talk to people for a few minutes. At every meeting, it’s important to make participants feel comfy enough to take part in the discussion and share thoughts.
Next, elaborate on how a story map works, and what you expect from participants. The main point here is to communicate the goals and align the team’s understanding. After that, you should explain the structure of the map:
The leader of the meeting may be the one to write the information on sticky notes, but each member can do it on their own. So, each participant should be acquainted with the rules.
Expected output: All the members understand what you are going to do, what you want to get as a result. All the structural elements of the map are explained to the participants.
Step 5: Conduct the Workshop
After explaining all the necessary information, you will begin building an actual map. The map itself starts with writing user activities, based on user personas. User activities are provided in the form of epics. So that will be our backbone for the future product, the steps a user can perform, the steps that denote our particular product.
Take a look at the example built with the StoriesOnBoard tool. You may click on the image to open it full screen:
Each epic is assigned with corresponding user persona and decomposed to user activities
As you can see, epics describe the general tasks a user can possibly do. Human face icons floating above the epics are the user personas that each epic is assigned to.
When writing the epics, think of a user persona description, as it will provide the key information on how to formulate the epic precisely. Then, break them down into activities a user can do, in the action frame of the epic. Keep in mind that user activities are not user stories; they should define a piece of the process, not a feature.
Expected outcome: The backbone of the story map is written.
Step 6: Write User Stories
Now we’re going to have a go at the low-level details. In a flat backlog, user stories are written as follows: “As a user role I want to action so I could motivation.” The format of user stories provides enough detail when we talk about separate features. So you can use this format in your map or simplify them to tech task format, e.g. add drag and drop to upload a file.
User stories are allocated by user activities/epics
As we already group stories across epics that have assigned user personas, the classic format of a user story is not obligatory.
The number of stories and their details depend on what phase of project preparation you are in right now. But, at a minimum, keep the focus on MVP (or Minimum Viable Solution).
Expected outcome: user stories decomposing epics and user activities.
Step 7: Prioritize Stories and Outline MVP
Now we have three levels of items describing our product in detail. Our task is to sort out the most important features and plan releases. Allocation of user stories by importance can be done by various methodologies we have mentioned before.
In the case of sticky notes, release planning is done using a tape. All we have to do is just separate the stories block so that each block visually defines a release. Digital products offer wide functionality to group, outline, color code, and allocate notes.
Now user stories are prioritized and put into blocks of releases, an MVP release comes first
At this stage of prioritization, we also outline which stories will go into the MVP release. The choice should be discussed with the team, considering the opinions of those participants who can provide a data-driven argument. Those people are a UX researcher, a business analyst, or a market researcher.
When you define the rest of the releases, you can estimate each release separately to provide the team with time frames. Or dates and estimates can be put in a separate document called Release Plan. A release plan is a type of product roadmap that defines time frames for delivering each part of the software without elaborating on tech details.
Expected outcome: User stories are prioritized to releases
Step 8: Arrange User Stories That are Left
During the discussion, you will probably generate some extra ideas. Usually, prioritization techniques consider a separate category for stories that are nice to have. So, don’t forget about them.
Another important section that you should definitely have is a thrash section. Thrash may sound a little… harsh, but it’s a section where your put stories that you don’t need. The importance of this section may not be obvious. However, as the product becomes mature, you can expect a change of priorities or new requirements. So, keep everything organized and clear to extract this data when it’s required.
After releases are set, you will have to update the information on the map so that it remains relevant to the current state of the project.
Story Map Maintenance Tips
The map is not static. It will require proper management over time, so also keep in mind the features of the map that will be added in the process:
Use note status markers. When the feature is done or there are some delays, add this info to the map. Consider marking each note (with the user story, or the whole user activity) with the status:
These statuses make what’s happening with the product clear and what part of the job is done correctly.
Put some risk notes. A risk note is a unit that denotes a high probability of failure. In product development, each feature is based on the assumption that a user needs it. However, this doesn’t work all the time.
The example of the risk may also be a need to integrate with a third-party solution, or dependency on the unstable solution/service. Putting risk notes on the map helps keep this information in sight and probably saves your budget.
Make stories testable. As we already mentioned, each user story that exists in the backlog or story map is just an assumption based on market research, business analysis, and user interviews. Each assumption can be wrong to some degree or wrong entirely. So, consider making stories testable. One of the ways to check if the assumption is true is to conduct user acceptance testing, which is basically testing that involves real users.
Can the Story Map Replace Product Backlog?
Product development is a tough process that requires efficient tools to drive it. A flat backlog can be enough to communicate product ideas, but its format makes it difficult to understand and share across the team.
“The main advantage of a story map is not the map itself, but the approach to structuring backlog. You may build a flat backlog and it will contain all the necessary information about releases, sprints, timelines, and pieces of functionality. But the map makes it more vivid because it shows the connections visually, and has a place for explanations,” states AltexSoft’s Vlad Khilchenko as an argument for story mapping. So, it should be considered a neat practice to building a good backlog, rather than an alternative document to replace it.
User story mapping: Closing the gap between design research & delivery
Starting with a story map was new for us, but it had some big benefits
Late this summer, a tiny team of three designers here at Fjord began an amazing project. Our client was a major freight company that ships across the US and Canada. The company has been around for over a hundred years, and they know the business inside and out. However, their technology hasn’t kept pace with the market. They’re now in the midst of a technological revolution.
The men and women at this company work hard. The work is outdoors, in extreme weather and dangerous industrial conditions. They plan, track and report their work on printed paper marked up with Sharpie. The process works, but it’s prone to errors. Each time a worker forgot to record what they did during the day, the company left more money on the table.
Our task was to design new software to help manage that day-to-day work. The software would help workers locate, assemble and deliver thousands of tons of goods every day. It was an intense, exciting challenge.
We had a strong plan of attack, but as we spoke with the client we realized that things weren’t perfectly aligned. While we were preparing to help define the vision & strategy of their product, they were already concerned with building the software.
A big part of building the new software was documenting user stories for our client’s development team. This was the last step in our plan. It was meant to come after we had done a month or two of research and designed a north-star vision for their application. However, the reality was that our client needed those user stories immediately.
Recalibrating our approach
We debated what to do. Should we reset expectations, stick to the plan as-is or take a blind stab at stories right away? Nothing seemed right.
The client already had user stories. Not one set of stories, but competing versions. The business managers were writing stories about the features they needed. These were about efficiency and cost savings. The technical folks were writing stories based on their knowledge of internal systems. As human-centered designers, we were writing stories based on which features would best serve the end-users.
We didn’t need to introduce yet another way of writing technical requirements. We needed to find a way to ensure that the client’s finished product matched their desired business outcomes, had impact with their users and was technically feasible.
Our client had many ideas, but there still was no clear way to bring the necessary points of view together. Luckily, my friend & former colleague Nate Archer had given me an introduction to the practice of User Story Mapping. It seemed to fit our needs.
User story mapping had the ability to tie our detailed knowledge from research into a familiar development framework. We could still map a user’s journey through the experience, but we would do it from a software point of view, using the language of agile methodology.
Below, I’m sharing a short summary of what I learned. If you want the full context behind story mapping I recommend checking out Jeff Patton’s book called User Story Mapping.
So what is a user story map?
Getting your stories straight
Before you make a map, it’s important to understand what size story you’re working with. Here’s a real-world example to illustrate what I mean:
If your goal is to make a pizza, that’s a pretty big story. You can break that down. Below that you might have: purchasing ingredients, gathering equipment, preparing the dough, and several more tasks (home-made sauce?). Those tasks can be broken down further — if preparing dough, you might have stories for proofing yeast, measuring flour, etc.
UPDATE: Since I originally wrote this article my story mapping practice has changed. When story mapping, I now follow a general mapping hierarchy of: User goals → Tasks → Stories to break things down consistently. This keeps it nice and clear about who is doing what and why. See the illustration below—not too hard!
If you live day-in, day-out in the agile world you’re already using user stories. They are written a very specific way, and follow a predictable format. The thing about user story mapping is that writing JIRA-ready detailed stories with the correct acceptance criteria needs to happen later. First you must define the product in broad strokes. Then you pick your priorities and dive into the details.
Creating a user story map
Once you have a rough idea of which stories to include, the next step is to build a map. You need to map those stories so they form a narrative from left to right.
It’s helpful to think of a story map as the overall plot of an application. Novels and films almost always have multiple characters and protagonists interwoven throughout. Your story map will inevitably need to represent the perspective of multiple users.
Features that involve each user can come at the beginning, middle or end of the narrative. I’ve added some slides below to illustrate how it all comes together:
If you clicked through the slides above, you noticed that user story maps have a few key elements:
That’s the quick tour of user story mapping. Let’s take a look at how we used it on our project.
How we mapped our stories
We only had a single day with our client. There simply wasn’t enough time for us to create a user story map from scratch. So what we did was gather all the user stories in one place. From those, we created a draft version of the map. We made informed guesses about what was needed based on our research and expertise. This went up on the wall prior to our workshop. When our clients came in for the day we invited them to tear it apart and rebuild it the way it SHOULD be.
Story mapping required us to give up some of our privileged space as expert design consultants. Rather, we needed take on the role of facilitators and listeners. We needed to leverage our clients’ subject matter expertise and closeness to the problem to create the best map possible.
It felt a little weird, and just a bit risky. We were stepping back and providing the space for our clients helps us find the shape of the software.
Defining an MVP
At the end of the workshop, We asked our clients to spend time looking at the entire map. They were then asked to decide which stories would be most useful to prioritize in our design and validation phase. These were the toughest stories. These were the stories that required the most experimentation and creative thinking to get right.
We quickly wireframed and tested those stories in the field to validate our assumptions. Throughout this process we were solving not just for our stories, but encompassing many peripheral stories. It was a great way to dive in and define the interaction model and architecture while keeping everything grounded in the needs of real users.
At the end, we had designed much more than just an MVP. And when we went to test, the feedback from our users was incredible. By focusing on user stories, we had focused on the people who mattered most—the people who would end up using the software every day.
What we learned
Starting with a story map was new for us, but it had some big benefits. It was an approach that allowed us to stay human-centered but be more inclusive in talking about our initial approach to designing software.
We could better facilitate a discussion about business requirements, technical requirements and the needs of the user. The user stories provided a metric for success to refer back to. We could always ask — is this design addressing the story? This is a powerful tool, and one we look forward to continuing to refine and adapt to our practice.
Инструменты для подготовки ТЗ + шаблон
Подготовка технического задания — этап, на который уходит уйма времени и нервов. Еще больше сил уходит, если заказчик без опыта. При этом на ТЗ завязано все: срок, стоимость и содержание проекта.
Мы в Alto работали с десятками проектов и постепенно накопили список инструментов, которые помогали нам. В этой статье решили собрать их вместе. Надеемся, что они помогут вам оптимизировать процесс создания технического задания.
Разработка сайтов – это долго и трудоёмко. Поэтому вы должны быть уверены, что решаете правильную задачу. Если вы не понимаете кто ваш пользователь и чего он хочет – есть риск создать сайт, который не подойдет вашим клиентам. Именно поэтому работу над техническим заданием рекомендуем начать с «User Story Mapping».
В основе пользовательской карты лежат два инструмента: User Story и User Journey.
User Story – это короткие истории, которые объясняют роль пользователей на сайте. Обычно история описывает:
Шаблон по которому строится User Story:
User Journey — описание задач и действий клиента на всех этапах взаимодействия с сайтом. Шаги пользователя продумывают, а затем фиксируют в удобном формате.
Список шагов может выглядеть следующим образом:
Зашел на главную страницу → открыл каталог → открыл карточку товара → перешел в другую карточку товара → добавил товар в корзину → оставил заявку.
Рассмотрим создание «User Story Mapping» подробнее. Опираться будем на рекомендации Джеффа Паттона из книги «Пользовательские истории. Искусство гибкой разработки ПО».
Объедините шаги клиента в этапы.
Приоритезируйте действия пользователя внутри каждого этапа. Выделите релизы.
Заказчик и исполнитель должны понимать, зачем нужна каждая страница и какие элементы на ней будут. Есть два способа показать это.
Figma.com – это первый способ визуализировать то, что вы планируете сделать. Для его использования необязательно иметь навыки дизайнера. Можно примерно показать, как всё должно выглядеть.
Для творческого вдохновения, рекомендуем посмотреть раздел wireframes, где выложены сотни примеров.
Также вы сможете найти множество готовых макетов по запросу “UI kit figma”. Можно скопировать компоненты и собрать из них прототип.
Рекомендую обратить внимание на bootstrap UI-кит. Это поможет сократить расходы на реализацию проекта. Так как есть одноименная библиотека для разработки.
Miro.com – это второй способ визуализации. У этого сервиса есть библиотека, которая позволяет быстро создавать простые прототипы. Даже если у вас нет опыта в прототипировании.
Создавать прототипы в Miro почти так же просто, как на листе бумаги. Вам не нужно будет зацикливаться на деталях, что позволит сосредоточиться на концепте сайта.
Если вы пишите техническое задание на разработку сайта, то вам не обойтись без подготовки структуры. Для этой задачи рекомендуем программу XMind. По ссылке можете скачать наш шаблон. Его хватит, чтобы приступить к работе над структурой сайта.
Структура сайта поможет определить основные страницы. Также она необходима SEO-специалистам для формирования семантического ядра – сбора ключевых слов
Рекомендуем собирать всю информацию по проекту в Notion. Одной их его из особенностей – универсальность. Здесь можно вставлять чек-листы, создавать канбан доски, дорожные карты и многое другое. Он позволит иметь всё необходимое по проекту в одном месте.
Например, один из инструментов Notion – базы данных. Вы можете создать свою базу с кастомными полями. Добавить несколько видов отображения: в виде календаря или в виде таблицы. Это поможет программисту разобраться из каких сущностей состоит проект.
Специфика Alto — это разработка корпоративных сайтов от 100 до 400 часов и интернет-магазинов от 150 до 1200 часов. Если ваш проект планируется в этом же интервале, тогда этот шаблон может подойти вам.
Мы используем данный шаблон, как стартовый «конструктор» для составления более подробного ТЗ. Рекомендуем туда добавить раздел с планом работ и порядком приемки результатов.
Также рекомендуем посмотреть онлайн-генераторы, которые помогут собрать требования для технического задания:
В качестве дополнительных источников смотрите ГОСТЫ. Они громоздкие и избыточные, поэтому не подходят большинству проектов. Однако, в них можно найти такие требования про которые вы бы даже и не вспомнили.
Надеюсь, эта статья была вам полезна. Расскажите в комментариях, какие инструменты помогают вам. Ваш Alto!
What is User Story Mapping?
Requirements always change as teams and customers learn more about the system along with the progress of the project. It’s not exactly realistic to expect project teams to plan for a static requirements list and then deliver functional software months later. User Story Mapping is a better and more Agile way to address rigid changes of the end-user requirements.
A user story map helps you arrange user stories into a useful model for understanding the functionality of a system, identifying holes and omissions in your backlog, and effectively plan holistic releases that deliver value to users and business with through releases.
User Story Map is becoming a popular user story management technique through the efforts of Jeff Patton and others. The user story tool allows you to establish multiple levels and dimensions for a product backlog through the breakdown of user needs as user activities, user tasks, epics and user stories. Typically, an agile development team makes use of story map in collaborative meetings in identifying the desired results the end users want to achieve.
Agile Software for Scrum Teams
Need an agile software solution for product backlog management? Visual Paradigm supports a powerful agile toolset that covers user story mapping, affinity estimation, sprint management, etc. It’s powerful but yet easy-to-use, intuitive and, most important, AGILE.
Why User Story Mapping?
Story Maps were first introduced by Jeff Patton in 2005. The main idea behind Story Maps is that single-list product backlogs are a terrible way to organize and prioritize the work that needs to be done. A richer structure is necessary. A user story map is a powerful tool that enable an agile team to groom their product backlog and plan the product releases more effectively.
A user story map captures the journey a customer takes with the product including activities and tasks they perform with the system. Creating a story map collaboratively ensures team members are on the same page from the start of the project through to ongoing development of new releases.
Here are few benefits of using story map as a user story tool:
Why You Need a User Story Mapping Tool like Visual Paradigm?
Listed below are some of the reasons why you need a user story mapping tool like Visual Paradigm in story mapping.
Flexible Structure Complex or Simple Projects
Visual Paradigm’s Story map supports a 3 or 4-level hierarchical structure for requirements gathering which is suitable for either complex, medium or simple projects. Story map starts from a collection of user features received from different sources (i.e. use case, BPMN, WBS or even mind maps) into the backlog of the story map, and these user features will be realized as an user activities and into related walking skeleton (user tasks). And these tasks can be breakdown further into epics, and then user stories for software development.
3-level Story Map for Medium Size Project
The 3-level story map involves three compartments: Activities > Tasks > Stories (Default)
4-level Story Map for More Complex Project
The 4-level story map adds Epics into the 3-level map: Activities > Tasks > Epics > Stories (Configurable to)
Receive User Requirement Identified From Different Sources
There are so many ways for us to identify user requirements. Different people may prefer different modeling techniques for capturing system requirements. In fact, we shouldn’t think that there is a single dominate technique that can serve all purposes for different problems or projects. Sometimes, we may consider a use case diagram, but in another situation, work break down structure may be a better choice, or perhaps a mind map instead, it all depends.
To facilitate agile development, Story Map in Visual Paradigm can receive user features identified from different sources. As mentioned above, it could be the requirements derived from EA contracts, work packages from project management initiatives or ad-hoc analysis such as-is and to-be analysis, use cases in a use diagram to be integrated with agile software development and etc.
Integrate with the Story Estimation Feature Seamlessly
The user story tool empowers team with Affinity Table for automating the story estimation process. Moreover, the visual Affinity Table supports real-time estimation with both story points and story hours at the same time. When you drag a story along the table, both the story point and hour will be shown simultaneously while the story is still moving around. Just drop the story in the grid where your team find the estimation is suitable.
The configurable user story map is seamlessly integrated with story map, and scrum and sprint process for providing one-stop-shop solution.
How the Automatic Affinity Table Calculate?
To understand how the story point and days are estimated automatically in the Affinity Table, we need to understand that the horizontal grids represent the work efforts, increases from the left to the right, and the complexity of the story development (such as new technology, new domain and etc.) increases from the top to the bottom.
As the maximum number of days for a user story to be developed should be no more than the length of the sprint (if not either the user story is to big that needed to be broken down, or the sprint is set too short which requires an extension), so the number of days of the bottom right grid should be also be equal to the length of the sprint. Based on this assumption, the story estimation can be calculated automatically.
Affinity of User Stories for Estimation
Estimation of a user story can never be 100 percent accurate and in fact no method can achieve this. To improve the accuracy of estimation, we start off by deciding the sprint length (say, two weeks, or 10 working days) and perform estimation on a few user stories that we feel most comfortable with in terms of estimation (say, 5 days and the certainty is medium). In this case, you will put the story in the middle vertically (certainty or risk level) and horizontally (work effort is equal to 5 day, or half of the sprint length, which is 10 days). You can then use it as a reference point in estimating the other user stories. Ask yourself whether this user story requires more effort than the referenced one, or less, and has more uncertainty or less). As you place some more user stories onto the Affinity Table you can compare among several user stories to determine whether the offsetting is logical or not, and then juggle them around to make them fair and that’s it. The process is a little bit more an art than engineering. Do it and discuss in the team meeting rather than any confrontation. The accuracy will usually be improved as the team getting more mature.
Conducting Spike Investigation
According to Agile Dictionary the definition of Spike is:
«A task aimed at answering a question or gathering information, rather than at producing shippable product. Sometimes a user story is generated that cannot be well estimated until the development team does some actual work to resolve a technical question or a design problem. The solution is to create a «spike», which is some work whose purpose is to provide the answer or solution.»
When estimating a user story we not only consider the development effort, but also take into considerations the risks and uncertainties involved. Quite often, a spike is created before the formal commencement of a sprint in managing the work required to be performed in order for some other user stories to be estimated fairly.
Ready for Agile?
Want an agile tool that can manage your scrum projects well? Visual Paradigm features a user story mapping tool, Affinity Estimation tool, sprint management tool, and task management.
Story Mapping: Painting The Big Picture Of Your Product’s User Stories
You stare at your laptop. A long list of user stories stares back at you. You shuffle some around, trying to put them in a sensible order.
You constantly re-sort the list. Either to see all stories related to feature A, or to see the most important stories across all features. If that’s even possible.
Time and again, you get lost.
What you need is a Story Map. Let’s see how you create one using Story Mapping, but first, let’s dig into what they are.
Let’s Dive:
Story Mapping in Agile – What Is (User) Story Mapping?
Story Mapping or User Story Mapping is a technique used in product discovery: outlining a new product or a new feature for an existing product.
The result is a Story Map: all the user stories arranged in functional groups. This helps you keep your eye on the big picture while also providing all the details of the whole application.
What’s the Purpose of Story Mapping?
The main purpose of Story Mapping is to facilitate product discovery and prioritization of development work. You achieve this by putting user activities and tasks on a map that serves to keep them in context.
The Story Map always shows how each individual story fits in the whole application. And this makes it easy to spot gaps and decide how important one is over another.
What agile values and principles does story mapping support?
Story Mapping supports two values of the Agile Manifesto. “Customer collaboration over contract negotiation” and “Responding to change over following a plan”.
You get the best results when you collaborate with a (future) user or a domain expert. Someone who is intimately familiar with the work that your application is to support and the problems it’s to solve.
Using Story Mapping, it’s easy to respond to change. Because when you add a new user story, or you change or remove an existing one, it’s easy to spot what else needs to be added, changed, or removed.
Who Created Story Mapping?

Why Use Story Mapping? – What Problems Does Story Mapping Solve?
When you finish your product discovery, you’ll likely put the user stories into the backlog of a Scrum or Kanban board.
That’s fine to drive the development effort once you’ve decided on the build order.
However, the backlog management capabilities of these tools fall short for product and release management. Simply because the backlog is shown as a long, flat list. The filtering, labeling, and coloring you can do, helps a bit, but you never get the whole picture.
Story Mapping solves this by arranging user stories in a simple helpful layout.
What (Other) Benefits Do You Get Out of Story Mapping?
Story Mapping gives you a number of direct and indirect benefits.
Having the big picture at your fingertips
When you create a physical Story Map, you get some more benefits.
Pitfalls and Mistakes
The most important pitfalls and mistakes with Story Mapping are:
You need to collaborate with someone that uses or will use your product to support their work.
Without their input and perspective, you’ll be guessing at what’s important and what’ll provide real value. You’ll be playing a hit and miss game and will likely waste development effort.
Working without a problem to solve, a goal to reach, you have nothing to guide your decisions and you’ll have no idea when you’re done. Leading to wasted effort, or at least to expending effort on something at the wrong time.
Out of sight, out of mind. Without the Story Map serving as a visible reminder of your application’s big picture, veering off course is all too easy. As is the danger of getting lost in the weeds: getting caught up in the details of a single story that are irrelevant for the whole. This hurts even more, when those details would take more effort than the value of the story merits.
While a physical Story Map is preferable for the extra benefits it provides, with so many remote teams nowadays, you won’t always have that luxury. But you can still keep it highly visible. You can for example have a dedicated, large monitor showing the map in every location where you have team members.
How to Create a Story Map in 6 Steps (With Examples)?
1. Start With the Big Boulders
Identify the big stories, the broad user activities that your application needs to support. They’re big stories because they have many steps. These steps don’t need to have a specific order or workflow. In fact, many user activities have steps that a user will do at different times and on different schedules.
Write each activity on a card. Arrange them in an order that makes sense to the user. If someone talks about doing one activity and then another, arrange them in that order. If activities aren’t done one after the other, simply use the order the user talks about them. That’ll help telling the story of the application to others.
Let’s say you’re building a Fun Events Club site. Visitors can look for fun events to join. Members can join and host events. And the team behind the site serve as moderators and check if new events are within the guidelines.
The big boulders of this site, the user-activities, could then look like this.
2. Crack Your Boulders Open
Break down the story of each user activity into smaller stories, the user tasks. Put the user tasks under the activity they belong to and arrange them in the same direction as the activities and in the order that makes sense to the user.
For the Fun Events Club, that looks like this.
You now have what’s called the backbone of your Story Map.
Most user tasks have steps or independent subtasks of their own. You put these subtasks under (if you were going horizontally) the user task to which they belong.
That looks like this.
Both user tasks and subtasks become the user stories you’ll implement. After all, a user still needs to select an event from a list to view its details or join it immediately.
3. Find the Pebbles That Got Away
Walk the map from beginning to end with someone else at your side. This can be a user, a developer, a tester, or someone else with a stake in the application.
Talk about the (types of) user of your application and how they’re using your application. It’s a sort of rubber duck debugging for your Story Map. And it’ll quite naturally bring out things you’ve missed. Either because you think of them yourself, or because your companion points them out.
It turns out that for the Fun Events Club, we missed quite a few.
When you’re walking the map with someone, take the opportunity to annotate the Story Map with other information you hear. Pain points in the current system, opportunities a user’s been waiting for. Edge cases and constraints you need to take into account. Write them on a sticky and stick them on the relevant card.
4. Put Your Pebbles in Line
There’s little sense in prioritizing the user activities. Apart from activities that won’t be used daily, it’s highly likely that something from each activity is needed to create a working whole.
So focus on prioritizing user tasks and subtasks within each activity. Added advantage is that you don’t need to think about the relative importance of tasks belonging to different activities.
In our Fun Events Club example, the subtasks are already in order of importance. A bit of premature optimization by your author.
5. Sculpt a Valuable First Boulder From Your Pebble Piles
Select the tasks from each activity that are essential to create a first version that works end-to-end even if it’s still in a very rudimentary way. That’s your MVP, your Minimum Viable Product.
6. Continue Sculpting
Plan your subsequent releases by prioritizing the remaining tasks. It’s entirely up to you how you want to move forward.
You can opt to prioritize the highest value stories from several or even all user activities. You can also opt to focus on a single activity and prioritize all but the lowest valued stories. And maybe the business people in your company want to take other aspects into consideration. They are in the best position to decide what features and stories make a good release.
Rather than drawing lines between the stories to mark which ones go into subsequent releases, you can also rearrange the map to show releases as horizontal spans of stories.

Using Story Mapping With Existing Applications
Story Mapping is not just for new applications. You can use it for existing applications as well.
To help you understand what an application does and recreate its big picture so you can take advantage of having that when moving forward.
And of course to map out new features and put them in context with the existing application.
If you can’t (aren’t allowed) to build a full Story Map of the existing application first, at least get all the existing user activities in place.
This’ll give you the context for new features.
And it’ll also give you a place to put the tasks you need to add or change in existing user activities. For example, when you create a new feature to send out targeted emails. You’ll need to add selecting multiple contacts in the existing contacts list. And you’ll probably need to add some extra filtering capabilities there as well.
Become a Storyteller
Remember the pain of having to prioritize stories in a long, flat backlog?
And how difficult it was to explain the application to other people?
You know now how Story Mapping can help you. To prioritize stories and assemble releases that deliver meaningful value. And to tell the story of your application as users will use it. Simply by walking the Story Map.
So, make your future self happy, and take advantage of Story Mapping. On a wall, or with a digital tool. For example, with Digité’s Story Mapping.
User Story Mapping For Beginners
Learn user story mapping in 5 simple steps and put your new skills into practice!
By organizing user goals, activities, and user stories, you can an intuitive, visual backlog, that everyone understands. This is what we call user story map. Why is it so important to create such easy-to-understand documentation? Your customers need a simple way to confirm product goals. Plus, your teammates benefit from such a straightforward platform, with a clear description guide at the tip of their fingertips to which thay can add valuable ideas. To sum up, user story maps are the aid to building shared understanding between project members.
The first step is to focus on your potential customers. Summarize which goals the users achieve by using the product. Write each goal on an index card or post it, and arrange them into the logical order.
For example on an accommodation website, the goals can be: “find hotels in Florida”, “choose the best hotel, near to the beach”, “book a room for a week”
After collecting the goals, retell the user journey. Identify the steps the user takes to fulfill her/his goal. Avoid mistakes by dutifully follow the narrative flow. Place the post-its into the second line, step-by-step. If you discover missing steps, just put it into the journey.
Post-it notes are a smart solution to creating small documents, but the online story mapping tool delivers more flexibility.
The next step is to find solutions for achieving the user steps. Through this process, you create «user stories». Initially, you can use the following template:
Using the accommodation example, user stories are: “As a user, I want to find hotels for my holiday, so I start browsing the discounts and advertisements” or “As a user, I want to find hotels for the next week, so I start searching by date.” Brainstorm with your team to collect the most possible solutions and put all user stories under the related steps.
If tGTM-5GXSDZ2rming team was successful, the story map should be full of great ideas! User stories have different priority levels. Identify the most common behavior or the basic solution to the problem.
Organize user stories by priority and place the most important card at the top of the column. Discussing priorities with the customer is crucial, so be sure to stay connected with your partners.
First, specify the smallest working part of the product, the Minimum Viable Product. It’s always hard to choose the fewest tasks for a marketable product.
Try to complete the user journey by beginning with the most common or most easy-to-develop tasks. Just focus on completing at least one user journey. After that, try to organize the rest of the backlog into tangible pieces by drawing horizontal lines between cards.
If you add estimations to user stories, you can plan and schedule the whole development process release by release. This is one of the most important pieces of information, so that your customer or executive needs to calculate delivery time and costs.
Start 14-day FREE trial
Ready to put your skills to practice?
FREE Story Mapping Playbook
All leaked best practices in one place
50 handpicked hints on
В· Discovering project goals
В· Mapping the user journey
В· Prioritizing user stories
Bonus materials included
В· 100 user stiory map examples
В· Templates for specs
В· Useful articles
Physical vs digital story mapping
User story mapping is a very useful and commonly used technique amongst software delivery and agile design teams. It aims to capture an entire product solution, in a sequenced, easy to read visual artefact. In essence, teams map a user’s goals, actions, product features.
Teams can make very advanced and intricate user story maps. Or they can keep them lean and simple, focusing on only the core journey and interactions. It totally depends on the team, their maturity with the technique and their aims!
There’s a lot of debate about physical vs digital user story mapping. Which is better? What’s the advantages of one over the other? Can I only use on type? Here we’re going to dive into some of that discussion.
What’s the debate about regarding physical and digital story mapping?
They achieve the same thing, a story map, but in different ways and produce very different final artefacts. Let’s do a comparison. First off, what do I mean by saying вЂphysical’ vs вЂdigital’ story map. What’s the difference?
Physical story mapping
Physical maps normally involve post-it notes and a big wall. Teams gather around the space and stick up the post-its to show the user’s journey through the product.
Co-location collaboration
There’s something special about gathering a group of designers together to make a story map, with everyone desperately scribbling onto post-its. It feels raw and real!
Very flexible
Don’t like the sequencing of those features? Just move them, they’re sticky notes!
Inclusive
The wall will be large, there’s room for the full team to dig in and get creative. It gives everyone a shared experience.
See everything
A great advantage of physical over digital user story maps is you can stand back and take in the entire solution with a glance.
Location
In this digital, cross located world it can be hard to get everyone you need in a room and for enough time to create a physical story map.
Access
Once created, you can’t share the story map without moving the wall (or pictures…)! So for anyone not in that space, if your only artefact is that wall art, it can be hard to stay aware of the feature map.
Durability
A large story map will span multiple releases, likely over a long time period. It’s challenging to keep a wall of post-its relevant and safe enough to endure that full period, so you could easily lose your map. Even if you do, it’ll look pretty rugged by the end!
Digtal story mapping
Digital story maps utilise a software programme, such as StoriesOnBoard, to create a digital version of the post-it wall described above, where an image of the post-it can be placed anywhere within the digital canvas.
Flexible
They’re movable and easily sharable. You don’t have to commandeer the same room for 2 weeks because all you needs is access to the internet.
Easy to keep up-to-date
Easily maintained by the software, e.g. If you insert a new вЂpost-it’ somewhere, everything automatically shifts along to create the space. Be that a day, or 6 months later.
This could be me, but it’s often really hard to read what someone wrote in a moment of exploration and design excitement. – Typed words are much more accessible, especially to those without context.
Detailed
Softwares are clever. With digital story maps you can introduce layers of complexity and intricacy without taking away from the top layer story map. This allows you to see the full solution, but also instantly delve into the weeds of the detail if you need too.
Normally a good tool costs something. It’s likely not a lot for the features you get, but it’s something to consider when compared to a few packs of sticky notes.
Collaboration
It can feel less inclusive as you’ll need an individual вЂscribing’ at the computer as the discussion takes place, when with a physical story map you can all be the artist.
Bird’s eye view
Unless you’re lucky to have a super large monitor it can be more tricky to take in the 40,000 ft view of entire product solution with a digital story map.
We can see there’s pros and cons to both approaches. “This isn’t helping me settle the physical vs digital story map debate” I hear you saying. In response, I say do we have to settle for picking one of the above? No! Instead I always recommend teams use a hybrid approach to achieve top quality user story maps.
Hybrid story mapping
A hybrid user story map has all of the advantages bestowed on physical maps by including; team co-location, the excitement of вЂin the moment’ collaborative design and the raw creativity of sticking post-its all over your office space. After that exuberance you can then step back, take it all in and understand where to cut your product releases by seeing the solution as a whole without having to scroll! Then, with the group creativity complete, you can spend some time turning it into a digital story map and begin to enjoy the pros associated with the digital mapping approach.
Call out the releases, join features and show user journey deviations with different colours.
Add extra detail to elaborate scenarios without taking away from the high-level picture.
Add addition information as you get questions answered from people not there at the time.
Because the group creativity is over you can afford to take time over it and produce a durable, high quality artefact that you can share with all your stakeholders – those that were there and those that could not make it or anyone simply interested! This new story map will be easily maintainable and can be iterated by the team as development and design continues.
Yes, this hybrid approach does take longer than simply doing either just a physical or digital story map, but I think the strengths of the approach far outweigh the extra time burden.Especially if you use an online backlog management tool like Jira or TFS, as for example, StoriesOnBoard integrates with both anyway, so by creating the digital map, you’ve created both an awesome story map that you can share and populated your backlog. Win win! So why settle for just pictures of your sticky-note wall or miss out on the group creativity when you don’t have to with a hybrid approach?
The bottom line
Story mapping is a great technique that should be embraced regardless of your approach to it. The question of physical vs digital story mapping is a valid one, as both have lots of advantages and disadvantages when used in isolation. That’s why I recommend combining both techniques and using a hybrid approach for your story maps, that way you get the best of both.
Want to explore more? Start here.
Product discovery with JIRA in 10 steps
Lack of discovery features in JIRA is no longer an obstacle with StoriesOnBoard!
What is user story mapping: tools and techniques
How can user story mapping help your team to boost the UX of your designs? Here’s how it works and some tools you can use
Are user stories a crucial part of planning iterative work in your team? Do you use them alongside a wireframe tool? User stories involve research and planning. What if we told you there was a way to make them go the extra distance and get your product over the finish line faster?
Prototype and test new apps today. Enjoy unlimited projects.
It turns out there is, and the technique is called user story mapping. It’s a way of taking all those user stories and arranging them in a way that a) makes sense, b) that helps you work faster and c) helps you discover issues sooner.
Let’s get you on the way to creating user story maps. Read on to see how your team can start creating user story maps today and for some great tools and books to help you master the technique in no time so you can begin wireframing ASAP.
What is user story mapping?
User story mapping is both a visual and planning exercise that allows a product development team to put all the tasks of a feature development backlog into action. Or you can think of it as a way of organizing sprint tasks.
As the name suggests, user story mapping draws on user stories. It uses them to create steps that represent a user persona’s journey towards achieving their goal and is a great way of putting some order into their sequence of development. It’s also a brilliant way to organize user stories into sprints.
Although it doesn’t look anything like an actual map (it actually more closely resembles a kanban board), it does show the natural progression of tasks and steps in user stories. It involves columns of digital cards or physical sticky notes on a whiteboard arranged into a table or panel format.
User story maps are generally aimed at product managers and development teams. However, they’re also useful for clients and other stakeholders, as the idea is to define and organize user stories into a flow that makes sense for both the user and the product’s business goals.
Furthermore, user story mapping is a helpful technique because it helps conceptualize the team’s understanding of how user personas might interact with a product while the canvas is still blank! It also shows a team which features they should work on in early sprints and the priority they should take. In many respects, user story maps are like sudoku puzzles – the more blanks you fill in, the easier it is to solve the puzzle.
It was Jeff Patton (check out his book below) who first popularized this UX workflow technique back in 2005. Since then it has been adopted by development teams worldwide.
Prototype and test new apps today. Enjoy unlimited projects.
How does user story mapping work?
There are two ways to go about user story mapping: the traditional way, with a whiteboard, sticky notes and a marker, or with one of the user story mapping tools we’ve featured below.
When it comes to the user stories themselves, you can create them before your map or as you create your map. In fact, sometimes user story mapping can help us identify user stories that are missing. Let’s take a look at how we might create one:
User story maps: define activities
The first element you’ll add to your user story maps will be “activities”. Each activity card or sticky note will represent a process that your user goes through in your product.
Let’s say there are three main activities users will carry out with our fictional eCommerce, Giraffe Specs:
We’ll write each of these onto cards and they’ll represent an activity. Under the activities, we’ll then arrange our epic stories and user stories.
Create a narrative backbone with epics
For the user story map to make sense, you’ll also need to create epic user stories. Epic user stories or simply “epics” are like an overview of a feature, whereas user stories are more specific.
If you haven’t created epics, you should do that first before anything else. Check out our guide on creating user stories for more information. Epics and user stories should be in different colors for easy visual assimilation.
The activities in the example above will be divided up into five different epics:
Our epics will form what’s called a “backbone” and will represent a left-to-right narrative along an x-axis. It’ll show a logical sequence of steps a user will take to complete each activity. It’s an important part of the user story map as it lays the foundation for the entire product development flow. Below the epics, we’ll place our user stories.
Rank user stories in order of priority
User stories are normally ranked vertically down a y-axis in order of priority, with the highest at the top.
Now let’s say we want to start building out our steps down vertically for the first phase of the epic narrative: “Signup with personal details”. We might include these user stories in the following order:
Under “Add payment option” we might include:
“I want to be able to scan my credit card with the camera so I can sign up quickly and don’t have to be entering lots of digits”
Then we might then draw a release slice or a swim lane beneath the first story of each epic as they would give us an MVP that we can test on early adopters. We can work on the following stories in subsequent sprints.
Prototype and test new apps today. Enjoy unlimited projects.
Benefits of user story mapping
Ever been faced with a mountain of a task and asked yourself the question “where do I start?”
One of the main benefits of user story mapping is that it helps us picture how a user might use our product in real life and thus prioritize feature development accordingly.
Provides direction
The user story map is thus brilliant for showing us not only where we should start when working on user stories, but also the direction the team should take right up until the MVP and afterward with subsequent sprints and iterations.
Furthermore, user story mapping shows up any possible holes in our current user flow or requirements. It lets us pin down any information architecture problems that might arise in our product and helps us address them early.
User story mapping is also a great way of uncovering any possible friction the user might run into while using our product. This lets us adjust our direction at a very early stage and avoid running into potential problems further on down the line. Perhaps there’s a necessary step the team overlooked or didn’t think about. Or it could even be an optional extra or nice-to-have that you could add or test later.
An alternative to the flat backlog
Lastly, apart from allowing us to more simply organize user stories and feature requirements, it also provides a way of organizing tasks from a flat backlog instead of working from a list. approach.
Working with a list can sometimes cause a team to feel disconnected from the end goal. This is because nothing is in context. It’s also harder to get an idea at a glance of where your team is in terms of MVP completion or product readiness. It can be an attractive alternative solution for teams that are tired of working with never-ending backlog lists.
A clear testing framework
In addition to that, the user story mapping technique also provides a brilliant framework for testing features because it depicts the features in order of priority. It shows which ones we need to build out first.
It also shows us the minimum amount of features and the most important ones required in order to satisfy your user needs, followed by the less important features and nice-to-haves (but be careful to avoid feature creep).
An alternative to use cases
Creating user story maps is a good alternative to not going down the use case route. Let’s say you just want to use user stories and avoid complex use case documentation, but are worried about a lack of structure. User story mapping is a great solution.
Imagine the following: user stories are the building materials and user story maps are the piledrivers that let you construct the building into its correct form using those materials.
Also, when you create user story maps, your user stories are no longer simply random statements written on index cards but are put into a greater context and start to shape a real user narrative as they navigate through your future product.
Provides a framework for user stories
Lastly, a further benefit when it comes to user story mapping is that it can also help you and your team to plan out your sprints. For example, using release slicing and drawing dividing lines or horizontal swim lanes and separating your vertical stories into groups helps you plan out your sprints and iterations.
These divisions thus help you decide on the most important group of features to work on in each given sprint. This is because they descend in order of priority. For example, you might decide that for the first sprint, you’ll draw a line under the first two rows of user stories, which represent features, and then reserve the rest for a later iteration in future sprints.
Analysis of a user story map
This simple example of user story mapping helps shine a light on the basic layout and function of the UX document. It represents the different steps that need to be developed for a book eCommerce.
Here we have just two sets of cards or stickies: blue and yellow. The blue cards, shown here as epics, represent the backbone of steps the user takes on their journey to achieve a goal with the eCommerce. Below the epics are groups of user stories that fit under each epic, or overarching theme. For example, “Search by Title” is under the “Search for book” epic and “View book cover” under the “View Details” epic.
The release slice is clearly shown by a dividing line. This separates the minimum features needed to release an MVP from the rest of the features below which can be added in later iterations before the full product release.
As you can see from this user story map, for the MVP to be released, the basic functions of the eCommerce need to be completed such as searching for a book by title or author, paying with PayPal or credit card and adding a new address. In the full release, the user will be able to search by ISBN, view biographies and ship books to an existing address.
Prototype and test new apps today. Enjoy unlimited projects.
5 top user story mapping tools
Often, with teams working remotely and with the flexible nature of the agile environment, teams need to coordinate digitally. Jira is one of the most efficient tools for the job which explains its widespread usage. There are many user story mapping tools that integrate with Jira so that teams can approach their backlog of issues more creatively.
To create user story maps in Jira, you’ll have to use a user story mapping add-on. Fortunately, there are many tools of that sort that integrate with Jira. Here are just some of the ones that you can try below:
1. Easy agile (user story mapping for JIRA)
Easy Agile has an integration with Jira that lets you create user story maps with user stories taken directly from the task backlog. It means there’s no need to transfer the user story map to Jira and your team can start working on stories that have the highest priority immediately.
All you have to do is install it to get to the user story mapping feature, create an epic and from there, build out the user story map. All the information you add to your user story map will be updated to reflect changes in your Jira projects.
2. Bauer: Agile User Story Map for Jira
Agile User Story Map is another Jira add-on from a company called Bauer. Like Easy Agile, it also provides an alternative to the flat backlog feature in Jira to track your project’s bigger picture.
It gives you quite a lot of control over the user story mapping process, letting you create your map by dragging, dropping and rearranging boards.
It offers great flexibility as you’re able to arrange your user story map as you see fit. You can also add in story points as well as status indicators, such as “in progress” and “resolved”. It’s available on the Atlassian Marketplace for Jira cloud, data server and server.
3. StoriesOnBoard
StoriesOnBoard is a tool that lets you create user story maps that keep clients involved lets your team visualize your user personas and goals whenever they need to. It’s also highly collaborative, allowing you to add and work with any stakeholders you choose and to manage expectations.
StoriesOnBoard boasts many integrations, letting you perform user story mapping in Jira (you can display Jira issue keys on the cards you create) as well as integrating with other popular tools such as Slack and Google Suite. You can even integrate it with Trello, and send story cards to scrum boards, synching in real-time.
Cardboard, created by Lyft, offers up a user story mapping experience that’s easy on the eyes. Soft color palettes and a simple layout bring order to the chaos of product development. Companies such as Starbucks and the Hilton have used the tool.
With Cardboard, you can choose the color of the cards that you use in your user story maps and add images of your user personas to the map. You can easily create a backbone of epics and proceed to add in your user stories, dividing them up into swim lanes and release slices.
Cardboard also allows for real-time collaboration with video chat which you can see on the same screen as the user story maps you create. The best part? You can also integrate it with Jira, Confluence, Trello, VersionOne, Azure and PivotalTracker.
5. FeatureMap
If you’re looking for a cheap alternative to the tools listed above, then FeatureMap might be the solution you need at the moment. It also has a two-way integration with Jira and also lets you export your user story maps to Microsoft Word documents and their API lets you set up integrations with thousands of other tools.
Features that make user story mapping easy with feature maps are easy drag and drop features, unlimited map space and real-time synchronization and updates so your team is always kept in the loop.
What Is User Story Mapping?
Read it in 15 Mins
User stories are concise descriptions of a software capability, written from the point of view of the customer or end user. A user story is an efficient way of precisely capturing the ‘who’, ‘what’ and ‘why’ of a product requirement and can be thought of as a ‘to-do’ list that guides the product development journey.
In this article, we will talk about what is user story mapping, why it is important, how and when it should be done and user stories examples. You will get a high-level view of story mapping, understand the core concepts involved, and learn how to bring user stories to life in your Agile projects so that your team can get the maximum benefit from this technique.
What is user story mapping?
User story maps are simple, lightweight representations of the product development journey in an Agile project. This method was popularised by Jeff Patton who first wrote about it in his book User Story Mapping, where he outlined how this technique could be used to help keep the focus on user needs without getting tangled up in never-ending product feature requirements.
These story maps—which are changeable and keep evolving throughout the journey—enable the team to have meaningful conversations about user needs through the development process, never losing sight of the big picture.
User-Story Mapping Defined
User story mapping can be defined as an exercise during which product managers and development teams list out the work that will create the most value to end users, maximising customer delight.
During this exercise, teams create a dynamic outline of the ways in which the customer is expected to use the product. They try to understand which steps offer the most value and prioritise the stories accordingly.
The user story format is an amazingly simple, concise sentence which clearly captures the requirements:
“As a [type of user], I want to [action] so that [benefit]. “
Without getting into too much detail, this format holds the essence of product interactions from a user’s perspective.
Why It’s Called User-Story Mapping
In the user-story map, all the activities are captured as short phrases that represent actual user actions. The first half of the user-story format, therefore, talks about what the user wants to do with the product. Next, the story is elaborated to include the key benefits as the second half of the conversation. So, this mapping method is called user-story mapping because it is cantered on the user and his or her needs.
Later, the team fleshes out this simple sentence into detailed user stories that are discussed, with acceptance criteria added on, and then added to the product/sprint backlog for completion during each sprint as per priority.
As we can see, the purpose behind user stories is to spark a dialogue around the solutions to user needs, from the viewpoint of the customer who will be using the product. The users are usually laypersons who are likely to be non-technical, and therefore the product must be easy to use, with an interface that is not complex and can be navigated easily. When the entire exercise is cantered on the user, the focus gets shifted to the customer’s perspective and maximises the product value in terms of user satisfaction.
When and How to Create a User Story Map
The user story map is created as one of the first exercises in the product development process. It is not a rigid document, and evolves as the journey unfolds, in keeping with the spirit of Agile.
Subsequently, the user story mapping can be carried out whenever the team needs more clarity on how to improve on the first version, how to manage the backlog or when branching out in a new direction with requirements for product extensions.
These are the processes involved in creating a User Story Map:
1. Start with the big picture
Start by identifying the big picture. What are the broad user applications that your product must support? Draft these big stories on cards and arrange them in the order of priority for the end user.
2. Break down the bigger stories
Each of these big user activities is now broken down into smaller user tasks. Once again, keep the user in mind and prioritise these tasks from the user’s perspective. This is now the backbone of your User Story Map.
3. Look for the gaps
It helps to walk through the map with your customers or stakeholders. Is there anything you’ve missed out? They will help you to fill in the gaps.
4. Start prioritising
Remember, at this stage it is still a high-level map and is highly likely to get changed down the line. Put the user tasks and subtasks within each activity into the order of importance.
5. Select your first release
From all the tasks listed, choose the ones that will go into your first version, which will be the MVP or Minimum Viable Product for your very first release.
Once you have the ball rolling, get started on your first release and then keep the momentum alive by planning subsequent releases in the same way. As you go along, you will be re-ordering the user story map, aligning subsequent stories horizontally to match your timeline, and creating order out of chaos.
What are some benefits of user story mapping?
As we have already seen, user story mapping is a systematic and highly efficient way of working out task priorities. When done right, it offers significant benefits that help teams build products that customers will love.
Lays the focus on the user
Any product must be built with the end user in mind. User story mapping shines the spotlight on the user’s needs and tells the story from the point of view of the user. It maps out the user experience and helps to emphasize the efforts that will lead to the best outcomes, creating an outside-in approach rather than the traditional inside-out way of working.
Sets priorities
By breaking down the bigger picture into smaller tasks, while always keeping the vision in mind, teams can decide what is important and what needs to get built first. A holistic visualisation of tasks helps to put priorities in the right perspective. Teams will organize releases around the delivery of maximum value and push items of lower value to the bottom of the backlog.
Gives clarity on requirements
Delivers value quickly
Work gets grouped together into iterations, and releases are planned around delivery of value. By working on the more important tasks faster, teams can deliver product increments more rapidly, get feedback early and maximise customer value.
Mitigates risks early
Risks and dependencies get exposed early in the development journey, and developers can plan to mitigate these risks and iron out potential obstacles to smooth progress of work. Early planning can reduce dependencies and streamline the tasks more effectively.
Builds team collaboration
In the end, the project progress will depend on how well the team works together. User story mapping is a team building exercise where the team members get a shared view of the customer experience and work together to map out tasks. Team collaboration is built through meaningful conversations.
Who should participate in user story mapping?
User story mapping is one of the most important exercises during the planning stage. It brings cross functional teams into better alignment and helps them work collaboratively toward building the best possible product in the market. It is important that all teams whose work will contribute toward successful delivery should participate in the dialogue.
Team members from Engineering, UX/design, Product management, Sales, Customer support, Finance, Ops / IT, Legal and Marketing teams can take part in this exercise and give their valuable inputs.
How does user story mapping work?
Teams can use planning software like Lucid chart, or even simple physical resources like a chart or a section of wall with sticky notes, to build the story map. Once they have decided on the medium to use, they can work on the following steps:
1. Define the problem
What is the problem that is solved by your product? This is your product goal, and it’s important to clearly define it at the outset. Once the goal is defined, the work that is to be done to achieve this goal can be mapped.
2. Understand the target audience
Any user story exercise starts with creating a persona as the end user. There could be several distinct categories of users, and all must be discussed. Each target persona will have a unique way of interacting with your product. Once the personas are understood, the user stories can be built from the perspective of each of these target users. This is an important aspect, as efforts are not wasted in building features that may not be important to any of these end users.
3. Map user interactions
Each user will use the product through a series of activities related to the product. Also known as themes, these activities are what will form the structural outline of the user story map. As an example, when buying an online service, users may wish to search a list of service providers, view their online rankings, check prices, and then put the chosen service item into the cart and complete the payment. These will comprise the main stories, and each will then be broken down into smaller tasks.
4. Break down the stories
Each of the major stories is then fleshed out into smaller activities, which are then written down in the format: ‘As a _______, I want to _________, so that _______.’
For instance, this could be something like: As a subscriber of Amazon music, I want to search for hip-hop music, so that I can make a playlist.
5. Set priorities and decide the flow
Once your bigger themes and user stories are mapped out, the next step is to prioritise and set the flow. Always rank them in such a way that the most urgent tasks are on the top of the list. The flow of tasks is usually always from left to right, and top to down. The visual representation of the user story mapping is already taking a visual form, helping teams to decide on the sequence and importance of work to be done.
6. Look for gaps and dependencies
This is a crucial step that will help to identify any bottlenecks that could impede progress. For instance, for task C to be completed, task A must first be finished. But for task C to even begin, there might be an interim task B that has not even been listed on the chart. In this way, all the missing gaps can be filled, and dependencies noted. Teams could also discuss workarounds if any if a dependency is found for which they do not have a resource now.
7. Schedule sprints and releases
This is the stage where teams create action plans and schedules. Now that they know the quantum of work that is needed, they can gauge the work that is needed to deliver the most value in the shortest time and group activities together into sprints and releases, always keeping user priorities in the forefront.
What are some challenges of user story mapping?
While user story mapping can yield great results when done the right way, it comes with its own set of challenges for teams that are inadequately prepared. Look out for these challenges:
No persona
There might be instances where there is lack of clarity on who the end user is. In such cases, imagine a persona who represents the most possible end user, and work with this characterisation.
Lack of clarity on the end goal
The product goal is the solution to a problem that exists and is the reason for building the product. When there is lack of clarity on the problem itself, then the team could end up building stories on the wrong goals. This will waste time, money and effort and could result in some unnecessary rework and lack of motivation.
Not using collaborative software
Smaller teams who are co-located might find it makes sense to do their planning using sticky notes on a wall, or markers on a whiteboard. What happens if someone cleans the whiteboard by mistake, or some of the notes fall off and are swept away? All the planning would have been in vain!
Repetitions and rework
The stories in a user story map might need to be rewritten in the form of a product backlog, which involves some rework. Instead, use collaborative tools that map progress and automatically keep records of the work done. An added advantage of using the right tools is that distributed teams can also participate in the planning and tracking of goals.
What happens after user story mapping is completed?
Once the user story mapping exercise is completed, teams will schedule their list of stories as per priority into sprints and releases. This forms the outline of the product roadmap, which will need to be shared with management and other teams that did not participate to ensure consensus. At this point, any teams which were not able to participate in the planning so far may give their inputs as well.
The final user story mapping could be transferred to a shared software tool so that it can be viewed by all teams concerned in real time. Engineering team members will add technical specs and detail out their acceptance criteria, so that the Definition of Done for each story is known to all teams.
This story map is never static but is always a work in progress. Estimates could be revised, schedules may be moved up or down, and parallel branches of the product might need to be added. At any time, the story map reflects the work to be done.
What agile values and principles does story mapping support?
Story mapping is an especially useful and productive tool that helps product managers and development teams to maximise customer value through an adaptive, iterative approach. At each stage, they will find plenty of opportunities to learn and improve themselves and the processes.
As such, story mapping supports these values of the Agile Manifesto:
User-Story Mapping vs. Customer-Journey Mapping
While user-story mapping and customer-journey mapping sound remarkably similar, there is a subtle difference in the emphasis. A customer journey map takes the perspective of the user and shows their interactions with the product and the steps taken to achieve an objective. It will also think about the user’s thoughts and experiences during this journey.
On the other hand, a user story is mapped from the point of view of the product, as the user interacts with it. It will guide the planning of features and functionality, as the product tries to solve the user’s problems.
Both will work very well when combined to achieve all the product goals and create and maximise customer delight.
What Problems Does Story Mapping Solve?
Story mapping solves the problems that arise due to lack of clarity in defining the requirements and tasks. It helps teams to comprehend user needs, set priorities for tasks, and collaborate with each other effectively. It helps to keep the focus on what is important- the end goals- so that the team does not get side-tracked into doing less important tasks. Once the user stories are mapped, the final set of acceptance criteria can be drawn up, schedules can be created, and a roadmap can be outlined.
How Do You Use Story Mapping to Prioritize Roadmap Initiatives?
User story maps give all the inputs needed to create a product roadmap. All the features are listed out in detail, broken down into user stories and basic priorities are set. All that remains is to group the features that deliver maximum value in the quickest time together, and schedule releases based on the team’s capabilities.
Here is how to go about this:
Conclusion
Anyone who has created user stories knows that this takes time and effort, and the best results come with experience. They allow teams to see the bigger picture, keeping the user at the core of all development progress. When done the right way, user story mapping promotes meaningful collaboration, enables quicker feedback and faster deliveries, and results in creating high-quality product features that most suit customer needs.
Agile User Story Mapping Tool
The essential scrum tools designed for every scrum team
Product backlog management with Story Map
User story mapping provides a visually structured approach for scrum teams to manage product backlog. The visual story map enables the arrangement of product backbone, user tasks, epics and user stories effectively into a manageable top-down structure, based on the nature, priority and level of sophistication of map items.
The agile tool of Visual Paradigm is designed to maximize productivity and efficiency of scrum projects through agile story mapping. When you drag an item, we help you move the entire branch and update the layout accordingly. When you add an item into the story map, we re-arrange the other part of the map to ensure the correctness of content. Several backlog schemes (i.e. 3 or 4 level map structure)are provided to support any scale of project. It’s simply a scrum-friendly, intuitive agile software development tool.
User activities, tasks and stories
Break-down a product backlog into manageable product backlog items. The standard 3-level structuring covers user activities, user tasks and user stories.
The Epics
The 4-level story map introduces an Epics tier in between user tasks and user stories, which is good for projects with higher complexity.
Release planning
User stories can be kept under releases compartments, which reflects a delivery schedule agreed upon by the team and stakeholder.
Advanced drag-and-drop
Elements in a story map can be re-arranged by dragging. And when you drag, the entire branch of elements will follow. Prioritization and re-arrangement of stories can be made intuitively and easily.
Inline editing
All elements can be renamed inline. You don’t need go through any windows or steps.
Click-to-add elements
To add a user story under a user task, or to add a sibling of user activity can both be done with a single click. The ad-hoc hovering button allows adding story map elements intuitively.
How to Create a User Story Map
How to Perform Release Planning in User Story Map
How to Use Tags in Categorizing User Stories
Card, Conversation and Confirmation, namely the 3C’s, are known to be the three critical components of good user stories. With Visual Paradigm, you can write user stories following the 3C’s guideline, and with something more.
Conversation notes
Discuss problems and find solutions with stakeholders, and then write down key finding and decisions as conversation notes. These notes reflect stakeholders’ needs and concerns, providing development team with guidelines to follow when implementing the software.
Confirmation items
Maintain a checklist of acceptance criteria raised by the stakeholders, which defines under what conditions and criteria the working software would be accepted or rejected.
Besides, you can optionally define the steps with which acceptance testing will be performed in verifying the completion of story.
Written Scenario
Describe how features will work by listing out the proposed user-to-system interactions as steps. You can also associate the steps with wireframes.
Storyboard
Create wireframes to visualize the screen layout and screen flow. We provide the wireframe tool, storyboard tool and slideshow player essential in storyboarding.
Diagrams
Categorize user stories with tags.
History
Keep log for all changes made to user stories.
Configurable Status
Configure the user story statuses (e.g. Todo, Pending, Confirming, etc) required for specific project.
Assignee
Set the team member who are responsible to the user story.
Followers
Want to be informed about changes made to a user story? Just follow it.
Description
Document the details of user stories with the description editor.
URL reference
Add URL reference to a user story. Example usage: The testing page for acceptance testing of story.
File reference
Add supplementary files to a user story through the file reference feature.
Share-able
Share a user story with someone by sending him a URL of the user story.
Extract backlog items from model
Capture requirements from any part of your model, through the «Send to» feature. Example usage: To derive backbone elements to use in a story map from each of the use cases in the use case model. We also help you maintain the traceability between the source and target. You can easily navigate through the model and the story map.
How to Create Backlog Items from Visual Model
Estimate user stories based on effort and risks
To include the right amount of work in a sprint is beneficial to both the project team and to end user. Two important factors to consider when choosing the right user stories are the development effort required and the risk involved.
Visual Paradigm provides you with a configurable column based or two-dimensional Affinity Table to assess and compare between user stories based on their effort and risk. Through an affinity assessment, you will obtain the story points and hours for user stories, which can be used in sprint planning.
Effort and risk assessment
Assess and place the user stories onto the table cells that represent their development effort and risk involved. Obtain both hour and story point for sprint planning.
Customizable table
You can assess stories based upon any factors you like by changing the captions for table axis. You can also change the number of rows and columns of table to fit your need.
Filter
Want to focus on user stories in particular user activity, task, release or tag(s)? The filter is there to help.
How to Estimate User Stories with Affinity Table
Scrum User Story Spike
Sprint backlog management
In scrum, a sprint is a time-boxed iteration during which planned work is completed and made ready for acceptance. The sprint management interface facilitates efficient sprint planning through dragging user stories into sprint boxes. It also supports scrum master in managing multiple sprints.
How to Manage Sprint
Burndown chart for progress tracking
Track the remaining amount of work anytime within a sprint. Burndown chart helps you identify your team’s performance and to determine whether the user stories can be finished on schedule.
The burndown chart of Visual Paradigm is auto-generated based on the daily activities and tasks’ statuses tracked. You don’t need to edit any chart data yourself.
Integration with Task Management system
Click-to-synchronize a sprint to Tasifier, a built-in Task Management system. We help you create tasks from user stories so that further development activities can be planned under a dedicated task management platform.
How to Derive Tasks from Sprint
Scrum Board for tracking tasks’ progresses
The scrum board is auto-generated to show the statuses of tasks managed. You don’t need to edit any chart data yourself.
Track story statuses with Sprint story board
Keep an eye on the sprint’s overall progress with the help of the Sprint Story Board. The board consists of user stories placed in different columns representing the progress status. You can view and update the progress of stories by drag-and-drop around the staged columns.
User story statements is a list of simple description of features told from the perspective of end users who desires the new capability with a good reason behind it. You can write user story statements under an Epic, and split it into a set of related user stories.
How to Identify User Stories from Epic by Writing Story Statements
Map BPMN with User Stories
* The support of writing user’s story with 3C’s is available in Visual Paradigm Standard, Professional and Enterprise. The support of user story mapping, story estimation and sprint is available in Visual Paradigm Professional and Enterprise..
# User story and business process mapping is available in Visual Paradigm Standard, Professional and Enterprise..
Атрибуты Scrum
8.1. Story mapping
Как правило, чем крупнее компания, тем более разветвленным и кросс-функциональным является автоматизируемый процесс. Соответственно и требование будет более высокоуровневым и комплексным. Для небольшой компании реализация небольшого требования занимает не более недели, а вот в крупных организациях разработка подобного требования займет не менее нескольких месяцев.
Причин, как у каждой проблемной ситуации в области разработки программного обеспечения, много. Из них следует выделить:
Карта историй представляется в виде двух последовательностей зависящих друг от друга активностей. Таким образом, мы получаем матричный вид карты историй.
Она представляет собой последовательные стадии, выполняющиеся в автоматизируемом процессе/продукте. На самом верхнем уровне располагается наиболее верхнеуровневое представление стадий или компонентов разрабатываемого продукта. Далее, по мере снижения, каждый компонент раскладывается на составляющие, и так до самого низкоуровневого представления автоматизируемого продукта.
Процесс построения карты историй:
Карта историй содержит каркас из задач, представляющих собой «кирпичики», составляющие конечный продукт. Этот каркас покрывает крупный набор функций, реализуемых в соответствии с приоритетами пользователей.
Под каркасом находятся подробные требования, которые описывают конкретные функциональные части для выполнения задач. В Scrum, когда речь заходит о работе с требованиями, применяют определенную технику работы с ними, которая называется User Story (пользовательские истории).
8.2. Пользовательские истории (User story)
В разработке программного обеспечения этот способ разработки и управления требованиями часто применяют для проектирования и описания взаимодействия пользователя и системы, поэтому название Use Case часто воспринимают как синоним требования человека-пользователя к решению определенной задачи в системе.
Важно отдавать себе отчет в том, что пользовательские истории не обеспечивают полноту всех функциональных требований и имеют ряд недостатков:
Пользовательские истории с примерами и шаблоном
Пользовательские истории — это задания на разработку, которые часто выражены в форме «тип пользователя + потребность + цель».
Просмотр тем
Краткое описание: пользовательская история — это описание функциональной возможности ПО простыми, общими словами, составленное с точки зрения конечного пользователя. Она пишется с целью разъяснить, как именно функциональная возможность принесет пользу клиенту.
Есть тенденция считать, что пользовательские истории — это, говоря проще, функциональные требования к программному обеспечению. Но это не так.
Уникальная черта agile-разработки ПО — ставить во главу угла человека, и пользовательские истории как раз служат для того, чтобы в центре обсуждения всегда были фактические пользователи. Истории пишутся простым языком, без технической специфики, и служат контекстом для команды разработчиков и их деятельности. Прочитав пользовательскую историю, команда знает, почему она создает то, что создает, и какую ценность это формирует.
Пользовательские истории — одна из базовых составляющих agile-программы. Они позволяют организовать повседневную работу в систему, ориентированную на пользователей, что способствует укреплению сотрудничества, поиску нестандартных идей и повышению качества продукта в целом.
Что такое пользовательские истории в agile?
Пользовательская история — это наименьшая единица работы в методике agile. Это конечная цель, а не возможность, сформулированная с точки зрения пользователя ПО.
Пользовательская история — это описание функциональной возможности ПО простыми, общими словами, составленное с точки зрения конечного пользователя или клиента.
Пользовательская история пишется с целью разъяснить, как именно выполнение рабочей задачи приведет к созданию конкретной ценности для клиента. «Клиентами» необязательно должны быть сторонние конечные пользователи в привычном смысле слова. Эту роль могут на себя примерять внутренние клиенты или коллеги из организации, которые рассчитывают на вашу команду.
Пользовательские истории состоят из нескольких предложений, описывающих требуемый результат простым языком и в общих чертах. Они не содержат мелочей. Требования появятся позже, когда команда обсудит их и придет к согласию.
Пользовательские истории изящно вписываются в методики Agile, такие как Scrum и Kanban. В Scrum пользовательские истории добавляют в спринты и отслеживают на диаграммах Burndown в течение спринта. Команды, работающие по методике Kanban, добавляют пользовательские истории в бэклог и пропускают их через рабочий процесс. Именно так Scrum-команды совершенствуют навыки оценки и планирования спринта, повышая точность прогнозов и свою гибкость. С помощью историй команды Kanban начинают более профессионально распоряжаться незавершенной работой (WIP) и могут в дальнейшем совершенствовать рабочие процессы.
Пользовательские истории также составляют значительные элементы методик Agile, такие как эпики и инициативы. Эпики — это большие рабочие задачи, которые делятся на несколько историй. Группа эпиков образует инициативу. Благодаря этим крупным структурам каждодневные усилия команды разработчиков (в работе над историями) ведут к достижению целей организации, выраженных в эпиках и инициативах.
Зачем нужны пользовательские истории?
Для команд разработчиков, которым agile в новинку, пользовательские истории кажутся лишним шагом. Почему бы просто не разбить большой проект (эпик) на несколько шагов, а потом разбираться с ними? Но с историями команда получает необходимый контекст и связь между задачами и ценностью, которая возникает в результате выполнения этих задач.
Пользовательские истории обладают несколькими важными преимуществами.
Работа с пользовательскими историями
Когда история написана, самое время встроить ее в рабочий процесс. Как правило, историю пишет владелец продукта, менеджер по продукту или руководитель группы проектов, после чего она отправляется на проверку.
В ходе собрания по планированию спринта или итерации команда решает, какие истории она выполнит в ходе этого спринта. На этом этапе команды обсуждают требования каждой пользовательской истории и связанные функциональные возможности. Это шанс проявить свои навыки и творческий потенциал и внести вклад в воплощение истории в жизнь вашей командой. По завершении согласования требования добавляются в историю.
Еще на собраниях оценивают истории на основании их сложности или времени, которое нужно потратить на выполнение. Команды высчитывают оценки в размерах футболок, баллах из последовательности Фибоначчи или с помощью покера планирования. Размер истории должен позволять выполнить ее за один спринт, поэтому в ходе оценки каждой истории команда следит, чтобы слишком трудоемкие или затратные по времени истории разбивались на меньшие части.
Как написать пользовательскую историю
При написании пользовательских историй держите в уме следующее.
Сформулировав пользовательские истории, позаботьтесь о том, чтобы они были доступны всей команде.
Шаблон и примеры пользовательских историй
Пользовательские истории часто представлены в виде простого предложения следующего вида:
«Как [тип клиента], [хочу то-то], [чтобы делать что-то]».
Давайте разберем эту формулировку.
Пользовательские истории могут выглядеть, например, следующим образом.
Придерживаться такой структуры необязательно, но она помогает определить критерии готовности работы. История выполнена, когда упомянутый тип клиента получает требуемую ценность. В идеале, команды формулируют свою собственную структуру и придерживаются ее.
Начало работы с пользовательскими историями в agile
В пользовательских историях раскрываются суть и цели повседневной работы участников команды разработчиков. Зачастую они написаны в форме «тип клиента + потребность + цель». Чтобы процесс работал как часы, важно понимать роль историй: именно в них объясняется, что должна сделать команда и почему она должна это сделать.
Начните с оценки следующего или самого срочного крупного проекта (например, эпика). Разбейте его на небольшие пользовательские истории и вместе с командой разработчиков доведите до ума. Когда истории будут готовы и представлены на суд всей команды, можно приступать к работе.
Источники:
- http://xraizor.medium.com/%D1%80%D1%83%D0%BA%D0%BE%D0%B2%D0%BE%D0%B4%D1%81%D1%82%D0%B2%D0%BE-%D0%BF%D0%BE-user-story-mapping-b0b0d724d77e
- http://medium.com/product-design/%D0%BA%D0%B0%D0%BA-%D1%83%D1%81%D1%82%D1%80%D0%BE%D0%B5%D0%BD%D0%B0-%D0%BA%D0%BE%D0%BD%D1%86%D0%B5%D0%BF%D1%86%D0%B8%D1%8F-user-story-mapping-%D0%B8-%D0%BA%D0%B0%D0%BA-%D0%B8%D0%BD%D1%82%D0%B5%D0%B3%D1%80%D0%B8%D1%80%D0%BE%D0%B2%D0%B0%D1%82%D1%8C-%D0%BA%D0%B0%D1%80%D1%82%D1%83-%D0%B8%D1%81%D1%82%D0%BE%D1%80%D0%B8%D0%B9-%D1%81-%D0%BA%D0%B0%D0%BD%D0%B1%D0%B0%D0%BD-%D0%B4%D0%BE%D1%81%D0%BA%D0%BE%D0%B9-25614cb20ace
- http://medium.com/product-design/%D0%BA%D0%B0%D0%BA-%D0%BF%D0%BE%D1%81%D1%82%D1%80%D0%BE%D0%B8%D1%82%D1%8C-%D0%BA%D0%B0%D1%80%D1%82%D1%83-%D0%B8%D1%81%D1%82%D0%BE%D1%80%D0%B8%D0%B9-user-story-mapping-%D0%B5%D1%81%D0%BB%D0%B8-%D0%BF%D1%80%D0%BE%D0%B5%D0%BA%D1%82-%D1%83%D0%B6%D0%B5-%D0%B2-%D1%80%D0%B0%D0%B1%D0%BE%D1%82%D0%B5-b53424880e27
- http://medium.com/product-design/%D0%BF%D0%BB%D0%B0%D0%BD%D0%B8%D1%80%D0%BE%D0%B2%D0%B0%D0%BD%D0%B8%D0%B5-%D1%80%D0%B5%D0%BB%D0%B8%D0%B7%D0%BE%D0%B2-%D0%BF%D1%80%D0%B8-%D0%BF%D0%BE%D0%BC%D0%BE%D1%89%D0%B8-%D0%BA%D0%B0%D1%80%D1%82%D1%8B-%D0%B8%D1%81%D1%82%D0%BE%D1%80%D0%B8%D0%B9-66164d11603b
- http://xraizor.medium.com/%D1%80%D1%83%D0%BA%D0%BE%D0%B2%D0%BE%D0%B4%D1%81%D1%82%D0%B2%D0%BE-%D0%BF%D0%BE-user-story-mapping-2f7bd967a54a
- http://ux-journal.ru/kak-postroit-kartu-istorij-story-map-esli-proekt-uzhe-v-rabote.html
- http://scrumtrek.ru/blog/product-management/3498/user-story-mapping-guide/
- http://www.easyagile.com/blog/the-ultimate-guide-to-user-story-maps/
- http://vc.ru/u/588510-user-friendly/206892-user-story-mapping
- http://medium.com/i-want-to-be-a-product-manager-when-i-grow-up/user-story-mapping-dd7462ee78cf
- http://sherer.pro/blog/user-story-mapping-i-funkcionalnaya-arxitektura/
- http://medium.com/design-pub/%D1%8E%D0%B7%D0%B5%D1%80-%D1%81%D1%82%D0%BE%D1%80%D0%B8-%D0%BC%D1%8D%D0%BF%D0%BF%D0%B8%D0%BD%D0%B3-51b7e2ee53d8
- http://blog.hubspot.com/marketing/user-story-mapping
- http://xraizor.medium.com/%D1%80%D1%83%D0%BA%D0%BE%D0%B2%D0%BE%D0%B4%D1%81%D1%82%D0%B2%D0%BE-%D0%BF%D0%BE-%D1%81%D0%B1%D0%BE%D1%80%D1%83-%D1%82%D1%80%D0%B5%D0%B1%D0%BE%D0%B2%D0%B0%D0%BD%D0%B8%D0%B9-%D0%B2-%D1%84%D0%BE%D1%80%D0%BC%D0%B0%D1%82%D0%B5-user-story-mapping-9a90beb2ff57
- http://habr.com/ru/post/345524/
- http://www.projectmanager.com/blog/user-story-mapping
- http://molinos.ru/about/blog/sozdanie-karty-polzovatelskih-istoriy-pri-razrabotke
- http://www.mtt.ru/blog/user-story-mapping-how-to-build-usm/
- http://blog.calltouch.ru/user-story-mapping-kak-postroit-kartu-polzovatelskih-istorij/
- http://www.lucidchart.com/blog/how-to-create-a-user-story-map
- http://www.nngroup.com/articles/user-story-mapping/
- http://www.altexsoft.com/blog/uxdesign/a-complete-guide-to-user-story-mapping-process-tips-advantages-and-use-cases-in-product-management/
- http://medium.com/design-voices/user-story-mapping-from-design-research-to-product-design-in-weeks-instead-of-months-73faf2a2991c
- http://vc.ru/marketing/425132-instrumenty-dlya-podgotovki-tz-shablon
- http://www.visual-paradigm.com/guide/agile-software-development/what-is-user-story-mapping/
- http://www.digite.com/agile/story-mapping/
- http://storiesonboard.com/user-story-mapping-intro.html
- http://www.justinmind.com/blog/user-story-mapping/
- http://www.knowledgehut.com/blog/agile/user-story-mapping
- http://www.visual-paradigm.com/features/agile-user-story-mapping-tool/
- http://intuit.ru/studies/courses/3590/832/lecture/31184
- http://www.atlassian.com/ru/agile/project-management/user-stories
