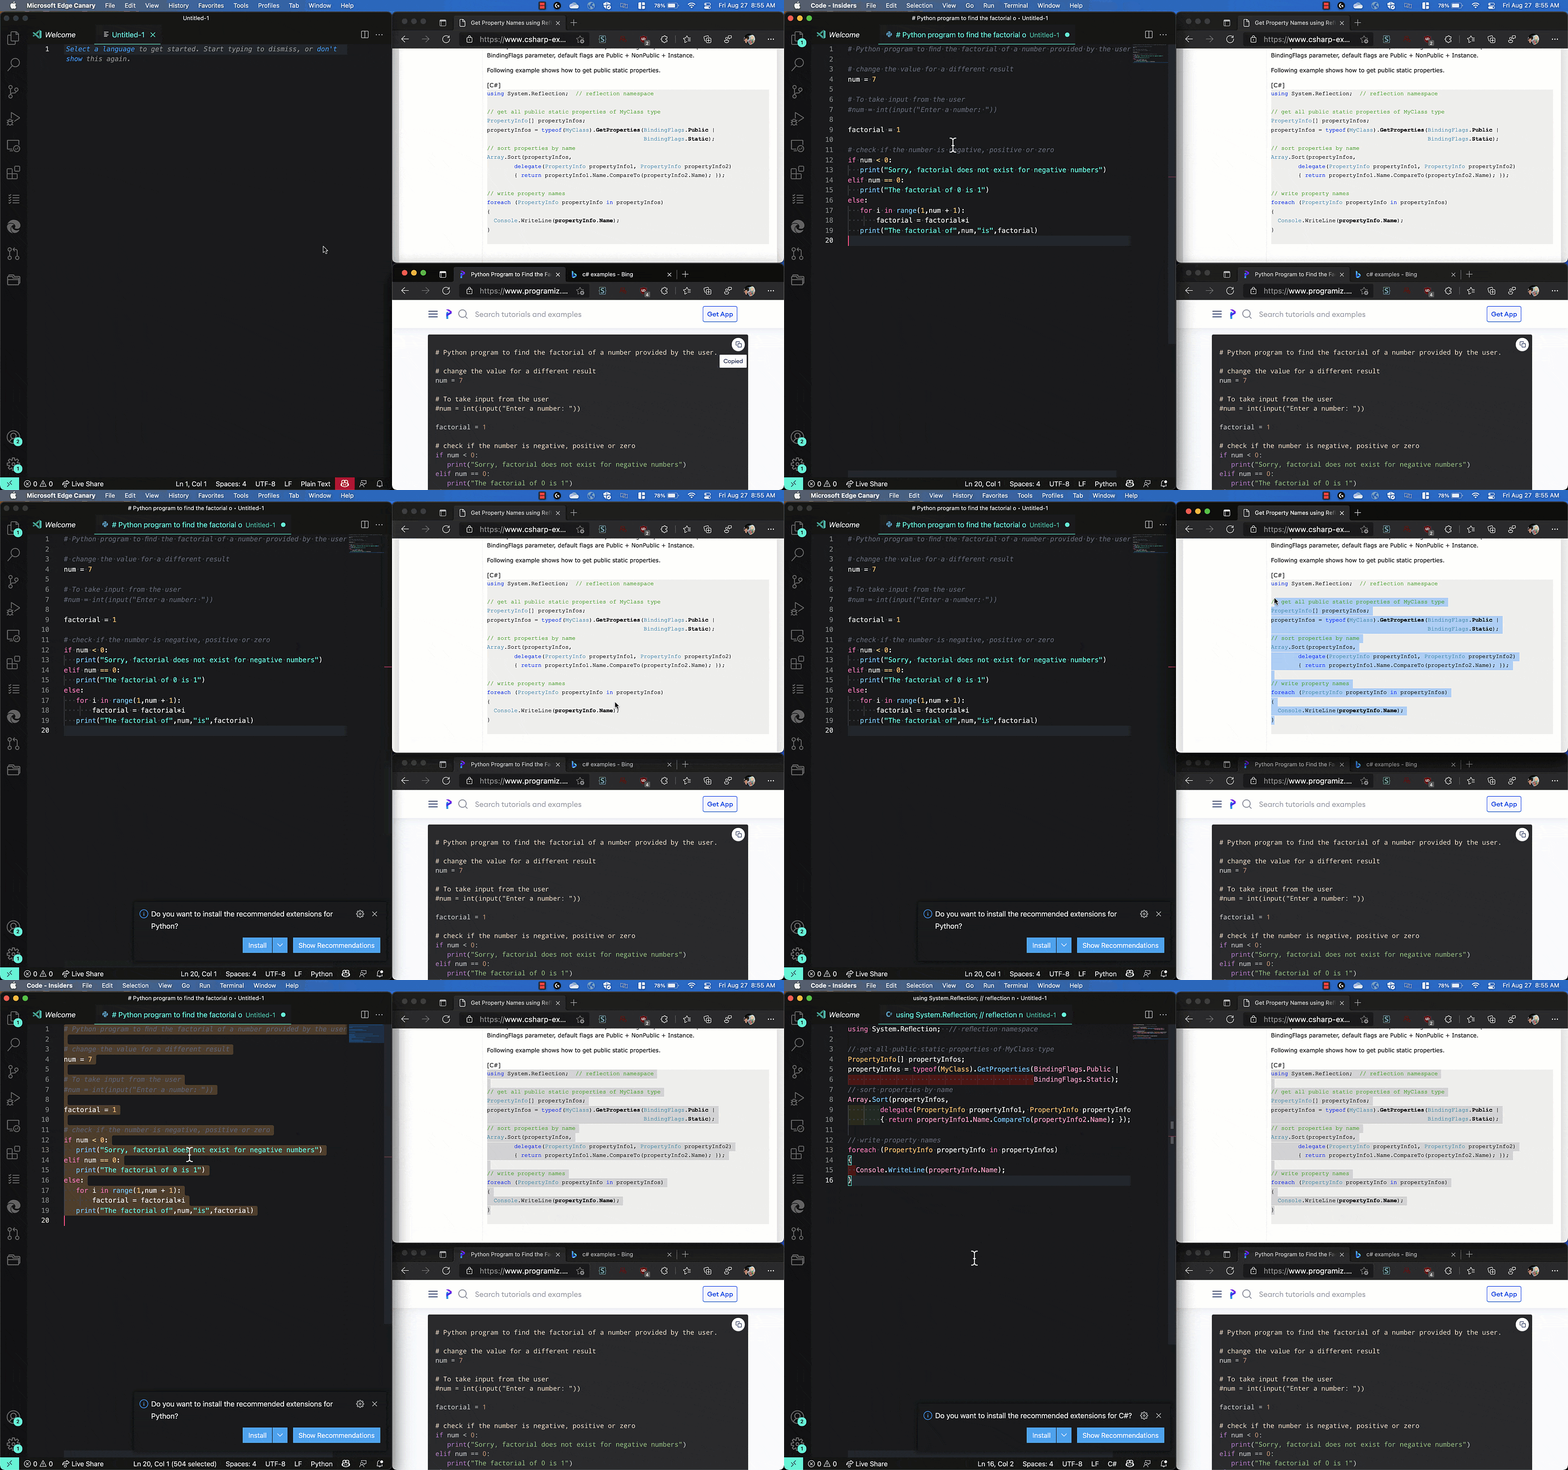
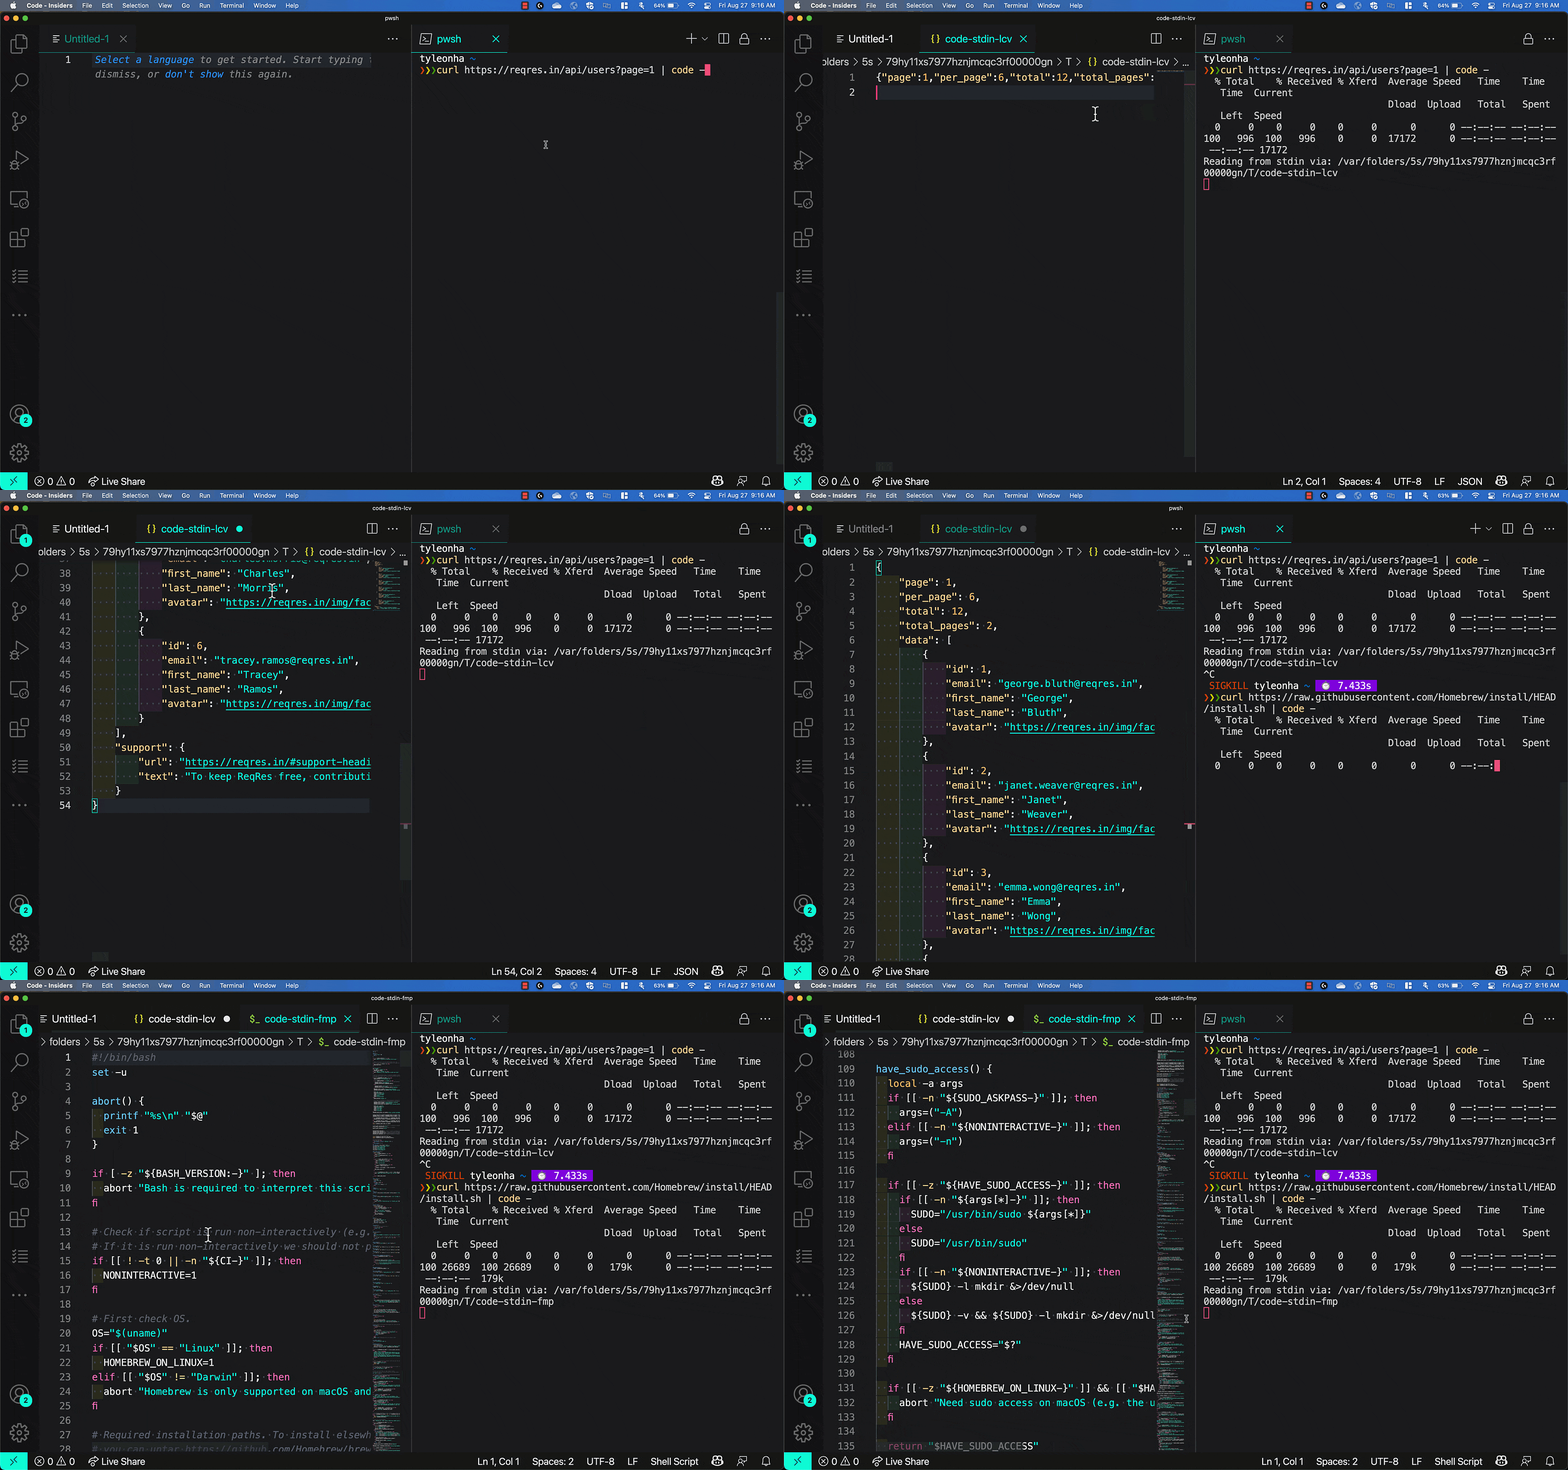
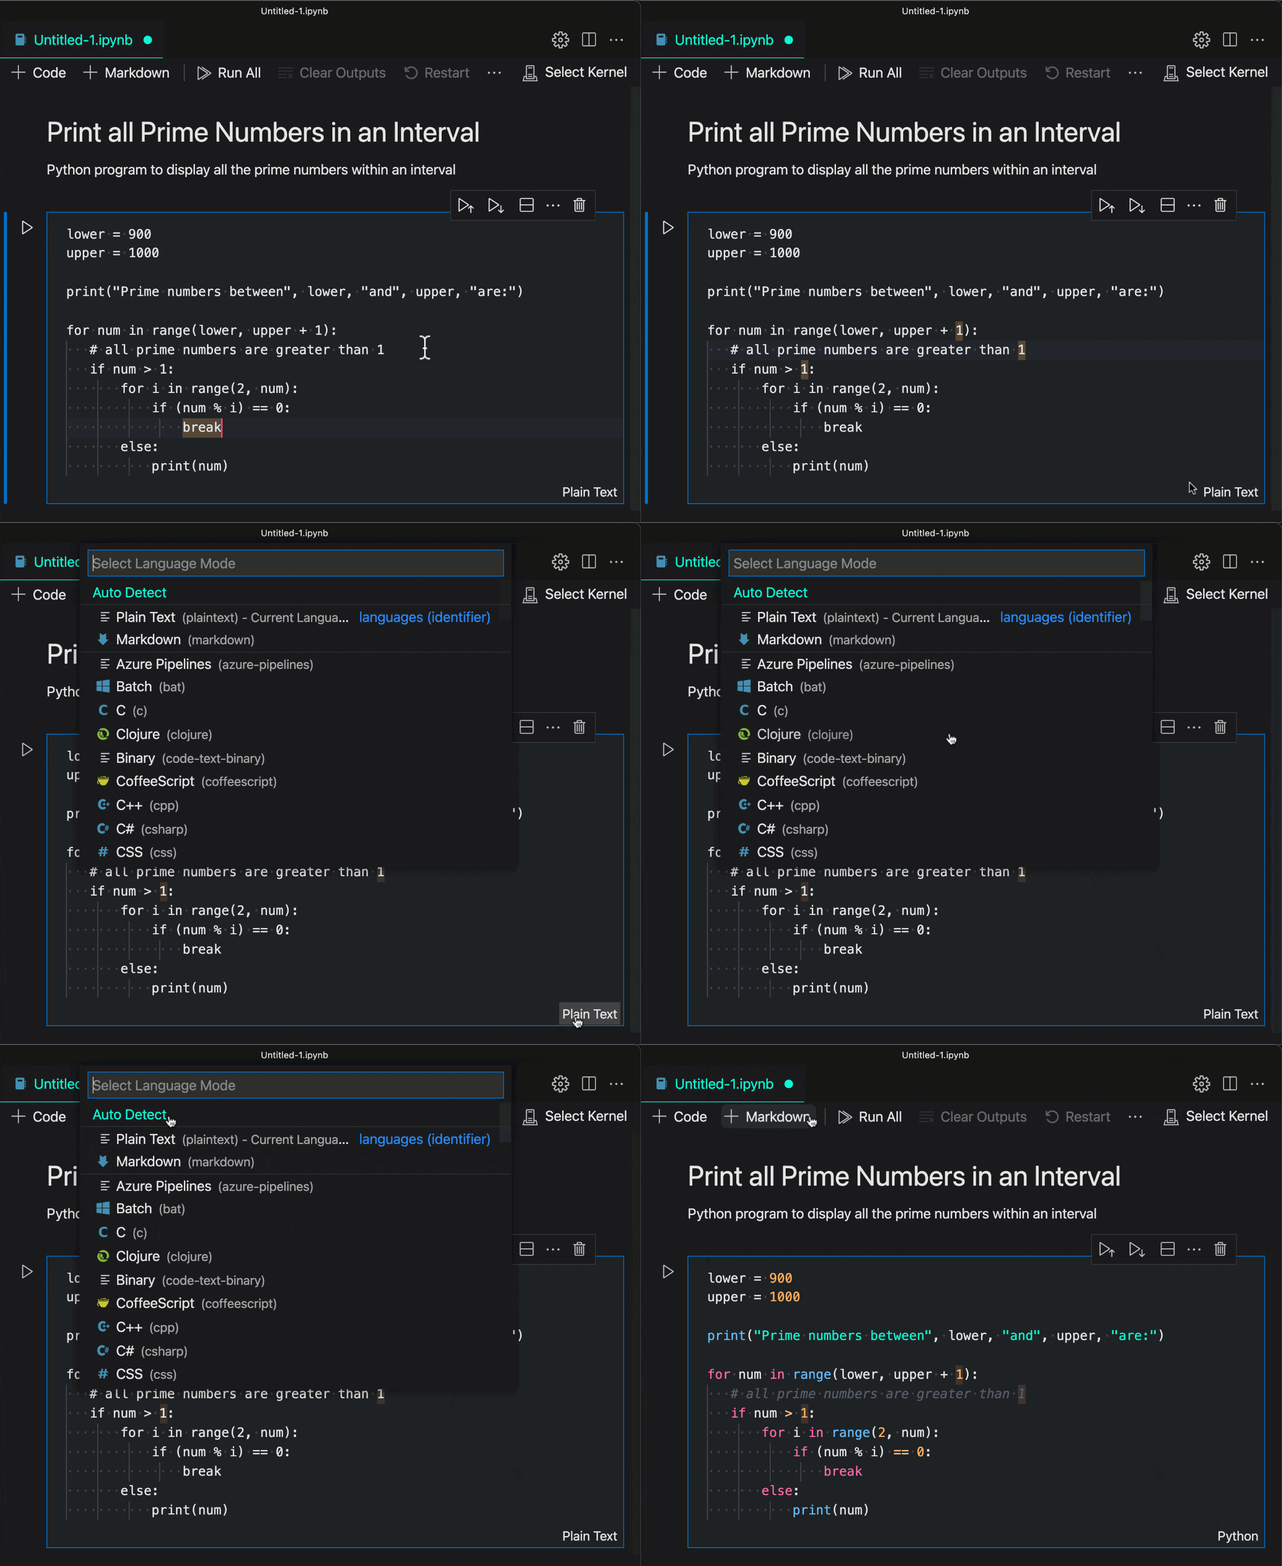
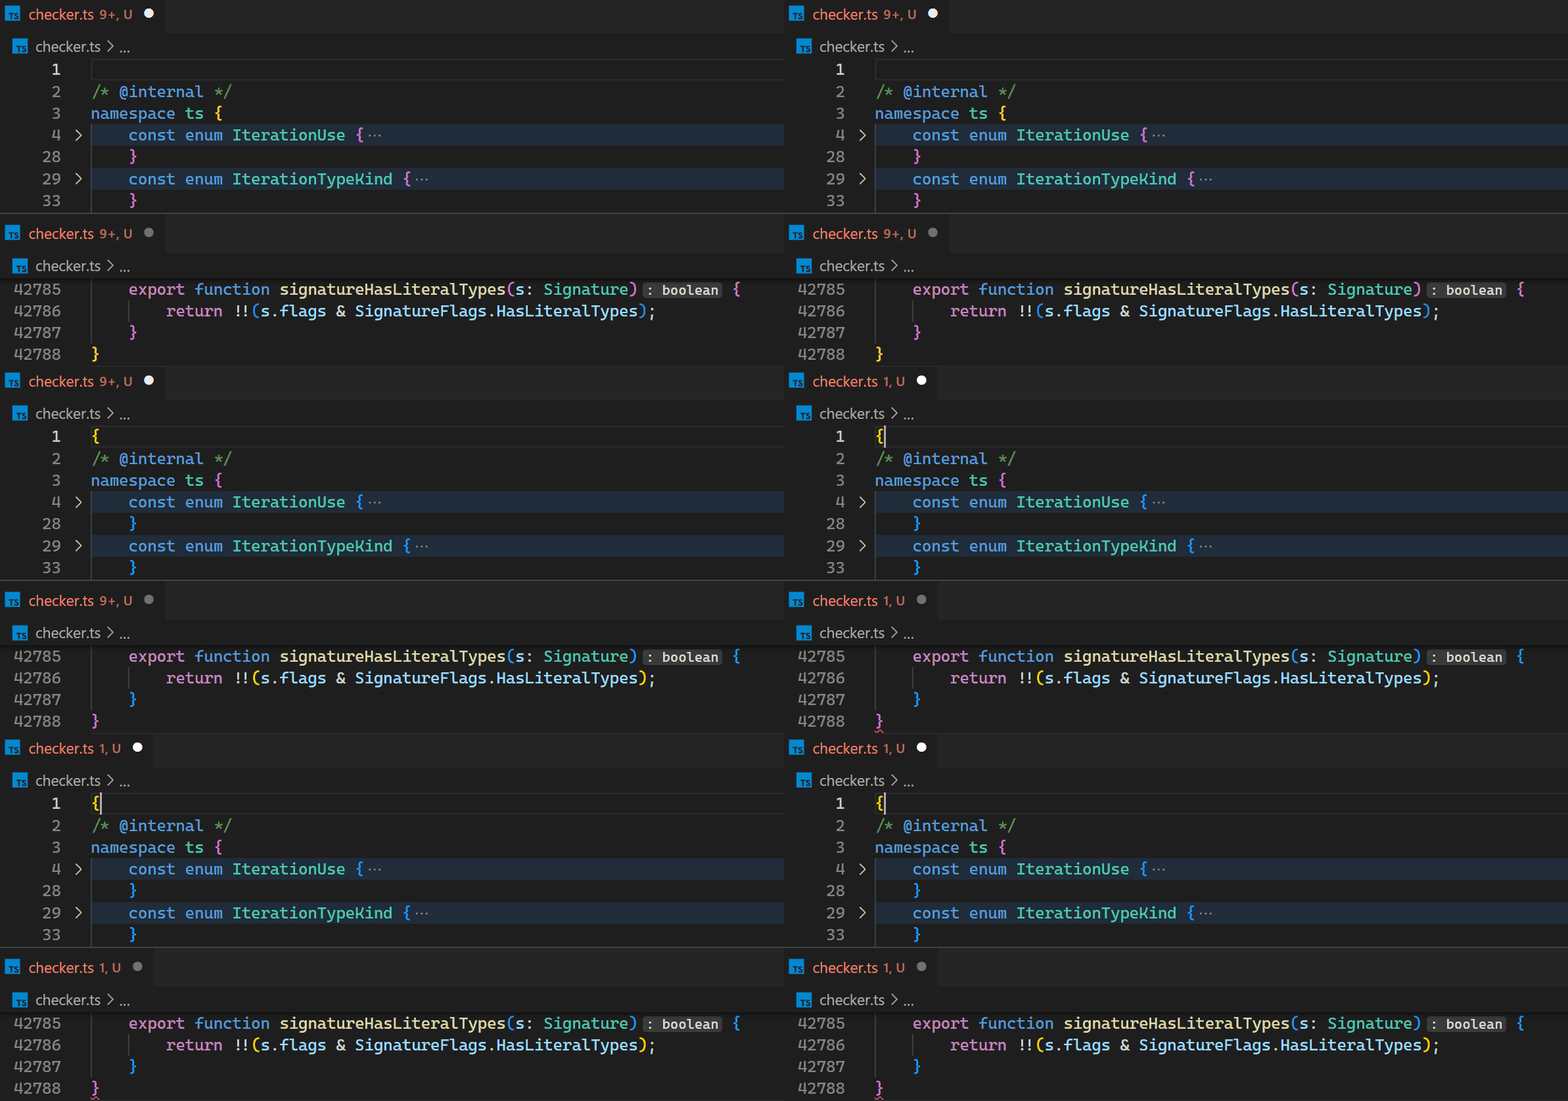
Virtual studio code
Virtual studio code
Редактор кода Visual Studio Code. Самый подробный гайд по настройке и установке плагинов для начинающих
Бесплатный, мощный, очень популярный, с кучей дополнений, да что там говорить, сам Фейсбук выбрал его в качестве основного редактора!
Сегодня речь пойдет о редакторе кода Visual Studio Code или просто VS Code. Мы с тобой его установим, настроим, а также применим плагины, которые существенно упростят нам работу.
Если больше интересен редактор кода Sublime Text 3 по нему статья тут https://habr.com/ru/post/458206/
Содержание:
Удаление
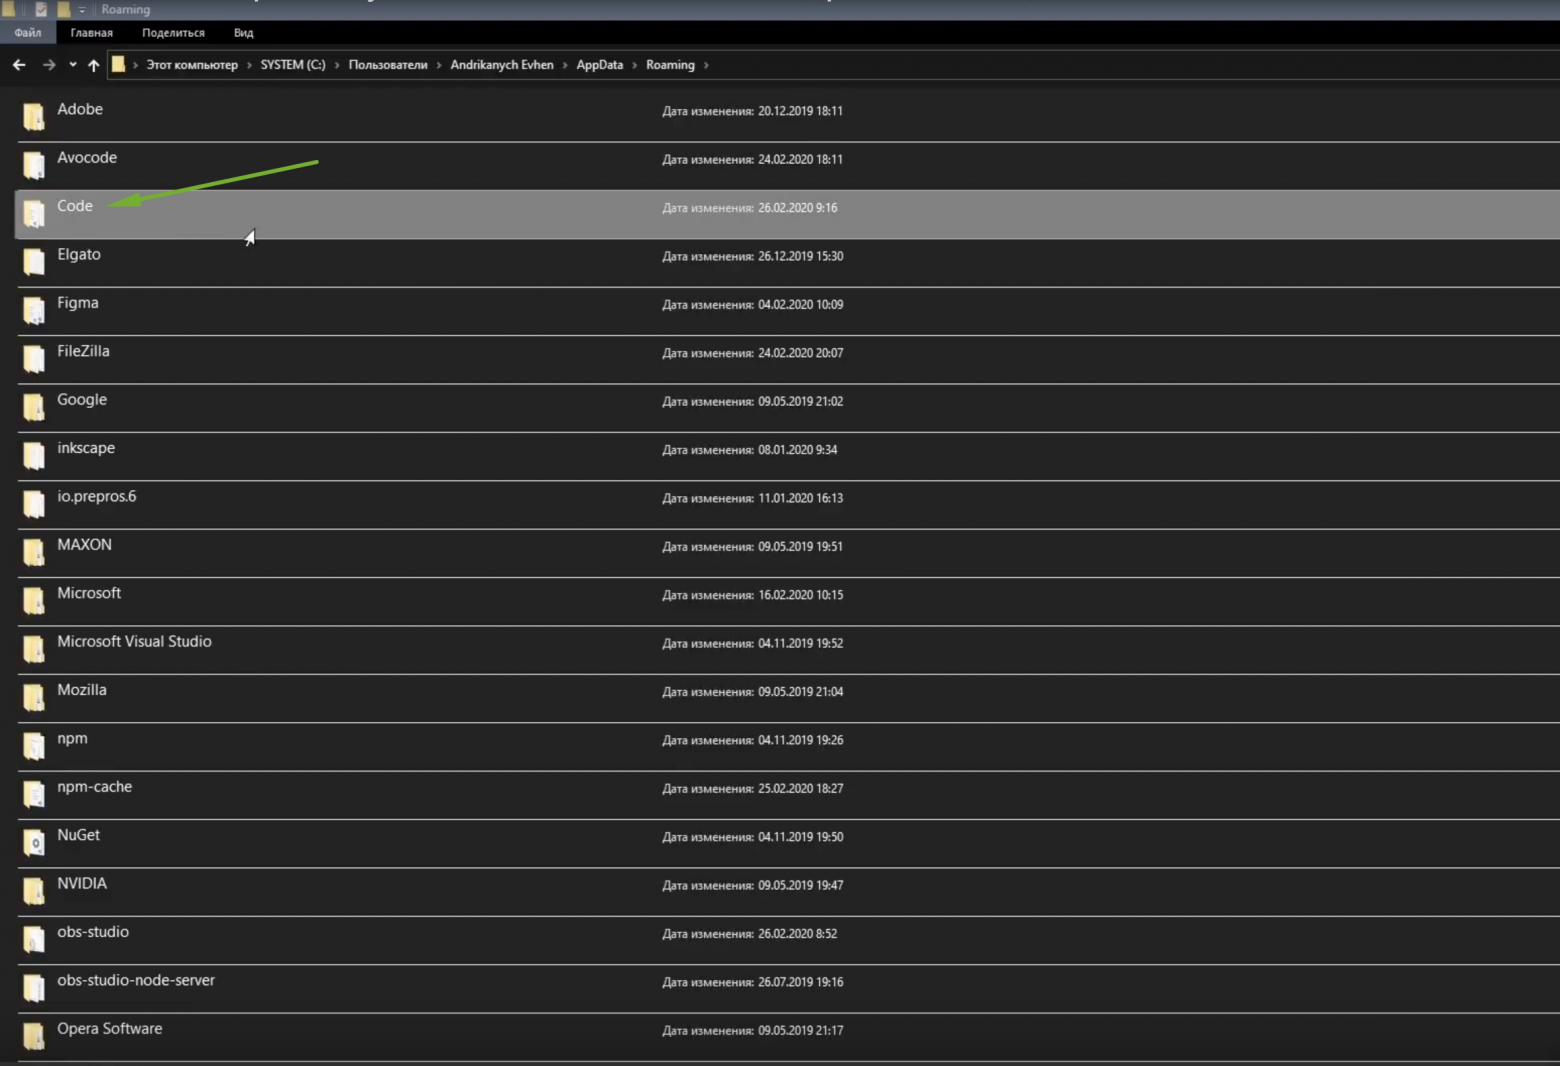
В строке пути нужно дописать AppData, далее переходим в папку Roaming и здесь нужно удалить папку Code.
Установка
Отлично, теперь мы можем установить программу. Переходим на сайт code.visualstudio.com, секция Download. Здесь есть версия под Mac, Linux. Меня интересует Windows. Нажимаем и скачиваем себе на ПК. Кстати, сайт программы очень полезный, поэтому советую его изучить.
Программа скачана, запускаем инсталлятор и следуем инструкциям: принимаем, добавляем все галочки, далее, ждем пока программа установится на наш ПК.
Запуск на слабой машине
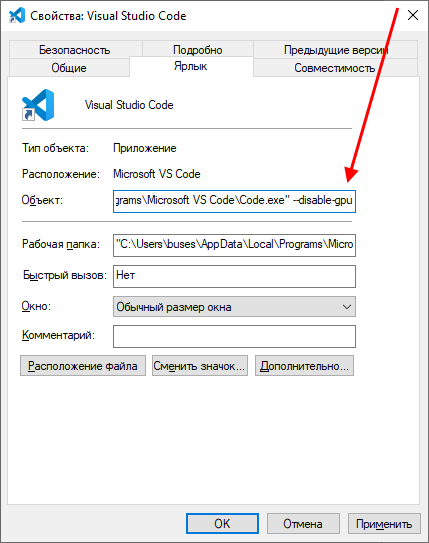
Когда программа установлена, можем ее запустить. Но запустится она не на каждом компьютере. Дело в том, что программа достаточно ресурсоемкая. Поэтому на слабой машине можно получить такой результат: вместо интерфейса программы черный экран, а процессор потеет на все 100%. Но выход есть — необходимо открыть контекстное меню ярлыка программы и дописать в пути к файлу вот такой флаг: —disable-gpu
Отлично, теперь программа запустится даже на калькуляторе.
Установка языка
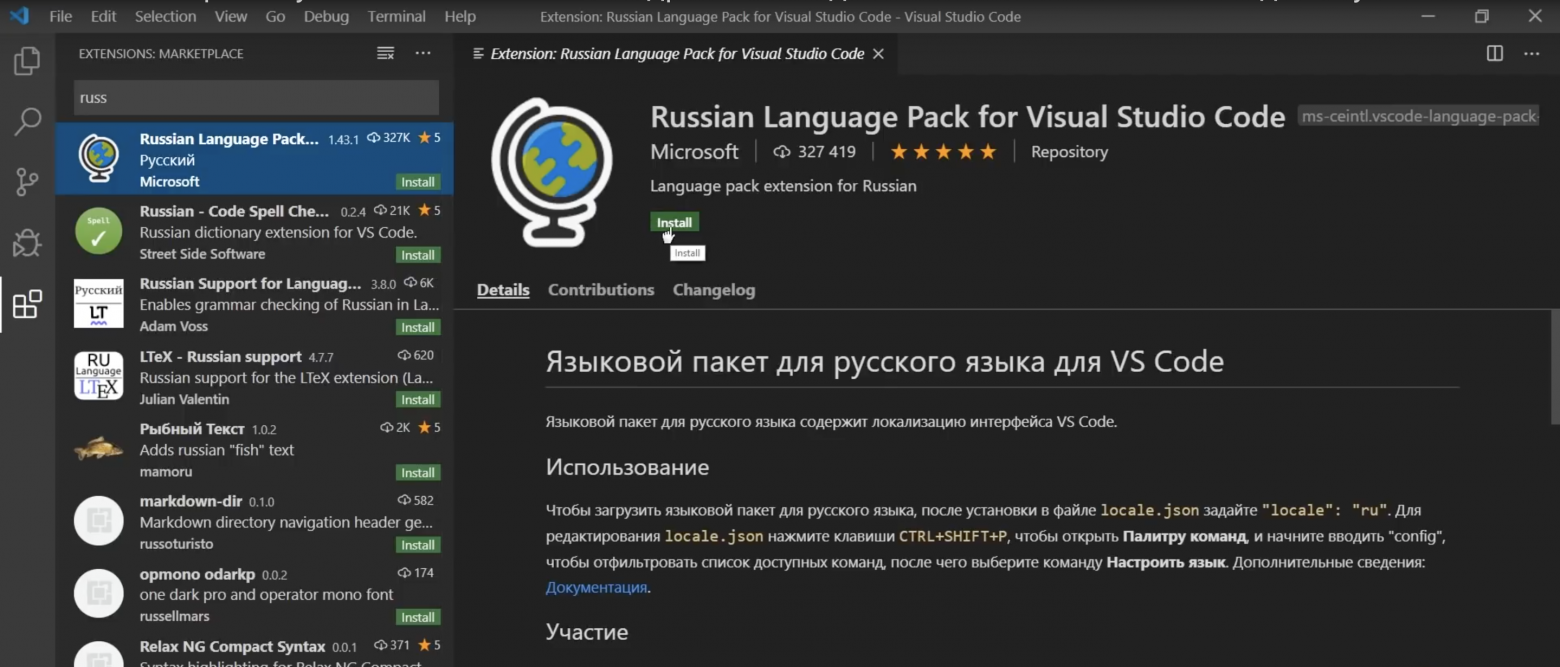
Программа запущена и мы можем приступить к знакомству с ней. А чтобы знакомится было проще, я установлю русский язык. Для этого я щелкаю на иконку расширений, В поле поиска начинаю писать russian, пока не увижу пакет Russian Language Pack for Visual Studio Code.
Жму на кнопочку Install. Далее программа попросит перезапуститься, делаем это. Отлично, теперь будет намного понятней. Но, если ты владеешь английским, то переходить на русский совсем не обязательно.
Экран Приветствия
Боковую панель я пока скрою, мы еще не раз к ней вернемся.
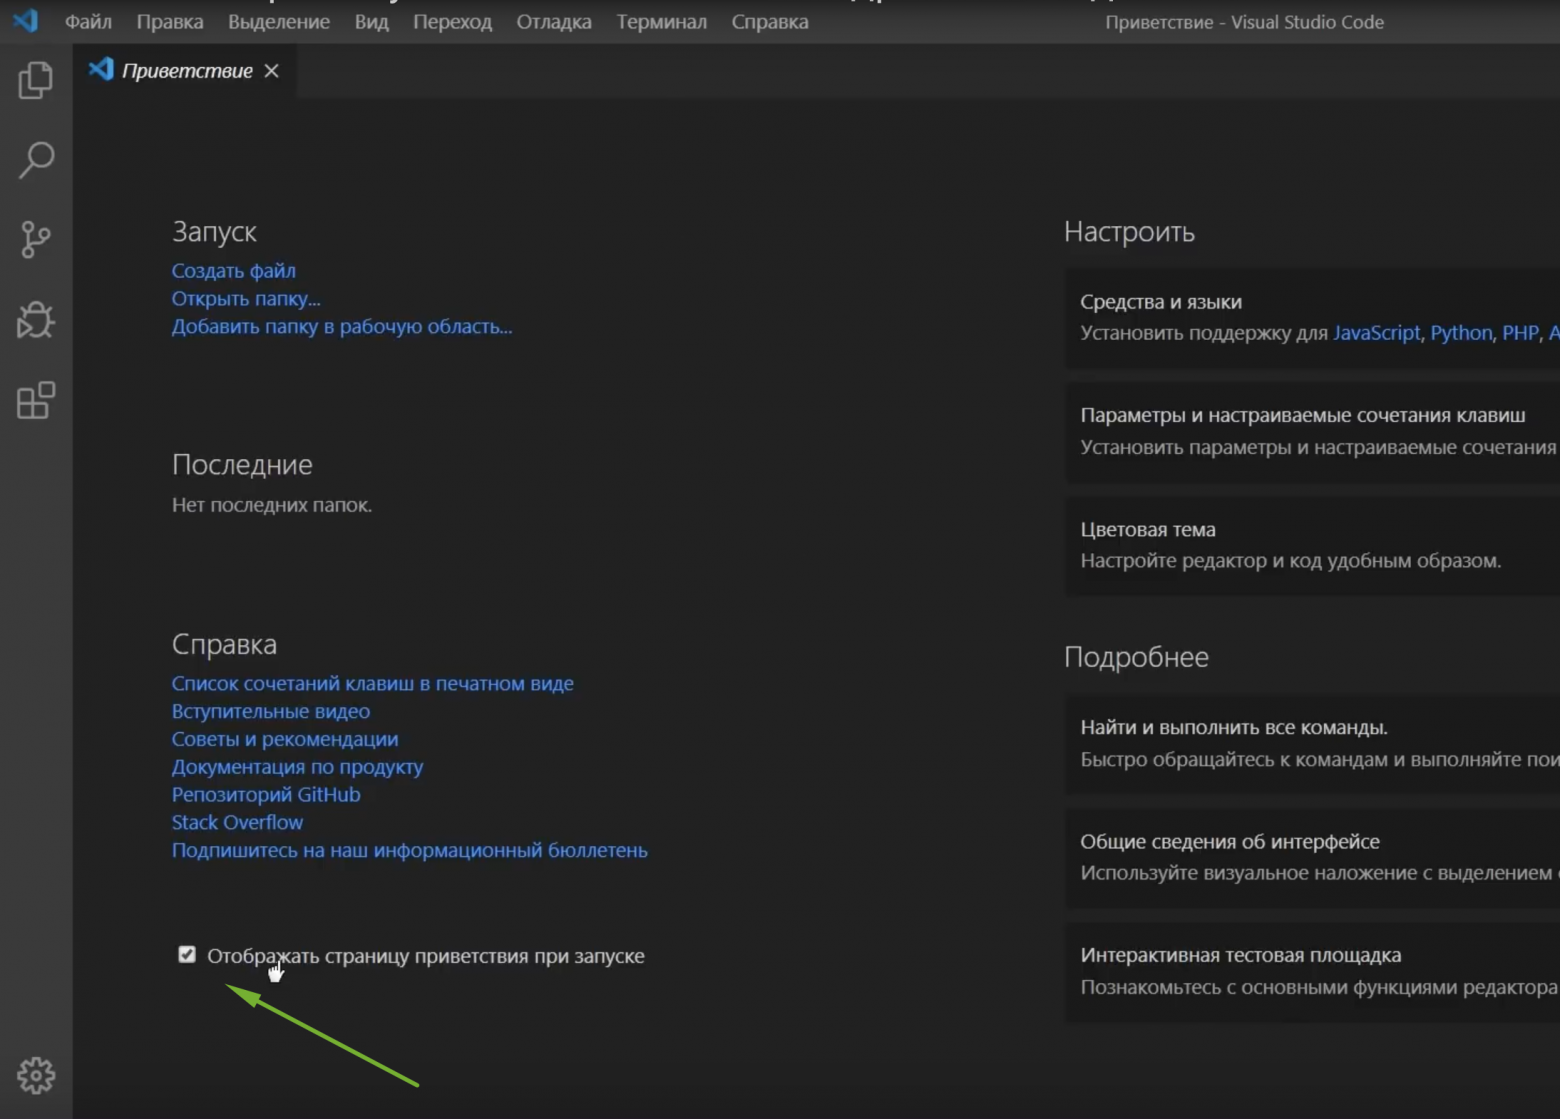
Первое, что мы видим — это экран приветствия. Здесь есть пункт, с помощью которого мы можем импортировать все настройки, клавиши из уже установленных редакторов, например Vim, Sublime, Atom и другие.
Это значительно ускорит и облегчит переход с одного редактора в другой. Но сегодня мы все будем делать с нуля. Далее здесь есть другие полезные ссылки — Общие сведения об интерфейсе, а также список сочетаний клавиш в очень удобном виде и многое другое.
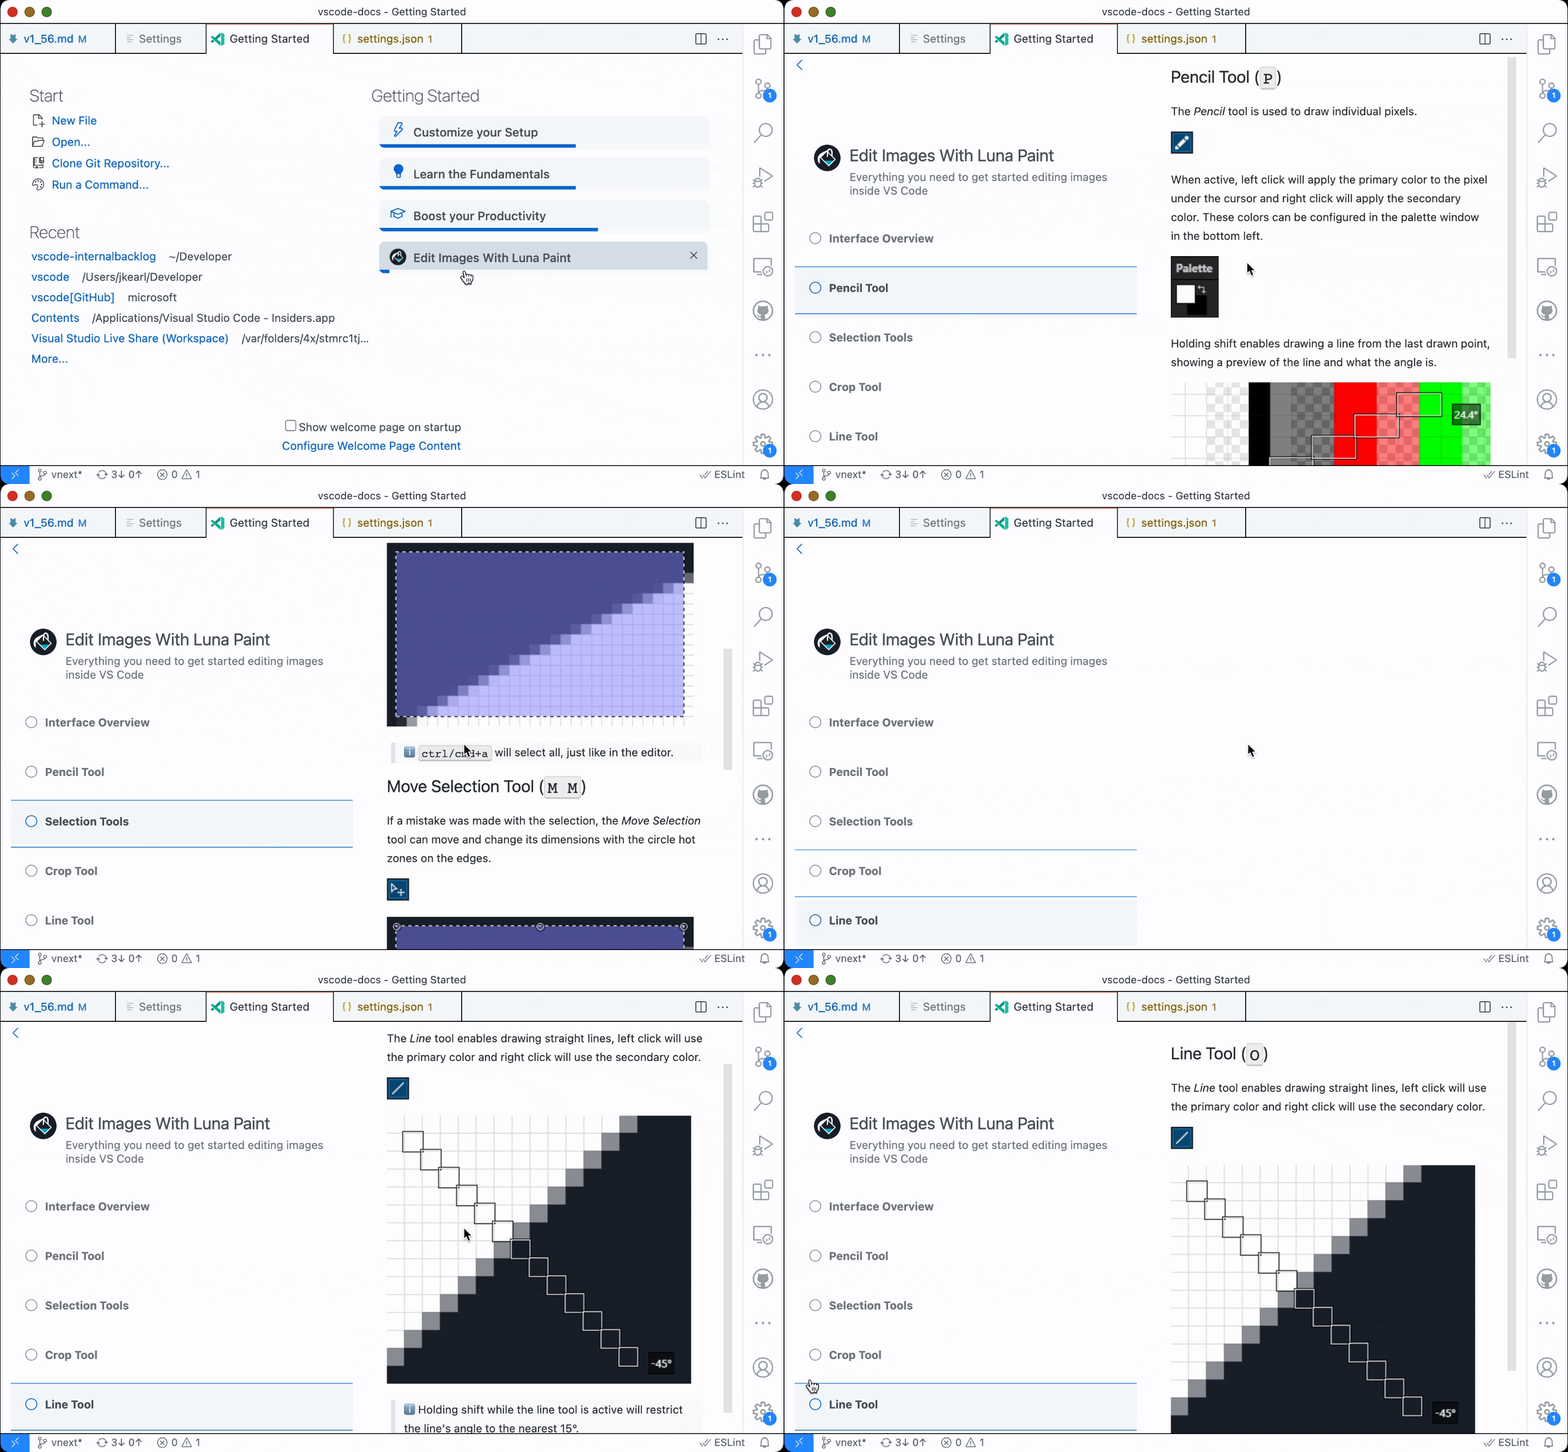
Советую изучить этот экран, а когда он будет уже не нужен при каждом запуске программы, необходимо снять вот эту галочку. Позже ты всегда сможешь вызвать его из меню Справка > Приветствие.
Интерфейс из коробки
Лень читать? Тут видео версия.
Все приготовления сделаны и теперь мы можем ознакомиться с интерфейсом программы и заодно посмотрим что может VS Code из коробки.
Вызовем окно Общие сведения об интерфейсе и посмотрим основные элементы программы.
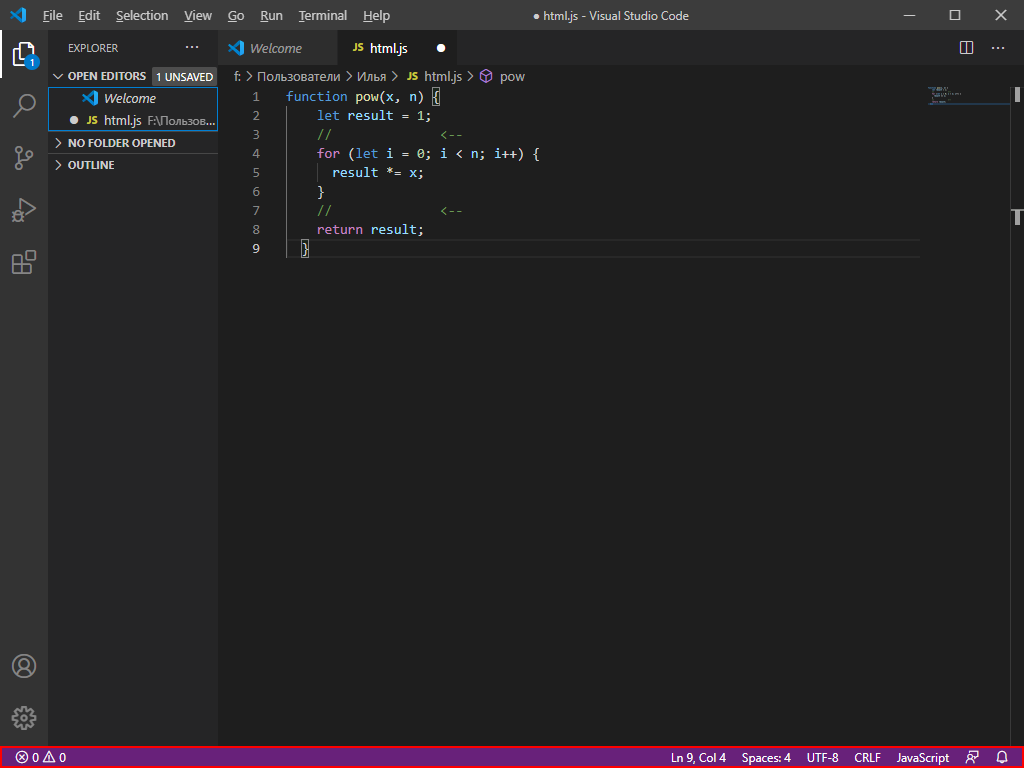
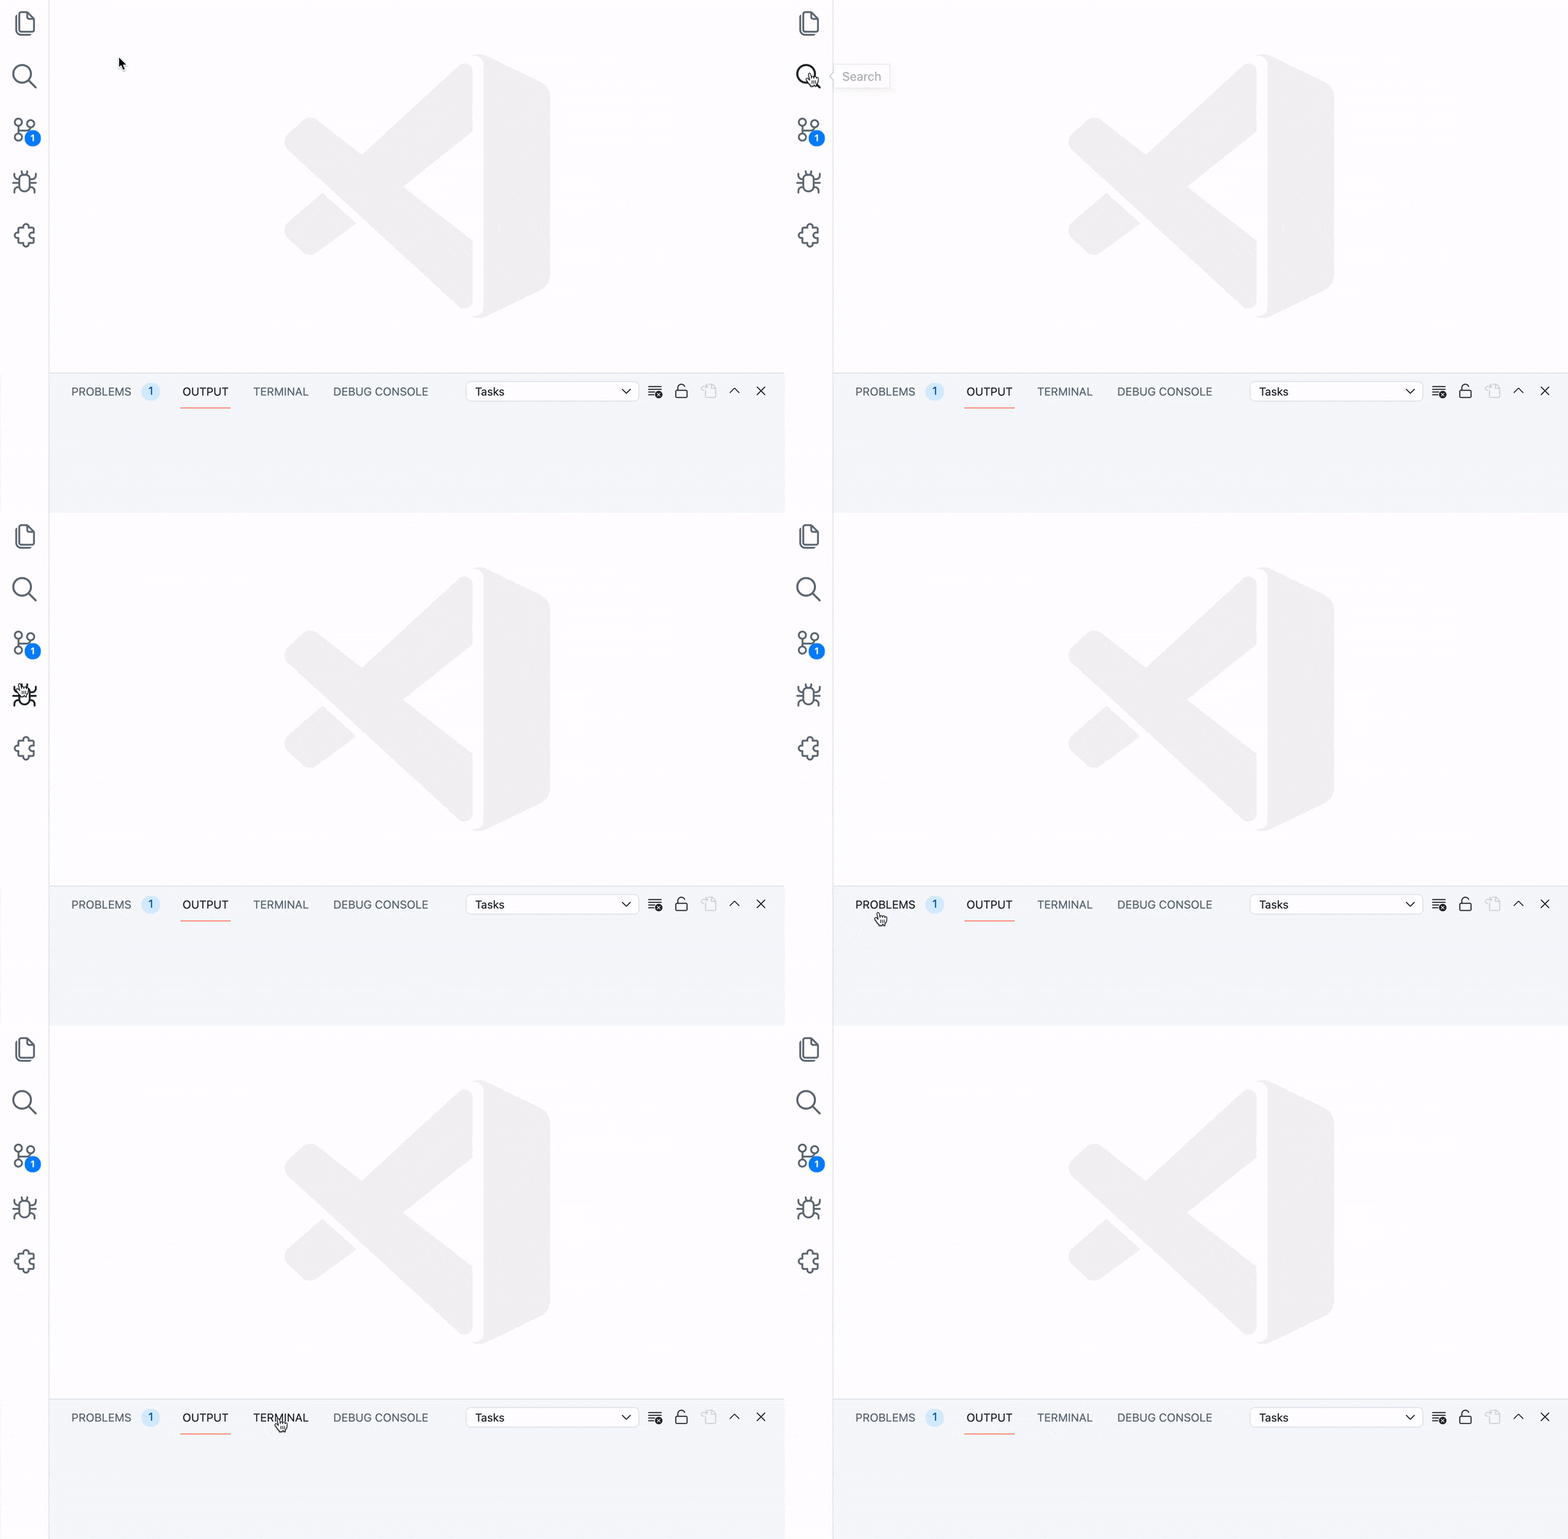
Сверху мы видим меню. Далее есть интерфейс выполнения любой команды, которую мы можем всегда вызвать. Общая область редактора. Слева Панель действий. Снизу строка состояния, с него мы и начнем. Подсказки говорят нам о том, что здесь есть Просмотр ошибок и предупреждений. Можно вызвать встроенный терминал.
Рассмотрим все подробнее.
Строка состояния
Проблемы
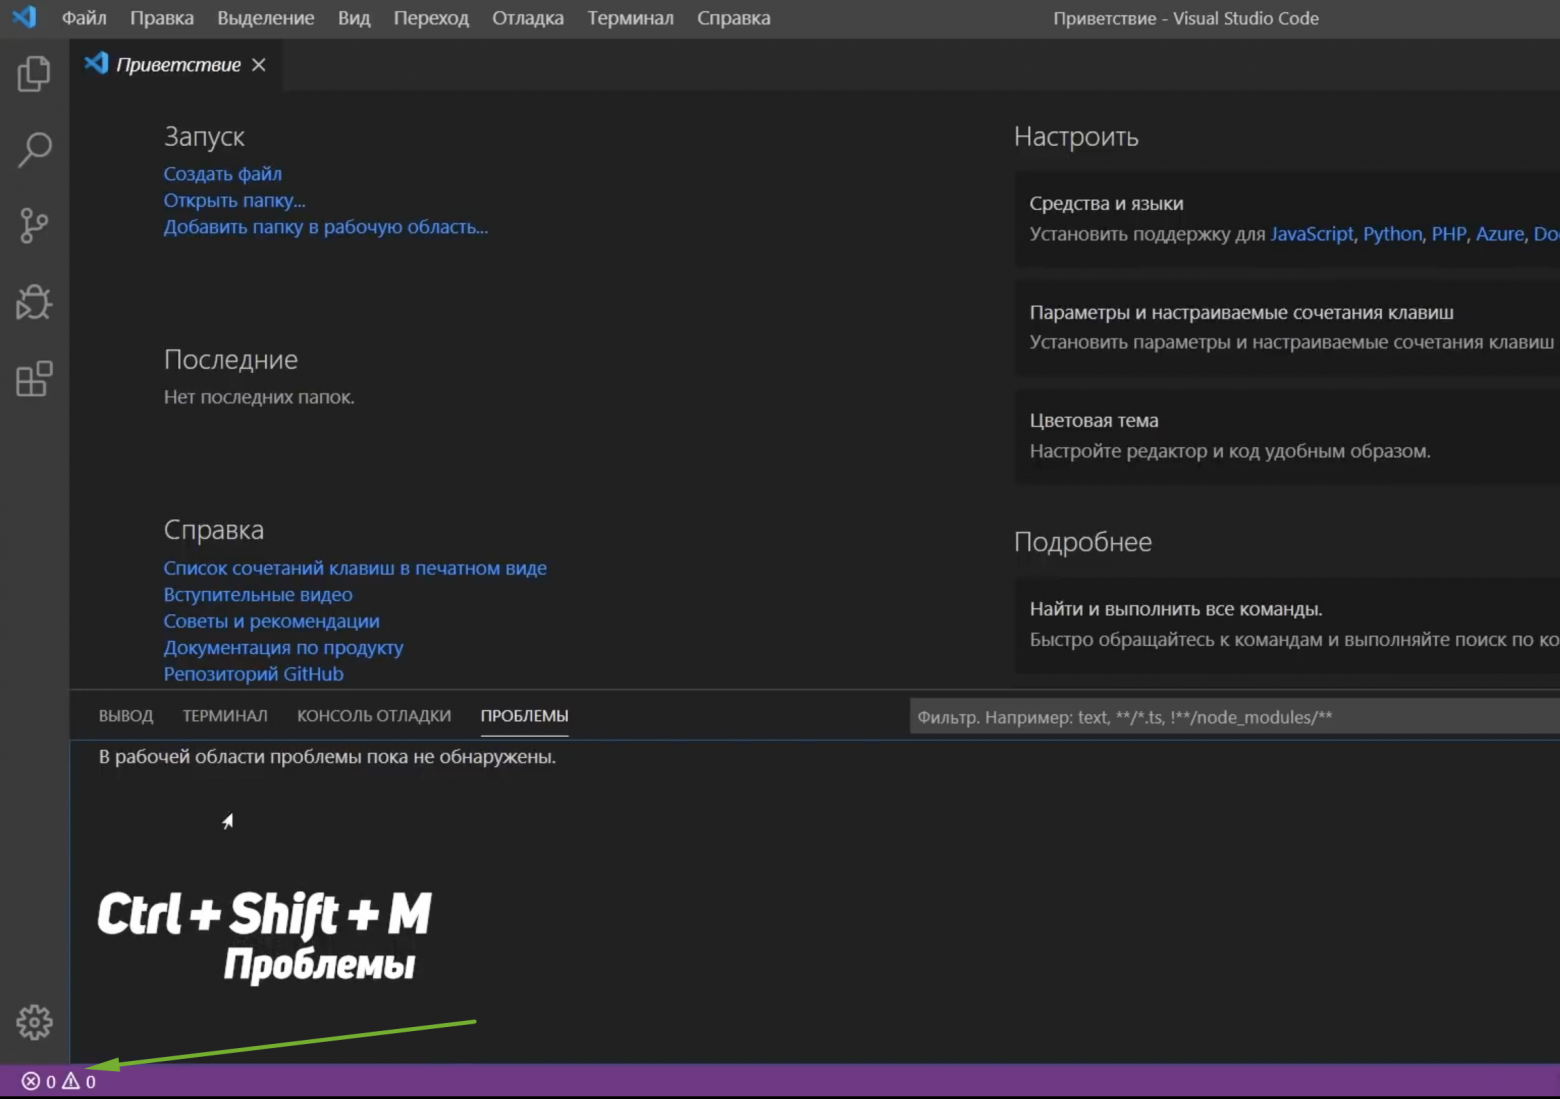
В левой части цифры возле иконок будут отображать количество ошибок и предупреждений, которые возникли в ходе выполнения кода.
Чтобы открыть панель, нужно щелкнуть на эти иконки либо зажать Ctrl+Shift+М, здесь нам будет выводиться сам текст сообщений о проблемах.
В панели можно отфильтровать эти сообщения, свернуть их, развернуть всю панель на весь экран или закрыть ее.
Консоль отладки
Помимо вкладки вывода проблем в этой панели у нас еще есть Консоль отладки кода, к ней мы еще вернемся.
Вывод
Журнал вывода работы всех программ и систем редактора. Здесь также можно отфильтровать этот журнал, очистить его, заблокировать скролл сообщений, развернуть панель или закрыть ее.
Терминал
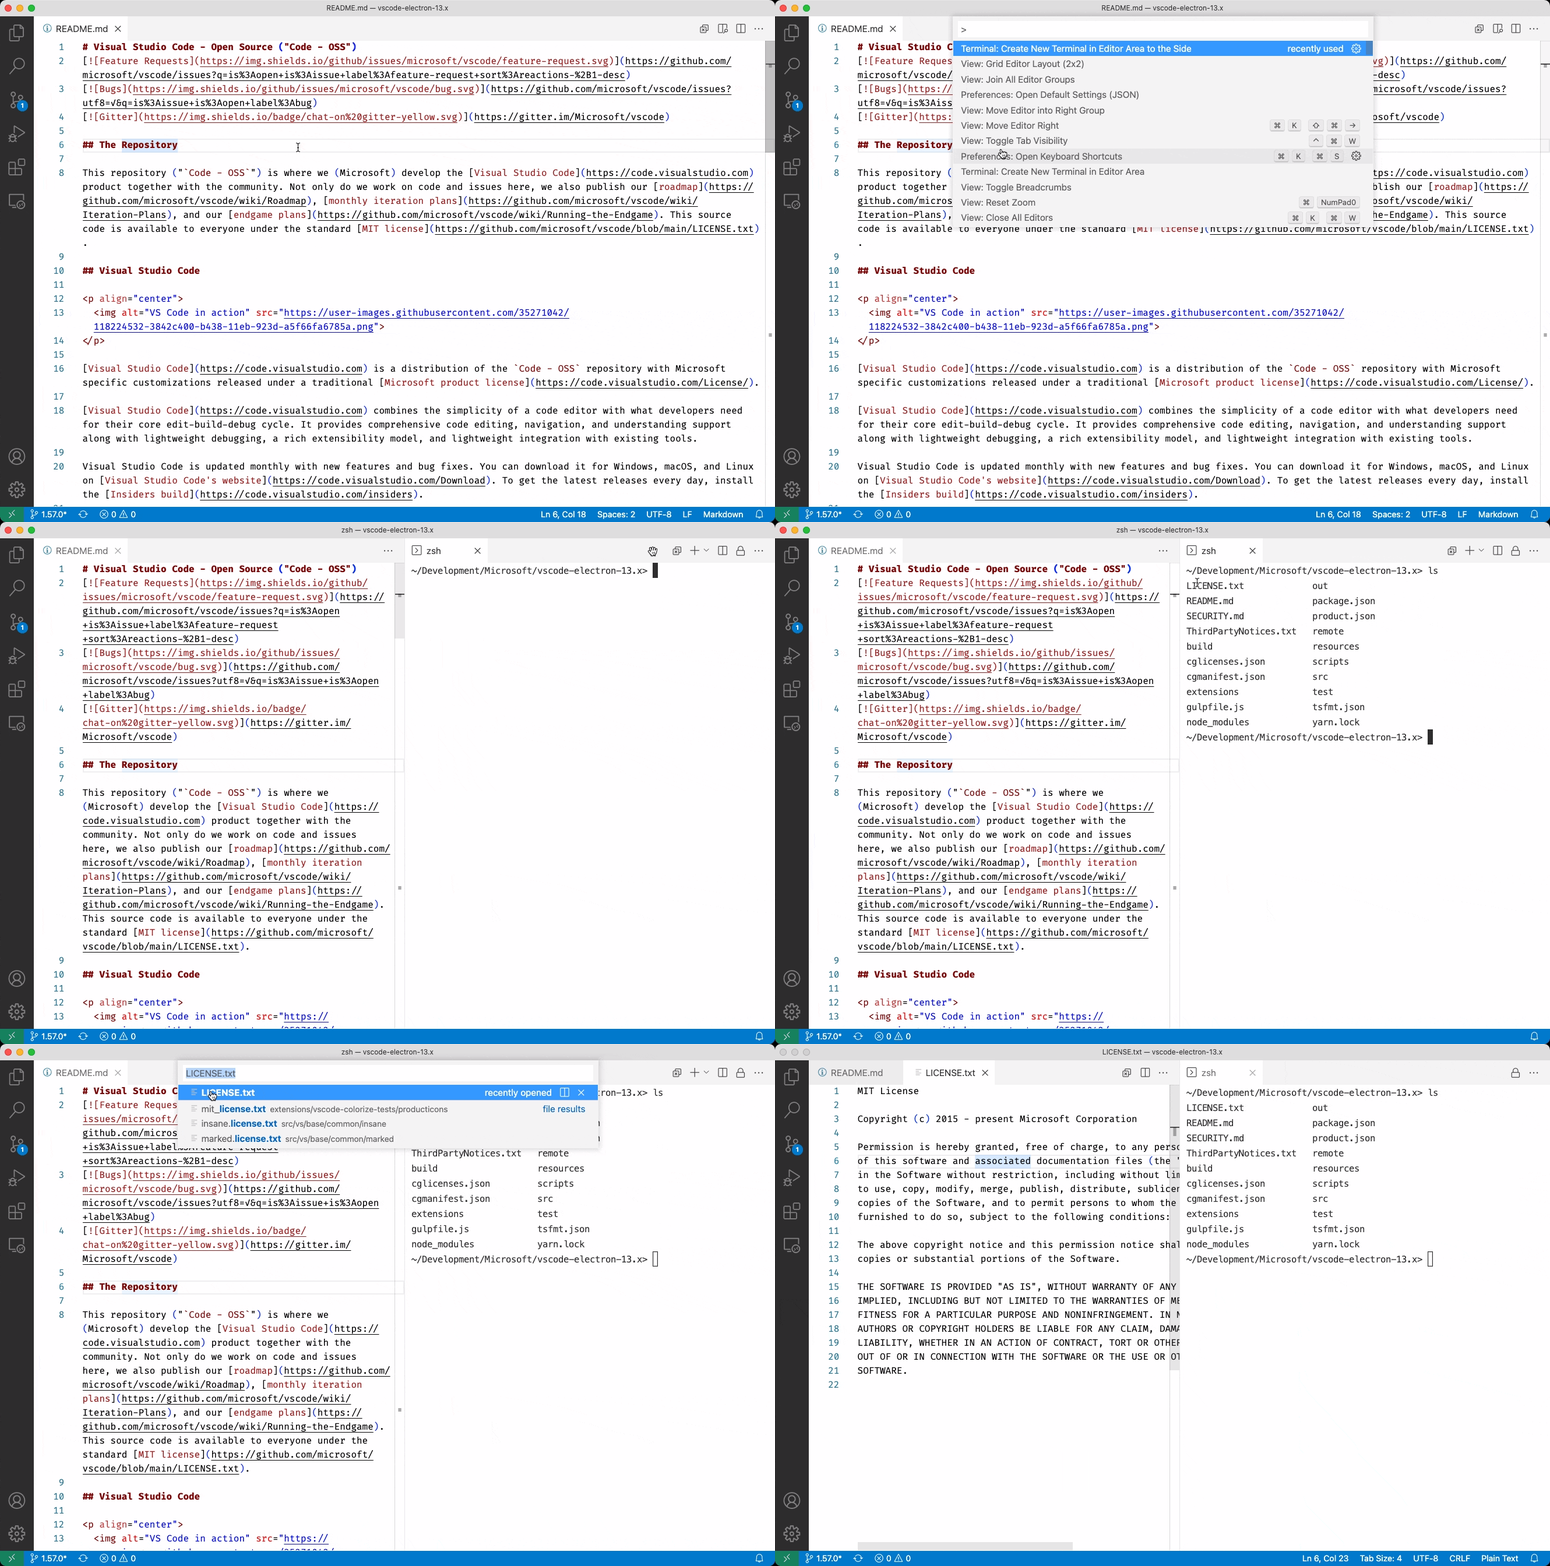
Последняя вкладка в этой панели — встроенный терминал. Вызвать его можно зажав Ctrl+`.
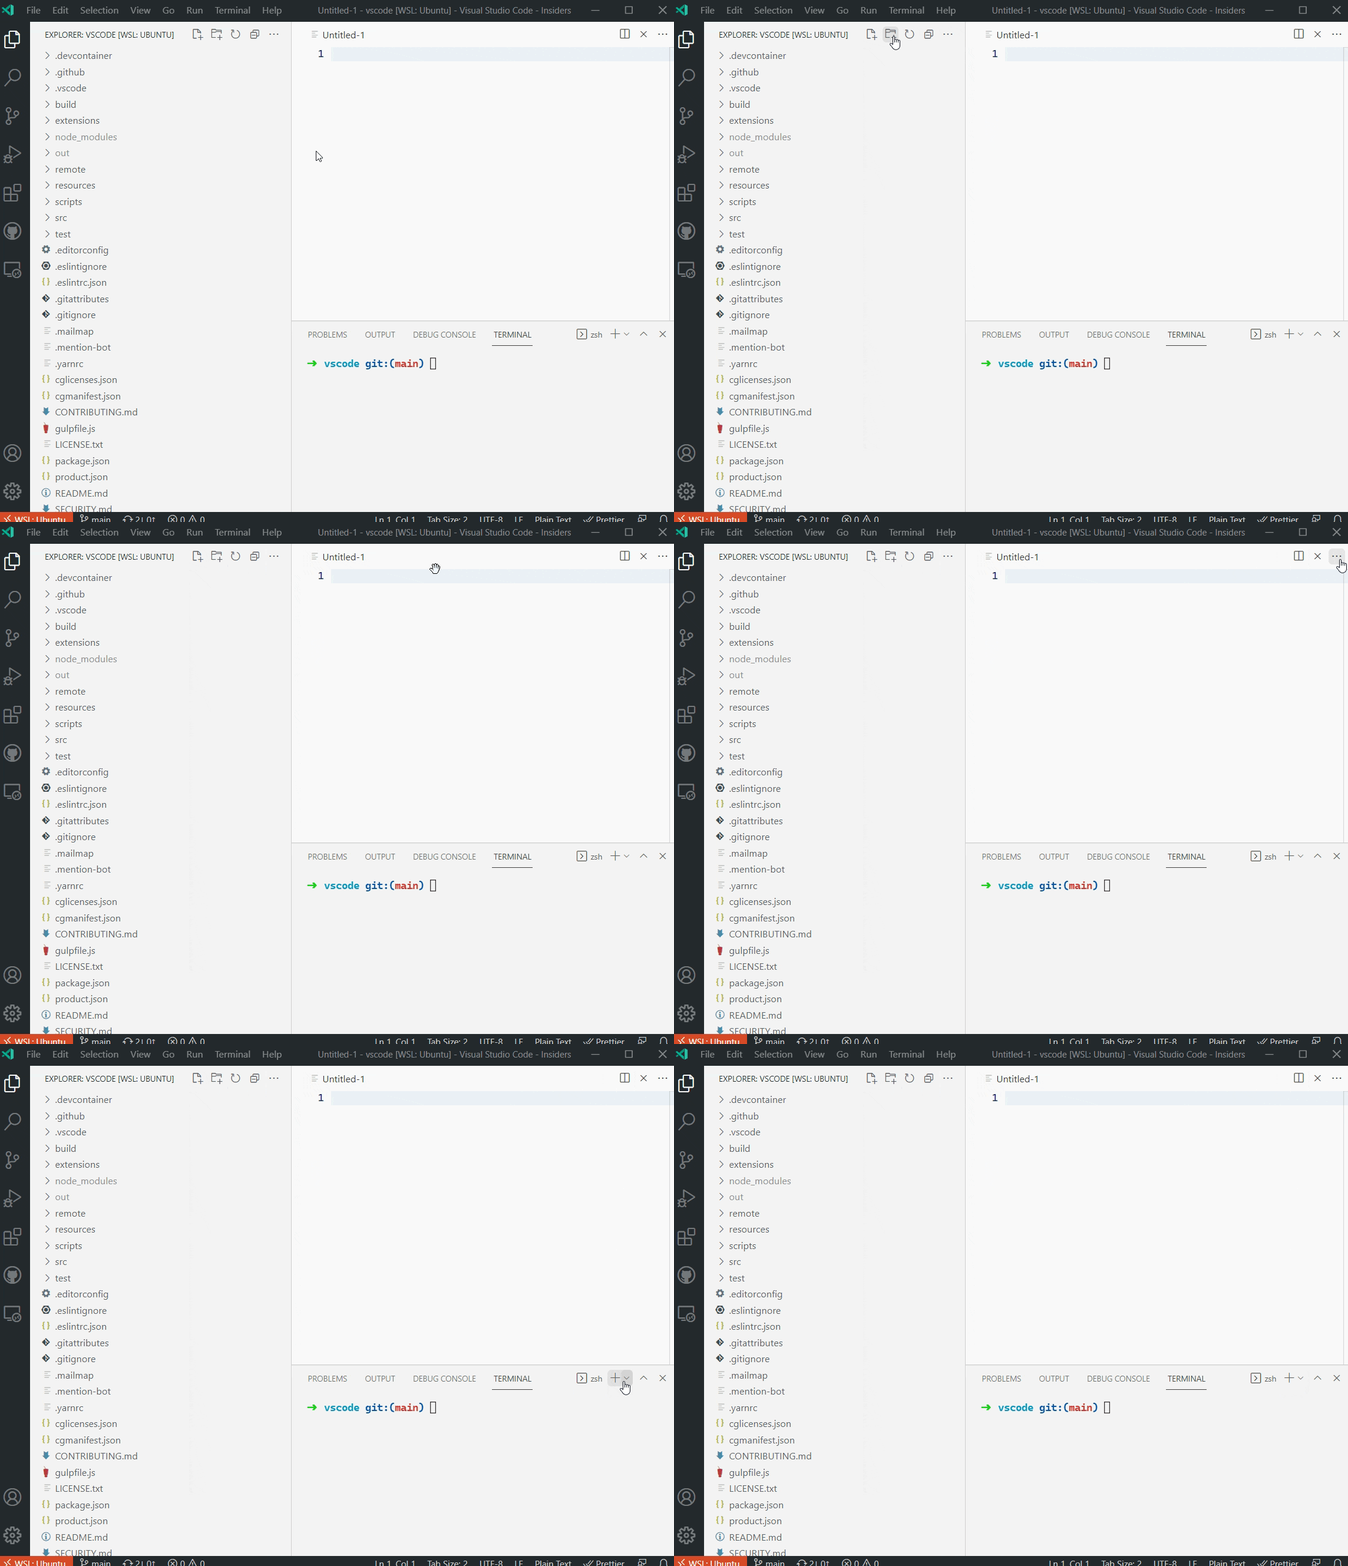
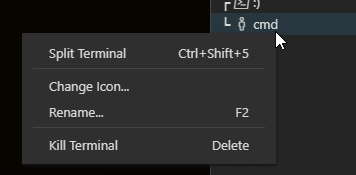
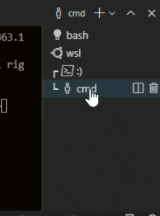
В Панели управления можно еще добавить терминалов, разделить окно на несколько частей, удалить окно терминала, переключаться между окнами терминала, а также выбрать оболочку по умолчанию.
Например, у меня установлен GitBash. Выбрав его, добавляем новое окно терминала, у меня откроется именно этот интерфейс.Традиционно здесь можно развернуть панель на весь экран и закрыть ее.
Уведомления
Справа в строке состояния мы видим уведомления, сейчас их нет. Также есть возможность отправить твит с отзывом о программе.
Также в панели состояния будут появляться множество других элементов.
Контекстное меню
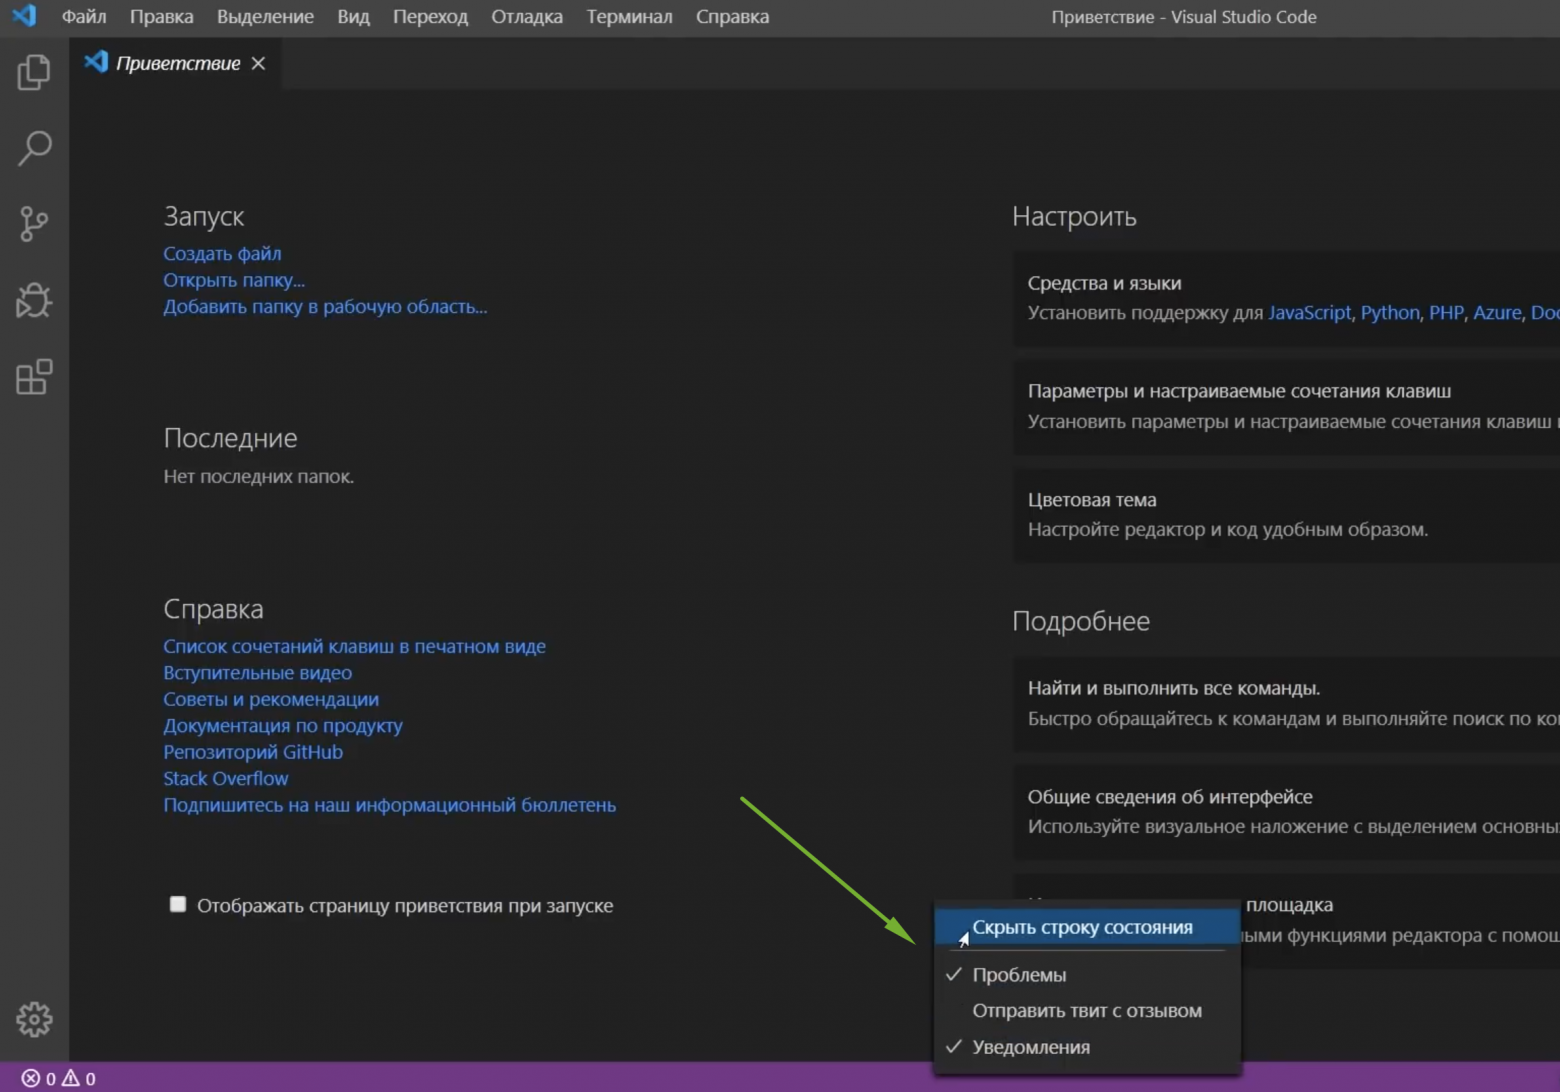
Также мы можем вызвать контекстное меню и убрать с этой строки то, чем мы не пользуемся. Например, твит с отзывом, чтобы освободить место.
Также в этом же контекстном меню можем скрыть эту строку полностью.
Панель действий
По умолчанию в левой части редактора расположилась панель действий с 6 элементами:
Проводник
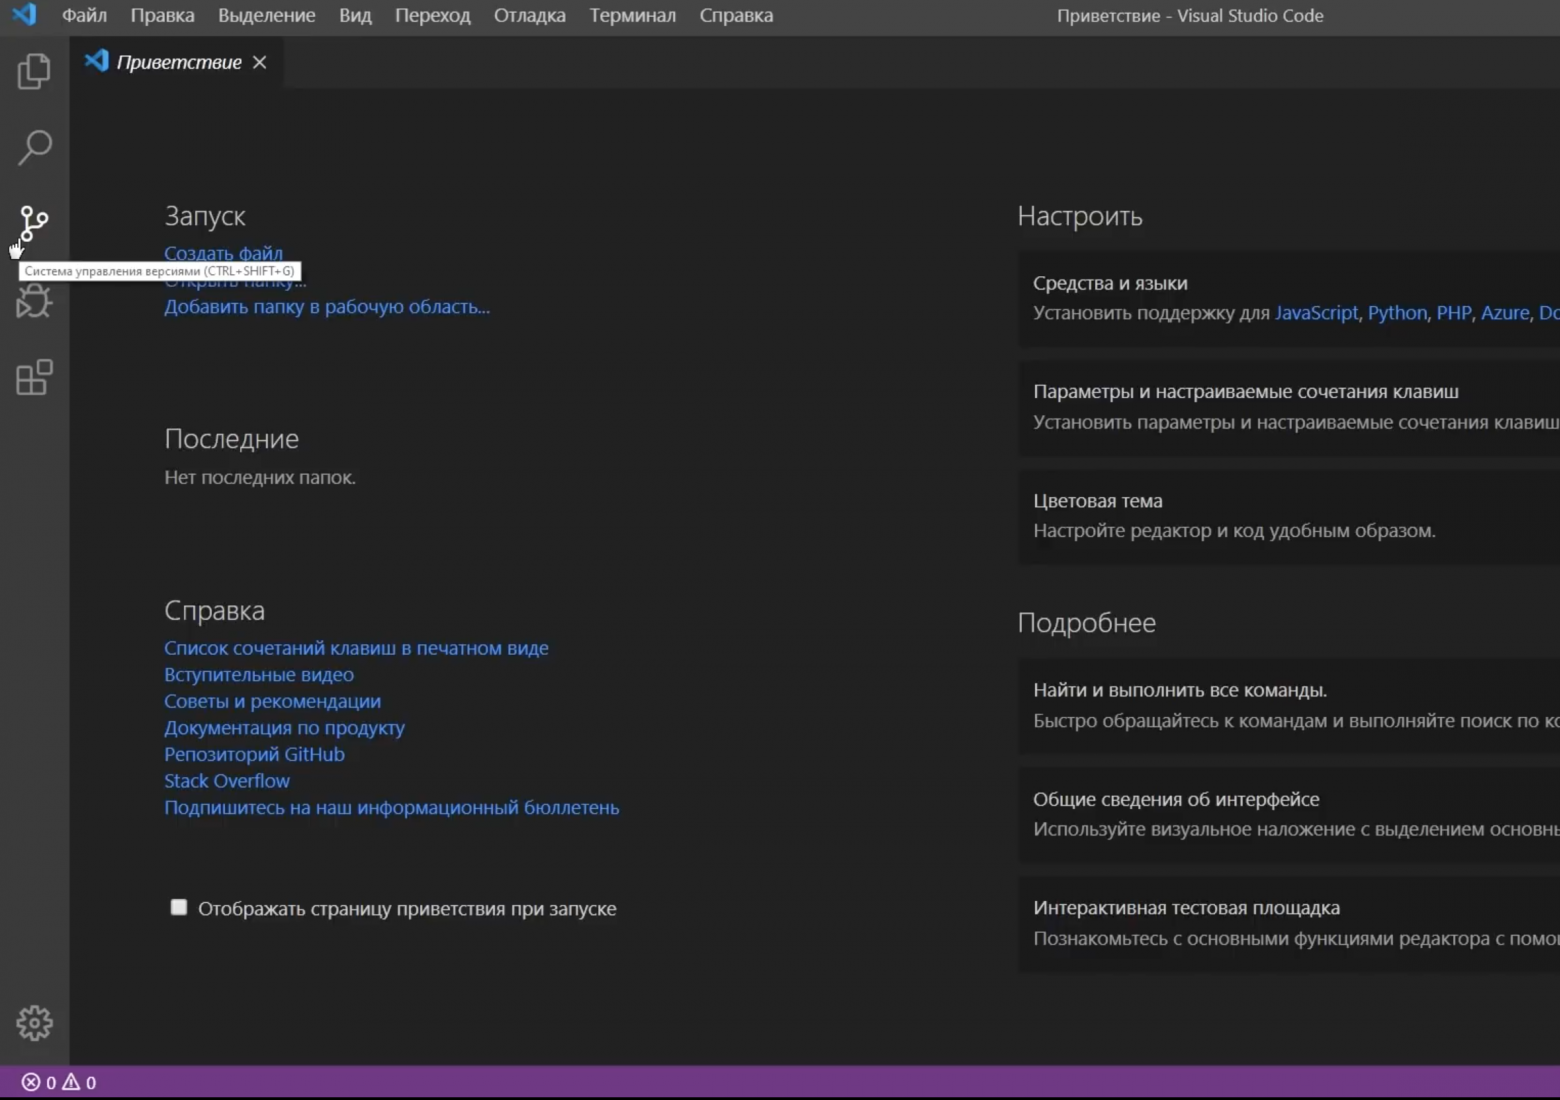
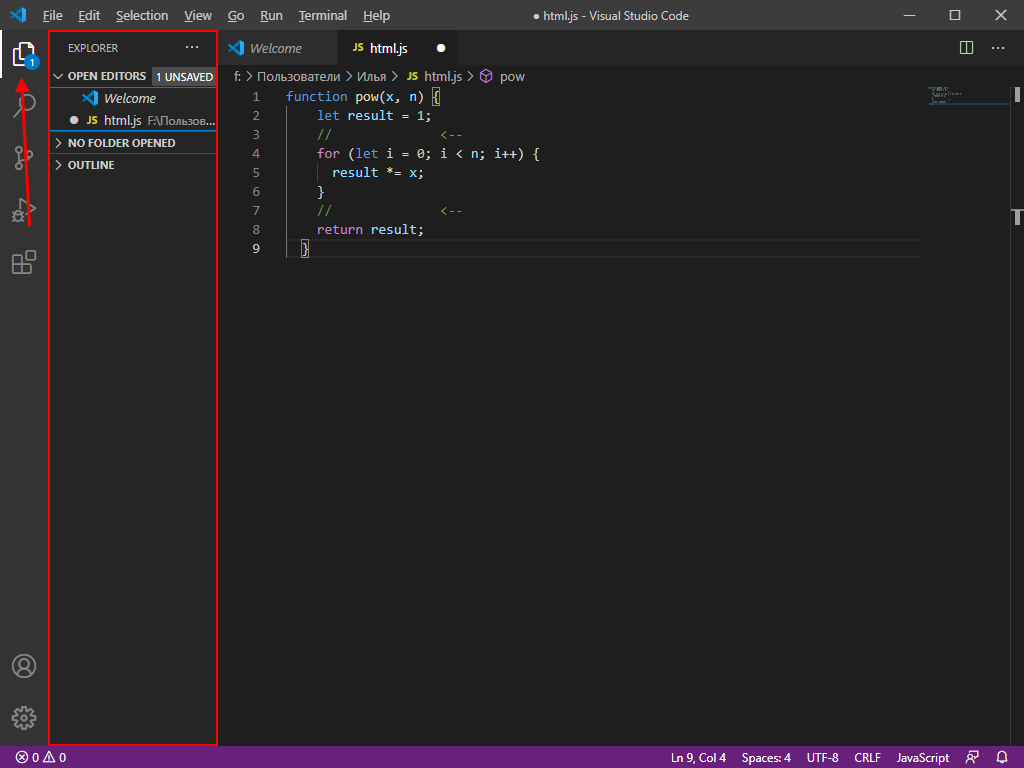
Начнем с Проводника, открыть его можно кликнув на иконку либо зажав Ctrl+Shift+E.
Очень удобно, что при наведении на иконку редактор подсказывает нам сочетание клавиш.
Тут мы видим 3 основные вкладки:
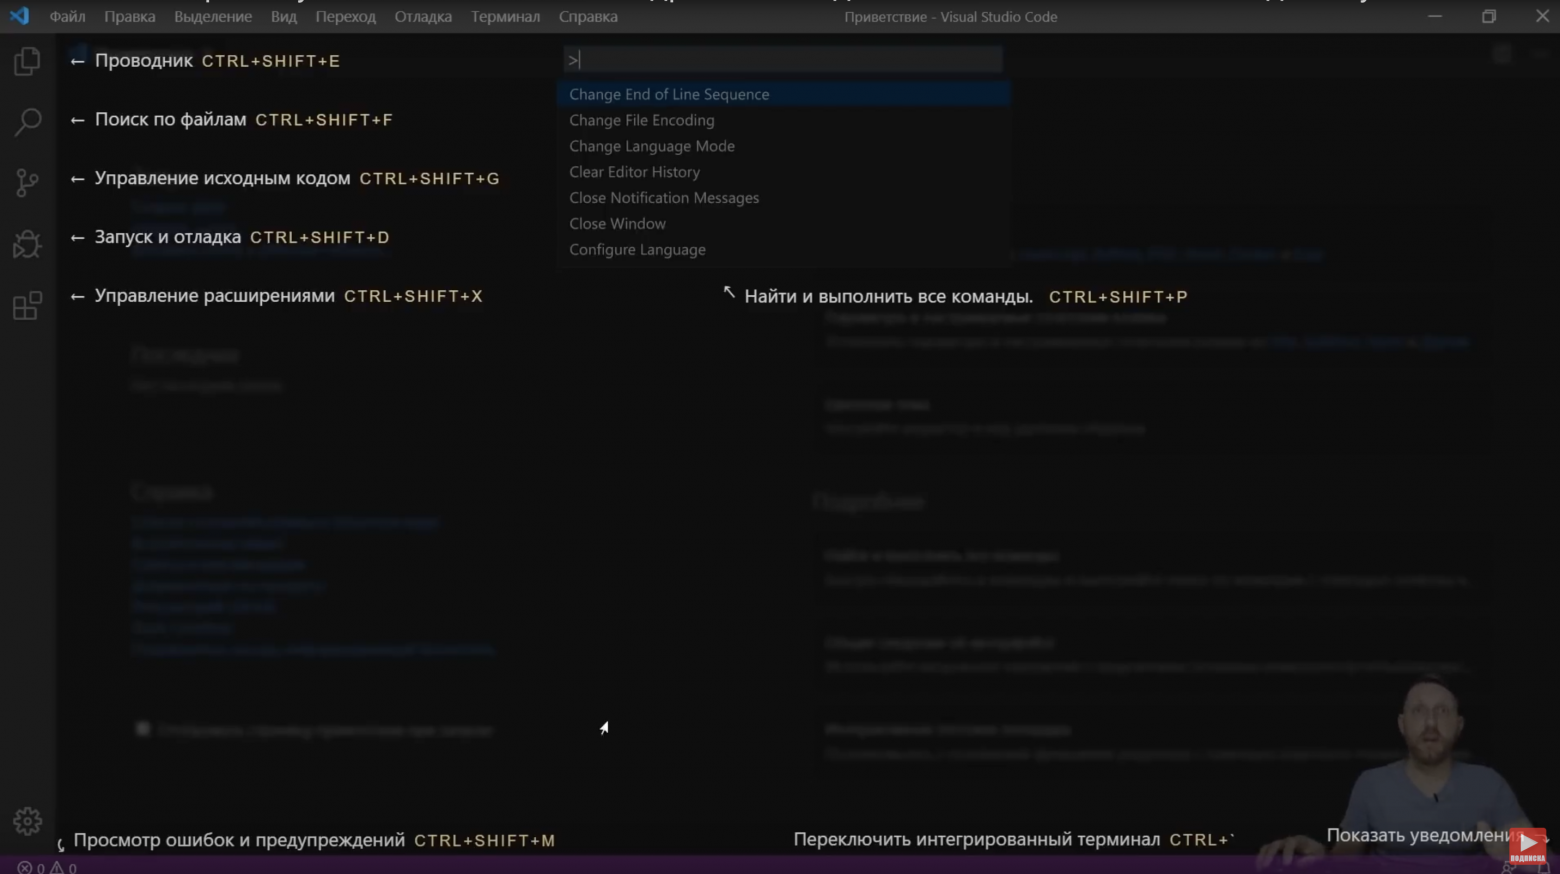
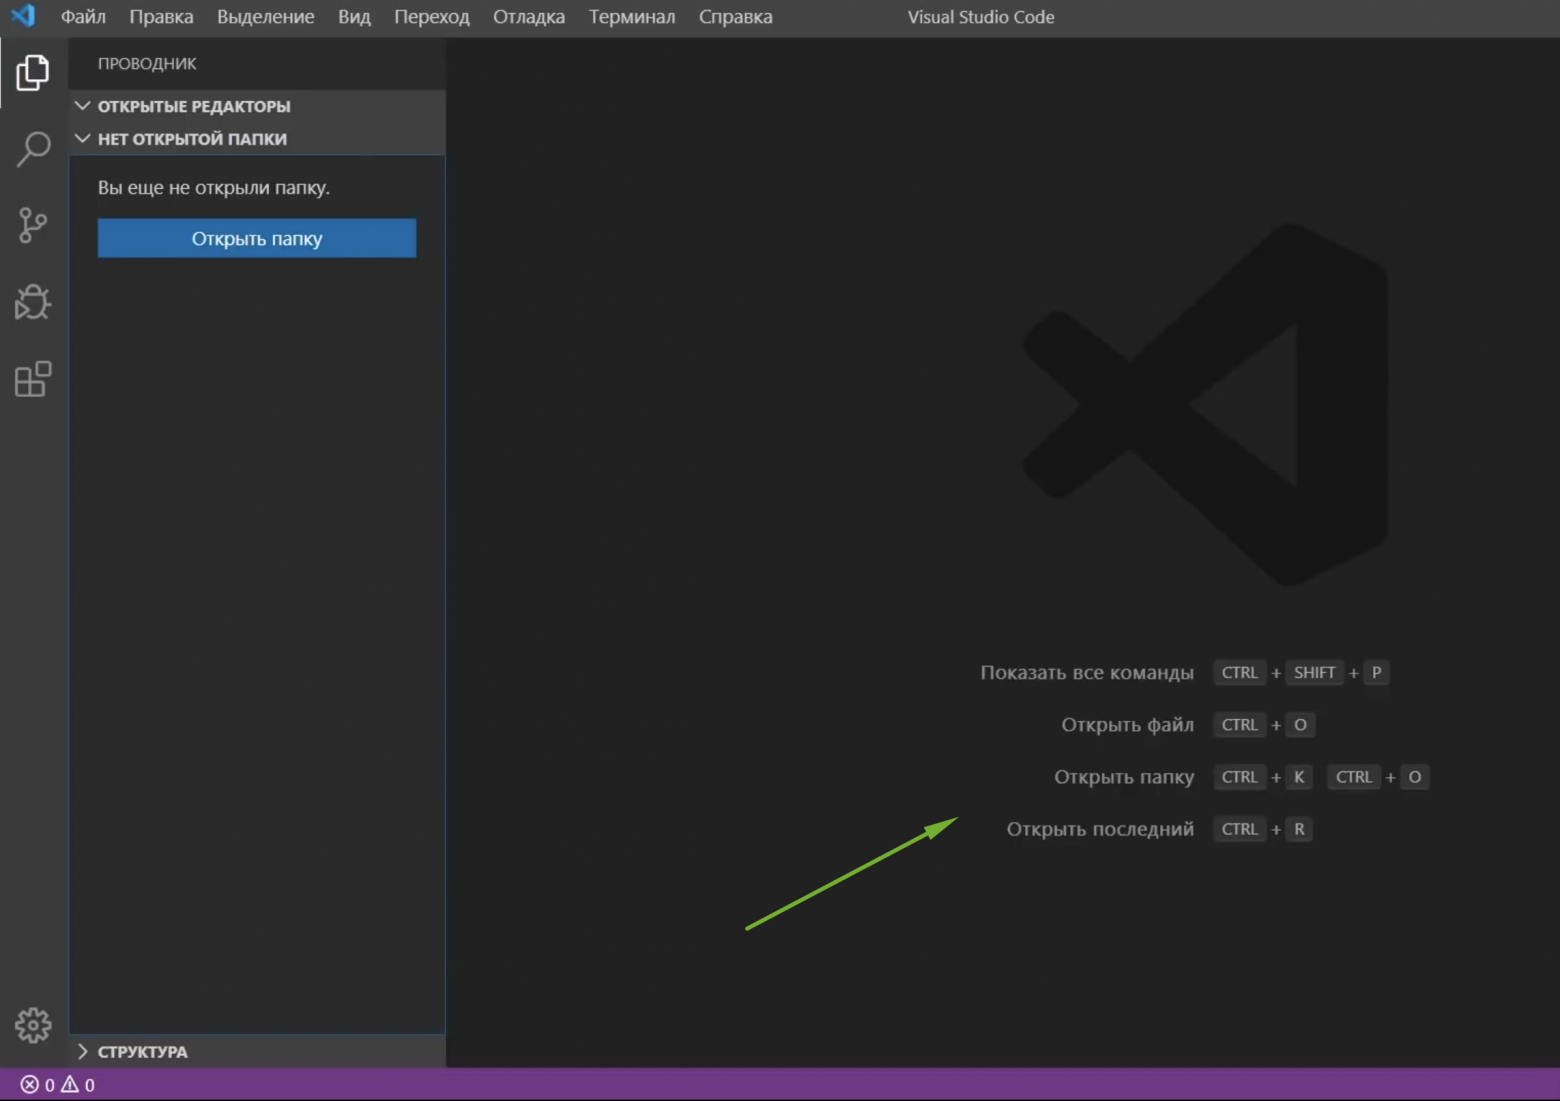
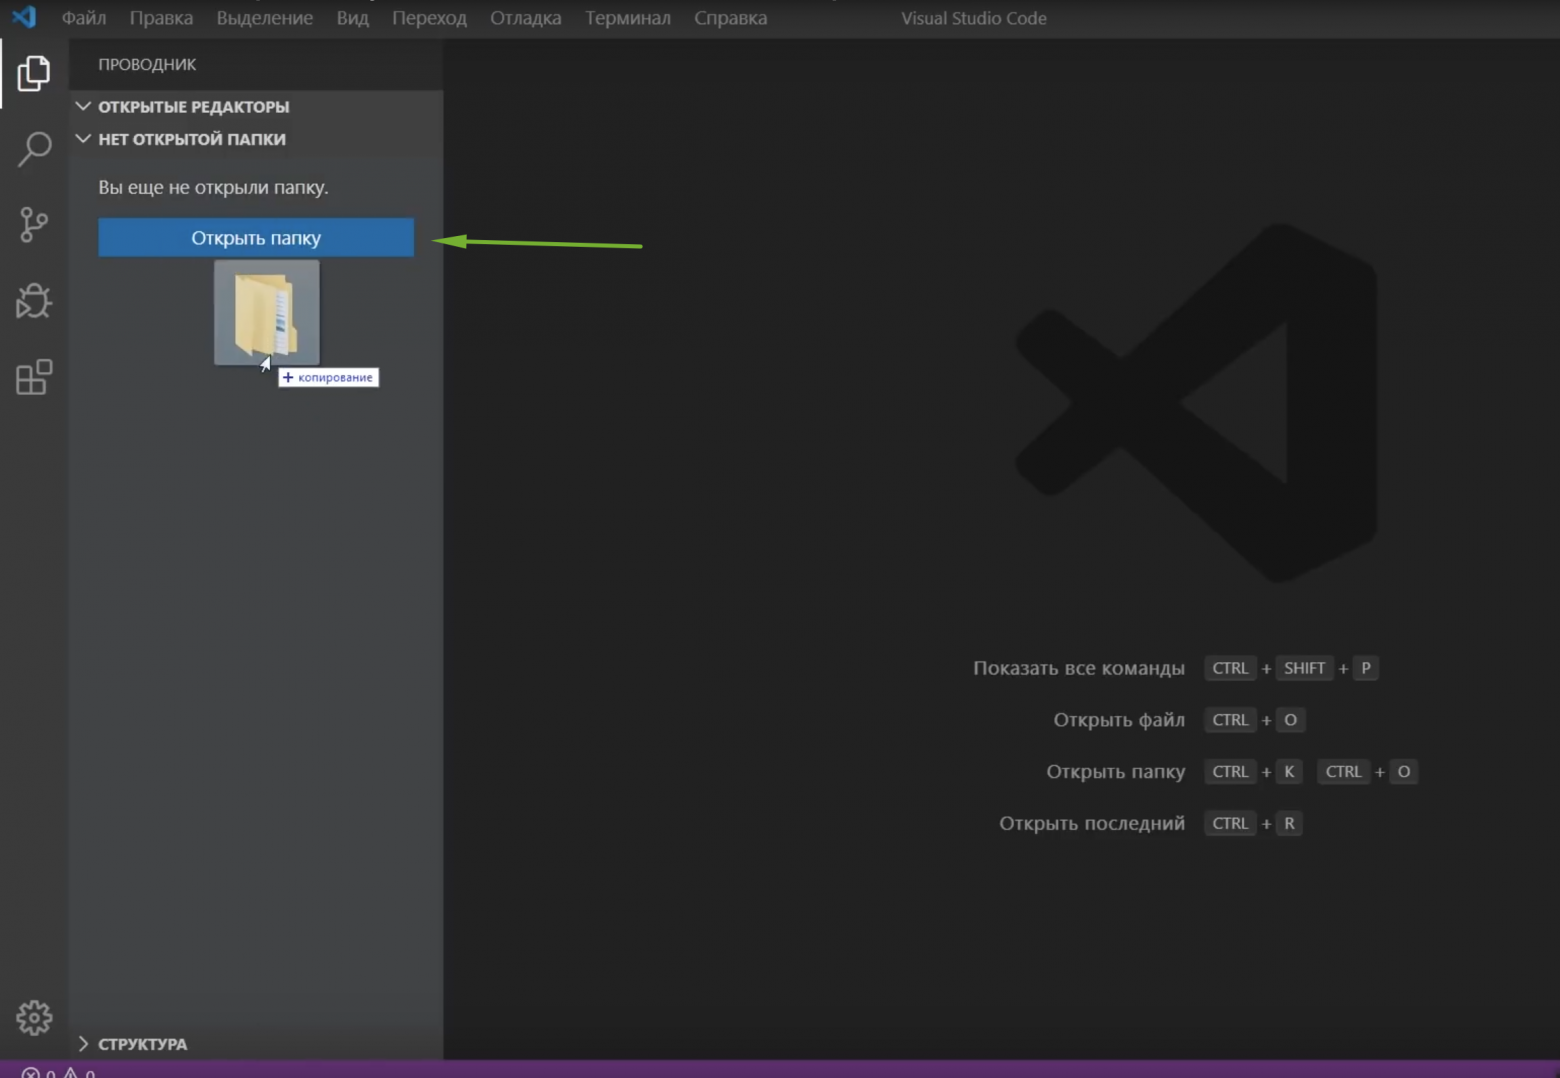
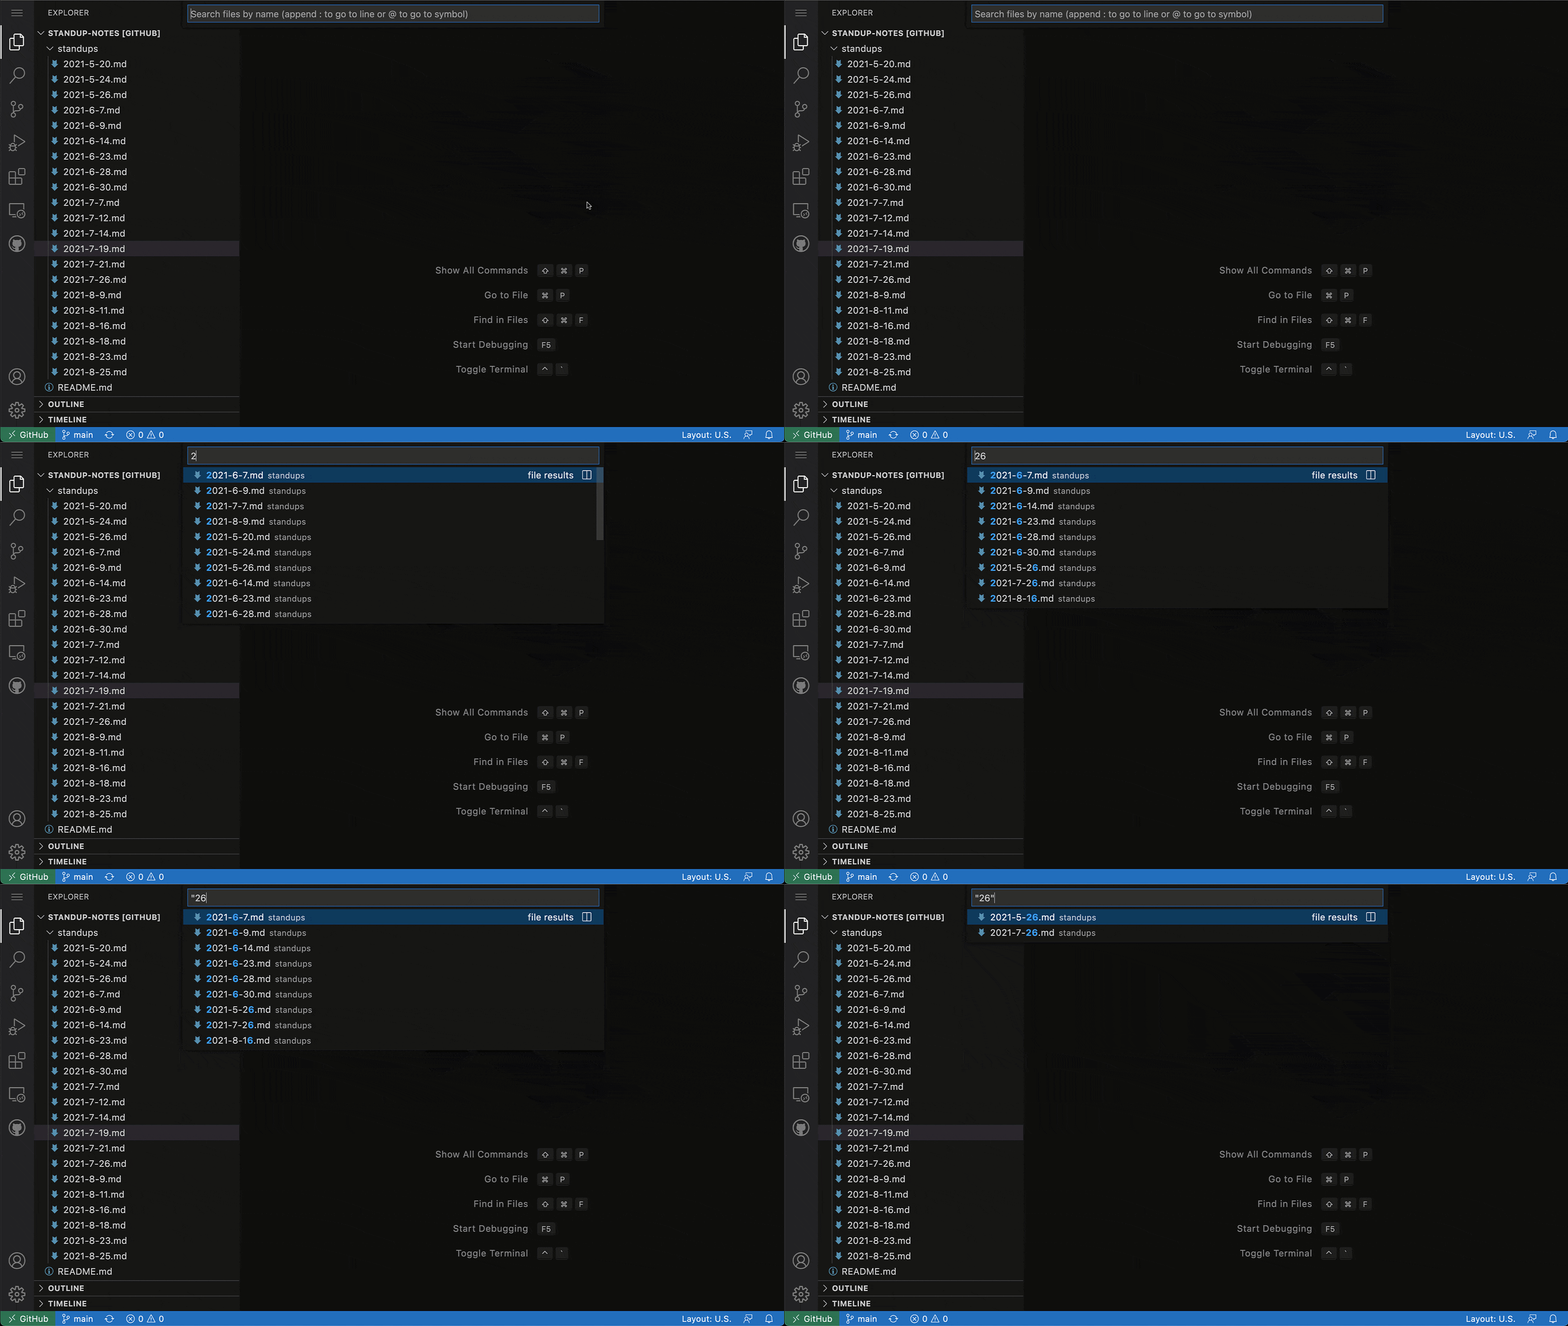
Окно Приветствия мы можем уже закрыть. Когда все окна закрыты, то редактор выводит такую заглушку, где показывает сочетания клавиш для основных действий:
Давай добавим в редакторе пустую папку нашего будущего проекта. Для этого нужно кликнуть Открыть папку либо просто перетащить ее в это поле.
Сейчас у нас появилась пустая папка hello_vscode, а также некоторые элементы управления:
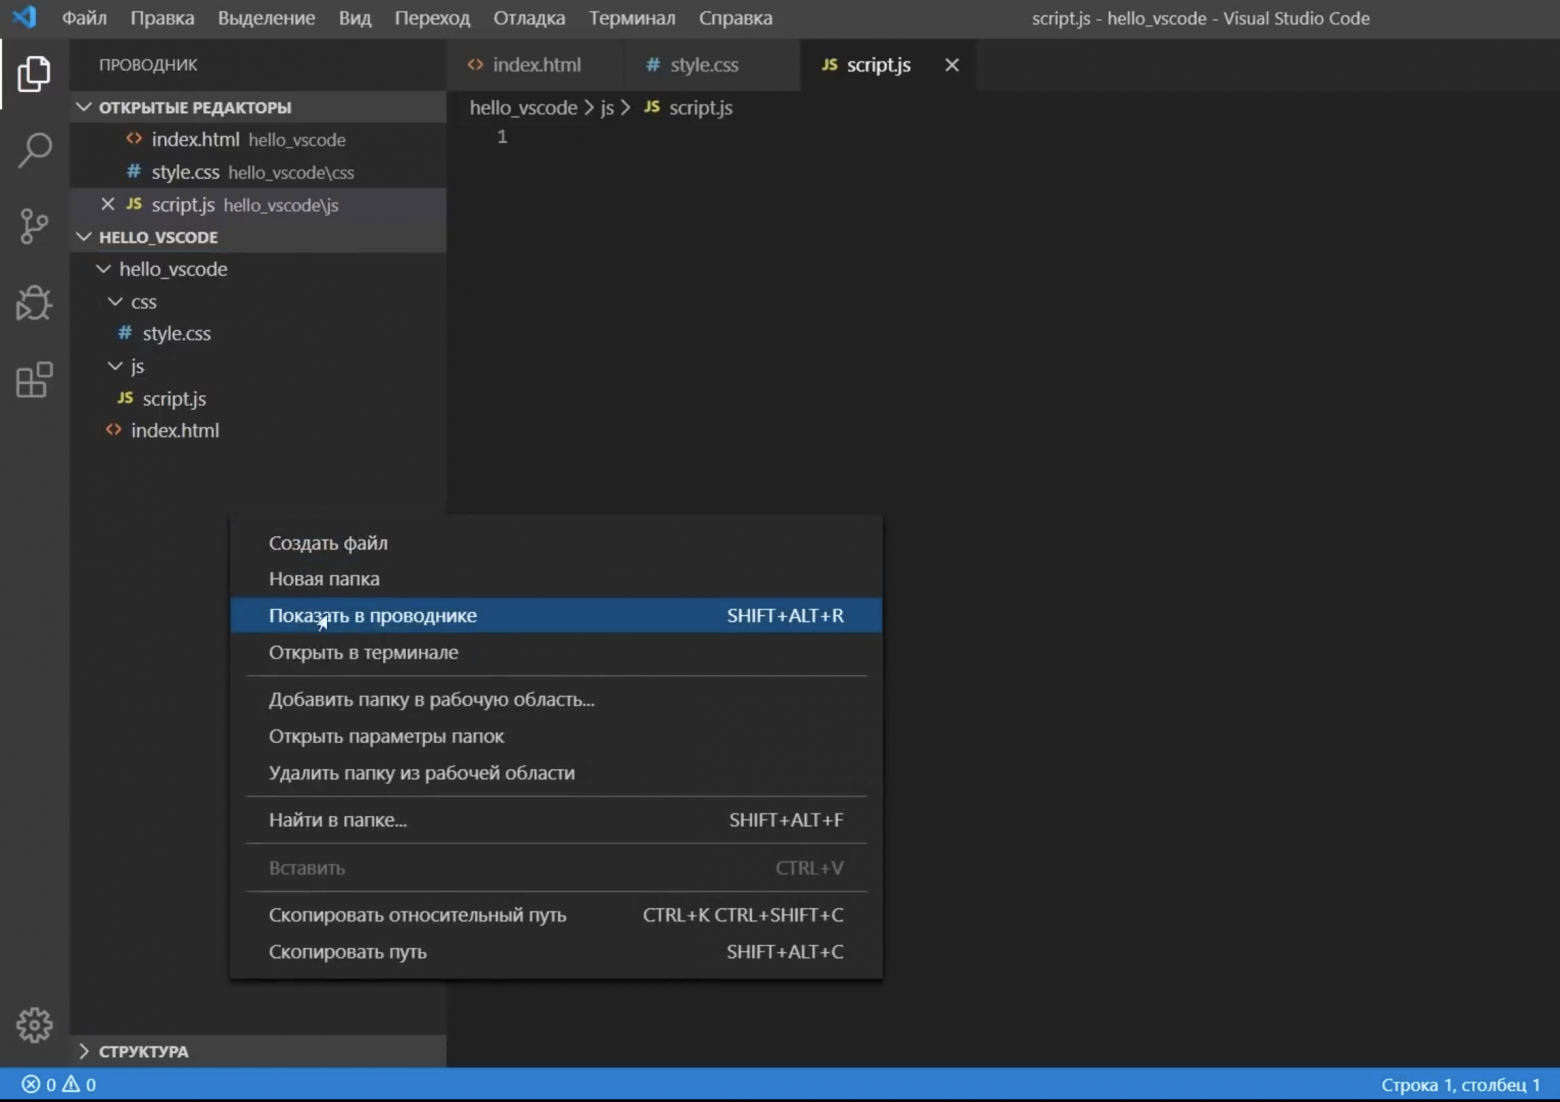
Давай создадим некоторые файлы, которые нам нужны для проекта. Нажимаем Создать файл, пишем например Index.html. Далее мы можем создать папку css и в ней создать файл style.css. Очень удобно пользоваться этим встроенным файл менеджером.
Также для создания файлов и папок можно пользоваться контекстным меню. Помимо этого здесь есть еще интересные функции, например показать папку в проводнике Windows.
Теперь мы можем перейти в Index.html и написать туда что-то интересное, например “Hello VC Code”.
Подсветка синтаксиса
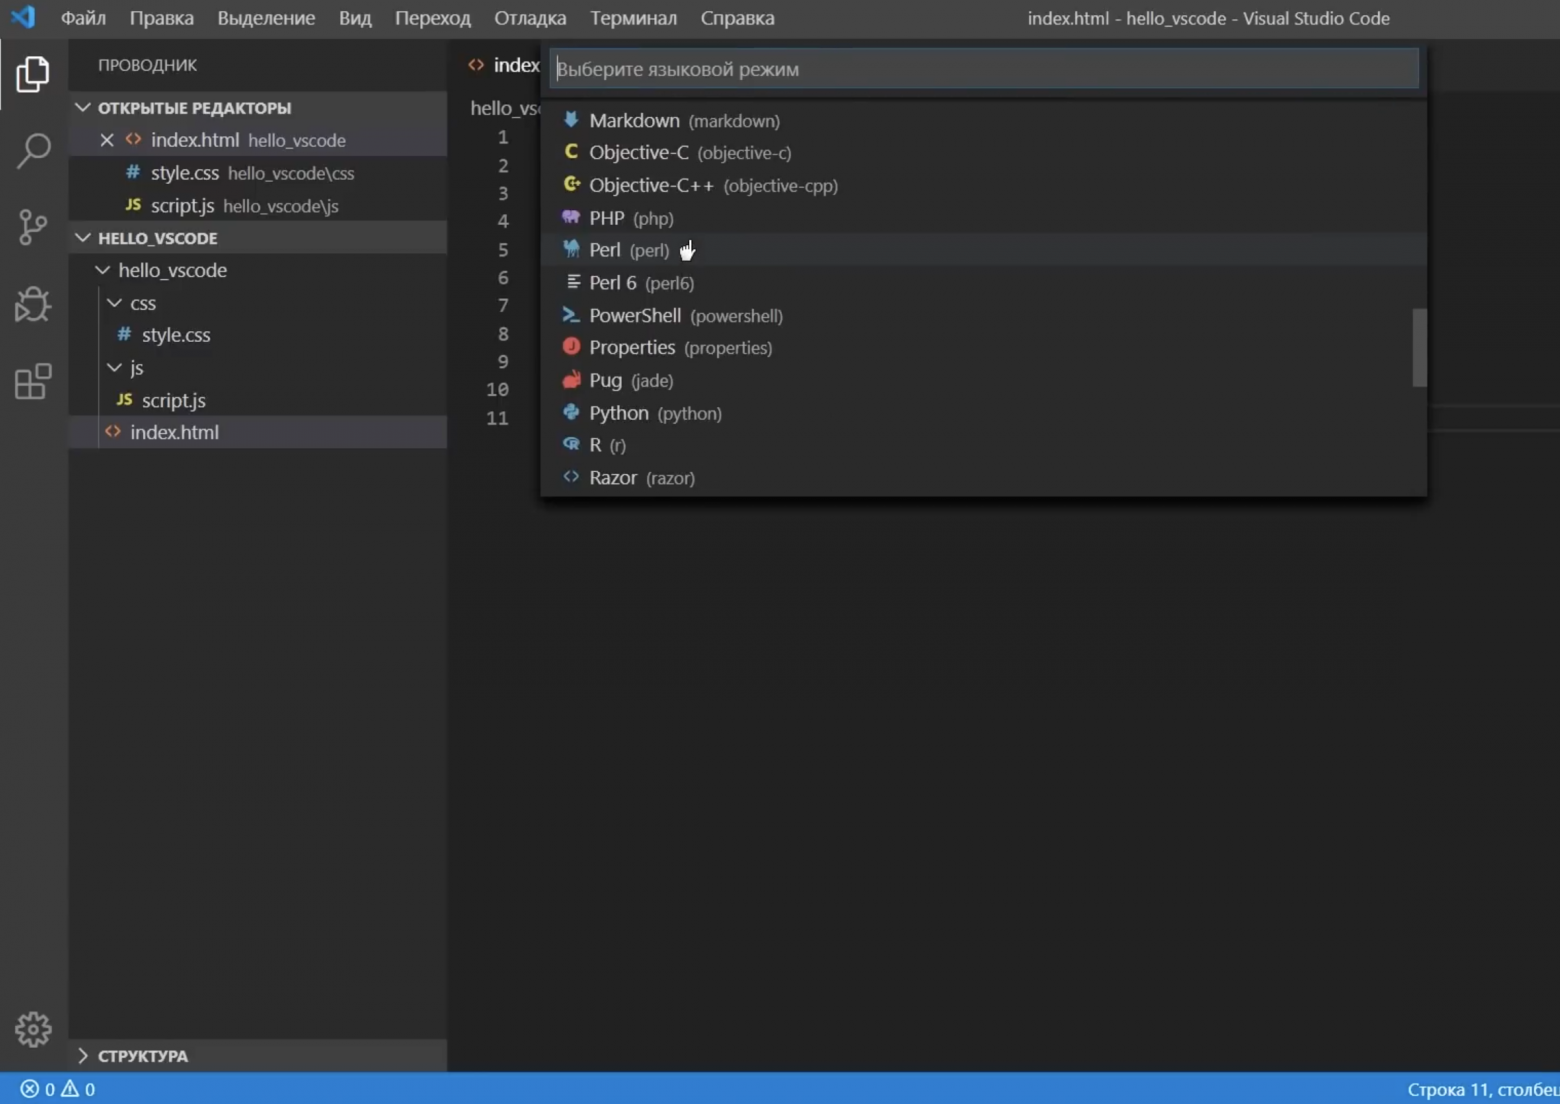
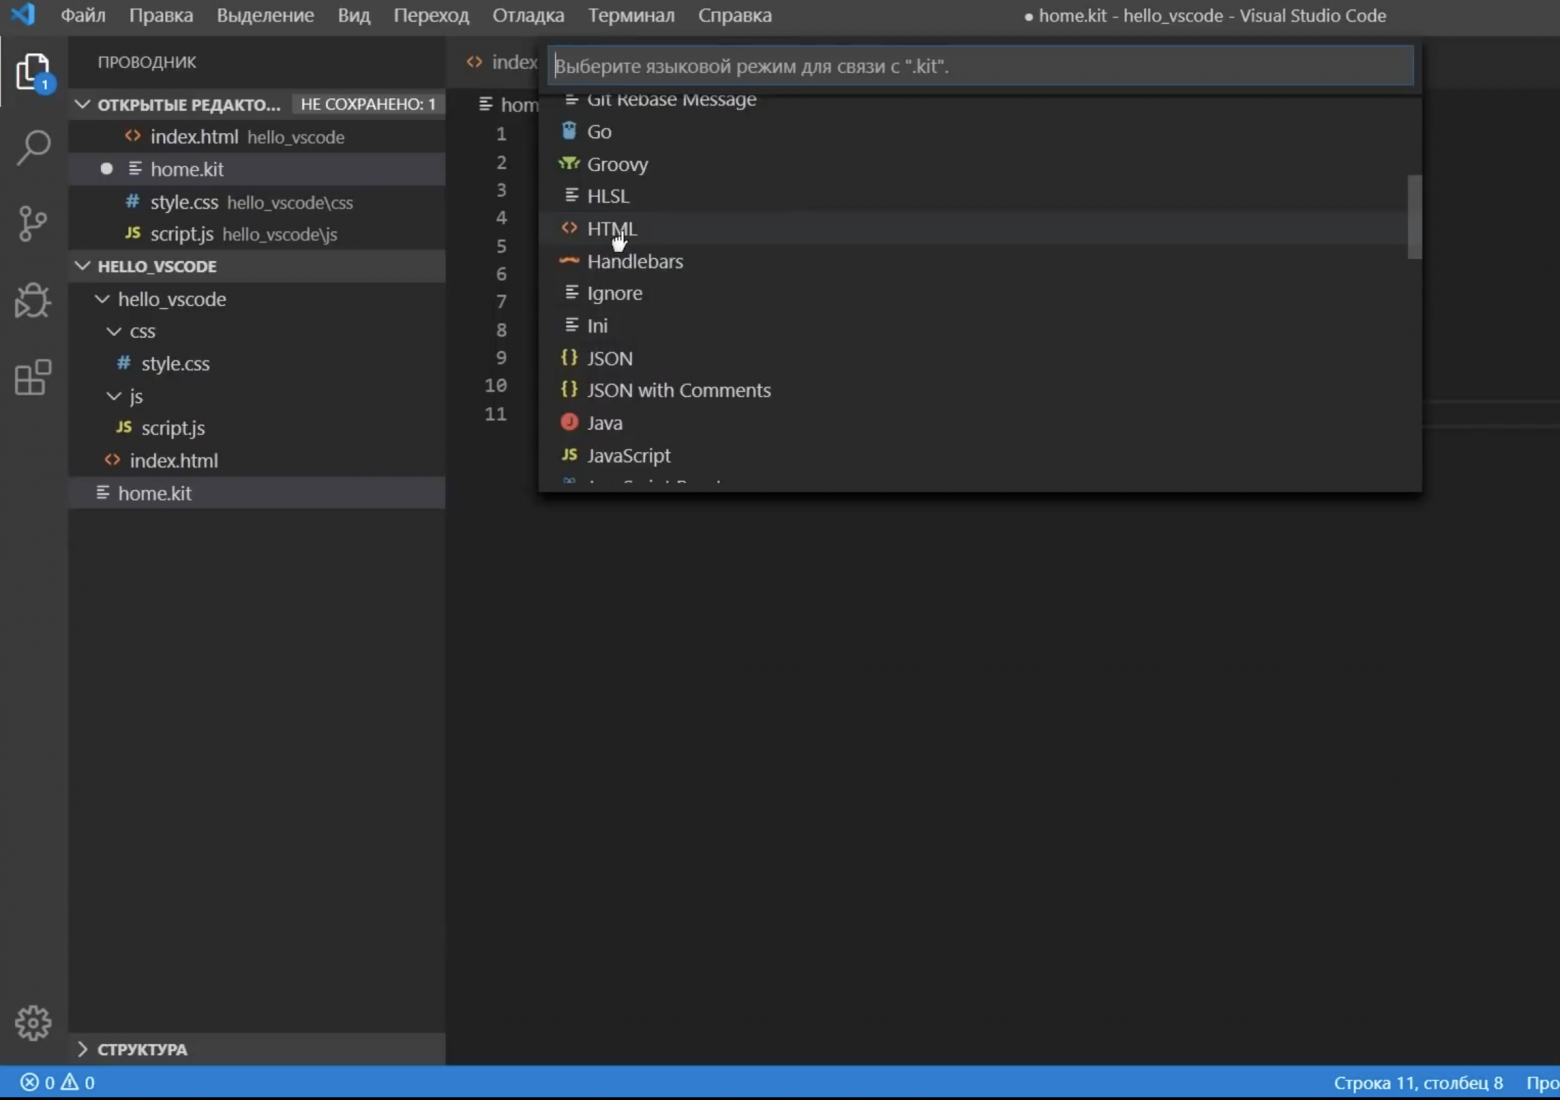
Сразу хочется сказать пару слов о подсветке синтаксиса — это такая способность редактора распознавать код и раскрашивать отдельные его элементы. Когда мы открыли файл и начали в нем работать, внизу в строке состояния помимо прочих новых элементов появился элемент html. Это означает, что редактор узнал язык и соответствующим образом его подсветил. Кликнув на этот элемент, мы увидим большой список подсветок для различных языков.
Дополнительной полезной возможностью проводника будет его Контекстное меню, где мы можем отобразить или скрыть любую вкладку. Например, я уберу структуру и уберу открытые редакторы.
В итоге у меня останется только папка с проектом.
Поиск
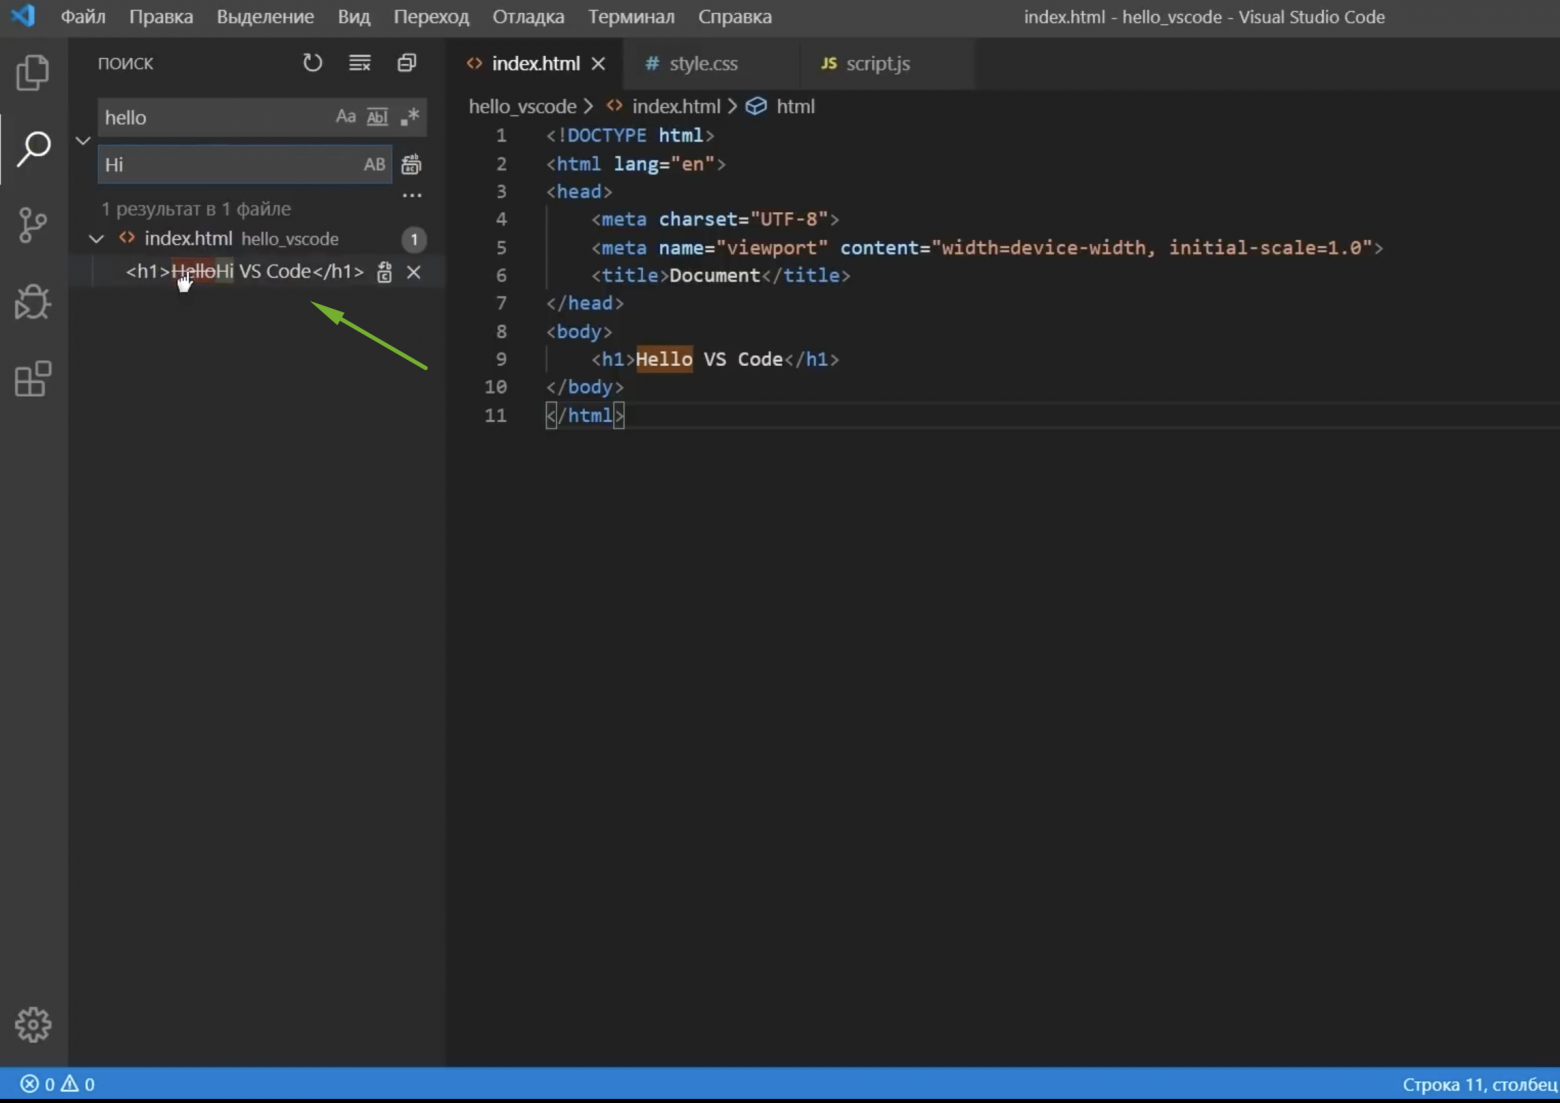
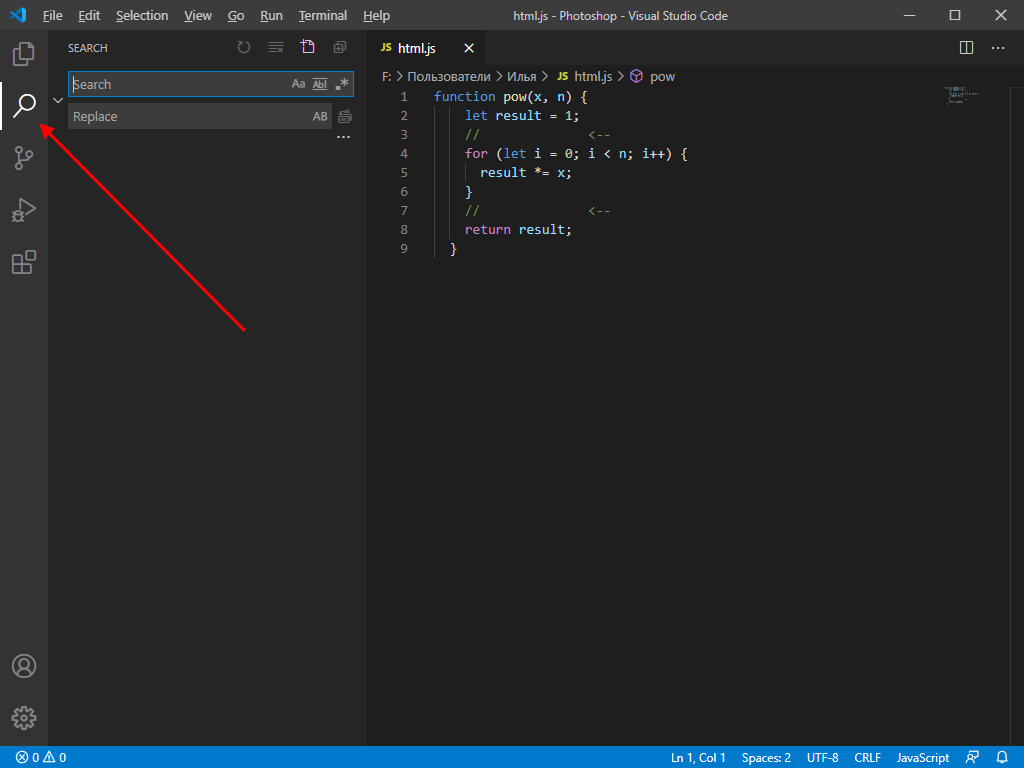
Поиск (Ctrl+Shift+F) — штука нужная. Пишем слово hello, которое мы указывали в нашем html файле. Поиск его сразу же нашел, подсветил, показал в каком файле. Тут же можно заменить это слово на какое-то другое.
Здесь удобно нам все это показывает, нажав здесь на иконку слово будет заменено.
Система управления контролем версий
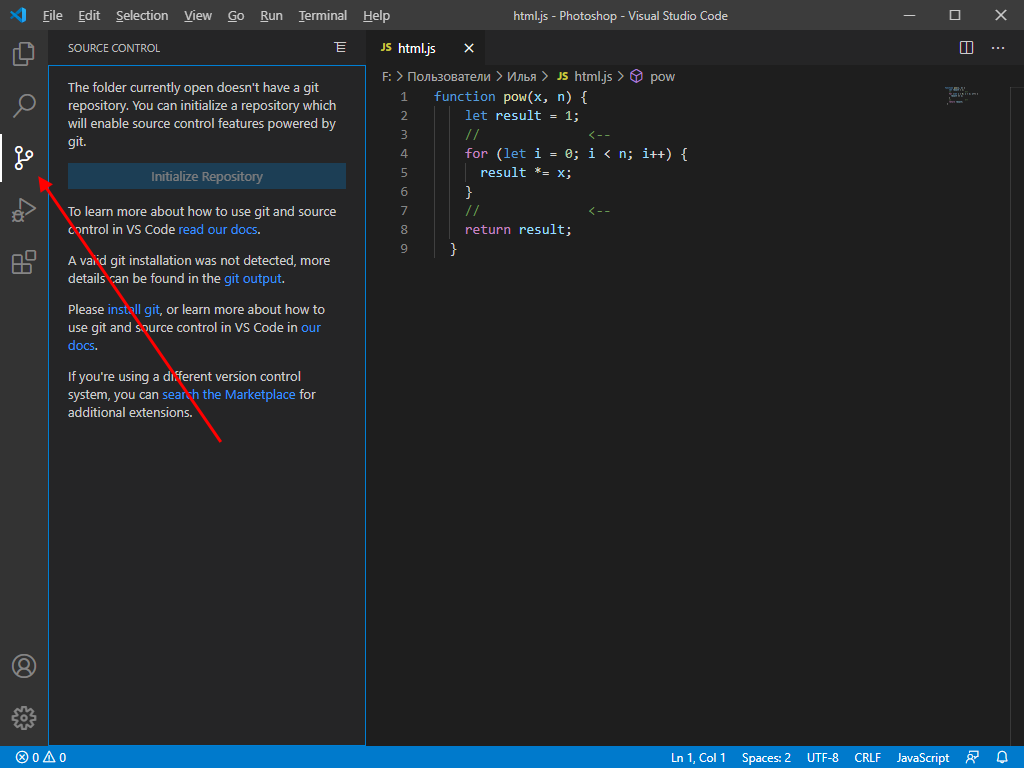
Открыть вкладку можно кликнув на иконку либо зажав Ctrl+Shift+G. Для тех, кто уже знаком с системами контроля версий, например Git, тот оценит эту возможность. Немного позже я покажу как связать свой локальный проект с репозиторием на GitHub.
Отладка приложения
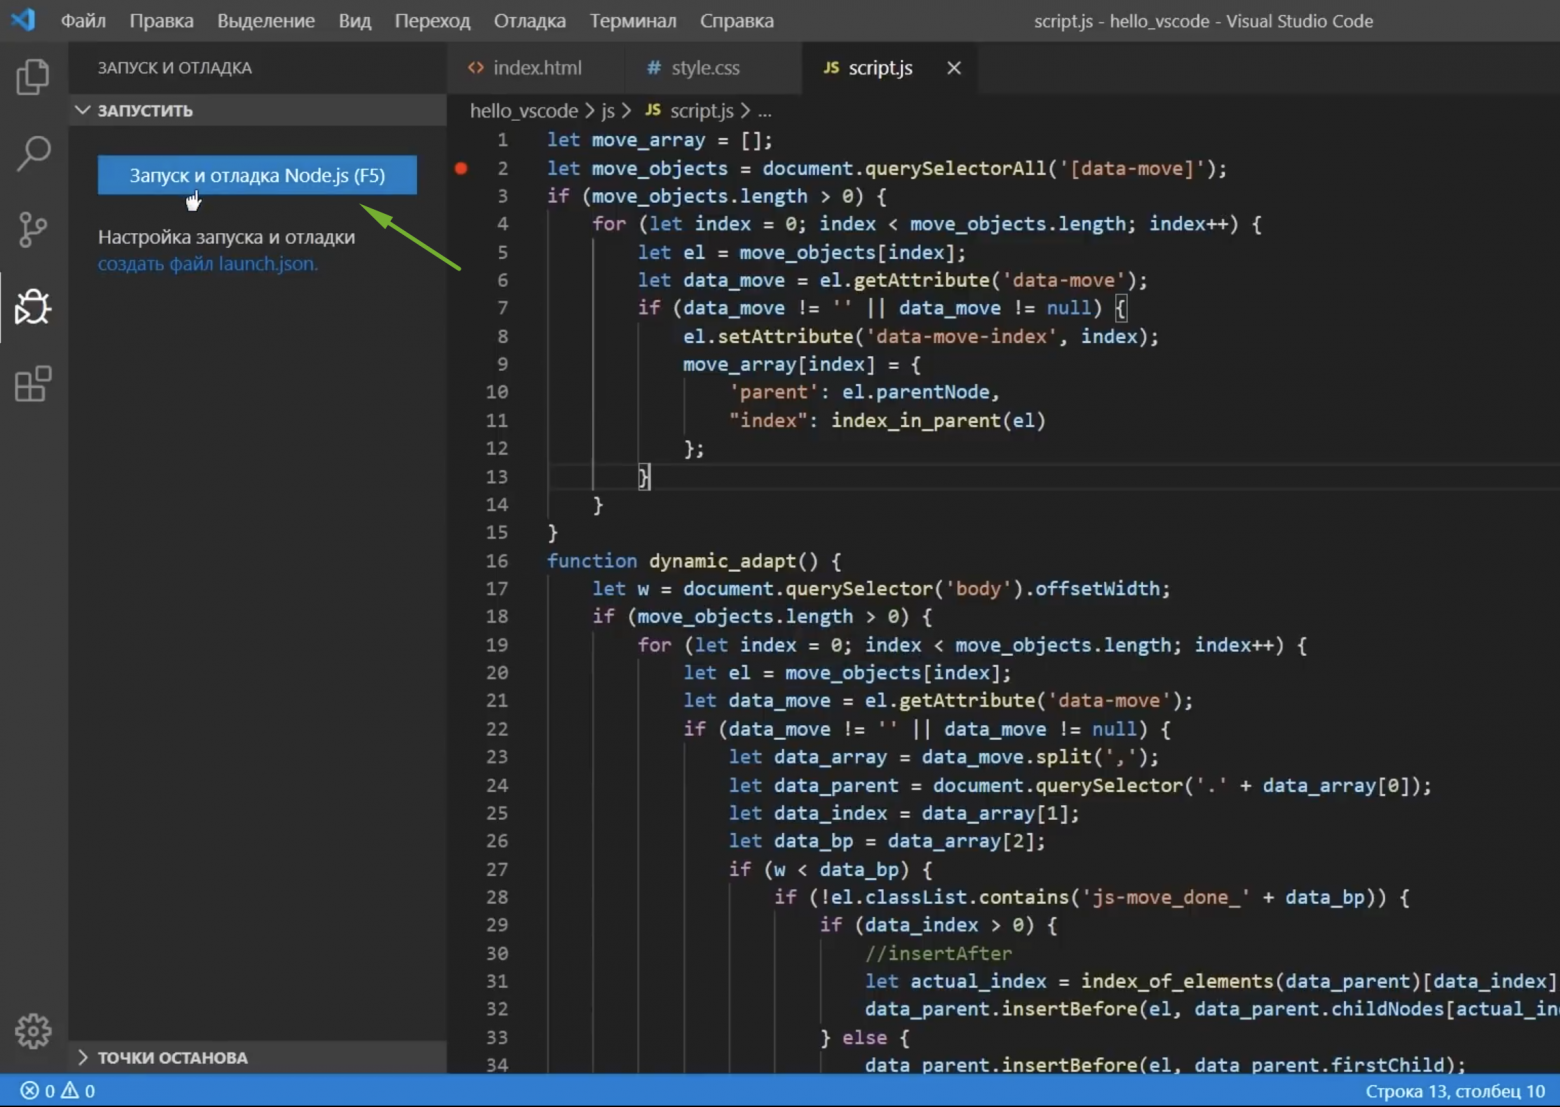
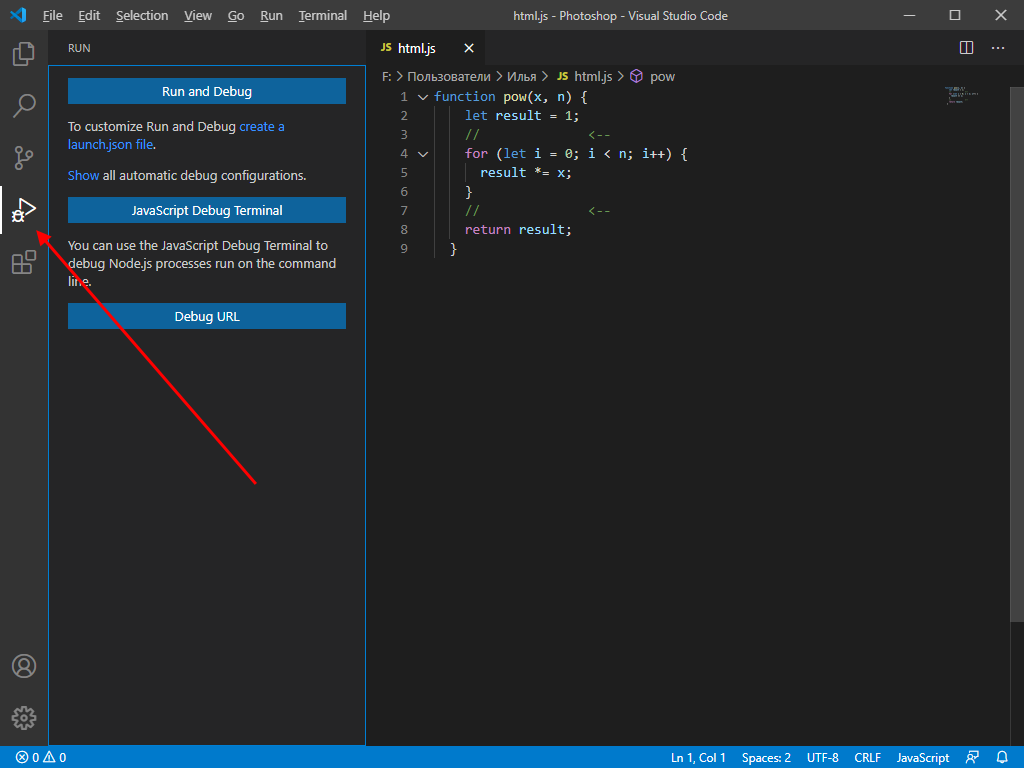
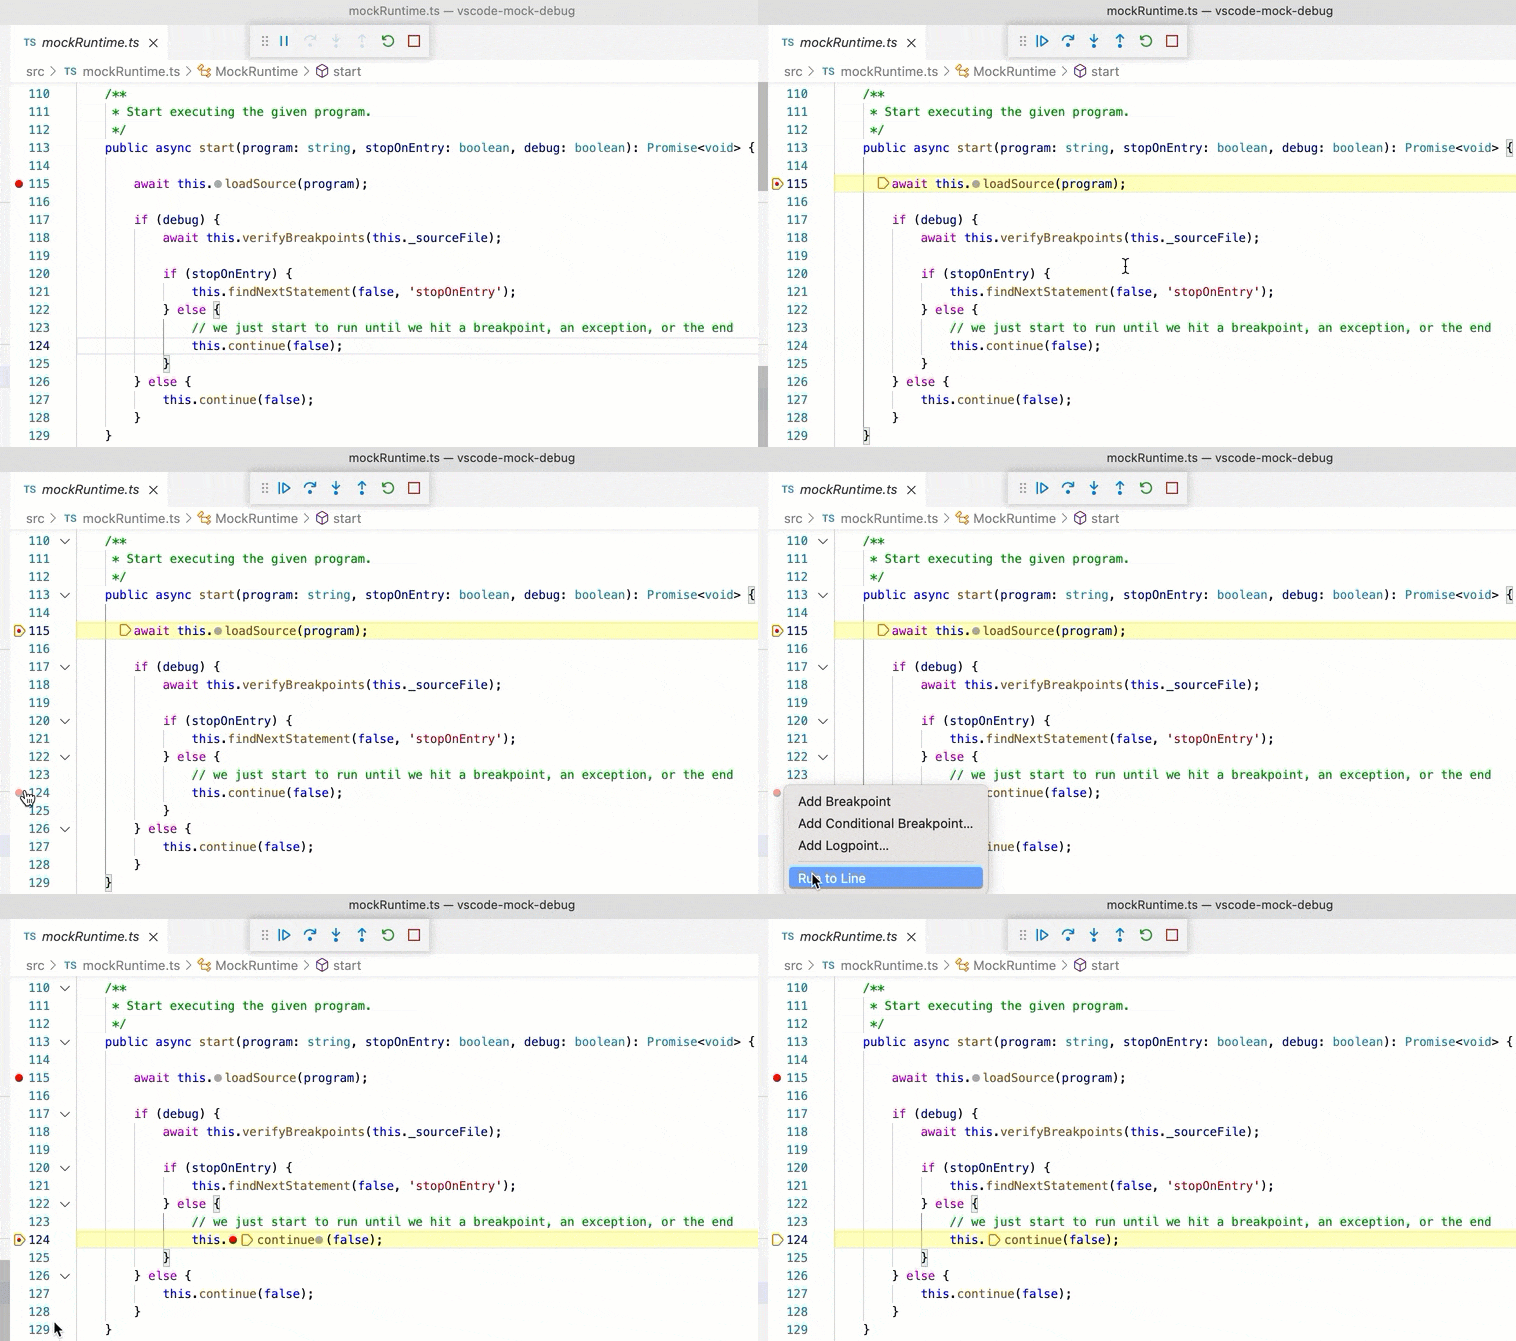
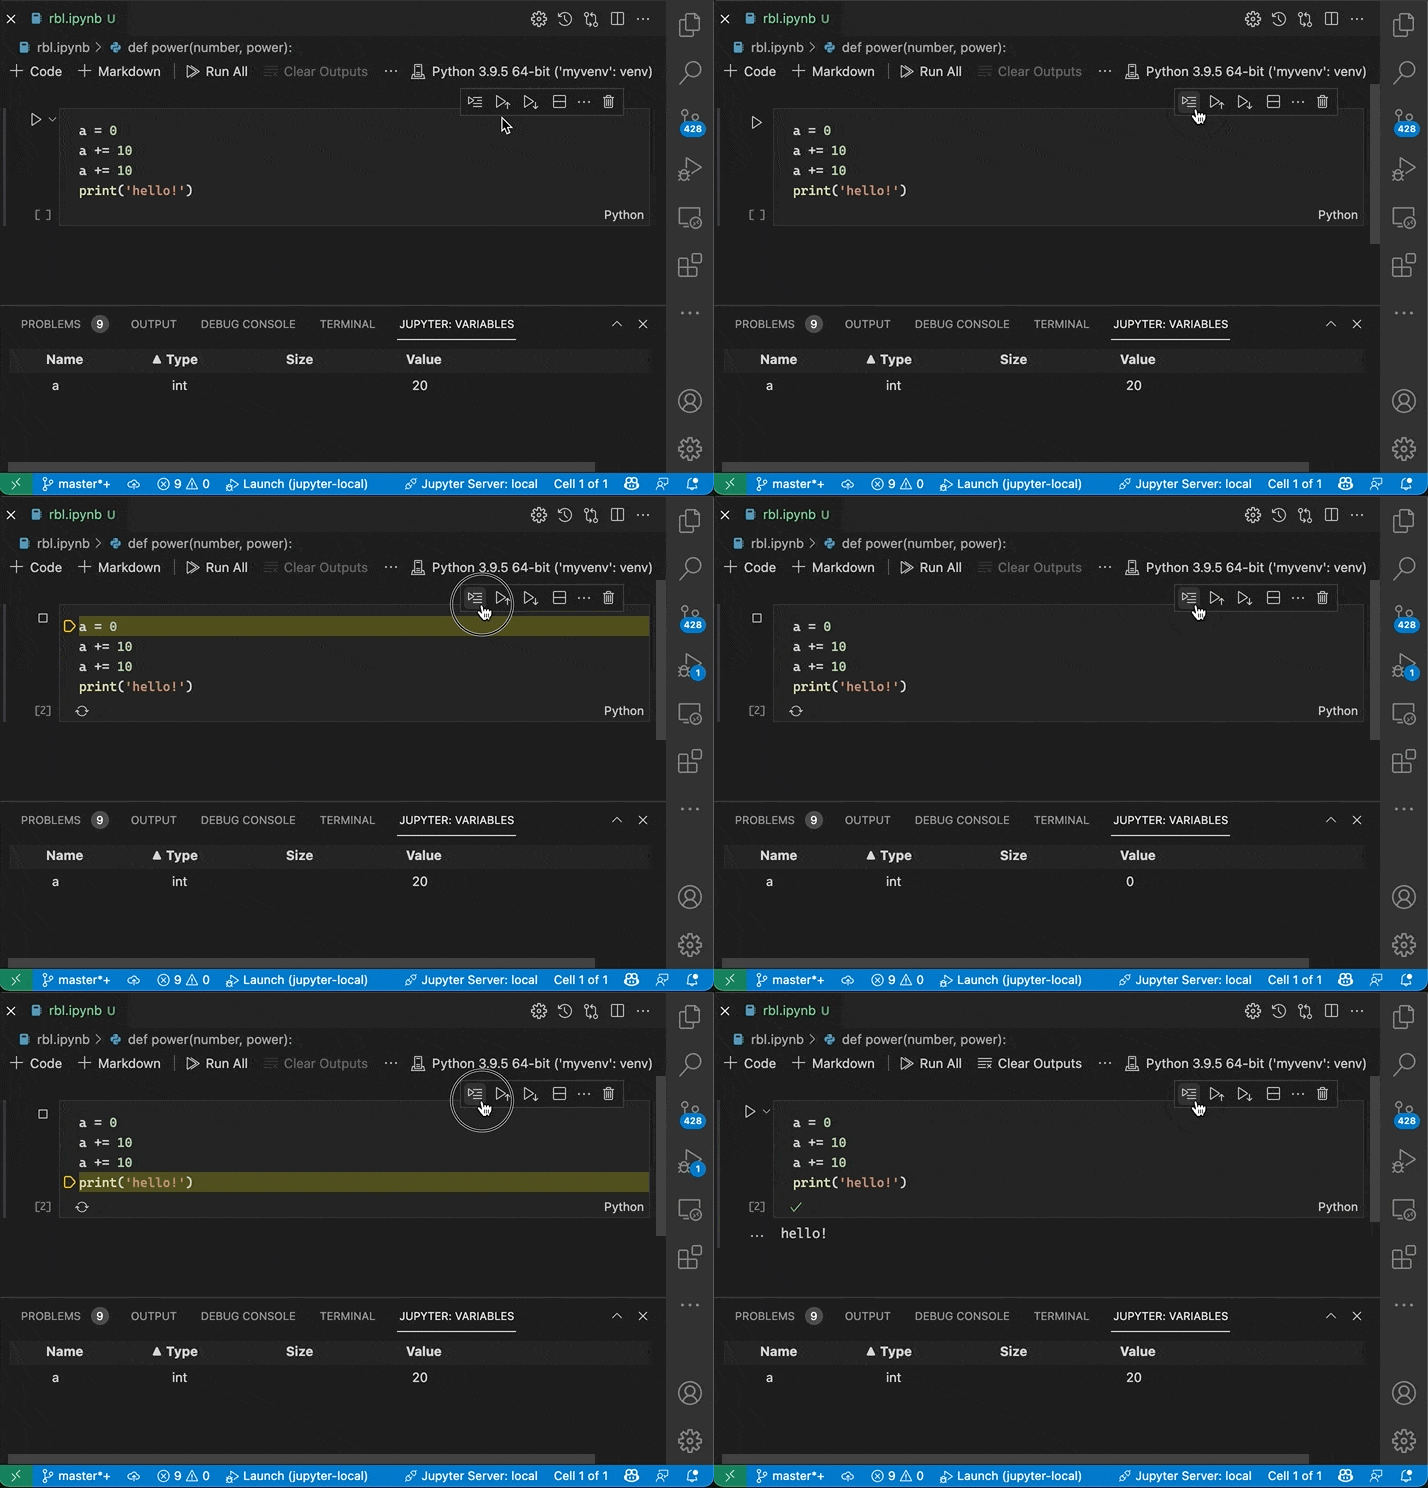
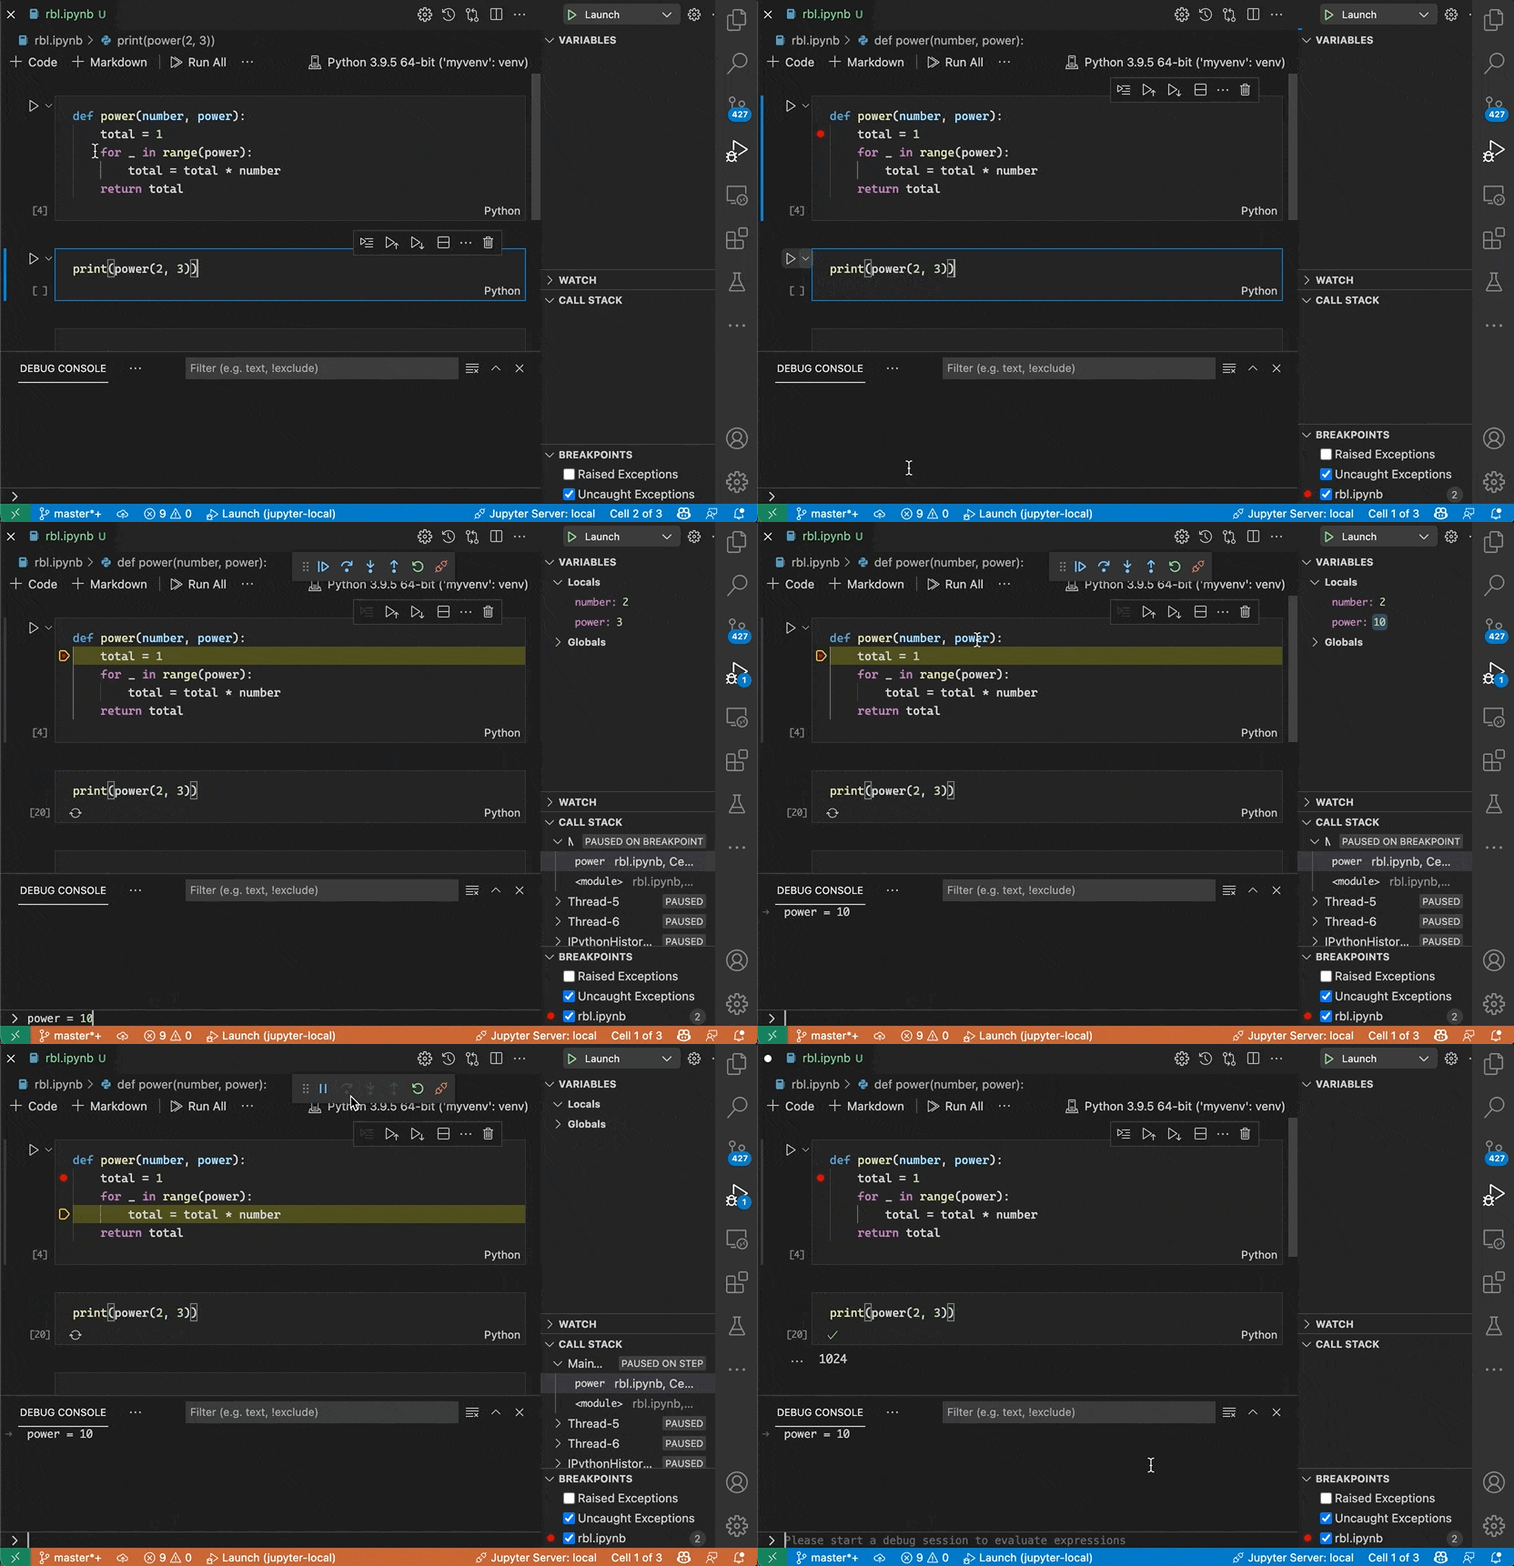
Следующий элемент панели действий — это Отладка приложения. Этот инструмент как самостоятельно так и с помощью сторонних плагинов позволяет нам анализировать выполнение того или иного программного кода.
Например, у нас есть некий javascript код, и для того, чтобы запустить отладку, мы можем нажать на кнопку здесь либо нажать F5.
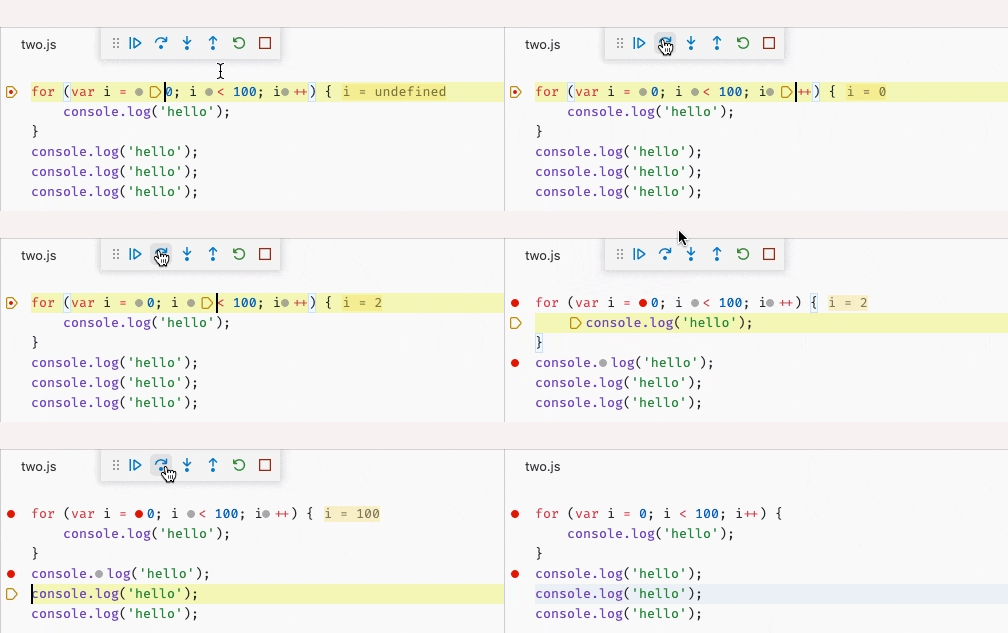
Результат отладки будет выведен в нижней панели, также можно устанавливать так называемые точки останова кода и перемещаться между ними, что очень удобно.
Расширения
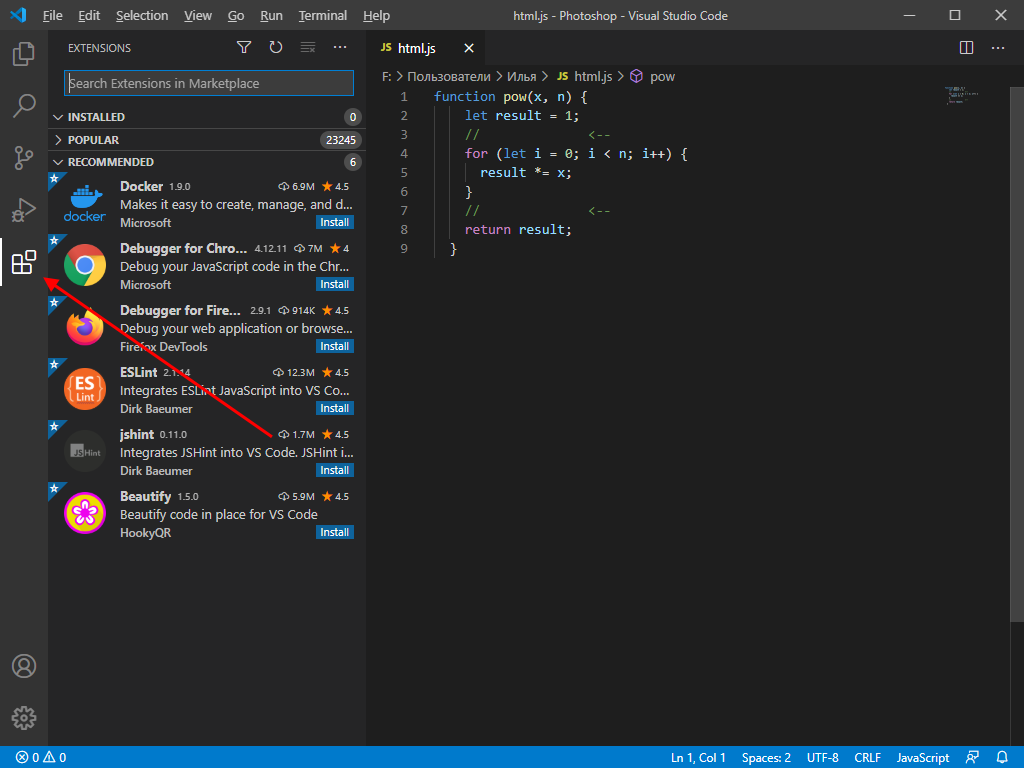
Тут у нас целый склад расширений и плагинов для нашего редактора. Мы уже использовали эту вкладку для установки языкового пакета. Кликаем на иконку либо зажав сочетание клавиш Ctrl+Shift+X мы увидим поле поиска расширений и три дополнительных вкладки:
Во вкладке с нашими установленными расширениями у нас есть быстрый к ним доступ, мы можем посмотреть, почитать какую-то информацию, горячие клавиши, узнать все подробности об этом расширении. Также, его можно удалить здесь же, нажав на кнопку Удалить. К расширениям мы еще вернемся и установим самые лучшие и полезные из них.
Настройки
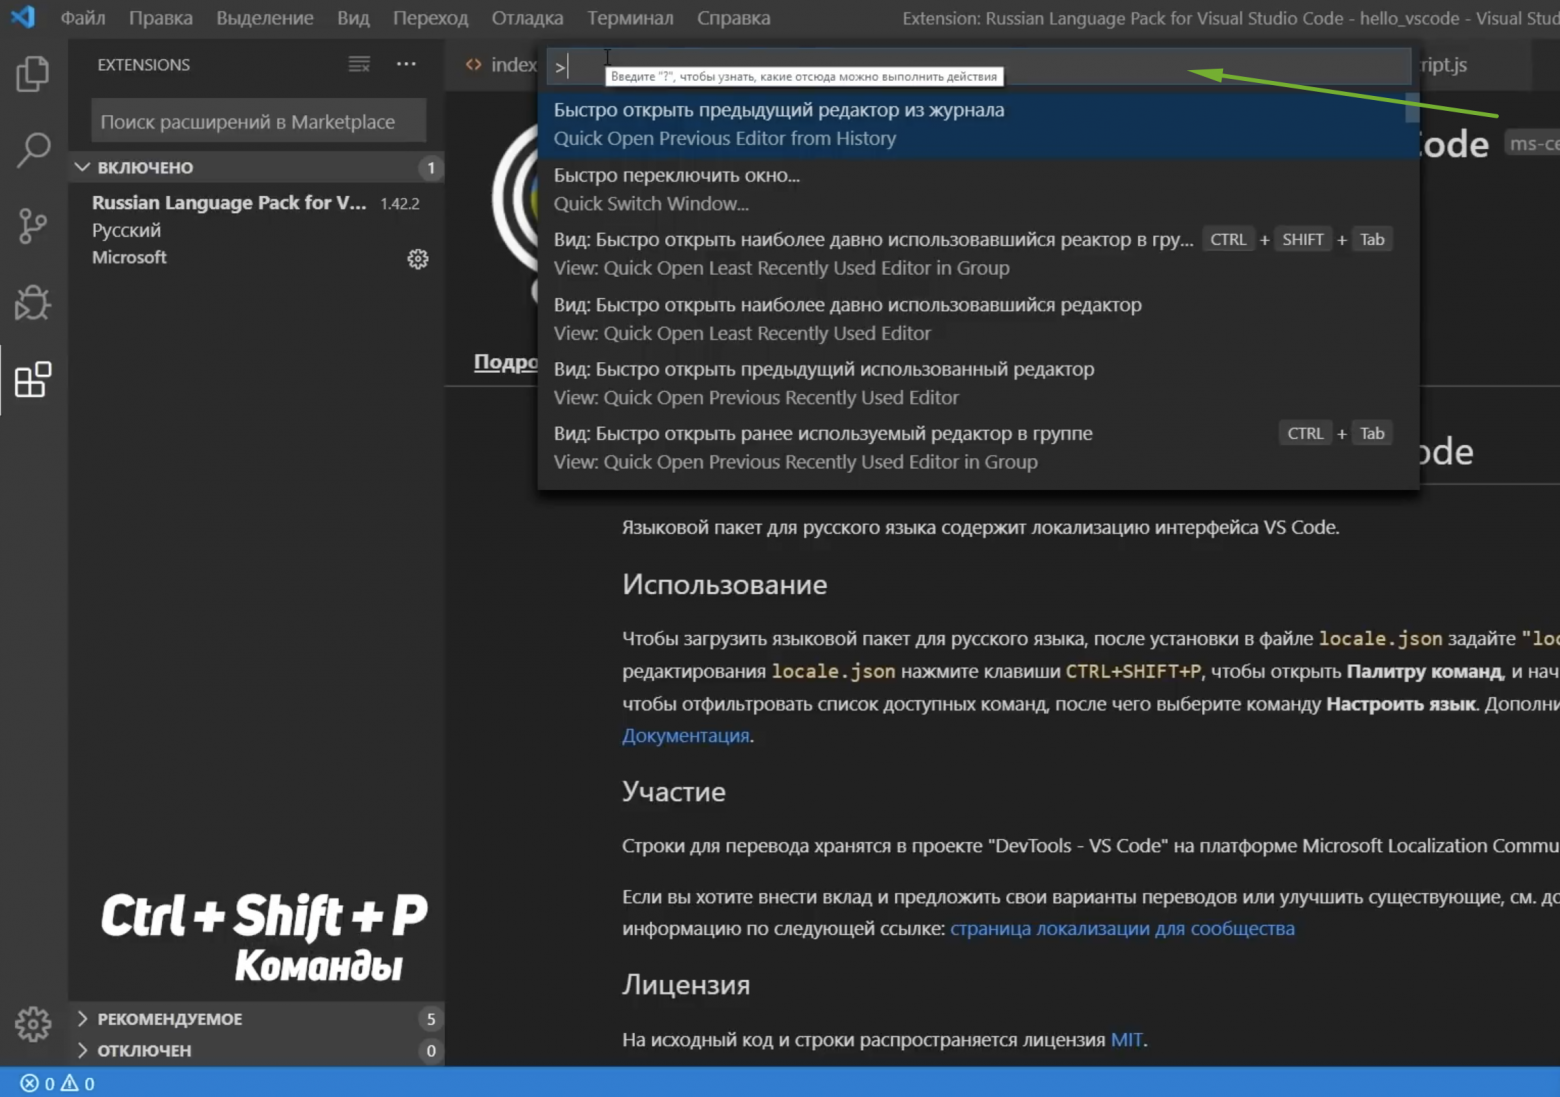
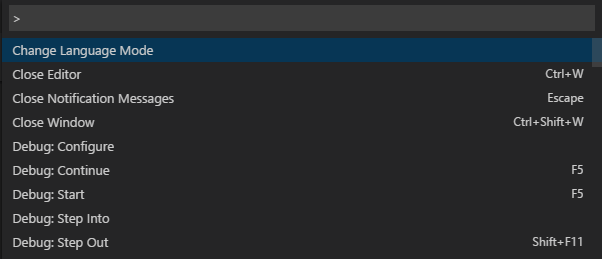
На панели действий у нас остался еще один элемент — шестеренка — меню основных настроек. Здесь мы можем вызвать палитру команд кликнув тут или Ctrl+Shift+P. Откроется такой блок, где мы можем найти и выполнить любую команду редактора или установленных плагинов.
Далее сочетания клавиш. Здесь мы можем настроить свои сочетания клавиш командам либо изменить к существующим. К ним мы еще вернемся. Пользовательские фрагменты кода, так называемые сниппеты — маленькие сокращения которые будут вызывать нужный нам фрагмент кода. Сегодня мы научимся их настраивать. Тут же можно настроить цветовую тему программы, значки для файлов и многое другое.
Заканчивая с Панелью действий, стоит отметить, что можно быстро вызвать последнюю открытую вкладку сочетанием Ctrl+B. Также скрыв контекстное меню можно скрыть ненужный элемент. Например, Запуск и Отладка я скрою. В этом же контекстном меню можно скрыть всю панель действий целиком.
Область редактора
Лень читать? Тут видео версия.
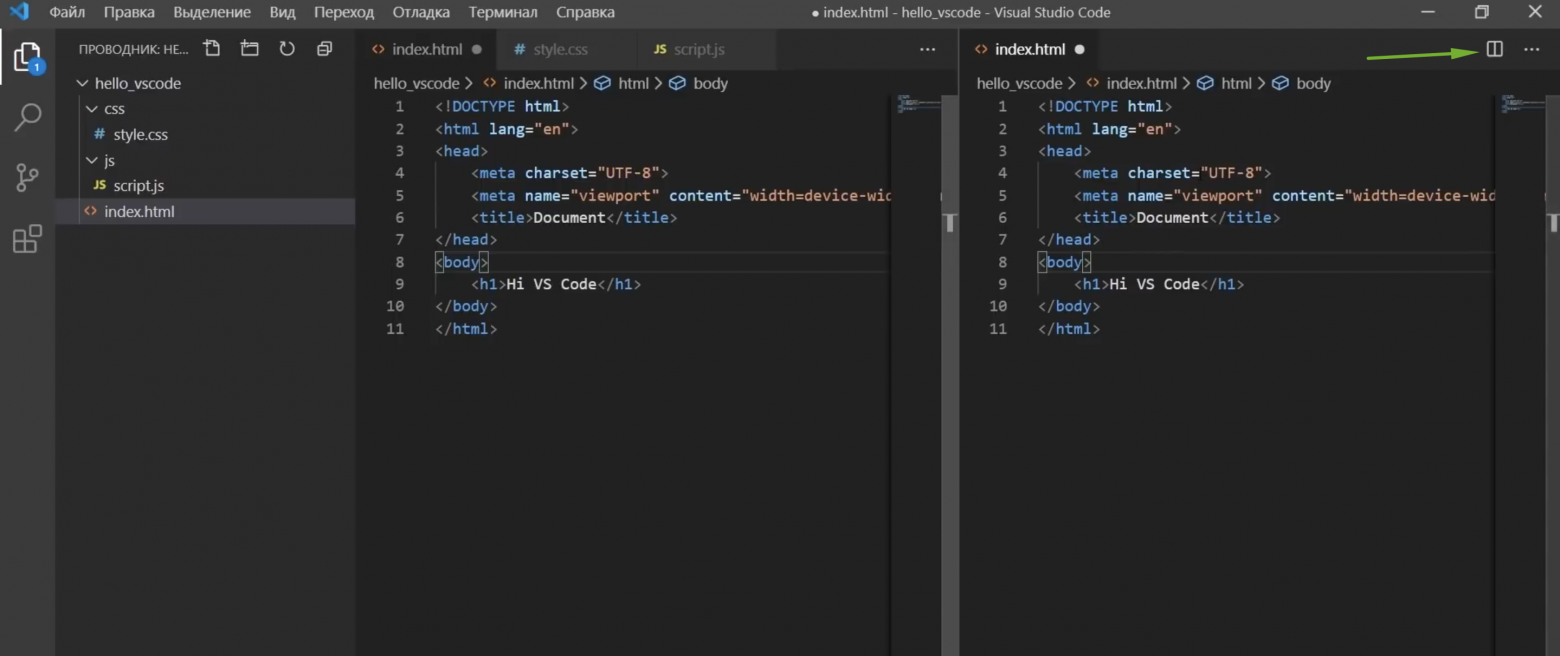
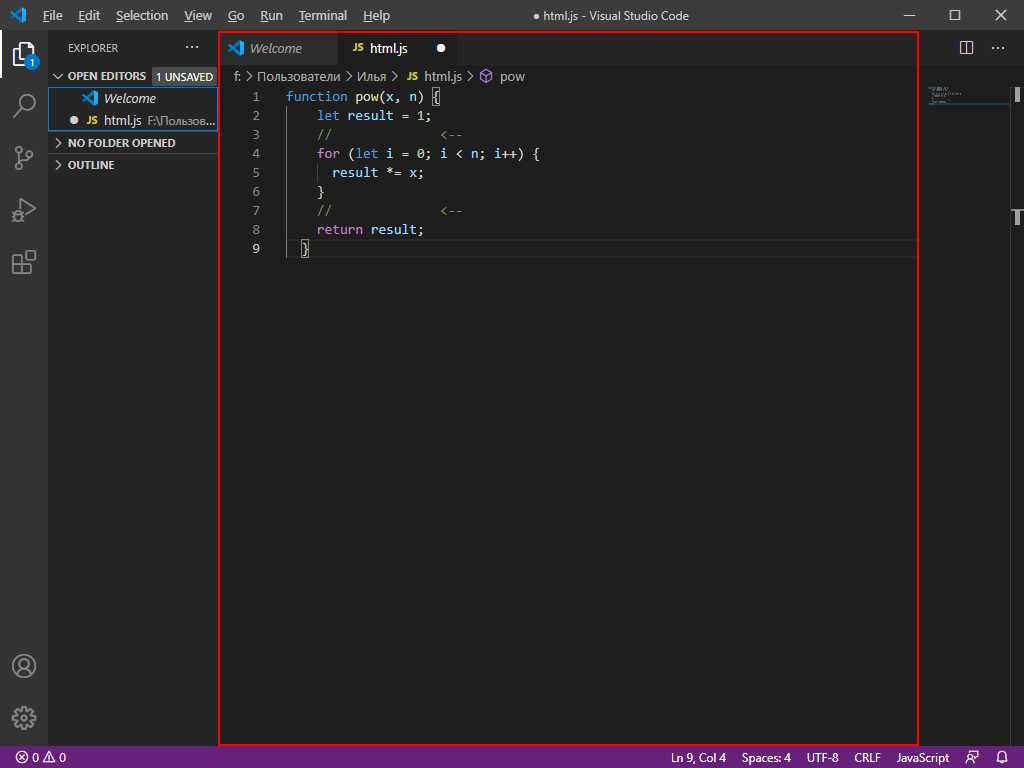
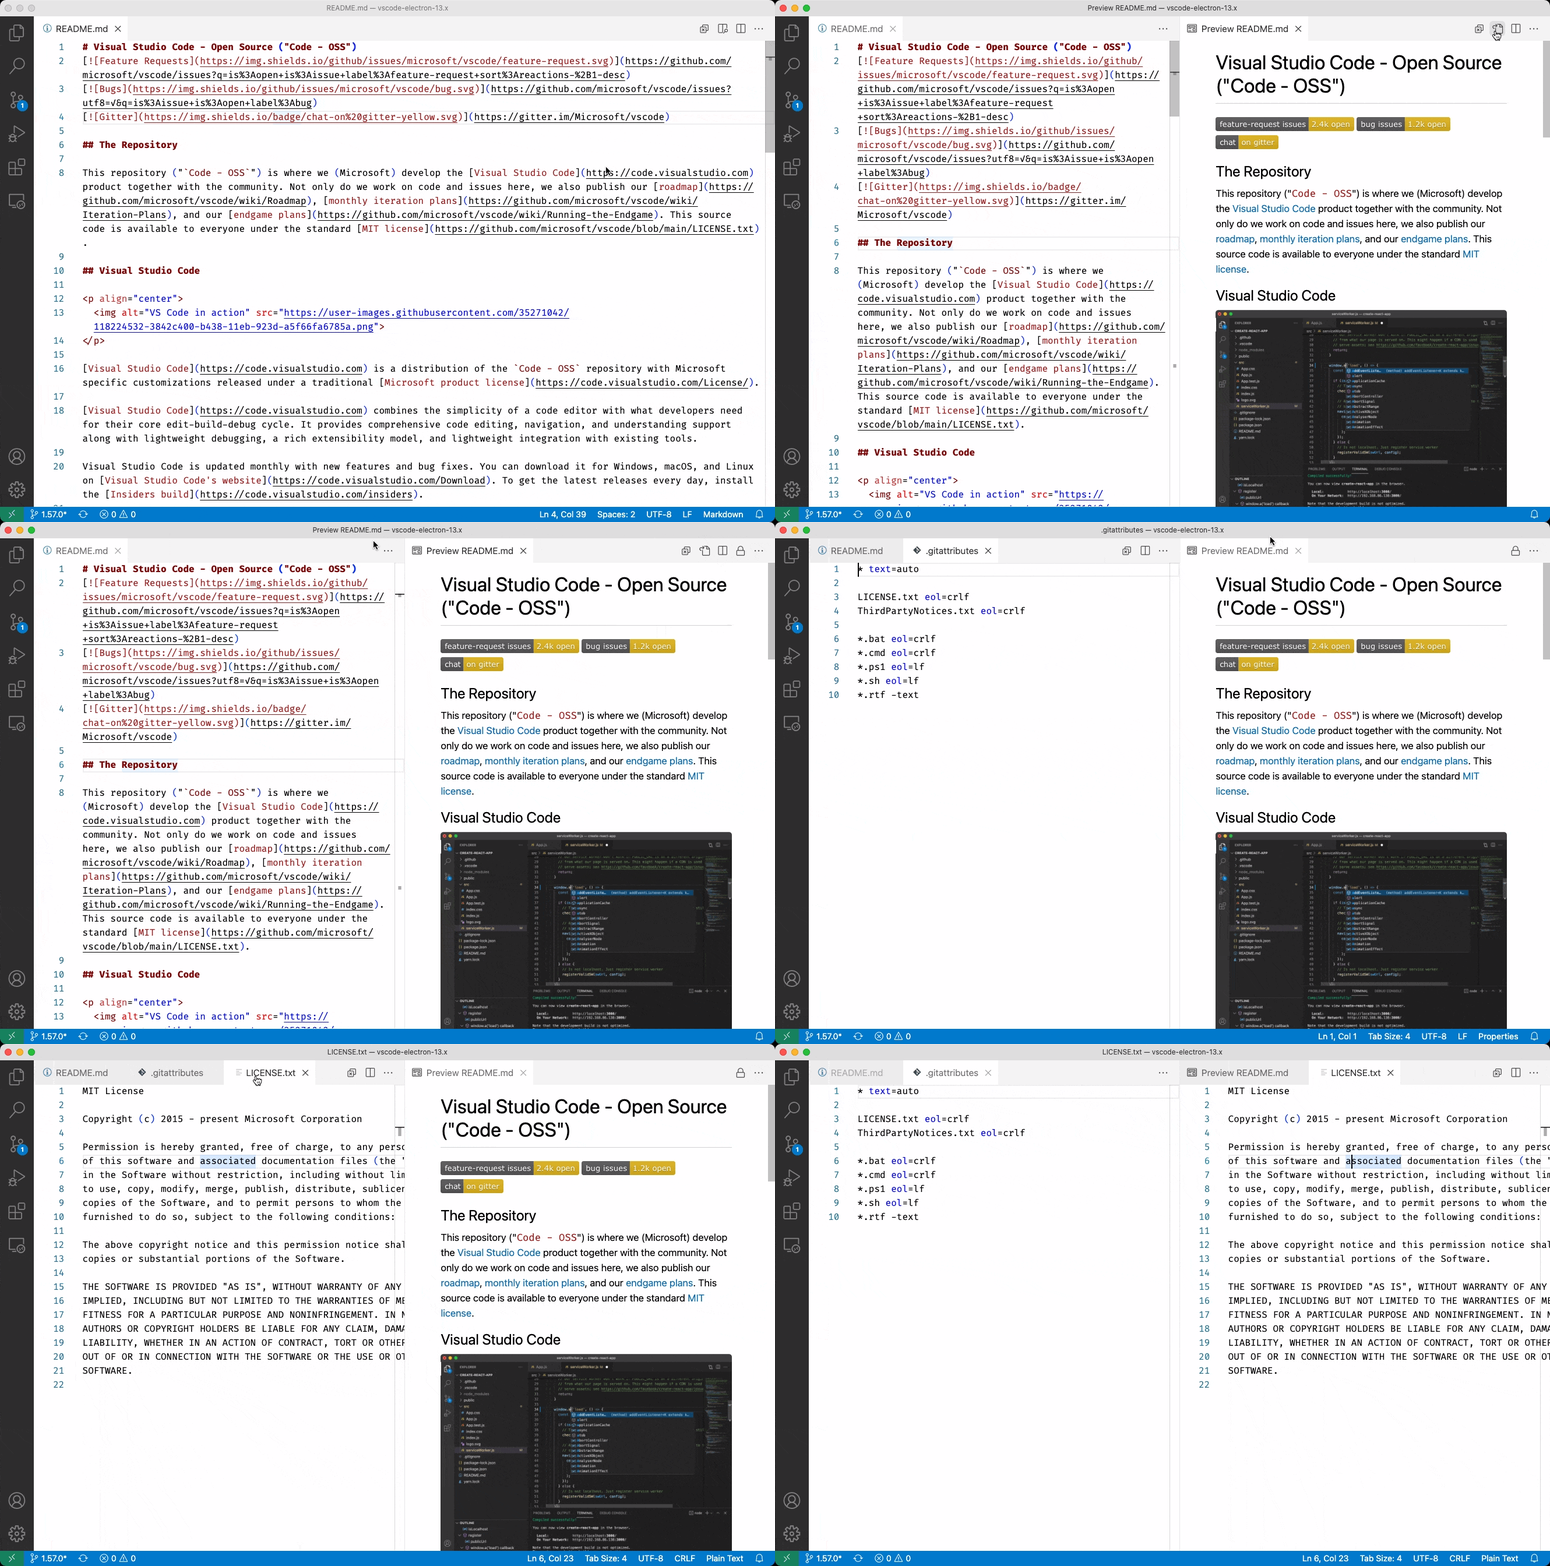
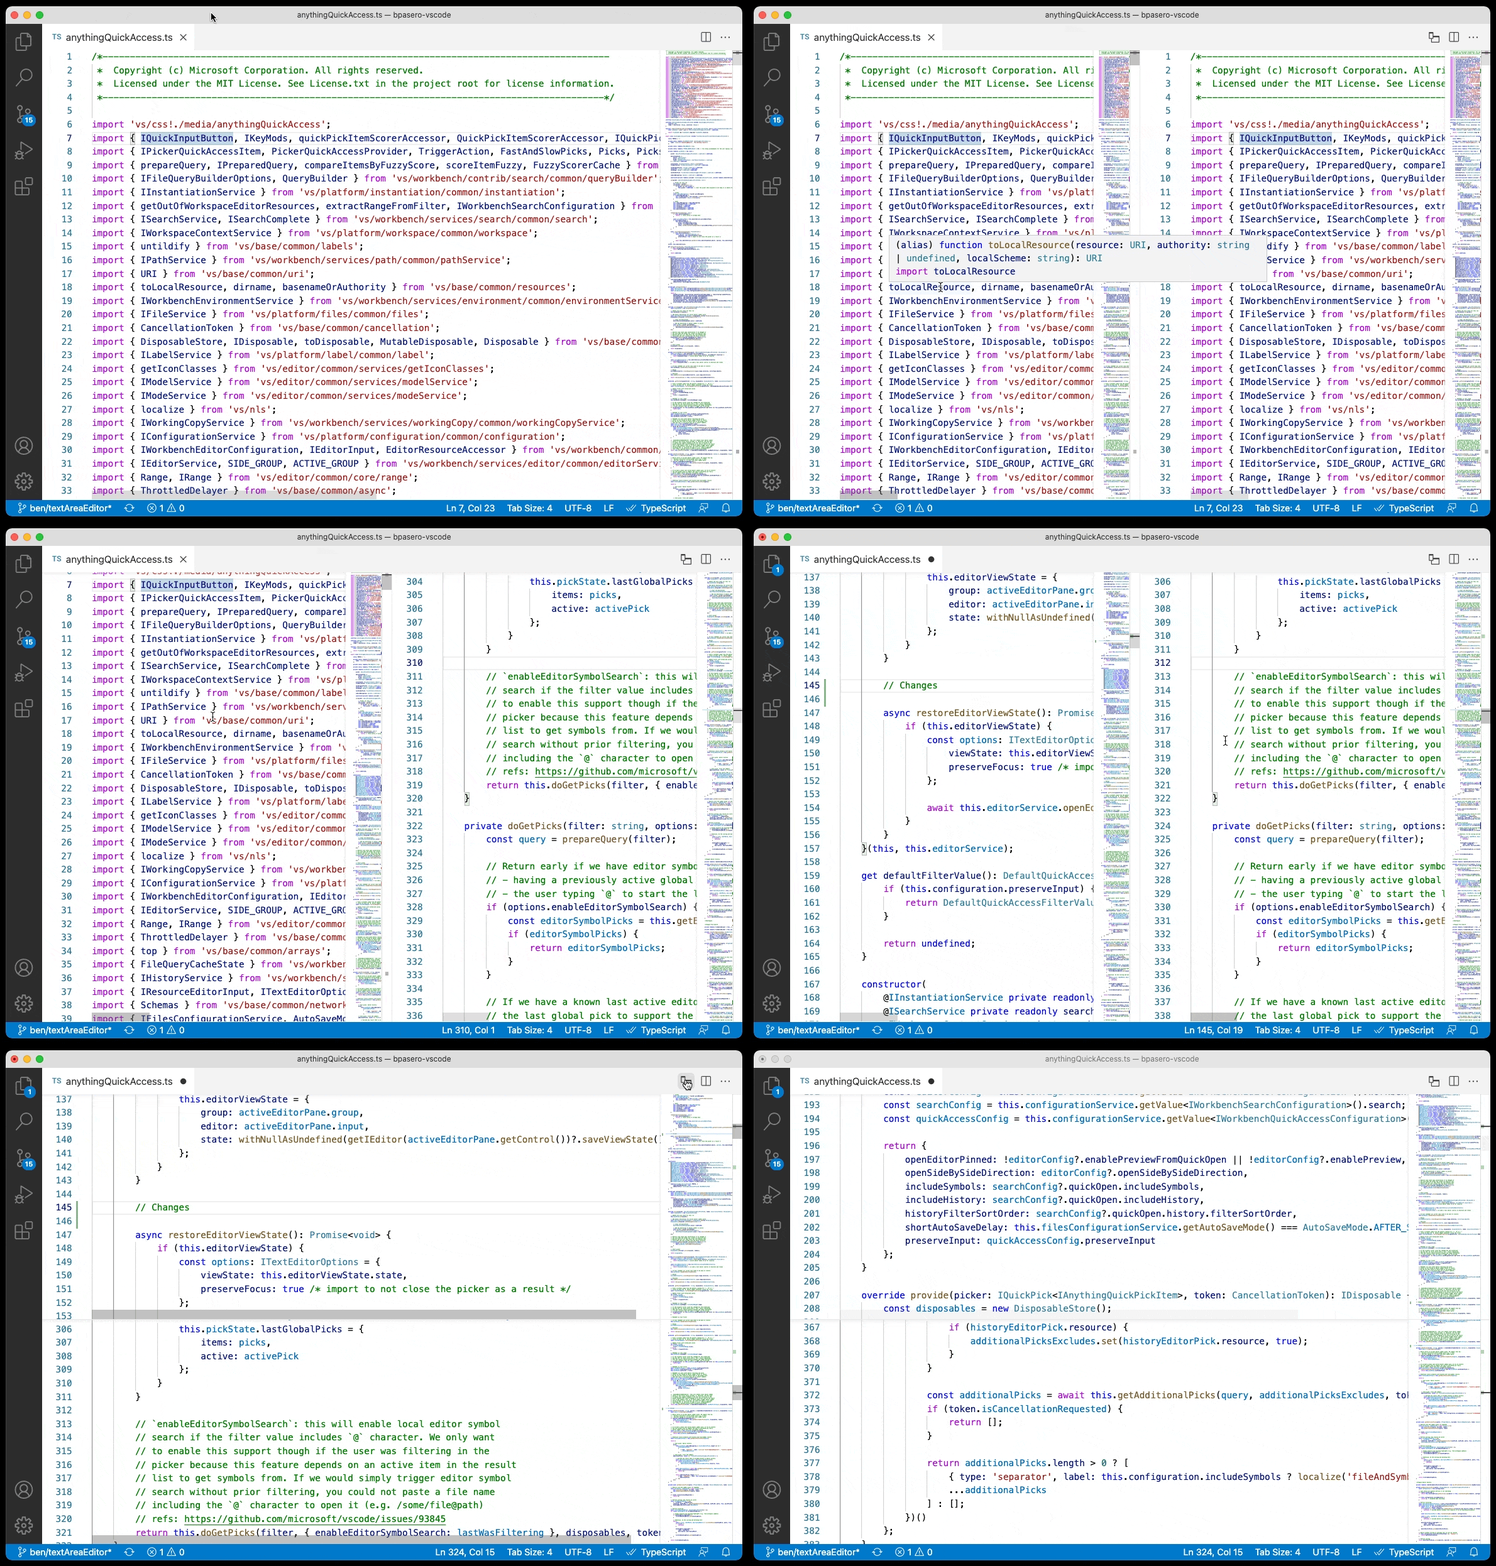
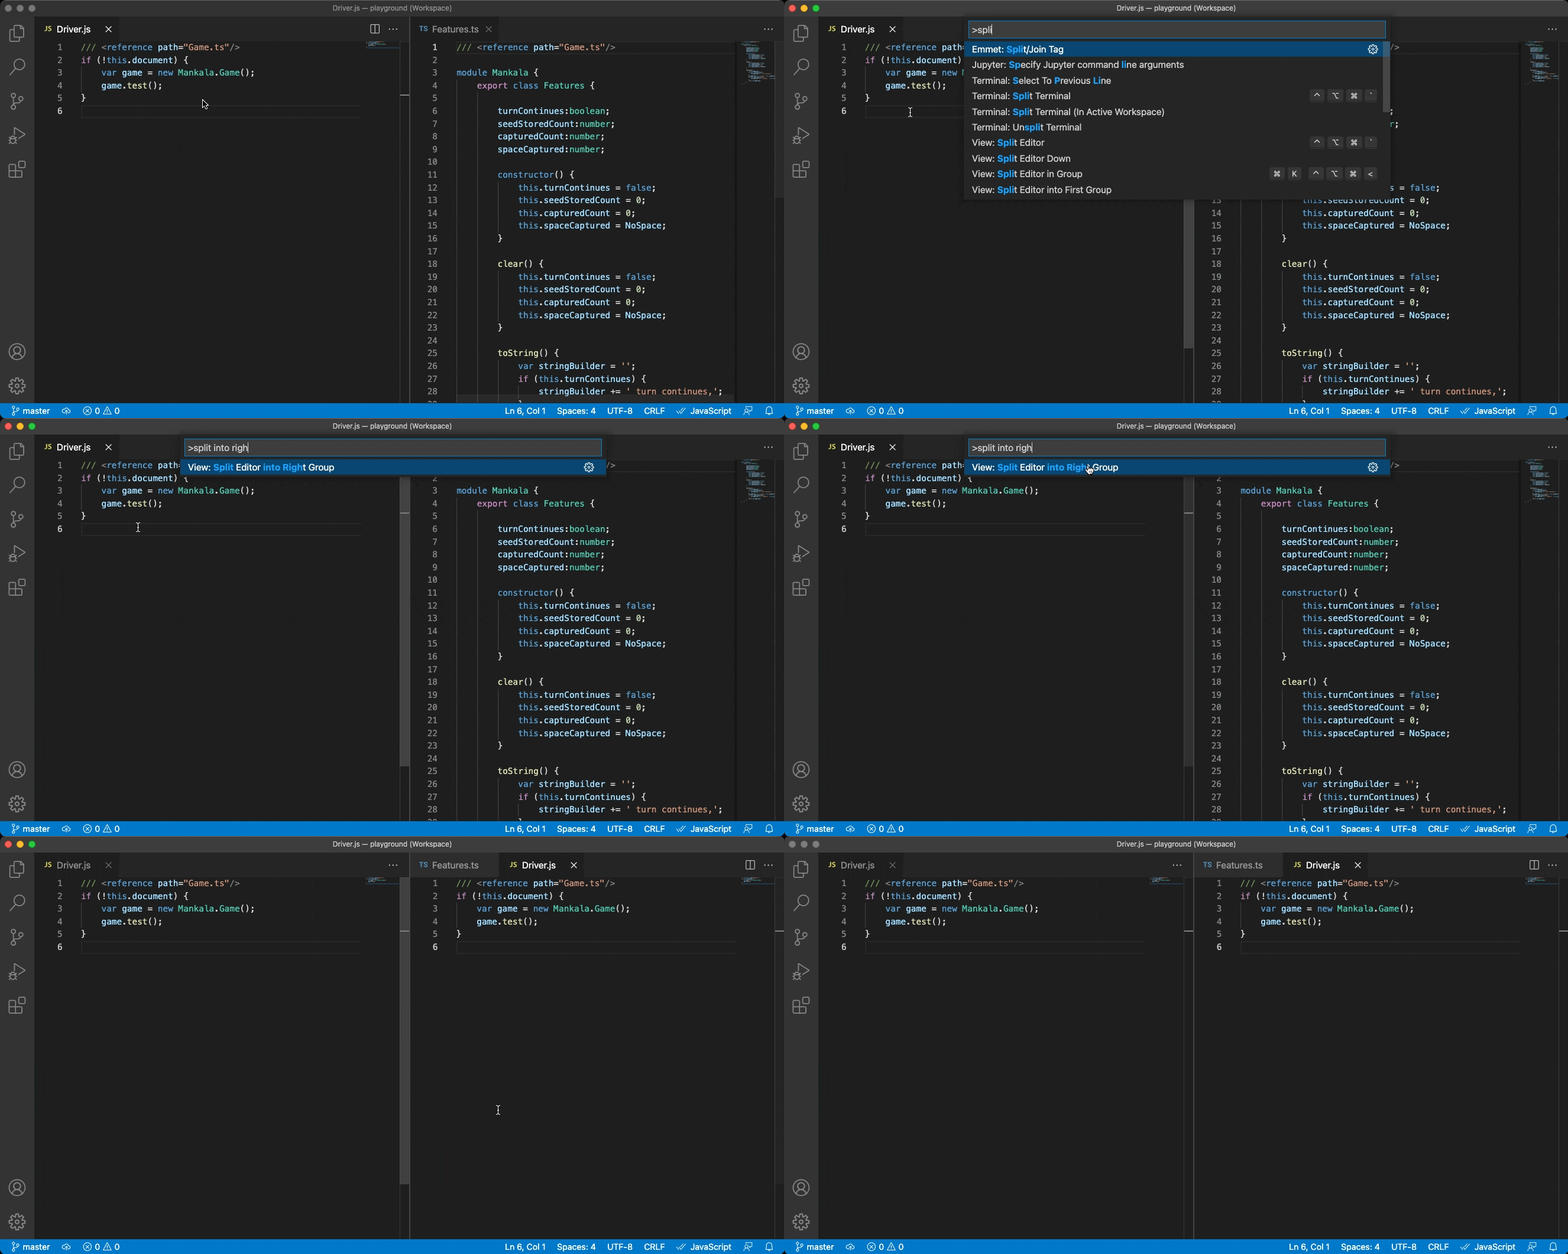
Мы видим вкладки с открытыми файлами. Их можно перетаскивать, закрывать. Если файл не сохранен, то место крестика здесь будет отображаться большая жирная точка. Далее сверху иконка разделения окна. Есть открытый активный файл, нажимаем на иконку и он продублируется сбоку.
Здесь есть дополнительное меню для управления всеми файлами.
Ниже мы видим строку навигации — хлебный крошки, где мы можем удобно перемещаться по структуре документа, а также между другими файлами.
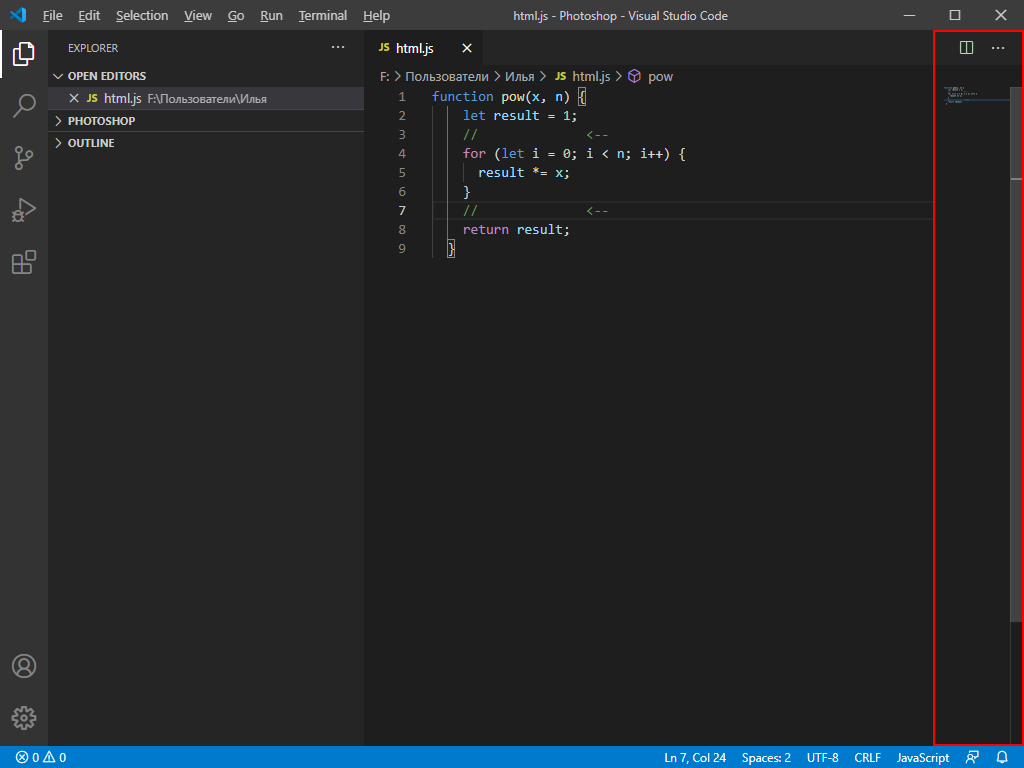
Общая область кода — мы видим сам код открытого файла, а справа мини-карту, которая позволяет удобно перемещаться по длинному файлу. В области кода слева есть небольшое пространство, для установки точек остановок для отладки кода, есть нумерация строк.
Далее мы видим стрелочки, они появляются при наведении, с их помощью можно свернуть целый блок кода. В этом редакторе эта функция работает с памятью. Я могу файл закрыть, даже закрыть всю программу, а когда открою вновь, то свернутый ранее блок останется свернутым.
Что тут можем мы настроить?
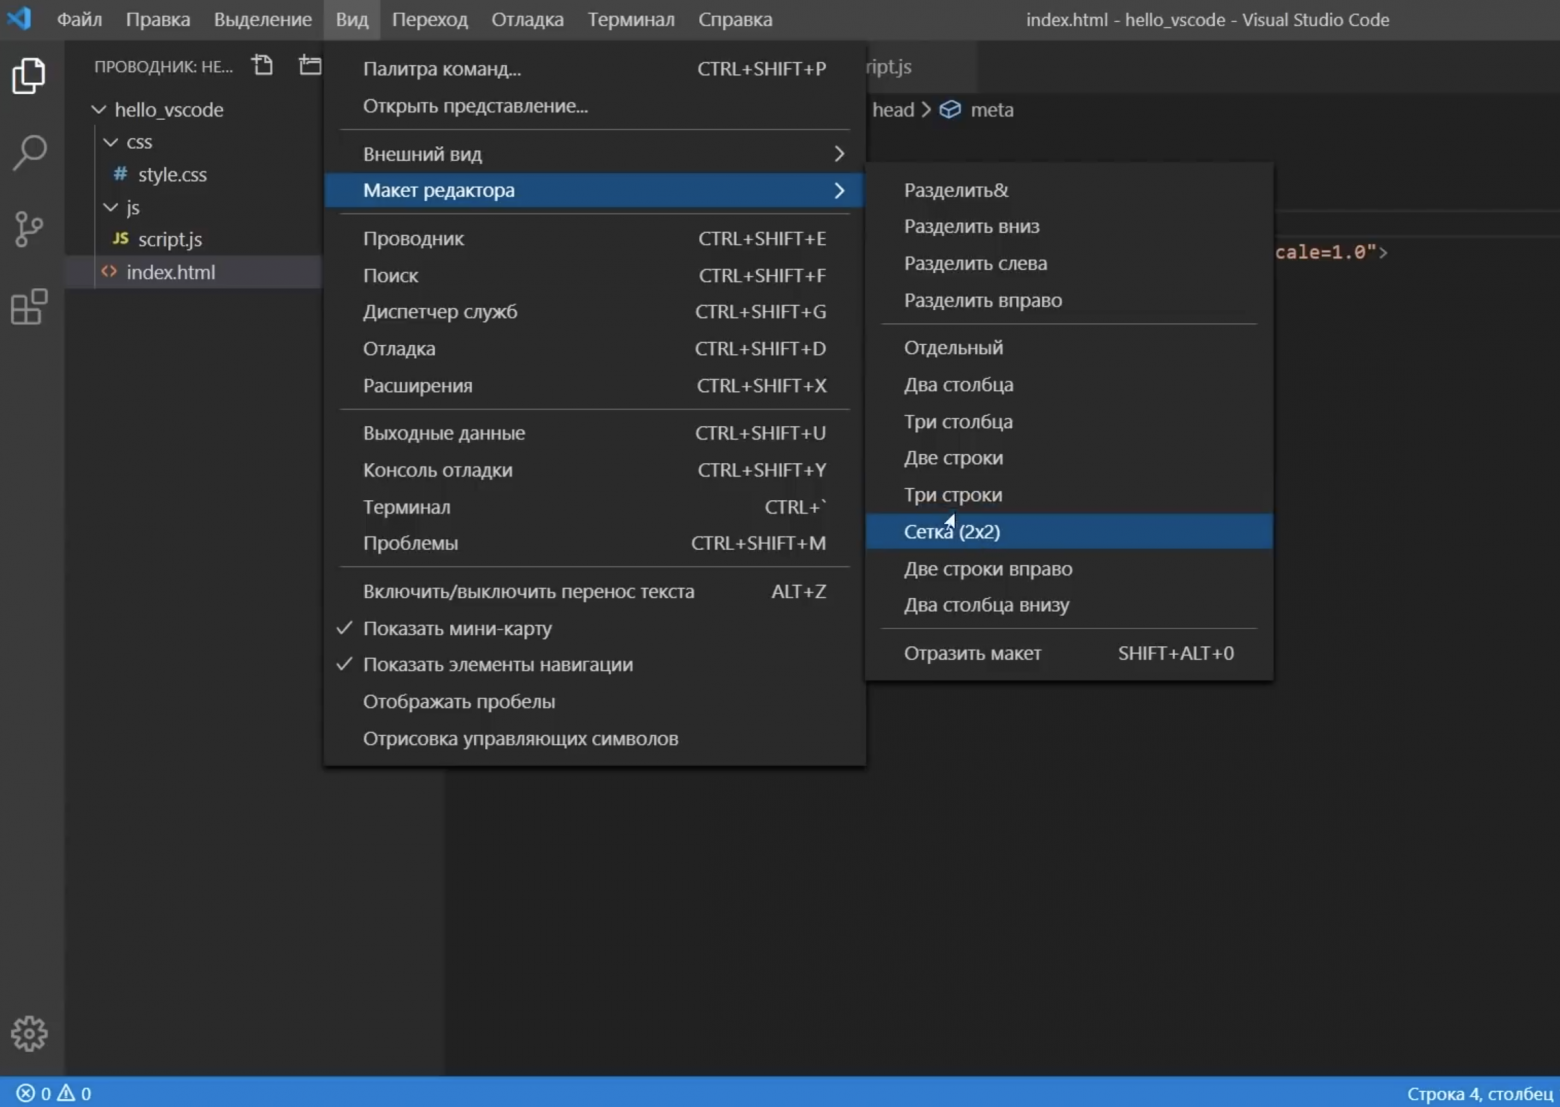
Как я уже показывал, окно редактора можно разделить на несколько частей, это удобно при работе с разными файлами. Для того, чтобы посмотреть разные варианты, нужно перейти в Вид > Макет редактора. Здесь есть куча вариантов, например две строки и мы можем какой-то файл переместить сюда и работать так. Также есть вариант Сетка 2х2. То есть, можно работать одновременно с 4 файлами.
Также можно быстро оформить нужное положение файлов, просто перетаскивая их. Я сразу сформировал себе нужный макет для работы. Также есть возможность настроить вид всей области редактора. Откроем Меню > Вид > Внешний вид.
Снизу есть возможность регулировать масштаб всей программы. Не путайте с размерами шрифта. Удобно пользоваться сочетаниями клавиш. Например, для увеличения элементов я нажимаю Сtrl+, для уменьшения — Ctrl-, для сброса настроек — Ctrl+0.
Можно перемещать панель действий слева направо и тогда она окажется с другой стороны. Можно указывать положение панели нашей строки состояния. Нажав, мы увидим, что панель откроется уже не снизу как раньше, а сбоку. Тоесть, есть возможность настроить практически все.
Также в этом блоке можно скрывать или показывать разные элементы. Ранее я говорил, что мы можем скрыть всю строку уведомлений, скрыть полностью панель действий. В этом блоке мы можем все это вернуть на место.
Режимы экрана
Сверху есть полноэкранный режим при нажатии на F11. Скроется верхнее меню, кнопки управления окном программы.
Выравнивание по центру макета. Область кода выстроится по центру, можно регулировать ширину. Это для того, чтобы лучше концентрироваться на коде.
Есть замечательный режим Zen. Он скрывает все элементы, даже вкладки с файлами, мы концентрируемся только на одном единственном файле, на одном коде. Решаем сложную задачу, которая требует максимальной концентрации.
Чтобы выйти из него, нажимаю Escape.
Перенос текста
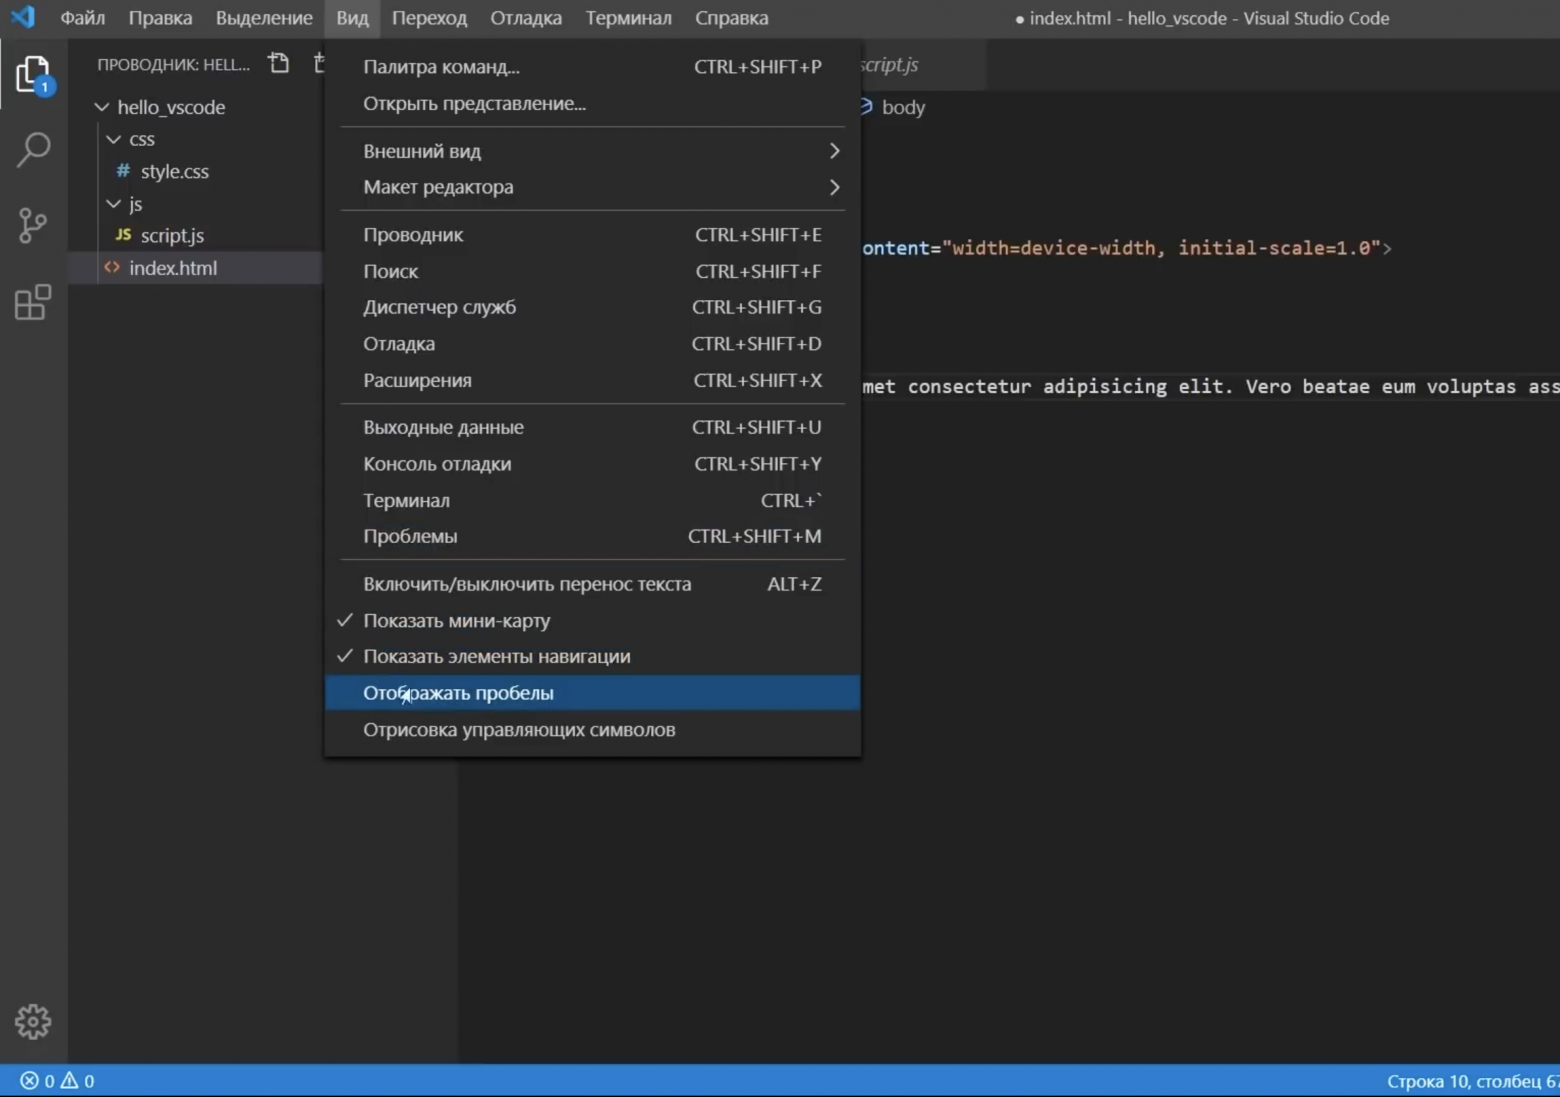
Далее в самом меню Вид мы можем включить или выключить перенос текста, это можно сделать зажав Alt + Z. Что это значит? Например, у нас есть очень длинный текст, который не помещается в область кода и появляется горизонтальная прокрутка. Если это кажется неудобным, можно нажать Alt + Z весь наш текст перенесется, чтобы поместиться в область кода.
Есть возможность скрыть или показать мини-карту, элементы управления, то есть хлебные крошки. Если он кажется ненужным. Здесь можно отобразить непечатаемые пробелы и печатаемые символы и отрисовать управляющие символы, которые могут быть в тексте скопированы с источника.
Цветовая схема
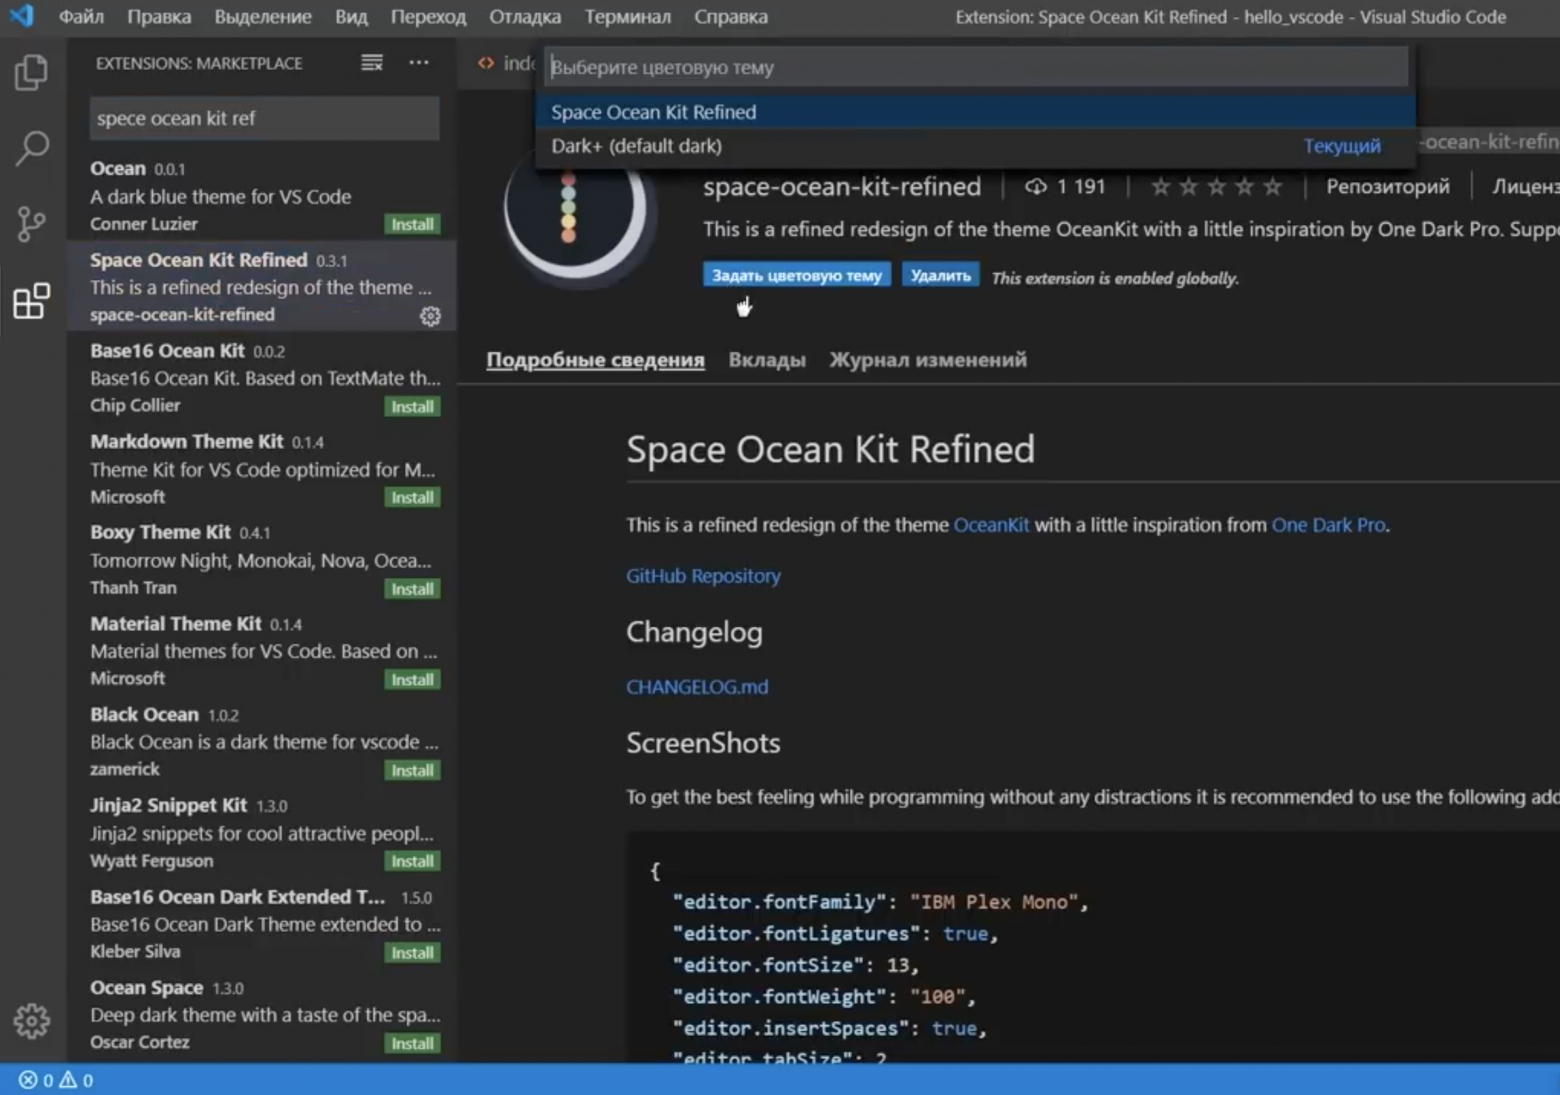
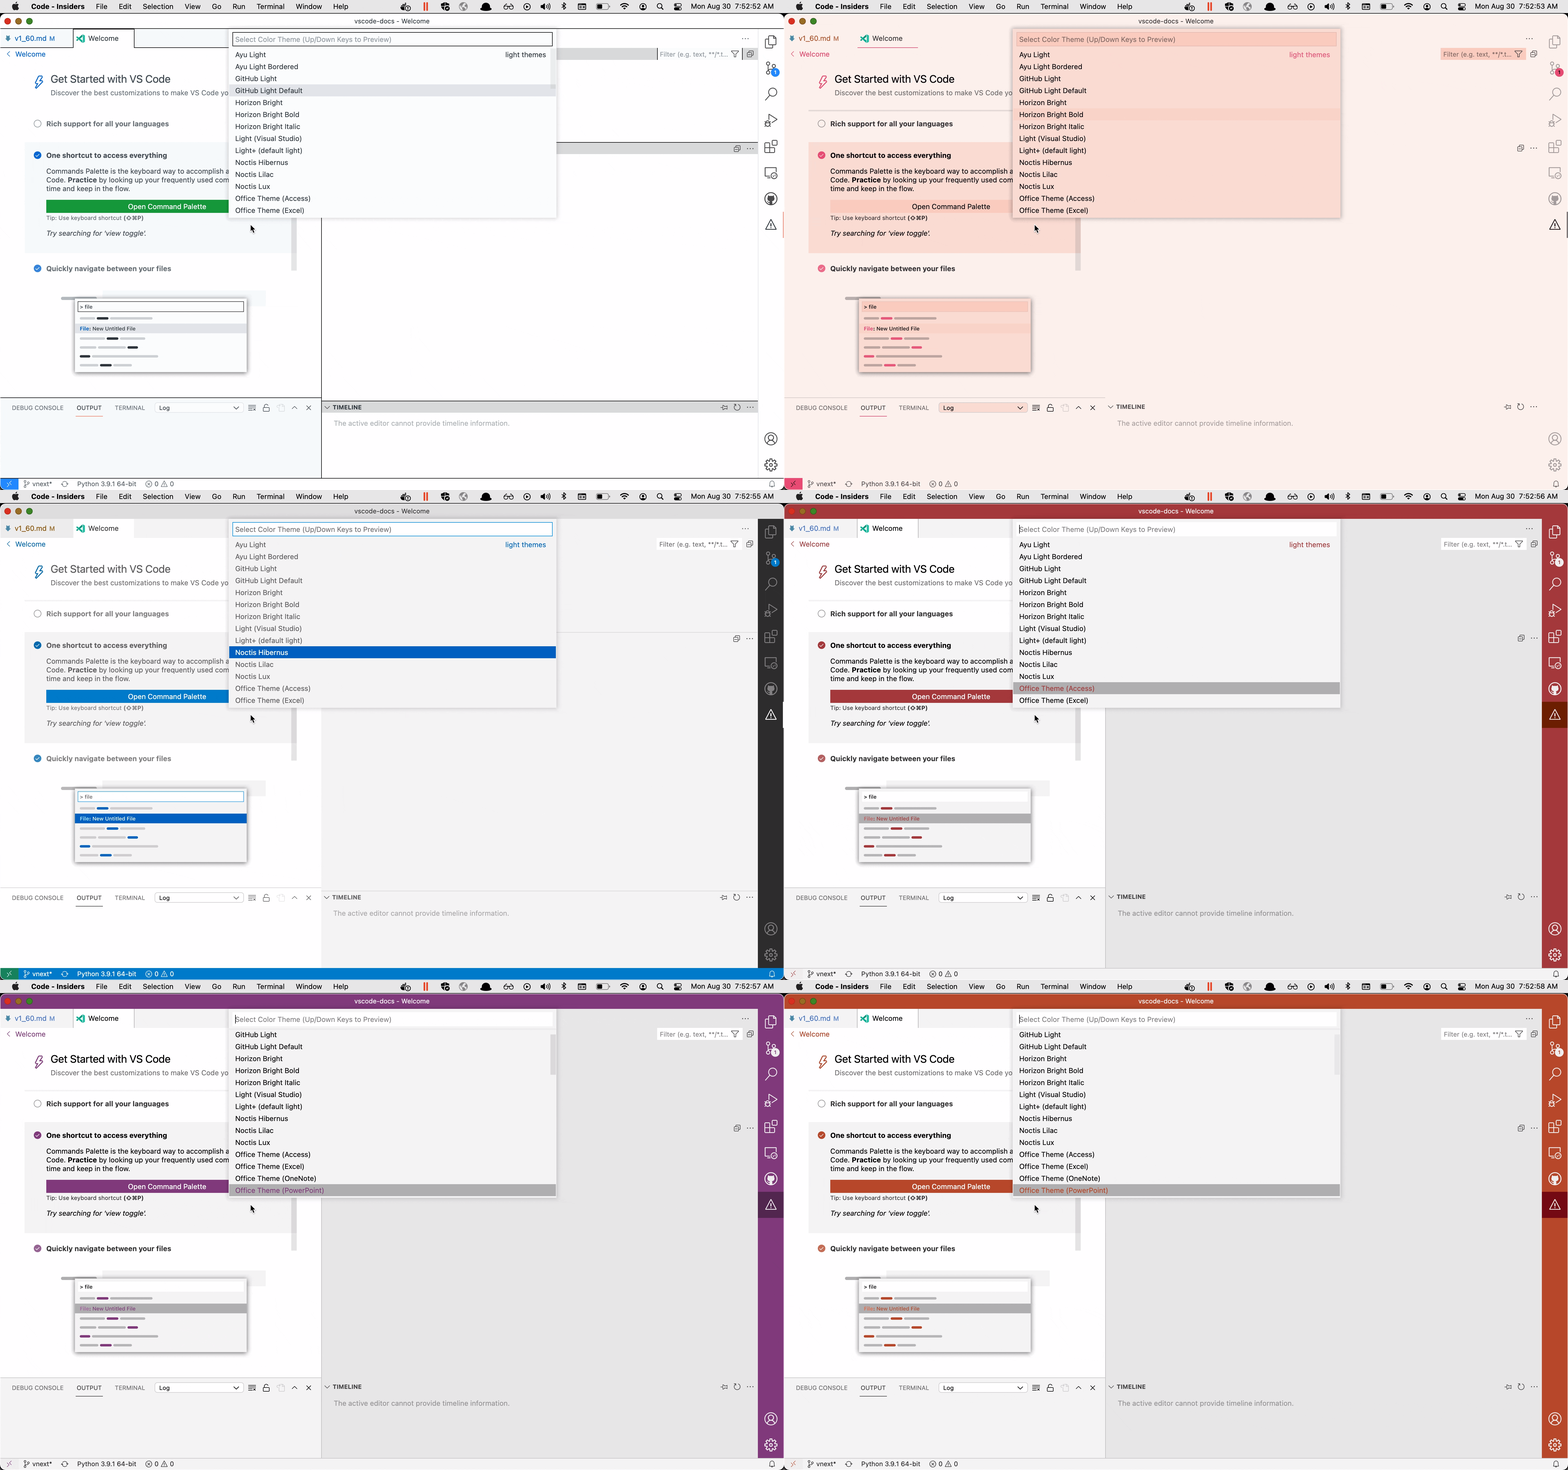
Выбрать одну из установленных тем мы можем перейдя в Управление, пункт Цветовая тема. Видим список и стрелками на клавиатуре можем перемещаться между темами, подбирая себе нужную тему. Есть как темные, так и светлые варианты.
Если ни одна из этих тем не подходит, мы можем установить свою. Для этого я возвращаюсь к вкладке Расширения, в поле поиска пишу название своей темы — SpaceOceanKit. Нахожу, нажимаю Install. Далее у меня есть выбор какую тему мне выбрать и я выбираю именно ее.
Теперь у меня весь редактор и в том числе код будет выглядеть по другому. Я установил свою тему, ты можешь установить любую другую.
Сочетание цветов очень важное при длительной работе с кодом, это влияет на восприятие, усталость и здоровье твоих глаз. Так что тщательно подбери себе тему и не забывай делать перерывы.
Иконки
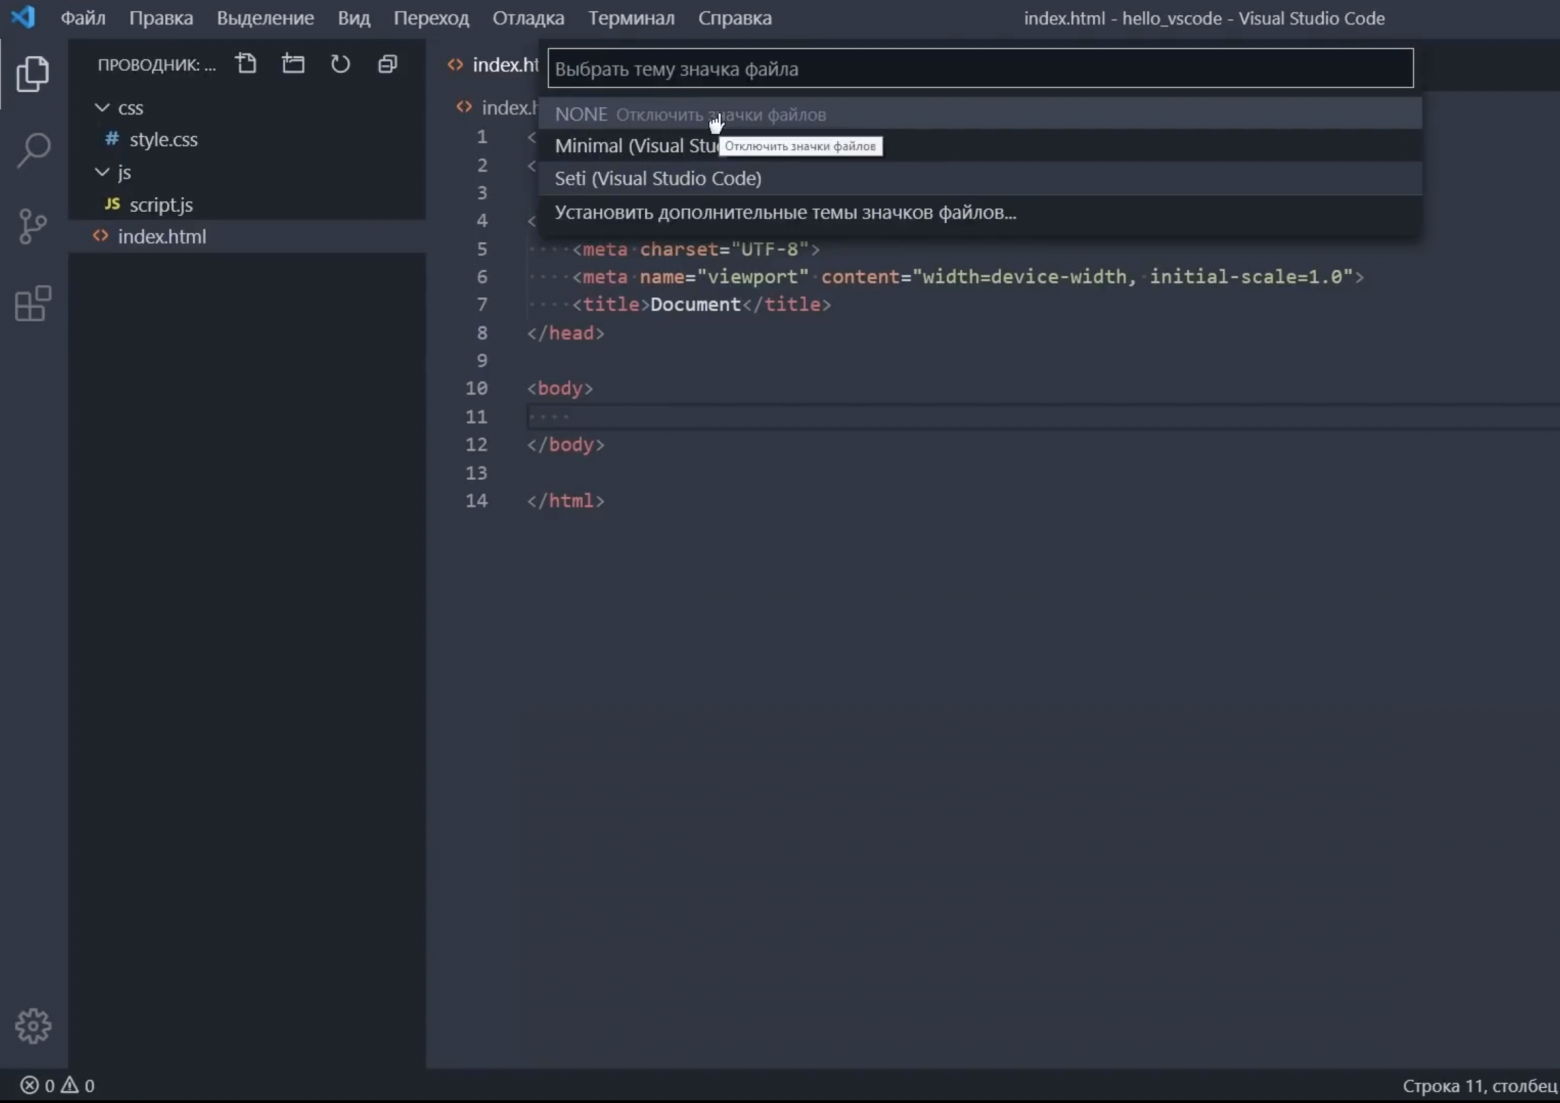
Также мы можем изменить вид иконок для файлов в нашем проводнике. Для этого переходим в Управление > Тема значков файлов, здесь мы можем отключить значки совсем либо выбрать из списка.
Также установить дополнительные пакеты значков. Например, Matherial Icon Theme.
Параметры
Дополнительно настроить комфорт работу с кодом и в целом с редактором можно в Параметрах программы. Для этого переходим в Управление > Параметры или зажимаем Ctrl+,
Параметры можно настроить как глобально, так и для конкретного проекта. Настроек здесь очень много. Мы пройдемся по основным.
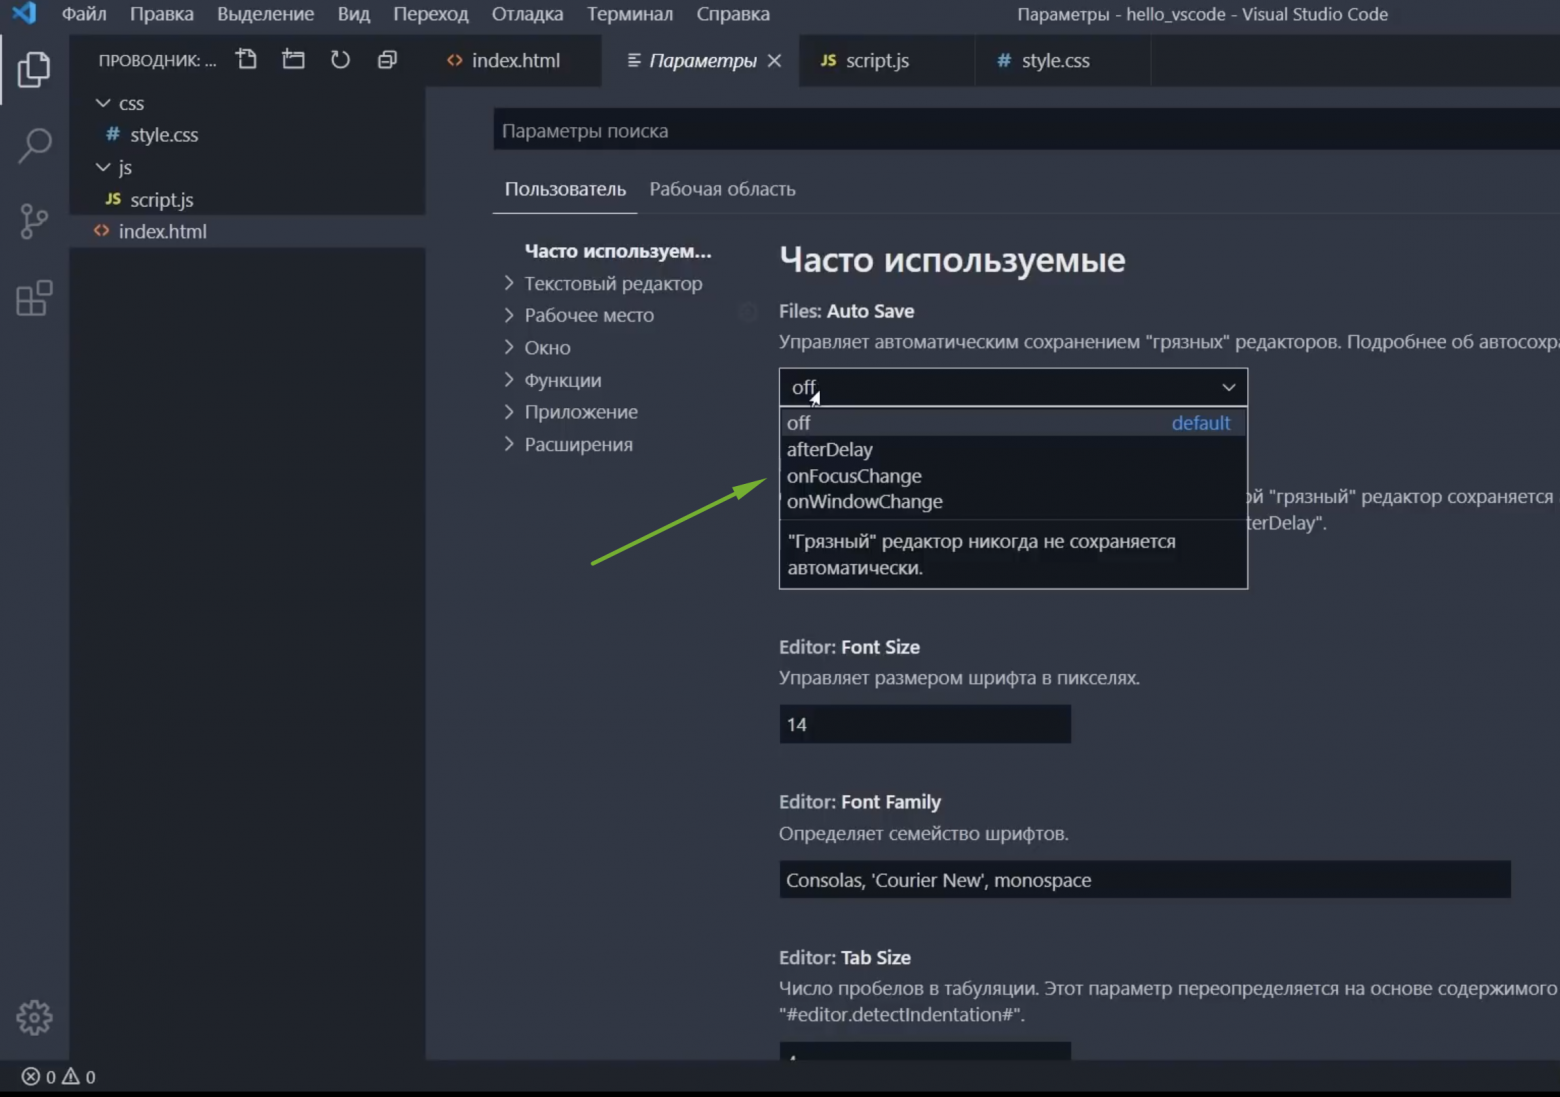
Автосохранение
Первая полезная опция — автосохранение файла. Для новичков очень крутая опция. Новички часто подходят ко мне с проблемой “Почему у меня ничего не работает?” Я смотрю, а там не сохранен файл.
Выбирайте для себя удобную опцию и двигаемся дальше.
Отображение кода
Следующие опции помогут настроить комфортное отображение кода. Это размер шрифта и семейство шрифта. Здесь можно подобрать значение, которое подходит именно тебе.
Я настраиваю размер отступа при табуляции. По умолчанию она составляет 4. Как по мне, слишком широкое поле при одном Tab, поэтому я меняю на значение 3, так мне кажется более компактно. Ты же указывай комфортное для тебя значение.
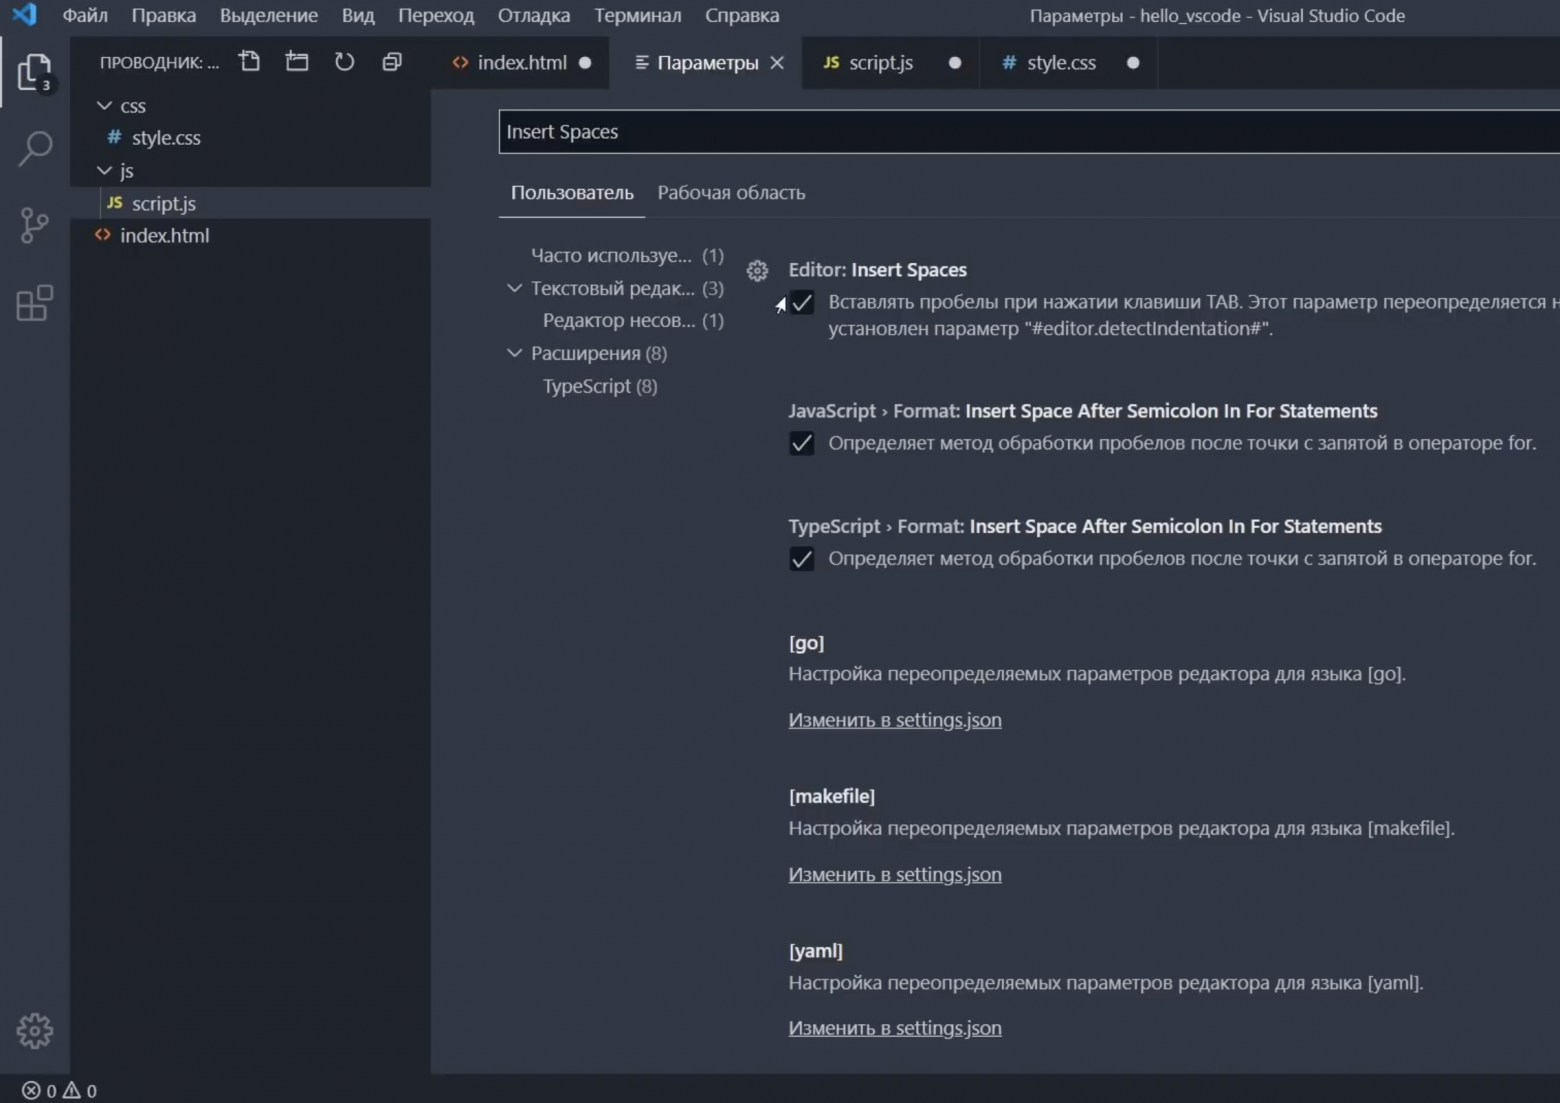
В одном файле у меня выводятся пробелы, точки при нажатии Tab, в другом — значок табуляции. За эту опцию отвечает параметр Insert Spaces. По умолчании установлена галочка, то есть будут выводиться именно пробелы. Я хочу, чтобы у меня выводились значки табуляции, поэтому галочку уберу.
Для того, чтобы преобразовать существующий файл с пробелами, можно обратиться к строке состояния нажать 4 пробела и указать опцию Преобразовать отступ в шаги табуляции. Таким образом мы можем преобразовать уже открытые файлы.
А то, каким образом определять вставку символов для новых открытых файлов отвечает опция Detect Indentation. Я галочку уберу, потому что хочу, чтобы для всех файлов работали именно мои настроенные параметры.
Скрыть подсказки
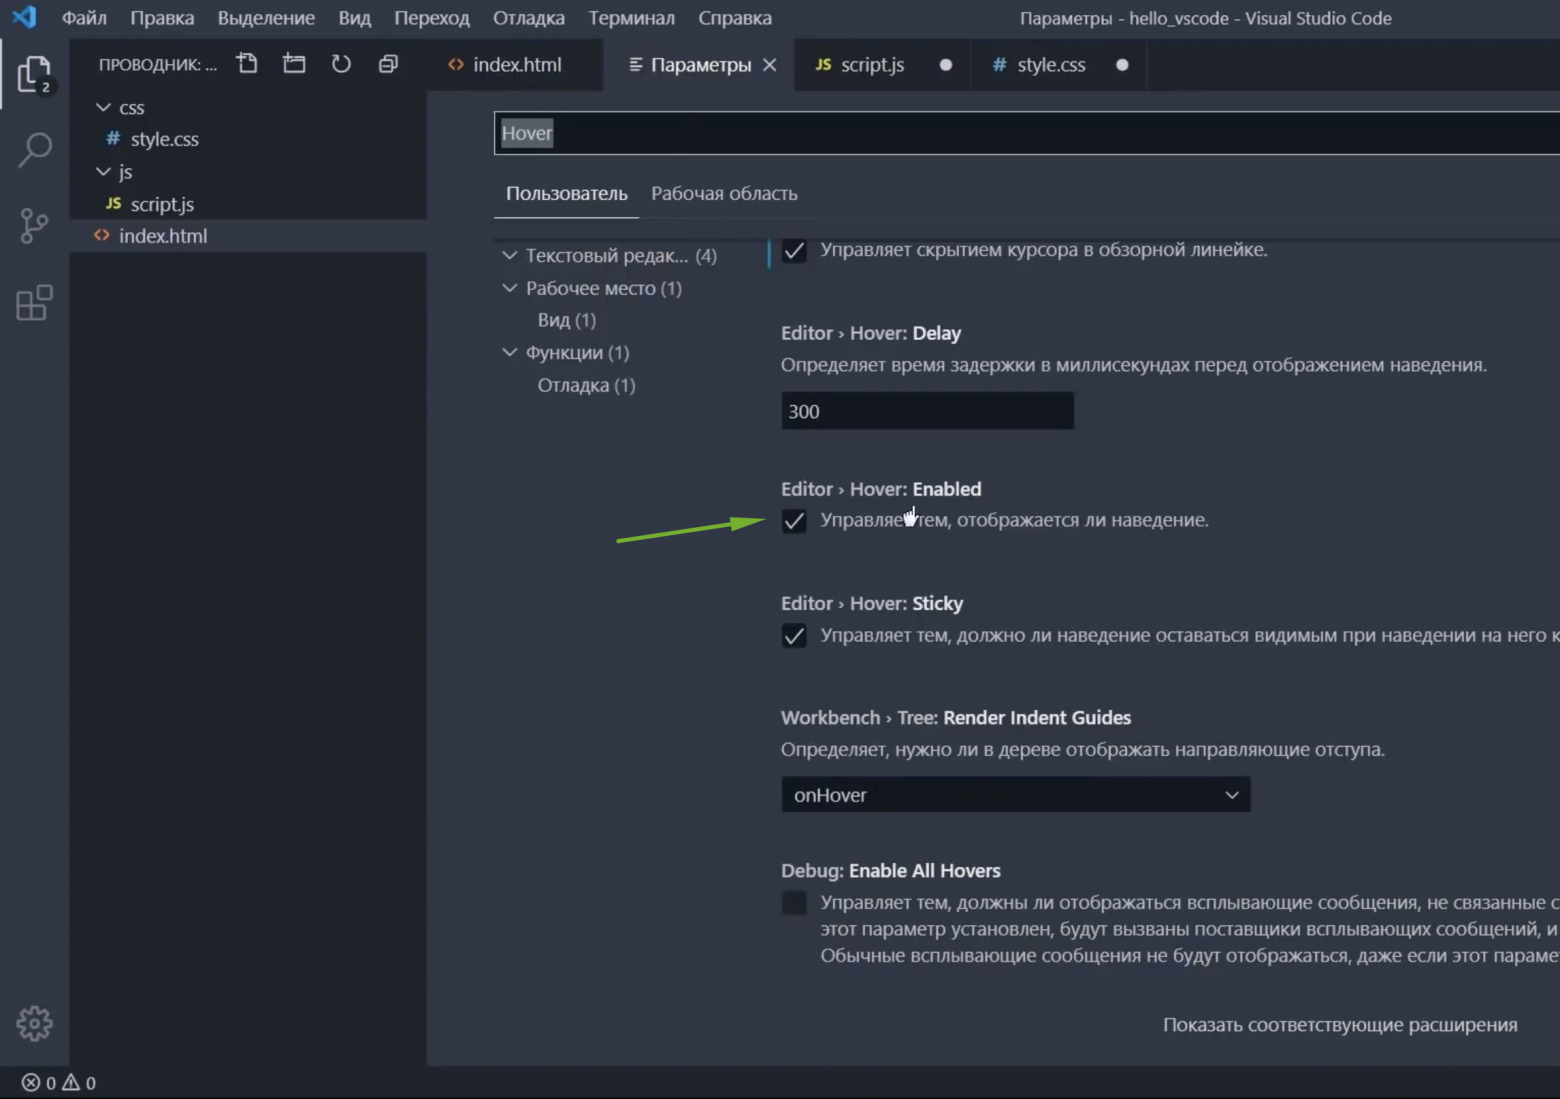
Ранее я показывал, что при наведении на элемент в коде всплывают подсказки, часто это может раздражать. Чтобы подсказки убрать, существует параметр Hover Enabled. Галочку можно снять и подсказки пропадут.
Но, вместе с этим пропадут функции, которые могут быль полезными.
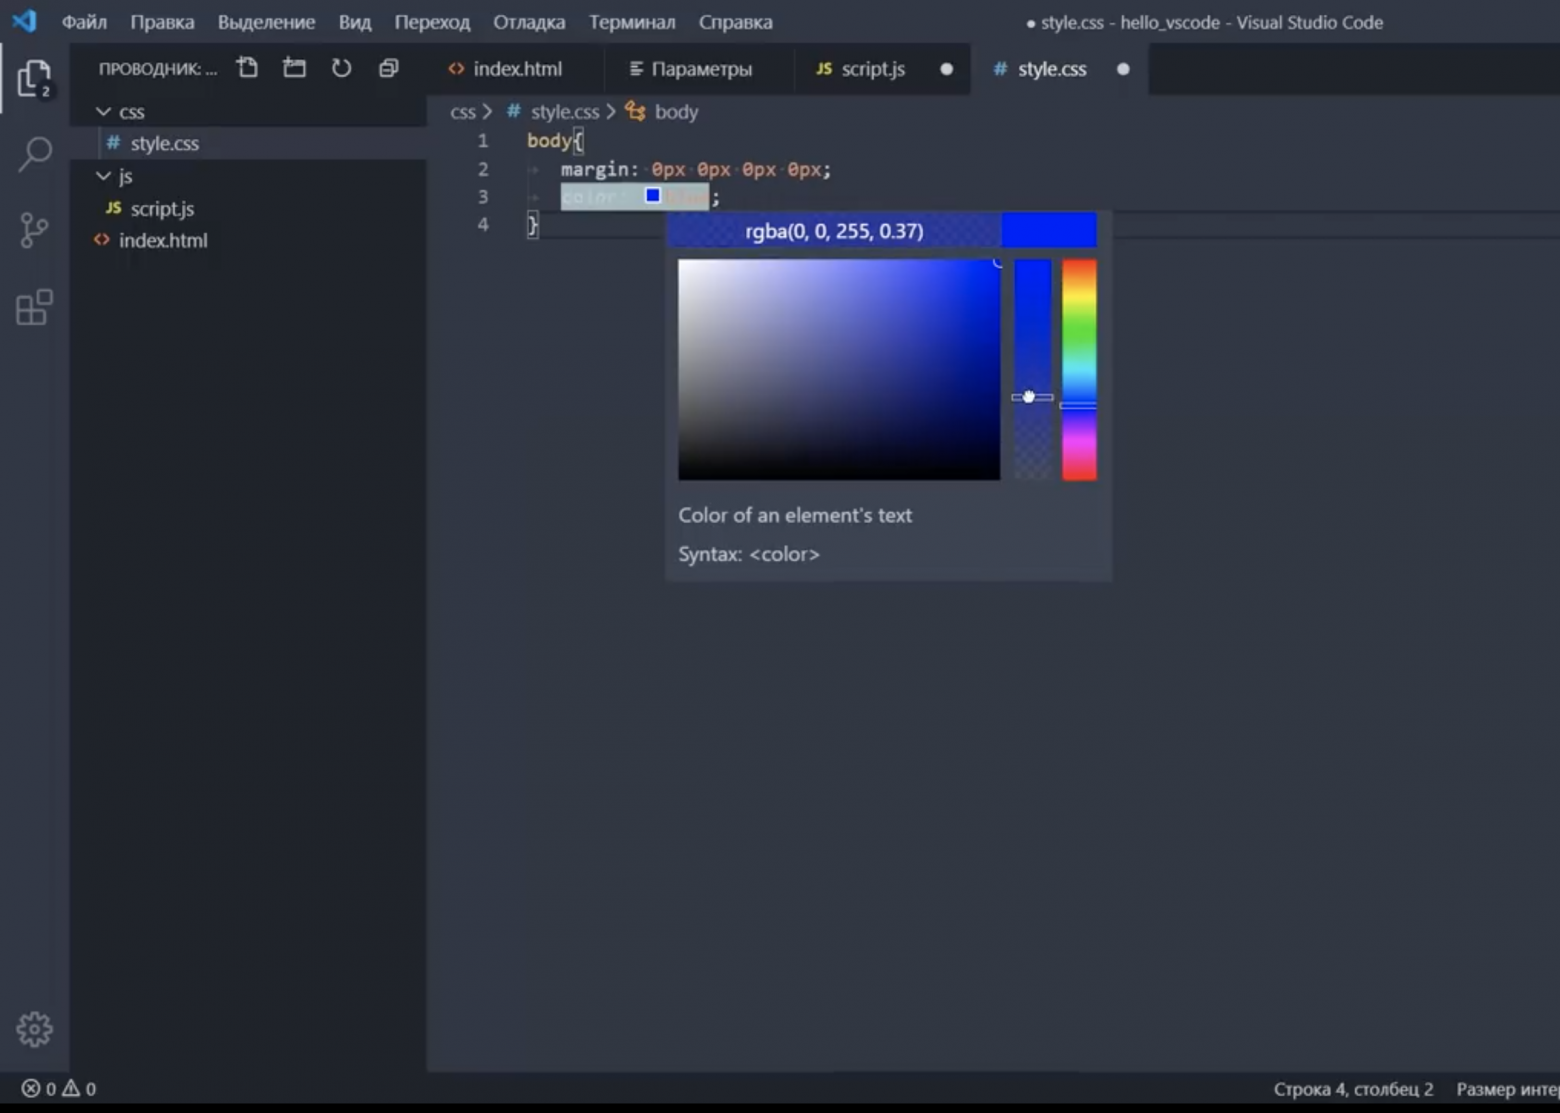
Например, в файле стили у нас есть цвет синий. Он подсвечивается сразу. Если Hover у нас включен, тогда при наведении на цвет выпадает такая штука:
Мы можем сделать его полупрозрачным, ставятся значения rgba или вообще поменять цвет на другой. Если галочку Hover Enabled уберем, то эта функция тоже пропадает.
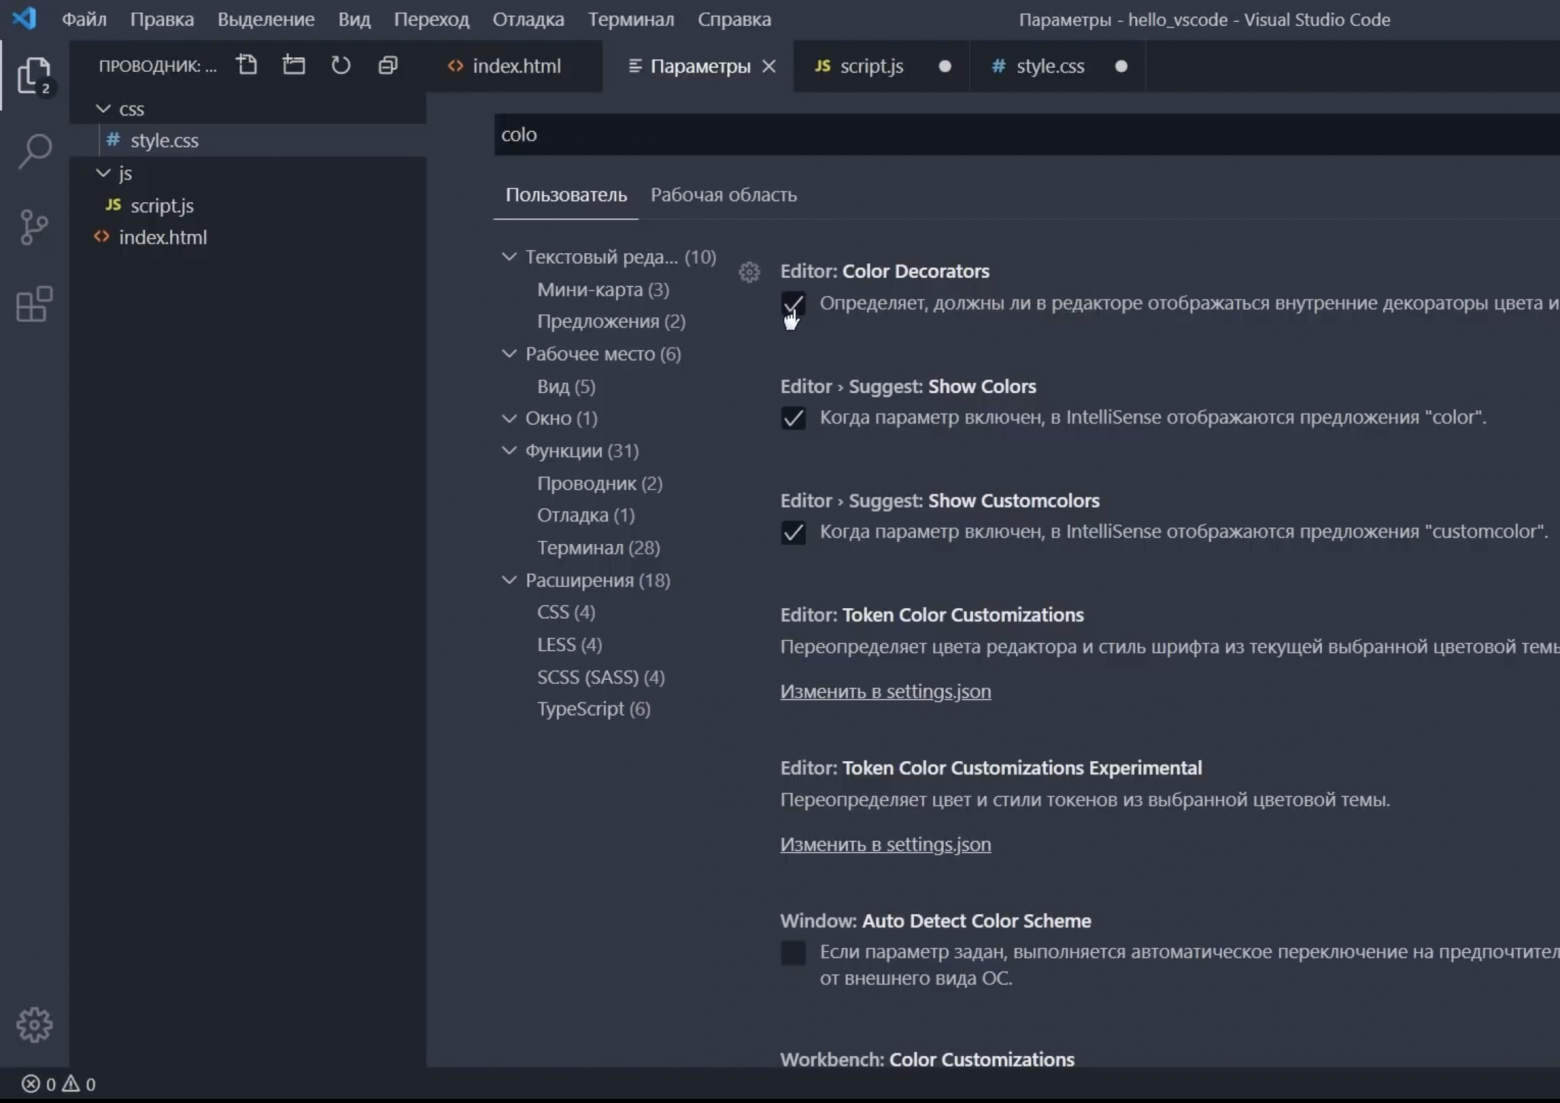
За вывод отвечает параметр Color Decorators, если он не нужен, галочку можно снять и никаких квадратиков цвета не будет.
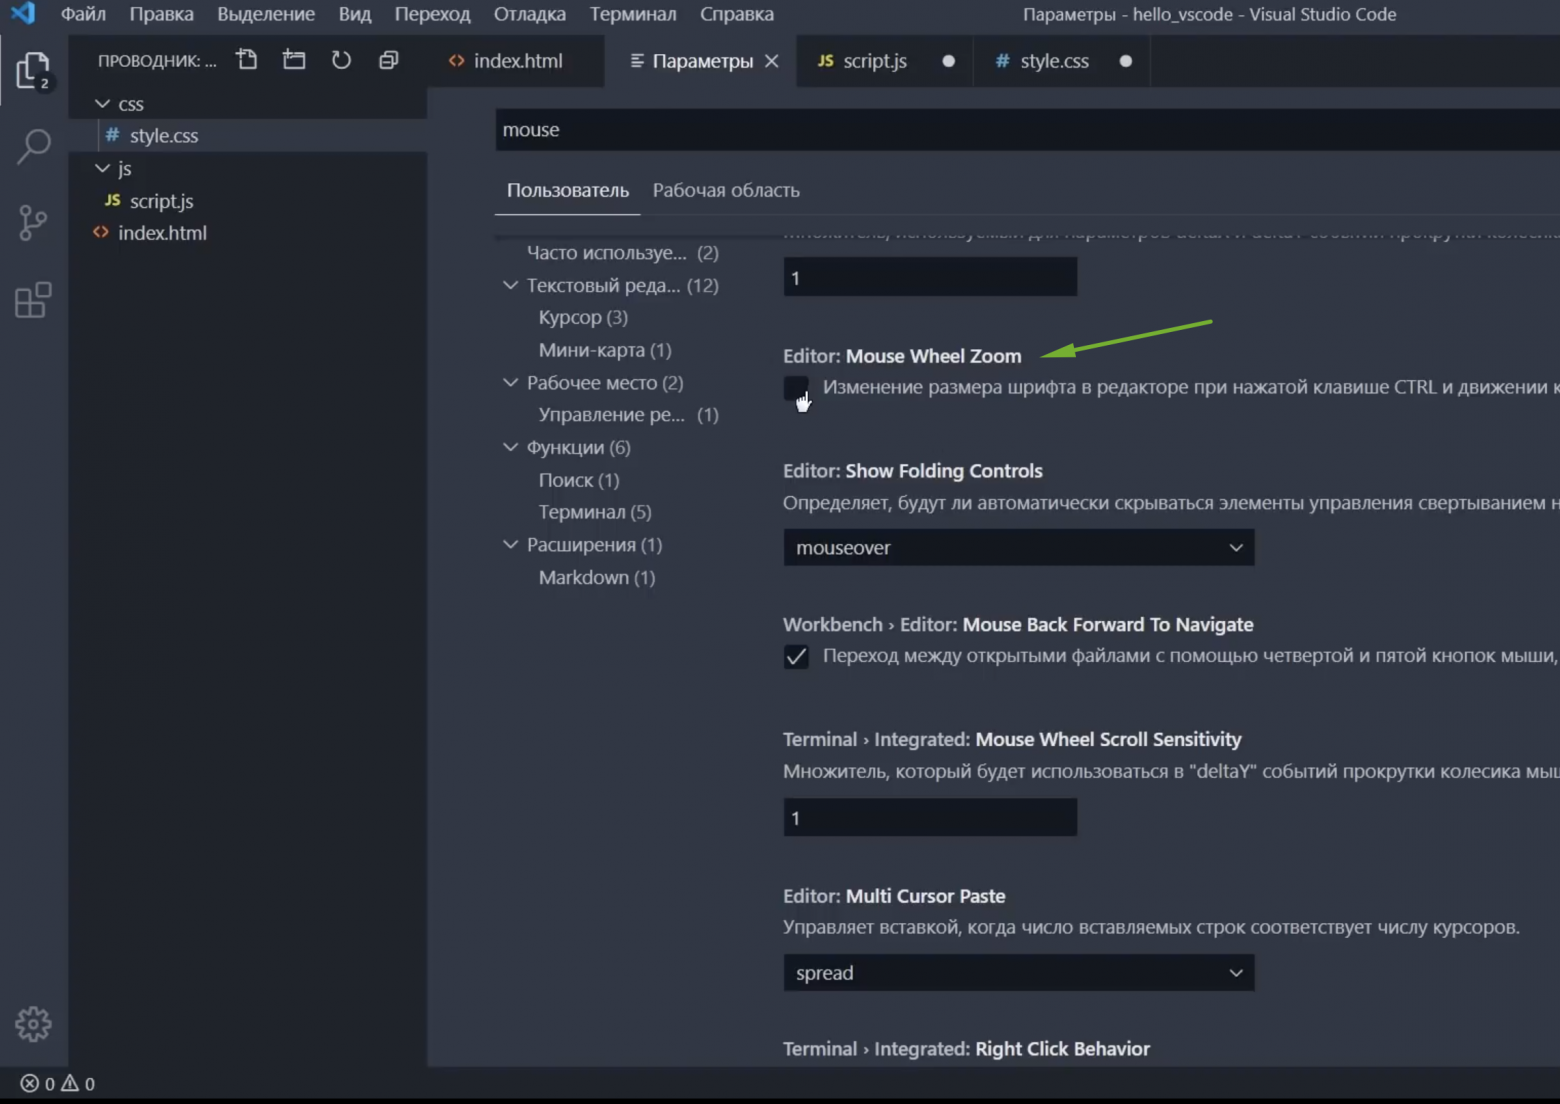
Mouse Wheel Zoom — поставив галочку, мы сможем в редакторе изменить размер шрифта зажав Ctrl и покрутив колесико мыши.
Close Active Groups управляет тем, будет ли закрываться группа при закрытии последней вкладки в ней. Редактор можно делить на части. По умолчанию при закрытии в последней вкладки, вся вкладка закроется. Иногда это неудобно, поэтому я эту галочку снимаю. И теперь при закрытии последней вкладки группа у меня все равно останется.
Форматирование
Следующая группа настроек отвечает за форматирование, которое уже встроено в редакторе VC Code. Что такое форматирование? Например, мы пишем структуру, в ней еще одну структуру, но по какой-то причине съехала табуляция. При зажатии Shift + Alt + F у нас все выстроится как надо.
Вернемся к нашим настройкам. Здесь мы можем поставить три галочки:
Я устанавливаю одну галочку — Форматирование при сохранении.
Теперь, когда у меня съехала табуляция, я не обращаю внимание, в момент сохранения файла все выстроится на свои места.
Сделать более тонкую настройку форматирования того или иного языка можно разобравшись с документацией на сайте программы. Также можно установить дополнительный расширения как под конкретный язык, так и под множество других.
Я показал ту часть настроек, которые использую сам. С остальными настройками ты можешь ознакомиться сам. Для удобства настройки здесь разделены на категории. Также есть категория настроек под расширения уже установленных либо тех, которые мы только установим.
Для быстрого доступа ко всему, что мы настроили, зажимаем Ctrl+Shift+P и в строке поиска пишем Settings, пока не увидим Settings (JSON). Нажимаем и перед нами появятся наши настройки, их тут же можно менять.
В этом же файле будем настраивать и новое расширение.
Комфорт при работе с программой очень важен, так как это напрямую влияет на производительность. Следующее, что мы сделаем — это установим ряд плагинов, которые нам существенно в этом помогут.
Плагины
Лень читать? Тут видео версия.
Emmet
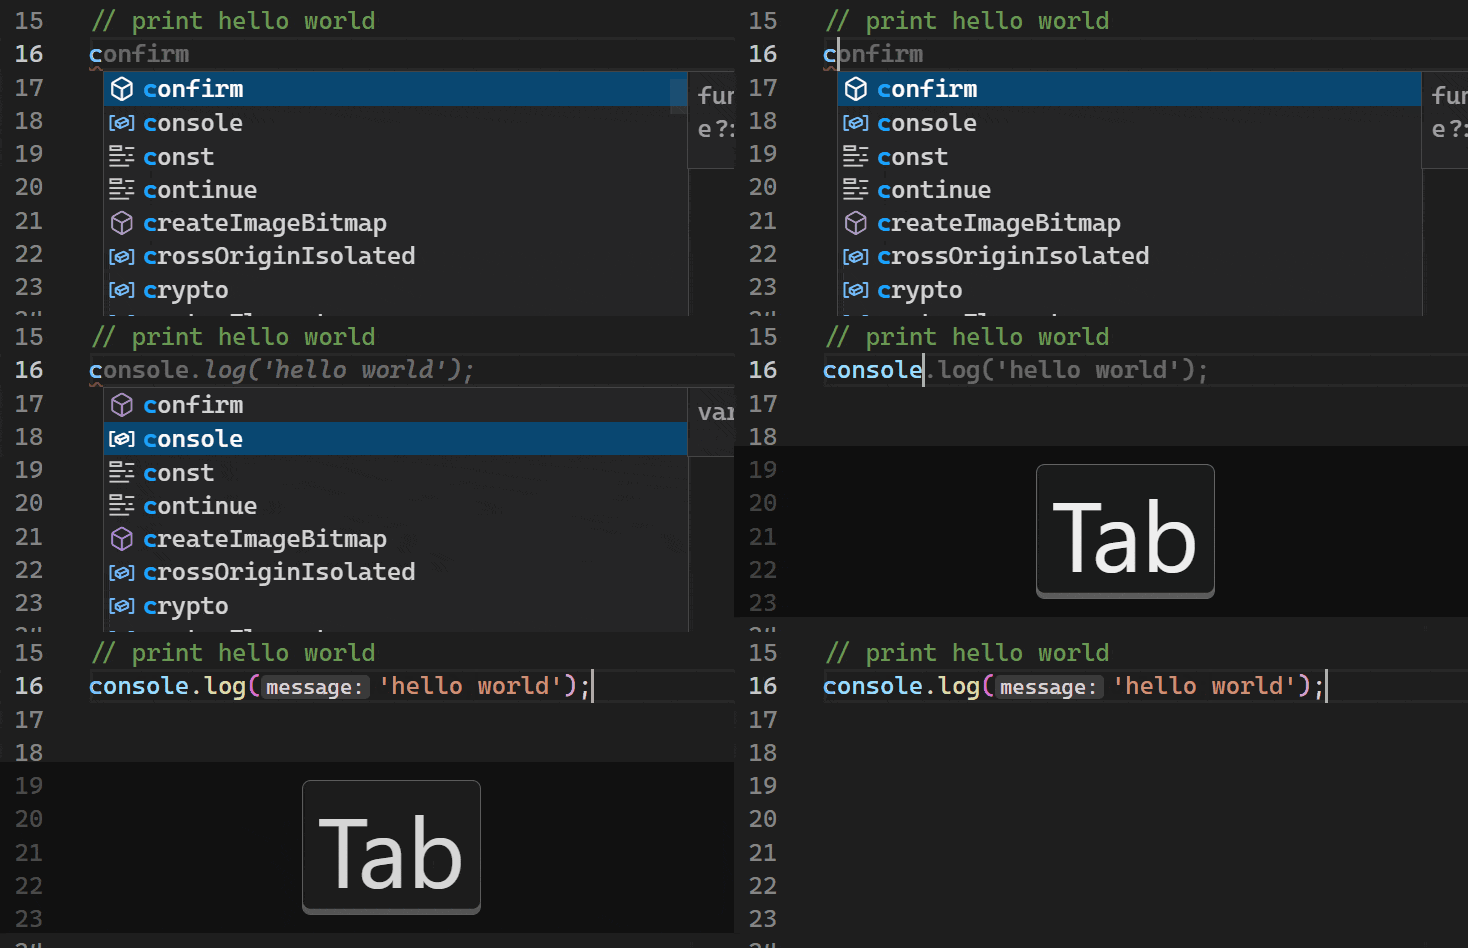
— этот плагин уже встроен в редакторе VS Code из коробки. И вправду, сегодня сложно себе представить жизнь без Emmet. Супер ускоряет набор кода. Например, именно благодаря ему, я так быстро создал начальный код для HTML файла написав только восклицательный знак и нажав Tab.
Вот еще пример. Нам нужно создать div с классом block для этого я пишу .block и нажимаю Tab. Готово!
Или например посложнее — нам нужно создать маркированный список на 10 элементов. Пишем ul>li*10 Tab. Готово!
То же самое применимо и к файлам стилей. Например, для тега body я хочу задать размер шрифта 20 пикселей. Для этого мне достаточно написать fz20. Нажав Tab я получу уже готовый параметр.
Лучше ознакомиться с возможностями Emmet можно на сайте этого дополнения.
Сниппеты
Но еще круче создавать свои сокращения-сниппеты для быстрого вызова того иного куска кода.
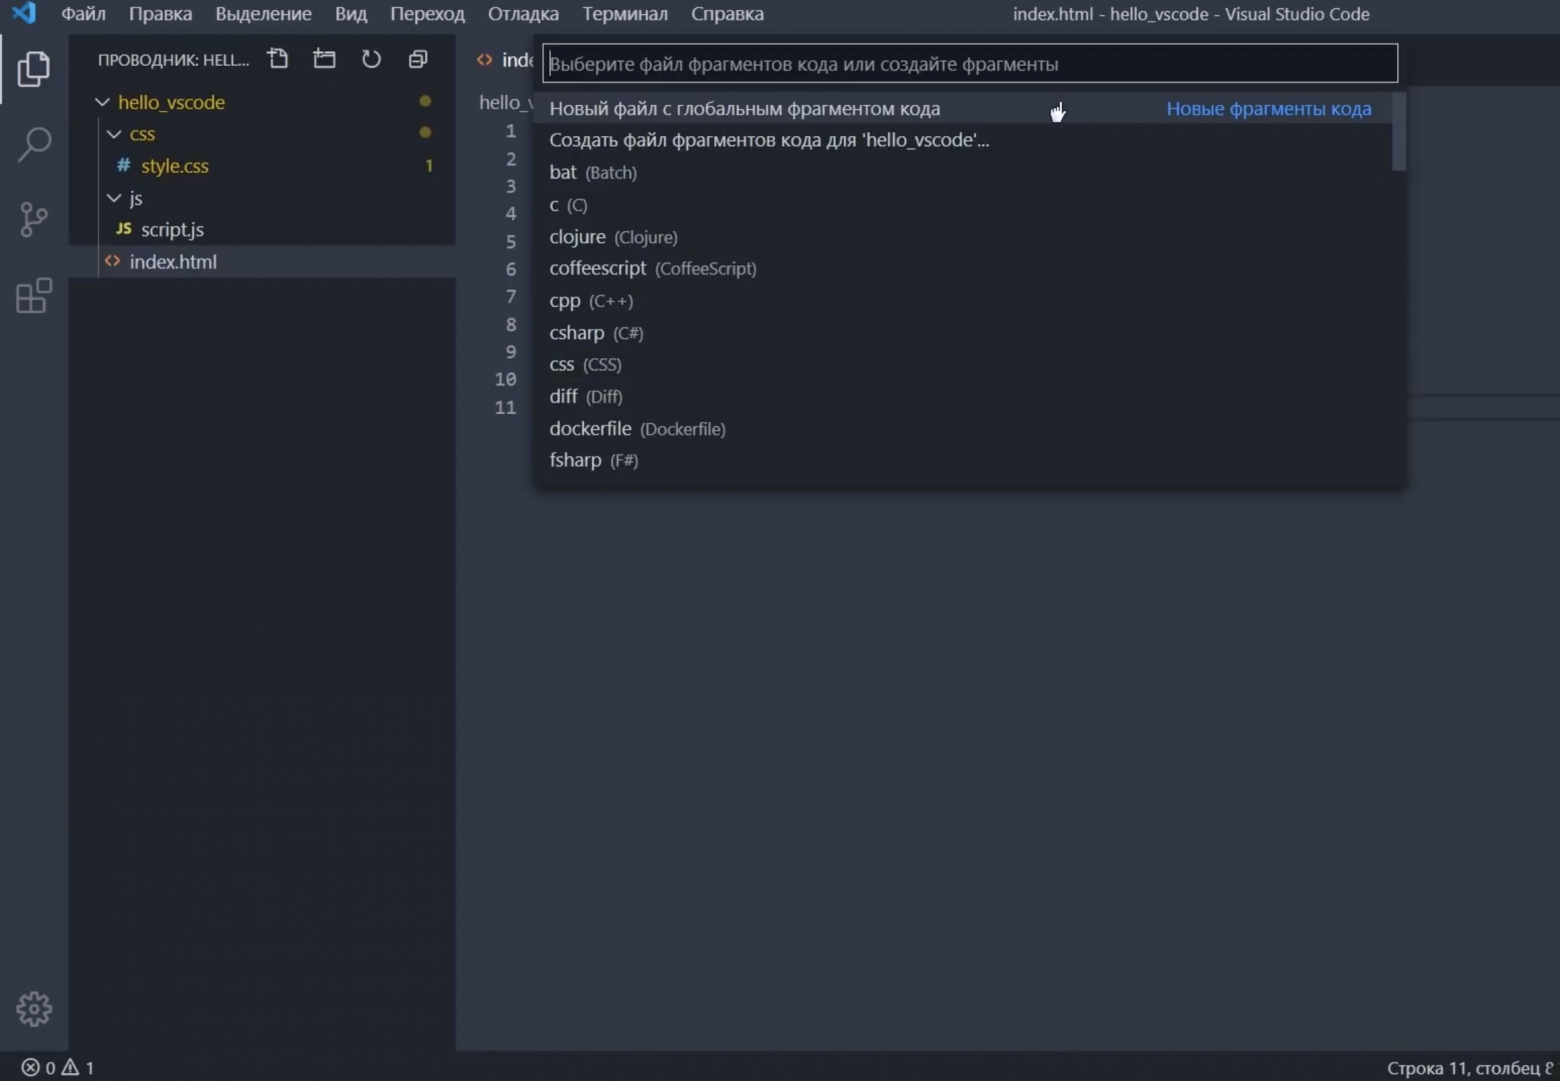
Переходим в Управление > Пользовательские фрагменты кода. Здесь есть выбор:
Создадим глобальные, здесь нужно ввести имя списка сниппетов.
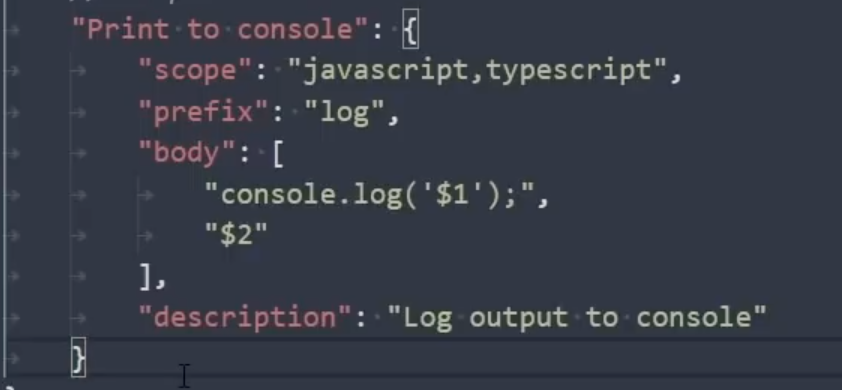
Набираю my, нажимаю и открывается файл my.code-snippets. Здесь есть всякая информация закомментированная, а также пример. Я его раскомментирую. Здесь заготовка сниппета для языка JavaScript.
Надпись означает название самого сниппета. Параметр scope — указываем языки для которых этот сниппет будет применяться. Это необязательный параметр, можно его убрать и сниппет будет применяться для всех языков. Префикс — это сокращения, то есть что мы будем набирать, чтобы вывелся нужный отрезок кода. В поле body мы и пишем наш кусок кода. Здесь будет выводиться console.log Ниже description, здесь можем указать описание.
Создадим свой сниппет: ставим запятую после фигурной скобки, можем этот кусок кода скопировать и заменить на свой. Я хочу создать сниппет, который будет выводить готовый параметр для css внешнего отступа.
Пишу — “Внешний отступ”, это же можно добавить и в описание. Языки вообще уберу, а префикс я поставлю например mm. В body нужно задать параметр «margin: 0px, 0px, 0px 0px;», я хочу чтобы при наборе mm у меня вывелся такой параметр. Сохраняем Ctrl+S и проверим.
Переходим в наш style.css набираем mm и нажимаем Tab. Видим, что наш кусок кода, готовый параметр сразу появился.
Можем проверить тот снипет, который был задан изначально в качестве примера. Переходим в файл js, набираем log Tab.
Я думаю, мне не нужено объяснять, какой скорости можно добиться, грамотно настроив свои сниппеты.
Продолжаем установку плагинов. Зажимаем Ctrl+Shift+X и переходим во вкладку с расширениями.
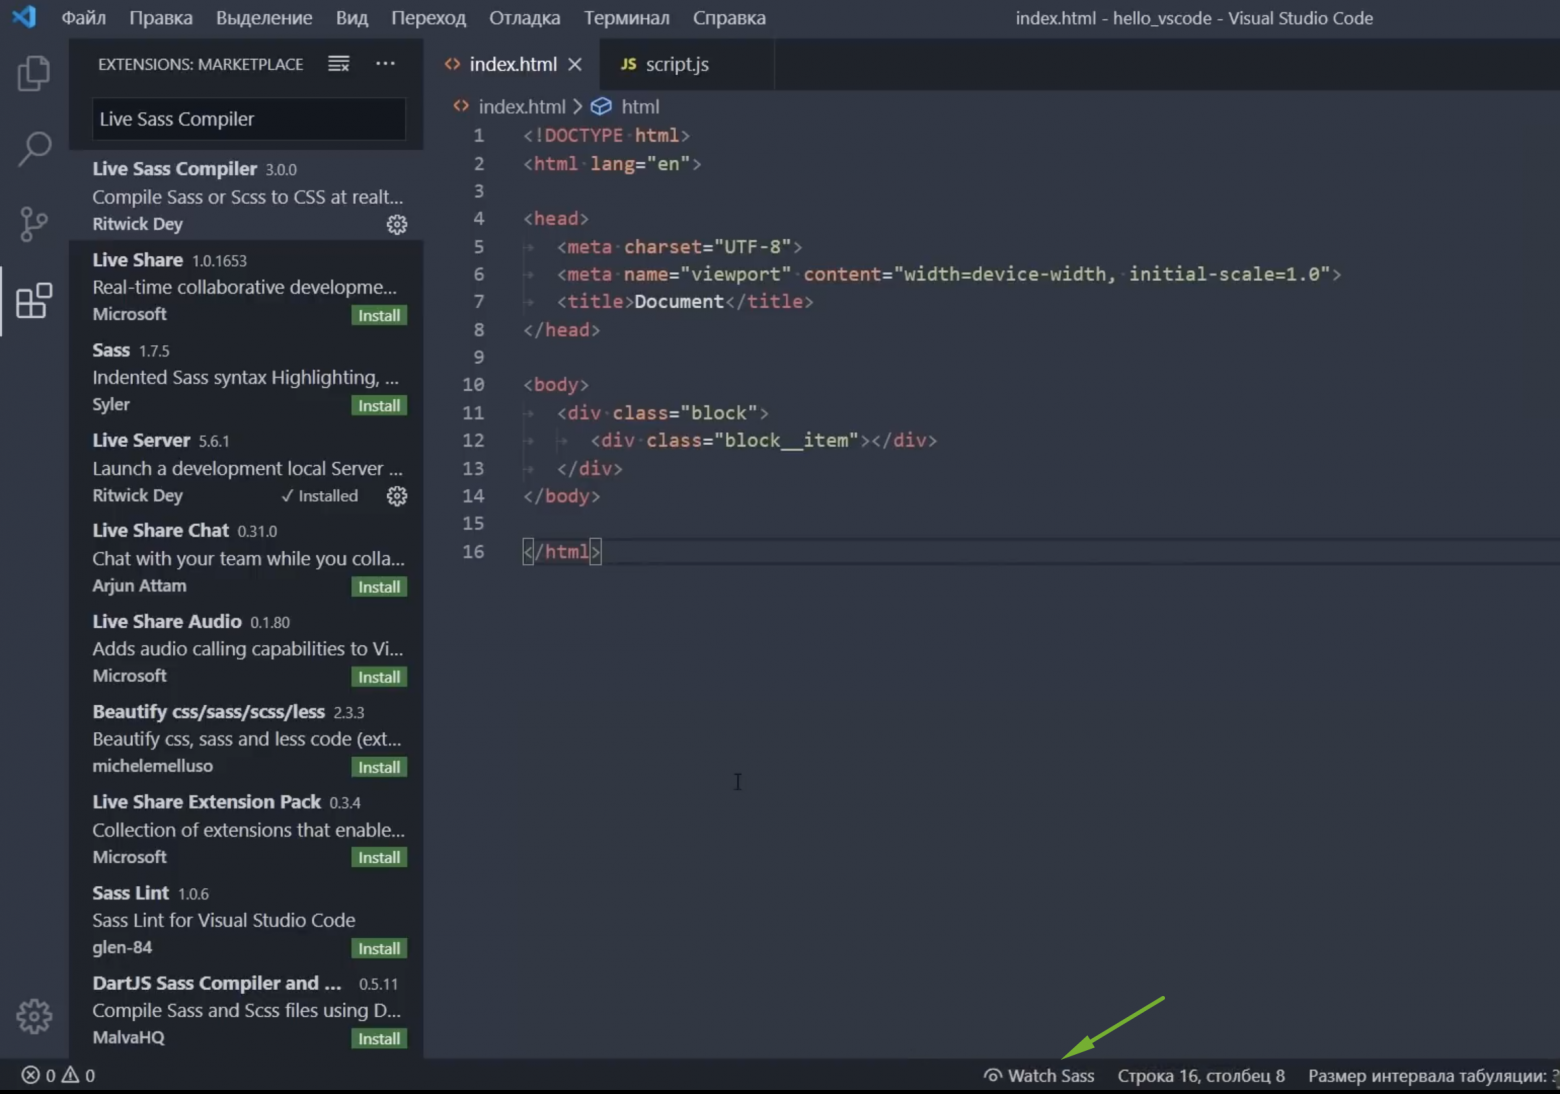
Live Sass Compiler
Идеальное для тех, кто работает с препроцессорами SASS/SCSS. Ищем наше дополнение и нажимаем Install. Индикатор сверху показывает, что идет установка, Отлично, расширение установлено. Получаем информационное окошко, что все окей.
В строке состояния появляется кнопочка Watch Sass. И сейчас мы будем этот плагин настраивать.
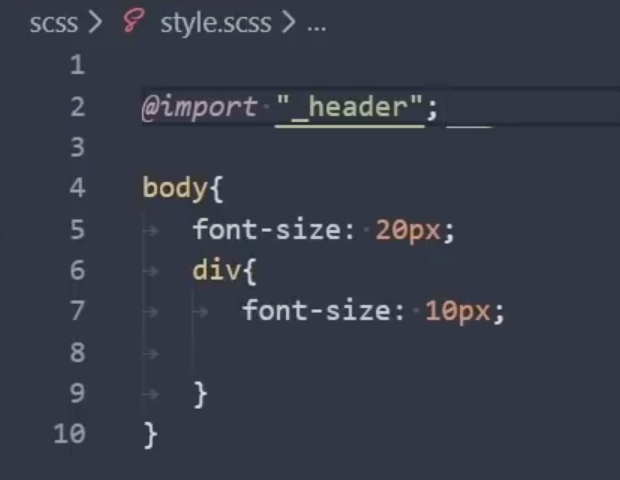
Создадим папку с нашими scss файлами, так ее и назовем. Внутри создадим style.scss.
Напишем код:
У нас пока ничего происходить не будет, но мы можем включить кнопку Watch Sass и плагин начал следить за нашими scss\sass файлами. Рядом с ним автоматически скомпилировались два файла style.css и style.css.map.
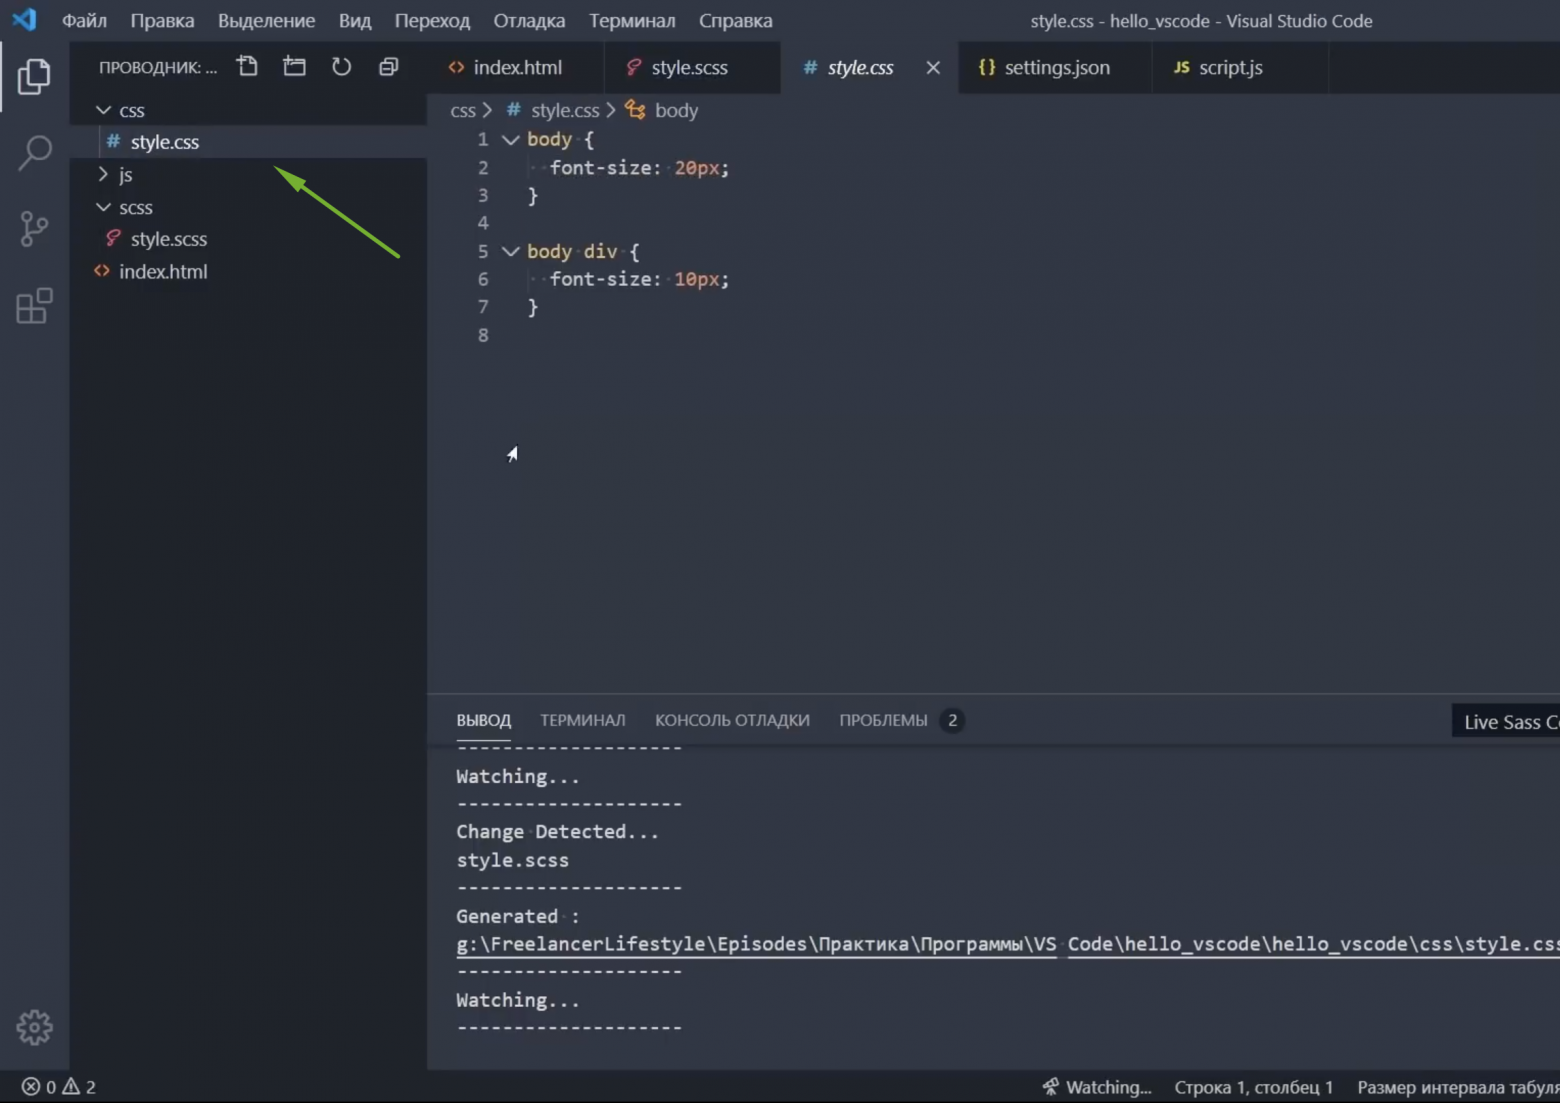
Все отлично работает. Но, допустим, мы хотим, чтобы файлы создавались не рядом с файлом scss, а в папке css.
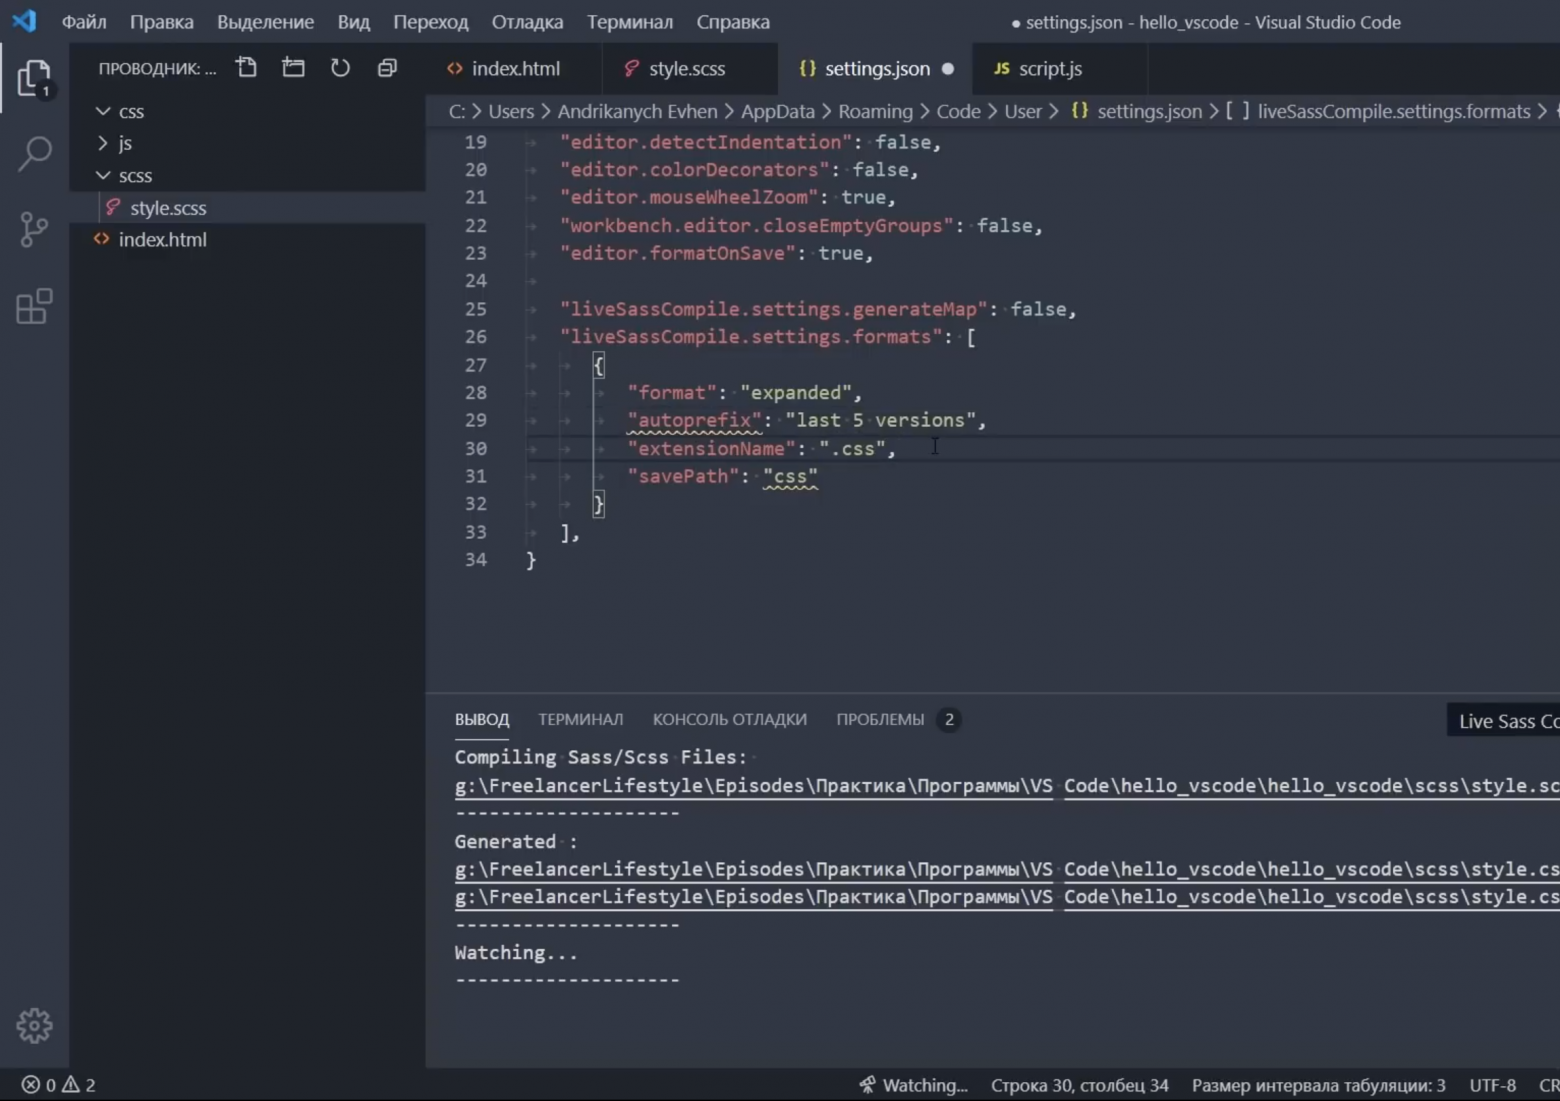
Удалим старые файлы и перейдем к настройкам. Зажимаем Shift+Ctrl+P, вызываем наш Settings (JSON). Можем вставить следующую настройку, обязательно ставим запятую и вставляем две настройки.
Я выключаю генерацию файла-карты, мап-файла. Следующие настройки для собственно самого компилятора. «format» — можно указать, каким именно способом будет генерироваться scss файл — развернутый, ужат, минифицирован и т.д.
Следующий параметр — Автопрефикс устанавливает всякие вендорные префиксы для наших css параметров. Указал последние пять версий браузера. Далее указываются расширения конечного файла — это css. Папку указал css, все файлы будут выводиться туда.
Смотрим, что будет происходить. Сохраняем настройки, что-то меняем и мы видим в журнале вывода что-то происходит, заглядываем в папку css и видим, что там уже создайся наш style.css. Теперь у нас все работает и выводится туда, куда нужно.
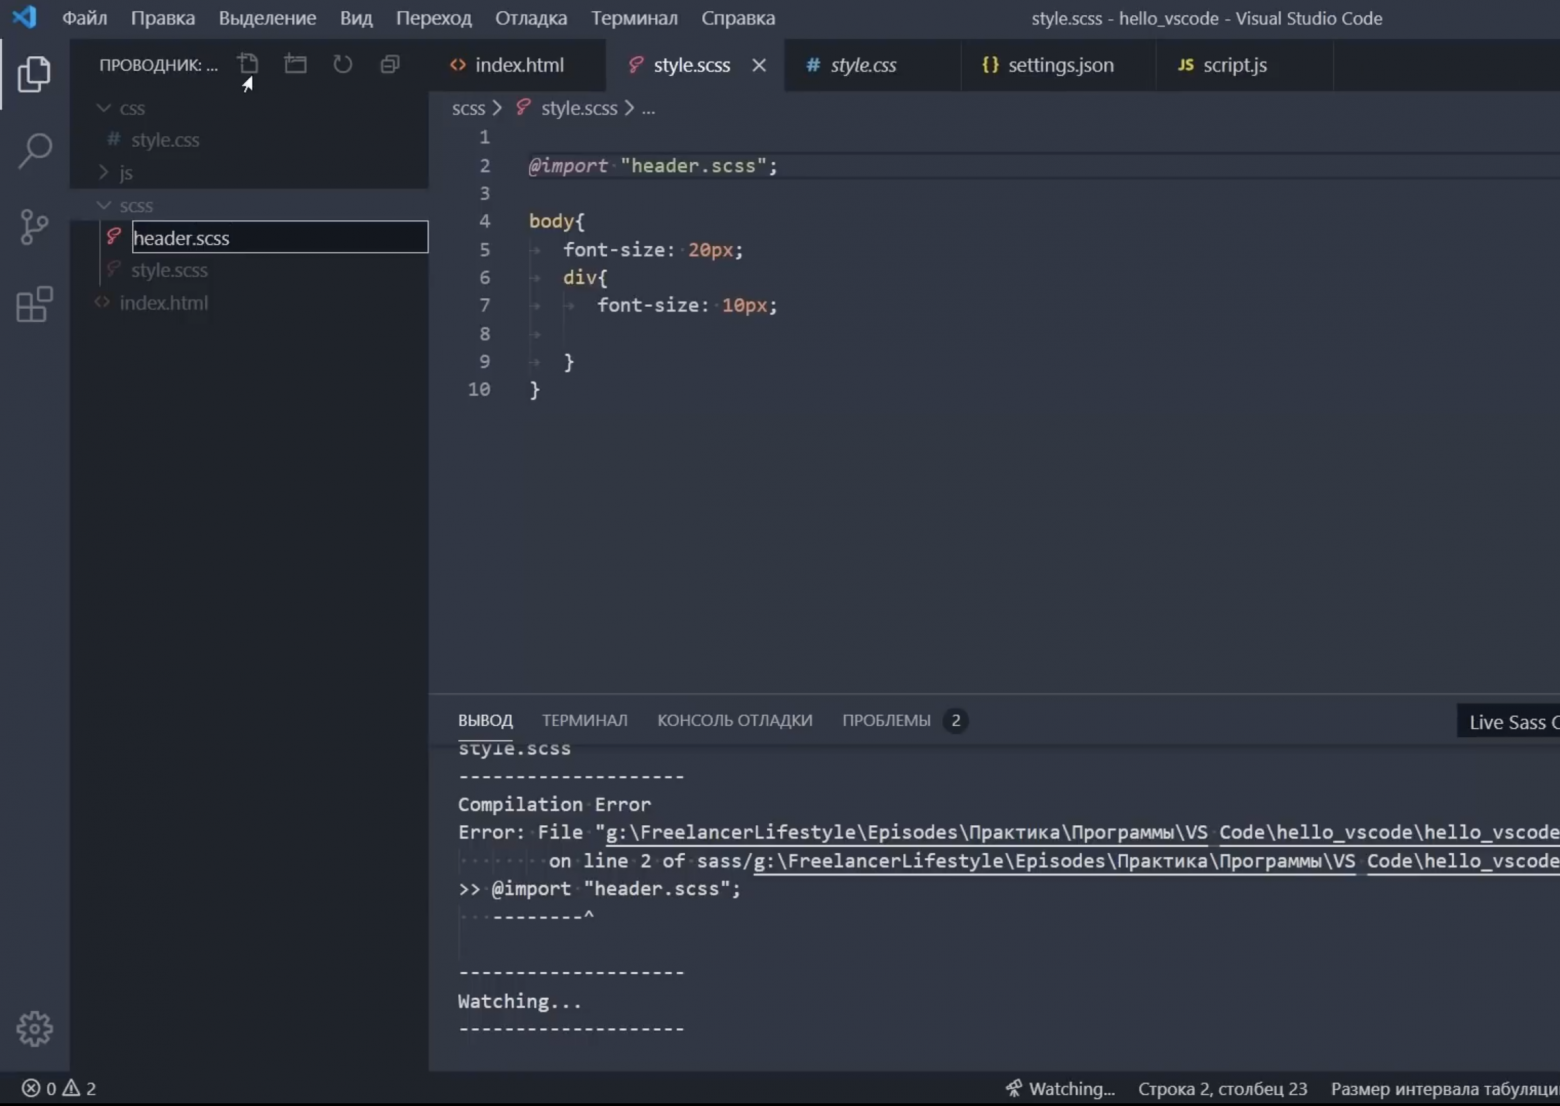
По поводу файлов, которые мы будем включать в style.scss. Мы знаем, что файлы в scss можно импортировать какие-то другие файлы. Пишем, как обычно — import «header.scss»
Сразу получаем ошибку, потому что такого файла не существует и все быстро исправляем. Так мы бы обычно и делали…
Что происходит? Когда я сохраняю header.scss у меня создается файл header.css. Но мне нужно, чтобы у меня был один файл style.css, который включает в себя и header, и многие другие файлы, которые я туда подключу. Удаляем header, это неправильно. Чтобы этого не было, мне нужно переименовать файл header.scss, указать вначале имени подчеркивание, а здесь при подключении указать подчеркивание и вообще убрать расширение.
Компилятор будет уже сам понимать, что с ним делать. В итоге, я сохраняю, у меня уже не создается отдельный файл header.css, но стили его собраны в одном файле. Теперь работать очень классно 🙂
Live Server
В комплекте с плагином Live Css Compiler сразу устанавливается плагин Live Server — один из самых полезных плагинов, который умеет создавать локальный сервер и автоматически обновляет нам страницу при редактировании. Если ты не пользуешься Live Css Compiler, то плагин Live Server нужно установить отдельно.
В поиске набираем его название, у нас он уже есть, установлен автоматически вместе с Live Css Compiler. Об этом говорит кнопку в строке состояния Go Live. Мы работаем с нашими файлами, когда мы хотим увидеть результат, перейдя в index.html нажимаем на Go Live и у нас запускается Браузер.
Я редактирую свою html файл, пишу “Hello”, сохраняю, нажимаю GoLive и сразу вижу результат в браузере.
То же самое будет происходить, когда мы будем менять файл стили. Сначала его нужно подключить. Набираю link, ищу link.css, тут нужно будет указать путь к нашему файлу. Кстати, помощник выбора пути уже встроен в редакторе.
Сохраняю, перехожу в файл стили, сохраняю и вижу, что все автоматически поменялось. Таким образом, скорость нашей работы существенно увеличивается.
SCSS IntelliSense
Покажу еще несколько интересных плагинов для препроцессора SaSS. Установим SCSS IntelliSense, этот плагин подсказывает нам интересные штуки во время работы с scss, также удобно при работе именно с этим синтаксисом.
SCSS Formatter
Форматирование можно отдельно установить для конкретного синтаксиса. Этот плагин форматирует sсss файлы. Также его можно подстроить.
Auto Complete Tag
Мегаполезный плагин в который входят Auto Rename Tag и Auto Close Tab. Несмотря на то, что VS Code умеет закрывать теги, плагин Auto Close Tab — умеет закрывать теги не только в html, но и в многих других языках. Auto Rename Tag — изменяет закрывающий элемент автоматически, если переименовать открывающий. Например, мне нужно изменить открывающий элемент на span и мы видим, что закрывающий элемент изменит название автоматически.
Bracket Pair Colorizer
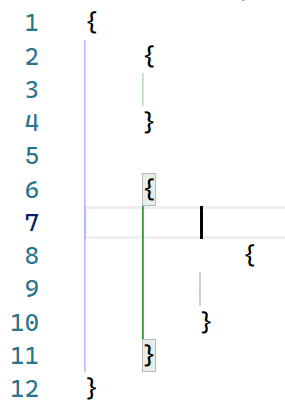
Он разукрашивает разными цветами наши скобочки, — квадратный, фигурные, любые. Разукрашивает разными цветами в зависимости от вложенности. Более того, когда мы находимся внутри скобок, он еще соединяет открывающую и закрывающую цветной вертикальной линией. Нам легко ориентироваться в коде, кроме того, он еще мегапозитивный, с классными цветами и работать приятней.
Indent Rainbow
Он тоже разукрашивает код, но не скобки, а отступы, что невероятно полезно для тех, кто работает в синтаксисе SaSS или с шаблонизатором pug, где отступы очень важны.
Better Comments
Плагин работает с комментариями. Обычные комментарии серые и невзрачные, но иногда нужно оставить пометки, обратить внимание и т.д. Когда плагин установлен, мы можем выделить комментарий, сделать чек-лист заданий, задать вопрос.
Ставим для чего-то очень важного —! — текст окрашен в красный, для списка ToDO — оранжевый, для вопроса —? — синий.
Все цвета можно настроить, есть готовый код с настройками в информации, его можно перенести и там подправить цвета под наши задачи.
Существуют ряд полезных плагинов, которые могут улучшить или заменить встроенный объект.
Набрав в поиске Color, можно найти очень много разных примочек для работы с цветом и выбрать для себя что-то полезное.
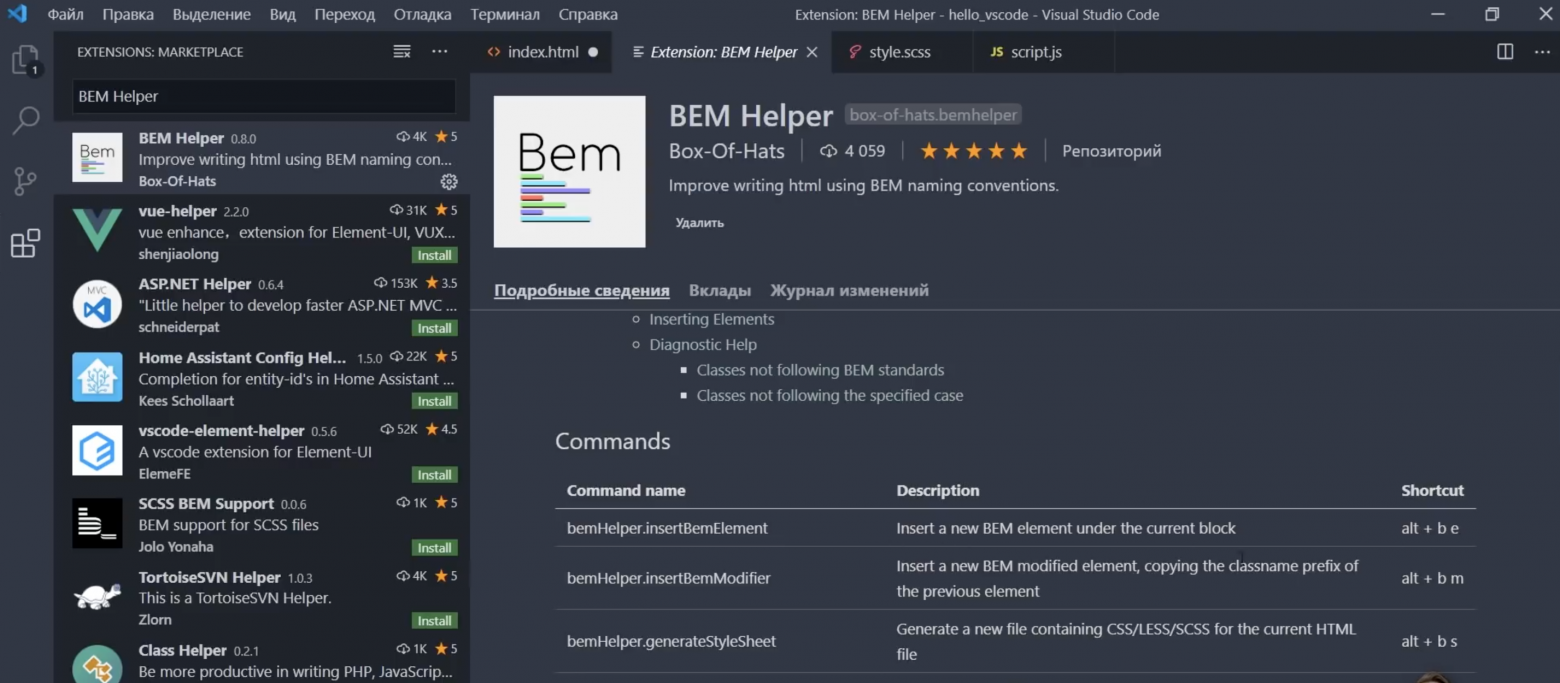
BEM Helper
Это помощник при работе с методологией BEM. Он умеет вставлять сразу новый элемент по методологии bem, учитывая родителя, учитывая блок. Может вставлять модификатор, помимо всего умеет формировать файл стилей, будь-то css или scss файл на основе bem-разметки в html коде.
Попробуем. Нажимаем Alt+B+E, у нас вставился объект, учитывая класс родителя, клас блока.
Как менять сочетания клавиш?
На примере этого плагина покажу как можно менять сочетания клавиш.
Допустим эти сочетания клавиш нас не устраивают. Мы копируем имя плагина, переходим в Управление > Сочетание клавиш и здесь ищем BEM Helper.
Например, мы хотим изменить сочетание клавиш для вставки элементов Insert Element. Кликаем два раза, можем указать тут любое сочетание клавиш, которое захотим.
Если сочетание клавиш занято, мы получим ошибку. Нужно смотреть, чтобы оно было свободно, иначе оно перезапишет вызов какой-то другой команды.
eCSStractor
Плагин, который помогает копировать классы из html в css\scss\sass. Установим его и сразу создадим сочетания клавиш, чтобы делать все быстро. Переходим в Управление > Сочетание клавиш, ищем наш плагин eCSStractor, видим несколько команд. Меня интересует команда eCSStractor Run (With BEM Nesting).
Нажимаем на команду, на плюсик, придумываем свободное сочетание Ctrl+Alt+1, нажимаем Enter, наши горячие клавиши присвоились.
Тестируем: переходим в наш html файл, выделяем блок с классами, нажимаем Ctrl+Alt+1, получаем сообщение, что наши классы скопировались.
Переходим в файл стилей и вставляем. Видим, что все работает.
Что делать, если нам нужно скопировать просто классы, но без BEM? Возвращаемся сочетания клавиш и нам нужно назначить сочетание Ctrl+Alt+2 например.
Тестим, выделяем, вставляем. Готово, теперь у нас есть две комбинации клавиш — по BEM и без BEM.
CSS Navigation
Отличный многофункциональный плагин, который связывает наши файлы стили с другими файлами. Во-первых, он будет подсказывать нам об имеющихся классах наших файлов стилей.
Например, мы создадим класс red. Когда мы пишем нашу разметку html, мы хотим здесь написать класс. Начинаем писать r и у нас сразу появляется подсказка, что такой класс есть и мы можем с ним работать.
Этот плагин позволяет очень быстро перемещаться между разметкой и нашими файлами стилей. Становимся в классы, нажимаем F12 и сразу перемещаемся в нужный файл стилей. При этом, абсолютно не важно, открытый или закрытый этот файл стилей.
Помимо этого, допустим, у нас есть какие-то медиа запросы, когда стиль используется несколько раз в разных местах. В таком случае когда мы нажимаем F12 у нас появится окошко выпадающее, где мы можем перемещаться между совпадениями классов, тут же их менять и быстро работать со стилями, не выходя из html-файла.
Это же окошко можно вызвать сочетанием Alt + F12
Image Preview
Позволяет быстро работать с изображениями в коде. Давайте я подключу картинку, после мы видим на полях появилась ее маленькая иконка. Когда длинный html-код, много картинок, мы можем ориентироваться, видеть что где у нас подключено. При наведении на путь картинки у нас появляется информационное окно, где мы можем открыть файл картинку, видим что это за картинка, а также некоторая информация о картинке.
Debugger for Chrome
Для отладки кода можно использовать не встроенный инструмент, а этот плагин и с его помощью делать отладку какого-то скрипта. При нажатии на F5 мы можем выбрать Chrome, вся отладка будет проводиться на основе этого браузера, Нужно его дополнительно настроить и пользоваться.
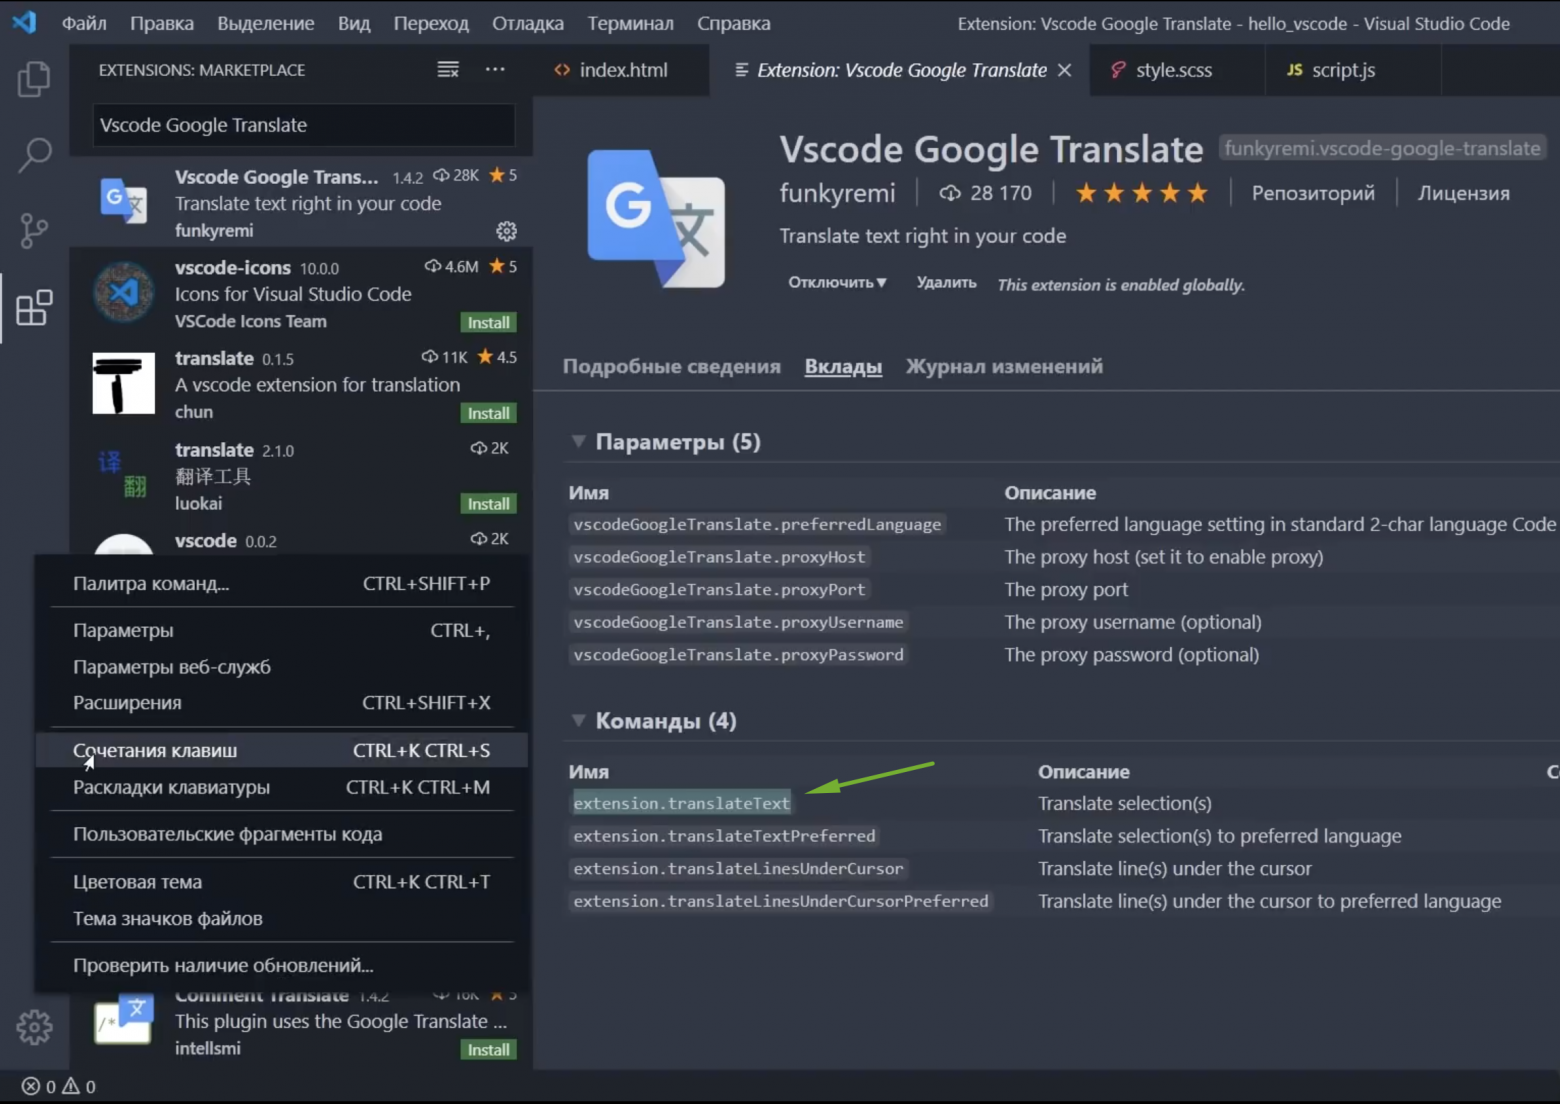
Vscode Google Translate или Google Translate
Позволяет переводить выделенный текст с одного языка на другой. Для его настройки переходим в плагин, ищем команду translate text.
Переходим в сочетания клавиш, вставляем команду, находим ее и задаем сочетание клавиш, допустим Shift+Alt+T.
Возвращаемся в наш html файл, выделяем слово hello, зажимаем Shift+Alt+T и получаем список языков. Далее выбираем язык, на который нужно перевести и получаем перевод.
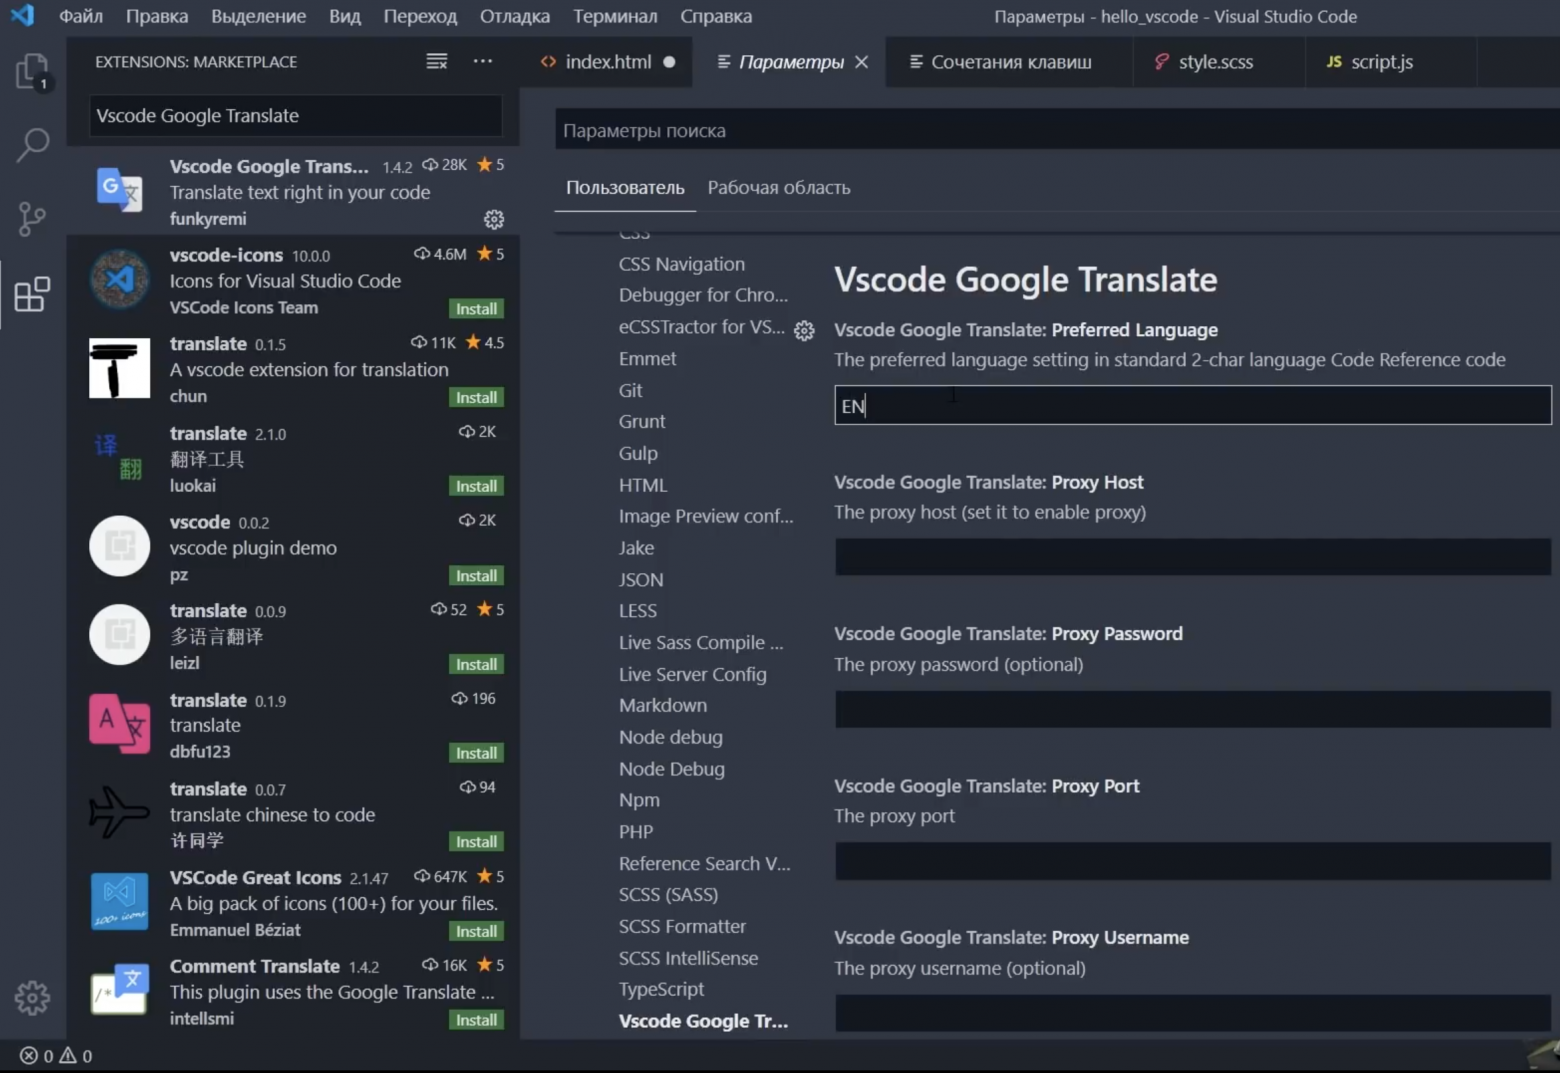
Если нам нужно переводить только с русского на английский, то можем зайти в Параметры > Расширения, найти этот плагин, указать основной язык, на который нужно переводить, например английский.
Возвращаемся в сочетание клавиш, сбросить старое сочетание клавиш и добавляем это сочетание клавиш на эту команду (Preffered). У нас есть русское слово, зажимаем Shift+Alt+T и сразу получаем английское. Я этим пользуюсь постоянно и поэтому рекомендую этот плагин.
Project Manager
Незаменим, если ты работаешь с множеством проектов, папок и т.д. Установим его и в панели действий появится иконка папочек. Это и есть наш Project Manager.
Мы можем сохранить наш проект, нажав на дискету, задать имя и теперь при нажатии на эту папочку у нас откроется наш проект. Также можно открыть его в новом окне редактора. Естественно, мы можем насоздавать тут множество проектов и быстро между ними переключаться, войдя на Project Manager и нажав на соответствующую папку.
Settings Sync
Настройка программы под себя дело не быстрое и требует усилий, и чтобы каждый раз не приходилось делать то же самое, например при переустановке Windows, существует плагин Settings Sync.
Он помогает хранить все настройки, в частности на GitHub и при установке новой версии программы мы получаем все настройки и плагины буквально за один клик.
Я плагин установил, нужно залогиниться с помощью GitHub, все ОК, я получил об этом сообщение.
Далее плагин предлагает мне выбрать один из существующих ключей, он у меня уже был и мне показывает, что я его обновлял три дня назад. Если ты пользуешься плагином в первый раз, эта синяя кнопка для тебя.
Нужно сохранить все то, что мы сегодня настроили. В информации о плагине есть сочетание Shift+Alt+U.
Нажимаю. В строке состояния видим, что работает плагин и далее получаем вывод в журнал отчет, что все загружено, все плагины, все хорошо.
Ну а сейчас я полностью удалю программу и попробую получить все настройки заново.
У меня чистая программа, теперь мне нужно установить плагин Settings Sync. Устанавливаю, далее нужно залогиниться с помощью GitHub. Здесь я могу выбрать свой существующий ключ.
Я его выбираю. Мне нужно все мои настройки получить, смотрю, какое сочетание клавиш мне для этого нужно — Shift+Alt+D.
Нажимаем, видим чтение удаленных данных, начинает что-то происходить. Спустя некоторое время я вижу, что моя программа выглядит точно так же, как она выглядела после того, как мы ее сегодня настроили. Некоторые плагины просят перезапустить программу, — позволяем. Отлично, вот у нас и русификатор, и все расширения, все как было и это заняло пару секунд.
Плагинов существует большое количество и я рассказал только о части. Помни, каждое расширение может влиять на производительность твоей программы.
Вот общий (более широкий) список полезных плагинов:
Auto Complete Tag (Auto Close Tag, Auto Rename Tag), Bracket Pair Colorizer, indent-rainbow, Better Comments, Guides, BEM Helper, CSS Navigation, eCSStractor for VSCode, Image preview, Live Sass Compiler, Live Server, Project Manager, SCSS BEM Support, SCSS Formatter, SCSS IntelliSense, Vscode Google Translate, SVG, SVG Font Previewer, jQuery Code Snippets, JavaScript Snippet Pack, jsflowchart, no jQuery Snippets, ESLint, Code Runner, Multiple clipboards for VSCode, WordPress Snippets, Live Pug Compiler, pug, Avocode, Google Fonts, GitLens — Git supercharged,
Settings Sync
Связать с GITHub
Лень читать? Тут видео версия.
Внимание! На ПК должен быть установлен Git.
Переходим на вкладку Система управления версиями, нажимаем на +, инициируя локальный репозиторий, выбираем папку с нашим проектом.
Тут мы видим изменения которые нам нужно применить. Жмем на +, чтобы применить сразу все изменения.
Нужно написать комит, жмем на галочку, пишем что-нибудь, нажимаем на Enter. Далее нужно создать репозиторий на GitHub.Переходим по ссылке Создать новый репозиторий, пишем название, жмем кнопку Создать. Даже нас интересуют эти две команды:
Копируем, переходим в редакторе и открываем терминал. Важно, чтобы мы находились внутри в папке проекта. Если это не так, нам нужно перейти в проводник, вызвать контекстное меню, указать пункт Открыть терминал. Вставляем наши две команды, нажимаем Enter.
Загрузки, готово. Теперь наш проект полностью связан с репозиторием Git. Если мы что-то начнем менять, мы увидим что здесь у нас появится значок 1, то есть изменен 1 файл в системе версий, опять нужно применить изменения, написать комит. Достаточно нажать Меню > Отправить и наш проект загрузится на репозиторий.
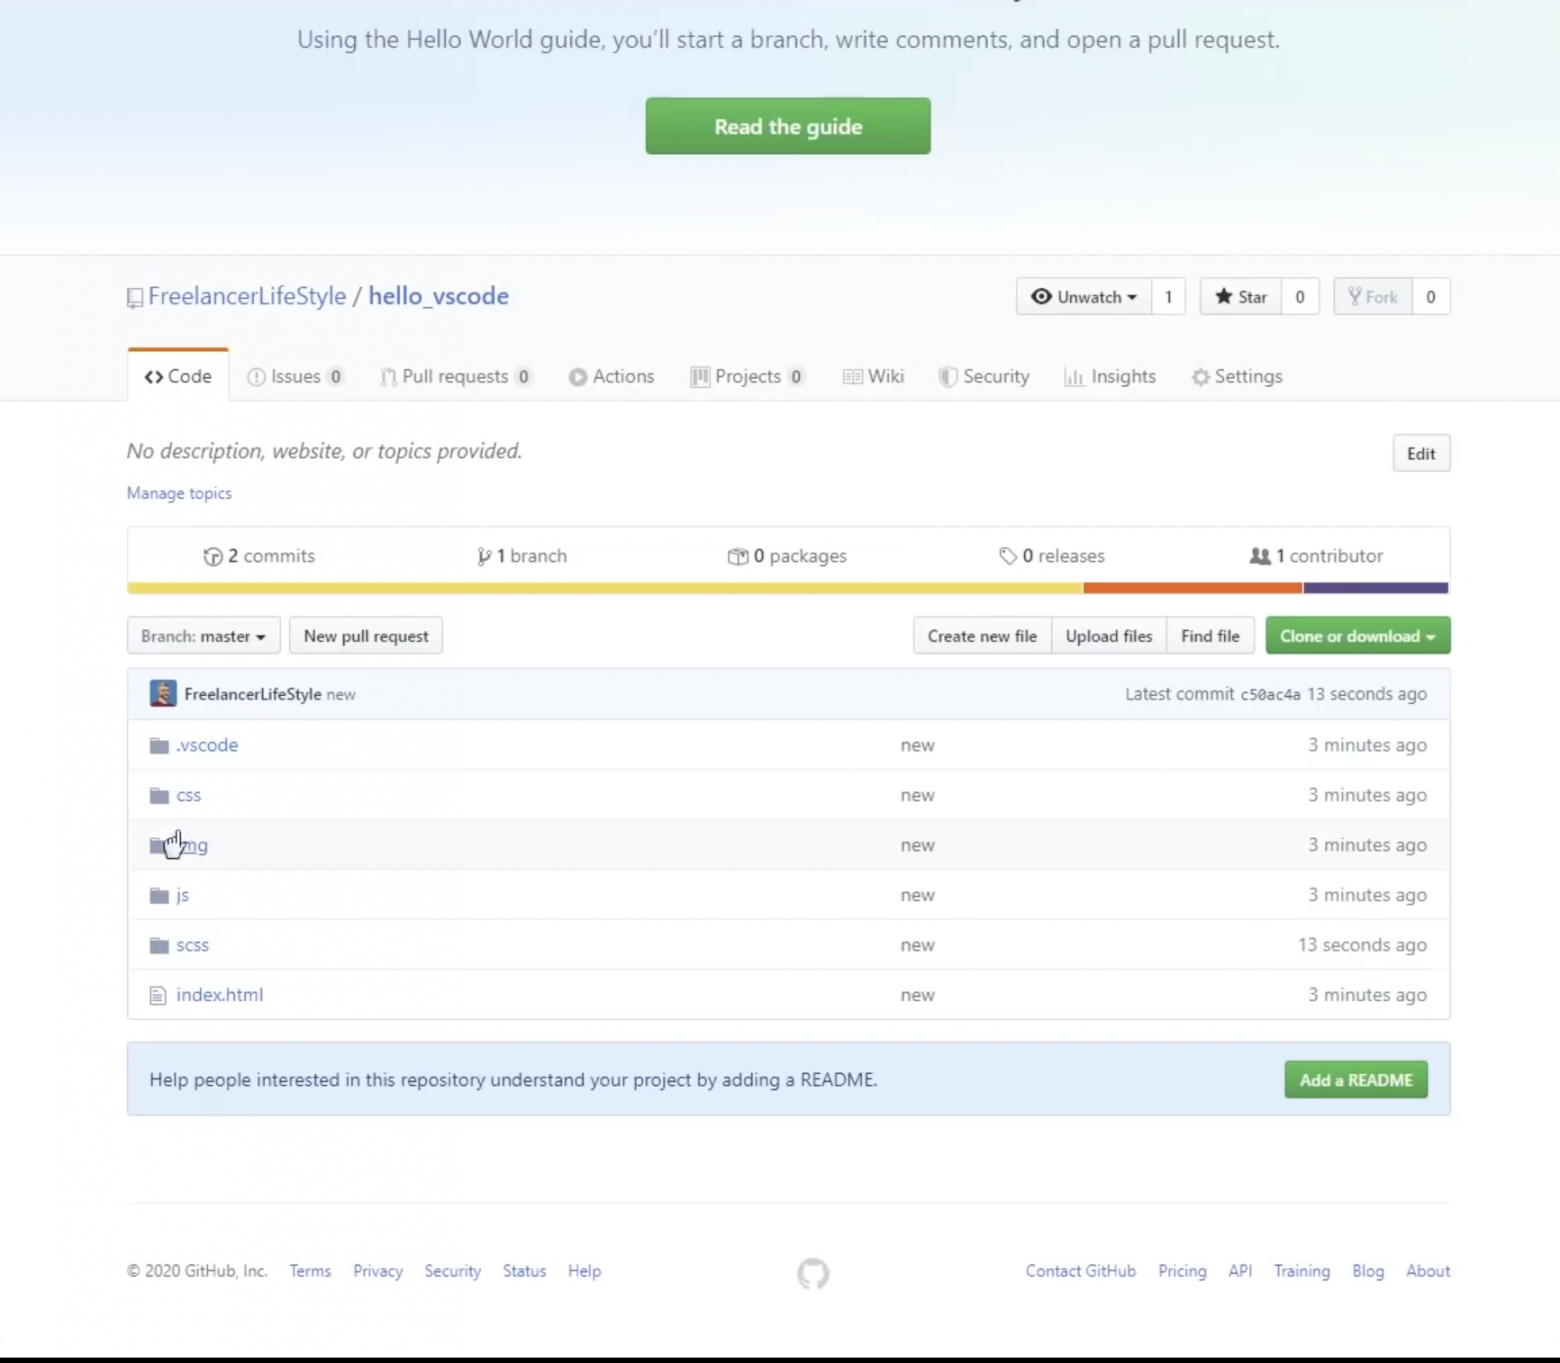
Войдя на GitHub, обновив страницу, мы увидим что все наши файлы и папки появились в репозитории на GitHub.
Дополнительно можно установить плагин GitLens, который существенно расширяет возможности системы управления контролем версий.
Все это только инструменты, и по большому счету абсолютно не важно, в каком именно редакторе ты работаешь — главное, — это твое мастерство.
Обучайся, развивайся, и помни — живи, а работай в свободное время!
Visual Studio Code – редактор кода для Linux, OS X и Windows
За свою долгую историю существования Microsoft выпустил немало инструментов разработки. Но так уж сложилось что на слуху у всех только лишь Visual Studio – большая и мощная IDE «комбайн» предназначенная для всего и вся. Развивается этот продукт уже более двух десятков лет и вобрал в себя самые разные функции. Многим этот инструментарий нравится и иногда даже задавали вопрос – будет ли перенесен Visual Studio на другие платформы. На что чаще всего получали ответ нет. Наверное, понятно почему, в целом такое портирование будет дорогим и неоправданно сложным, уж очень много всего в этой IDE завязано на Windows.
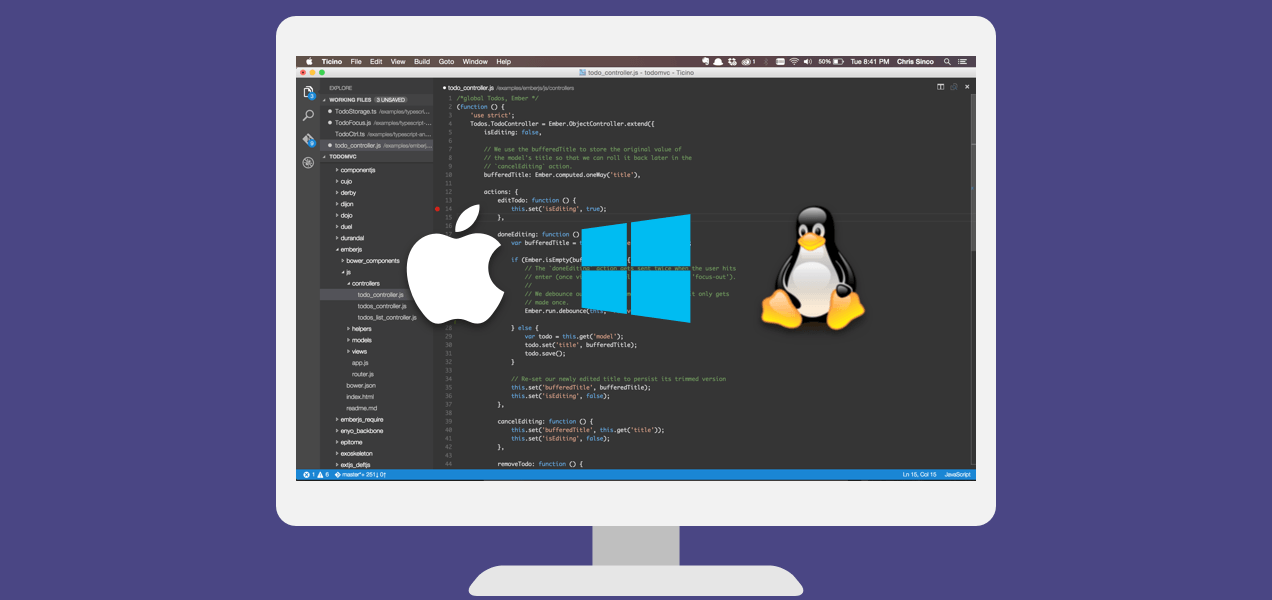
И вот, этой весной для многих неожиданностью было то что Microsoft представил новый продукт под названием Visual Studio Code, да еще и работающий сразу на трех платформах, Linux, OS X и Windows. Не замахиваясь на все функции полноценной IDE, внутри Microsoft решили переосмыслить подход, по которому строится основной инструментарий программиста и начали с самого главного – редактора кода. Visual Studio Code это именно редактор, но при этом обладающий функциями IDE, полагающийся на расширения.
Уже сейчас вы можете использовать Visual Studio Code для создания веб-проектов ASP.NET 5 или Node.js (в чем-то даже удобнее чем в «взрослой» Visual Studio), использовать различные языки, такие как JavaScript, TypeScript, C#, работать с пакетными менеджерами npm, скаффолдингом yeoman и даже осуществлять отладку. Плюсом ко всему будет отличный «интеллисенс», поддержка сниппетов кода, рефакторинг, навигация, многооконность, поддержка git и многое другое.
Установка Visual Studio Code
Mac OS X
Совет: если вы хотите чтобы Visual Studio Code стартовал из терминала добавьте в
Linux
Совет: если вы хотите чтобы Visual Studio Code стартовал из терминала добавьте на него ссылку
Windows
Совет: если вы хотите чтобы Visual Studio Code стартовал из терминала сделайте logon/logoff, соответствующие пути к файлу прописываются в переменной PATH самим установщиком
Дополнительные инструменты
Без инструментария Visual Studio Code годится разве что для простого редактирования файлов, для полноценной работы понадобится сопутствующий инструментарий, который зависит от ваших целей и задач:
Начало работы
Чтобы попробовать в деле VS Code, проще всего создать веб-проект Node. Для этого установите Node на свой компьютер (ссылка выше) и выполните следующие команды:
В текущем каталоге будет создан проект, который можно будет открыть в Visual Studio Code. Для того чтобы проверить, что все работает как надо, выполните команду npm start и запустите браузер по адресу http://localhost:3000.
После всех этих действий просто запустите VS Code в папке с проектом
Если вы хотите попробовать возможности VS Code на примере ASP.NET 5 то можете воспользоваться инструкцией по адресу https://code.visualstudio.com/Docs/ASPnet5.
Базовые возможности Visual Studio Code
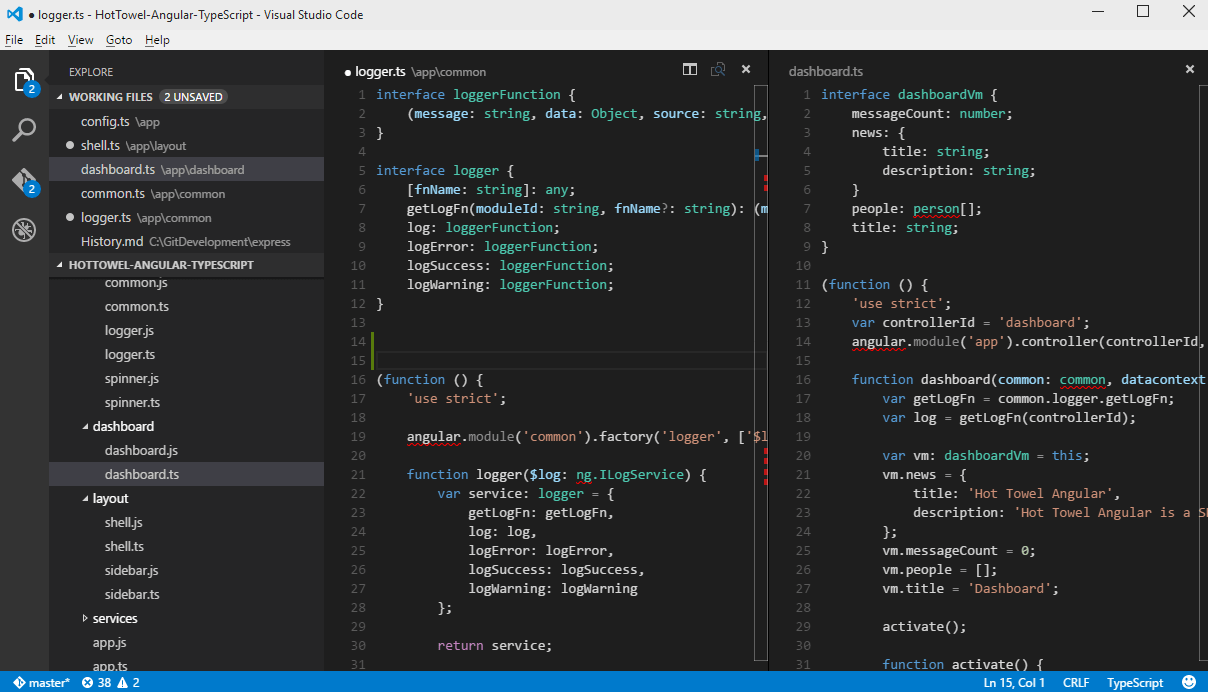
Как и многие редакторы кода, VS Code использует распространенную схему расположения основных элементов – слева обозреватель файлов, справа редактор кода. В дополнение к этому есть специфичные элементы, обеспечивающие навигацию и выполнение специальных команд.
Файлы, папки, и проекты
Расположение основных элементов
VS Code обладает интуитивно понятной и простой схемой расположения основных элементов. Интерфейс разделен на четыре основных блока, это:
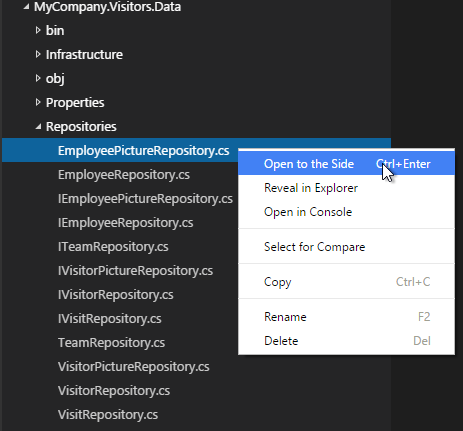
Редактор VS Code может открыть для редактирования на экране до трех файлов одновременно, располагая их друг за другом справа. Открыть дополнительные редакторы можно различными способами:
Ctrl (Mac: Cmd) и кликнуть на файле в обозревателе
Ctrl+\ для того чтобы разделить активный текущий редактор на два
Open to the Side в контекстном меню файла в обозревателе
Совет: Вы можете переместить сайдбар слева на право с помощью меню View, Move Sidebar а так же включить его видимость с помощью клавиатуры (Ctrl+B).
Палитра команд
Самым главным инструментом взаимодействия с редактором в VS Code является палитра команд. Вызвать ее можно через клавиатуру, нажав на комбинацию Ctrl+Shift+P. Множество команд перечисленных в палитре тоже привязаны к клавишам.
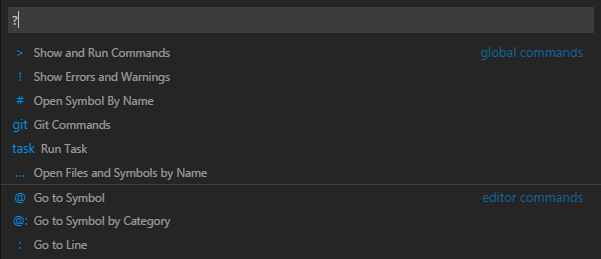
Введите в строку команды знак вопроса? и тогда вы получите перечень команд которые работают в текущем контексте:
Некоторые часто используемые команды:
Обозреватель
Обозреватель предназначен для открытия и управления файлами находящимися в папке вашего проекта. Вы можете осуществлять множество привычных операций по созданию, изменению имени, удалению файлов и папок, и их перемещению.
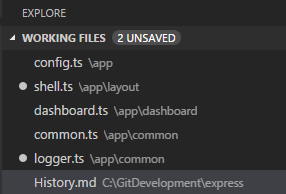
Файлы, которые вы редактировали или открывали двойным щелчком в обозревателе, помещаются в верхнюю часть обозревателя и получают статус Working files:
Автосохранение
По умолчанию, VS Code работает в режиме явного сохранения, которое вы можете выполнить, нажав на комбинацию Ctrl+S. Этот режим совместим с большинством инструментов следящих за статусом файлов (например bower). Можно включить и режим автоматического сохранения (Auto Save), нажав Ctrl+Shift+P и набрать auto.
Поиск
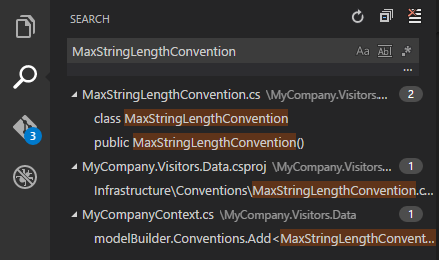
Нажимите Ctrl+Shift+F и введите интересующую вас фразу. Результаты поиска будут сгруппированы, в дополнение вы можете развернуть узел группы чтобы посмотреть множественные вхождения. В строке поиска поддерживаются регулярные выражения.
Более детальный поиск может быть осуществлен с помощью команды Ctrl+Shift+J. Введите в дополнительные поля критерии поиска.
Возможности редактора
Подсказки IntelliSence
Где бы вы не находились в вашем коде, нажав на Ctrl+Space будет выведено окно подсказки IntelliSence. При наборе кода редактор будет показывать его автоматически.
Подсказки параметров
Для перегруженных функций вы можете листать варианты реализации используя клавиши Up и Down.
Сниппеты кода
VS Code поддерживает аббревиатуры Emmet. Вы можете использовать их при редактировании файлов HTML, Razor, CSS, Less, Sass, XML или Jade. Основной перечень аббревиатур можно посмотреть по адресу http://docs.emmet.io/cheat-sheet/.
Переход к определению символа
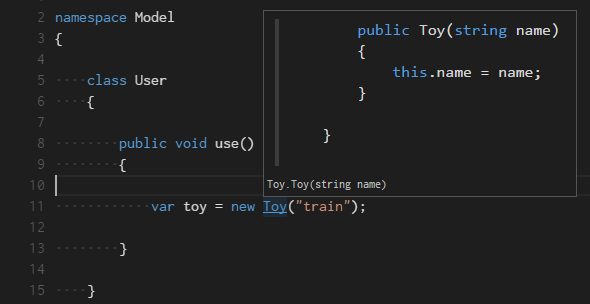
Нажав на F12 вы перейдете к определению символа. Если нажать Ctrl и провести курсором по символу вы увидите определение в дополнительном окне.
Переход к методу или переменной
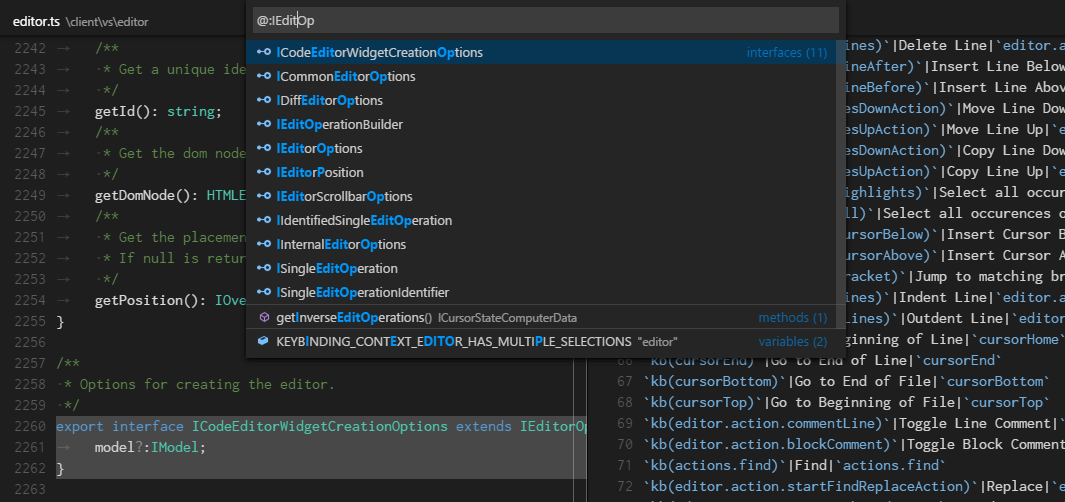
Нажав на Ctrl+Shift+O вы откроете перечень методов в файле, в дополнение вы можете нажать двоеточие: и методы будут сгруппированы по типу. Нажав на Up и Down выберите нужный метод и курсор в редакторе перейдет на строку где находится выбранный метод.
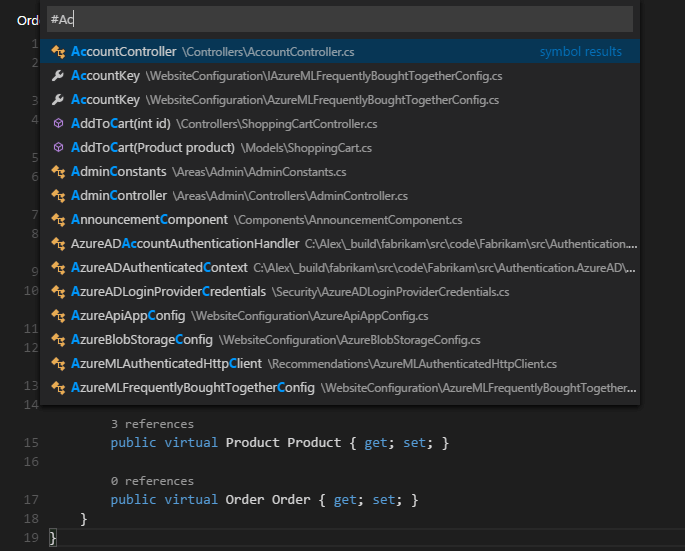
Для языков C# и TypeScript вы можете использовать комбинацию Ctrl+T и набрать нужный метод или переменную, при этом будет осуществлен поиск по всем файлам в проекте.
Просмотр определения символа
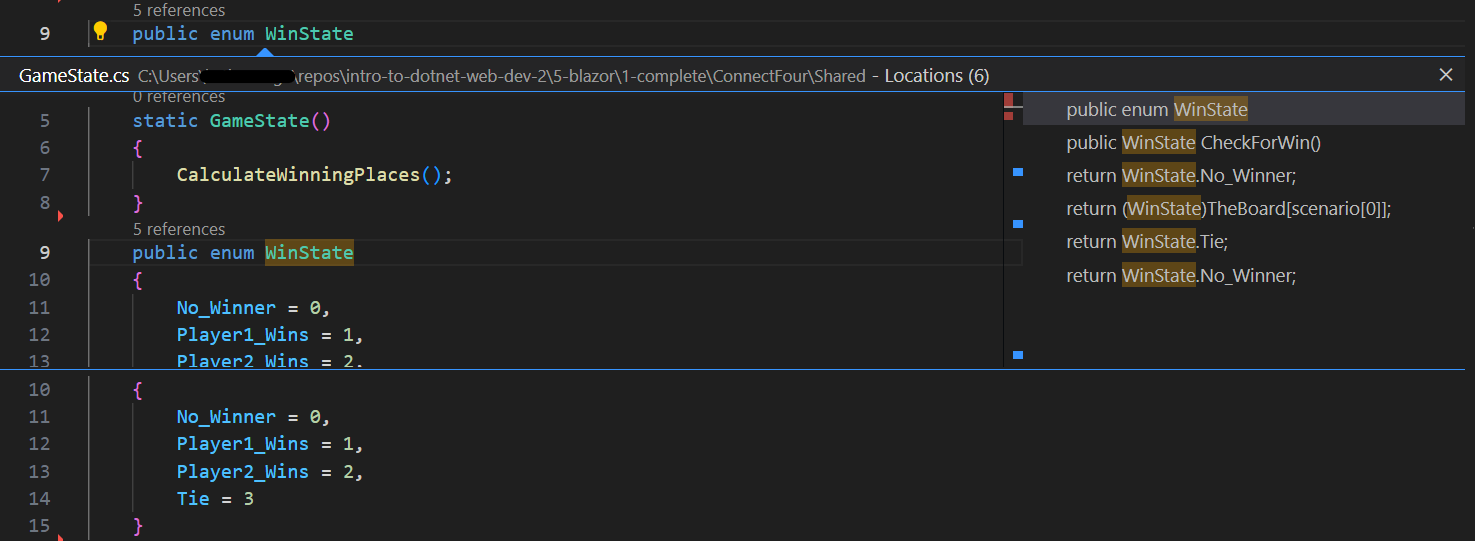
Если вам необходимо быстро посмотреть на определение символа или на референсы, для того чтобы вспомнить детали реализации или использования, можно использовать поиск или переход к определению символов, что не всегда удобно так как переключает контекст.
В этом случае можно воспользоваться командами Reference Search (Shift+F12) или Peek Definition (Alt+F12) и результаты поиска будут отображаться в инлайн окошке:
Переименование методов и переменных
Нажав F2 вы можете изменить имя метода или переменной. Стандартная операция рефакторинга, но пока она поддерживается только для языков C# и TypeScript.
Отладка
В VS Code входит отладчик. Его возможности пока ограничены, и работают не на всех платформах. Тем не менее, вы можете использовать отладчик для языков JavaScript и TypeScript на всех платформах, а для C# и F# на платформах OS X и Linux.
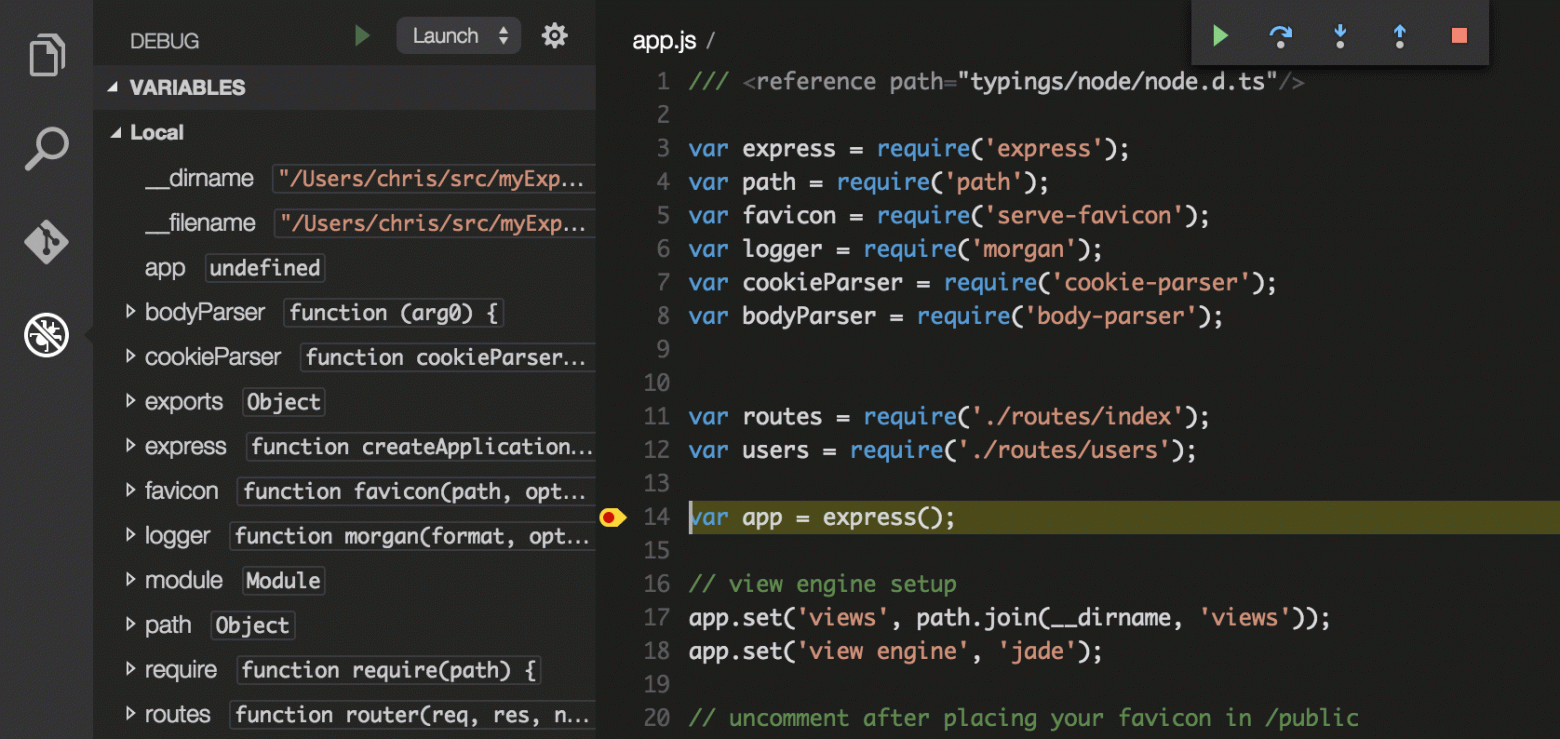
Сохраните конфигурационный файл и выберите пункт Launch в меню, установите точку останова и нажмите F5 для старта отладки.
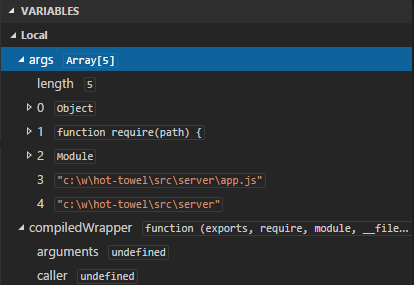
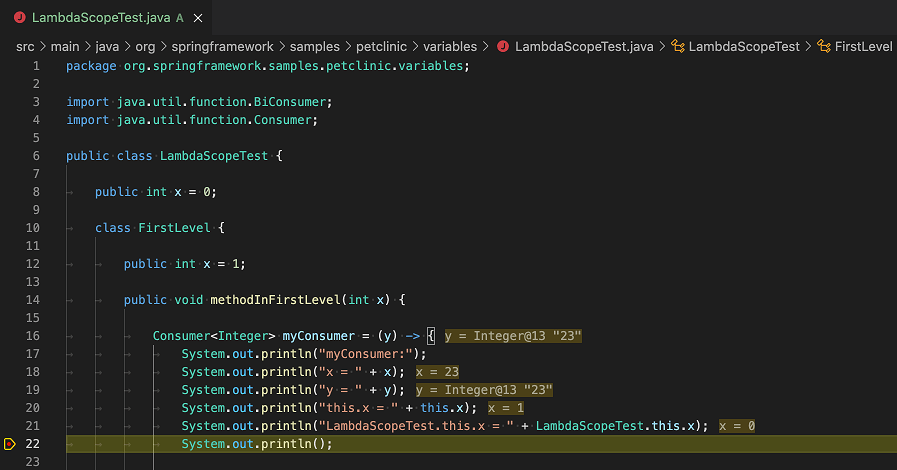
Отладчик позволяет просматривать значения текущих переменных:
Более подробно о возможностях отладчика можно почитать по адресу https://code.visualstudio.com/Docs/debugging в том числе о том как сконфигурировать Mono для отладки C# и F# кода на платформах OS X и Linux.
Контроль версий
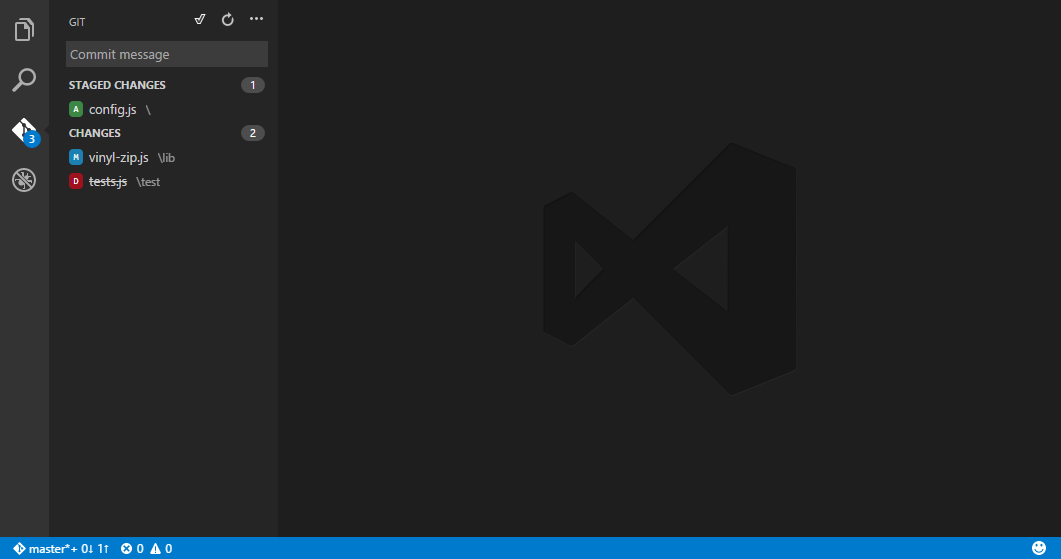
VS Code интегрирован с системой контроля версий git, и поддерживает большинство команд. В версии 0.5 был зафиксирован ряд ошибок связанных с интеграцией. Поддерживаются локальные и удаленные репозитарии.
Совет: установите credential helper для того чтобы не получать постоянные запросы на ввод данных учетной записи https://help.github.com/articles/caching-your-github-password-in-git/
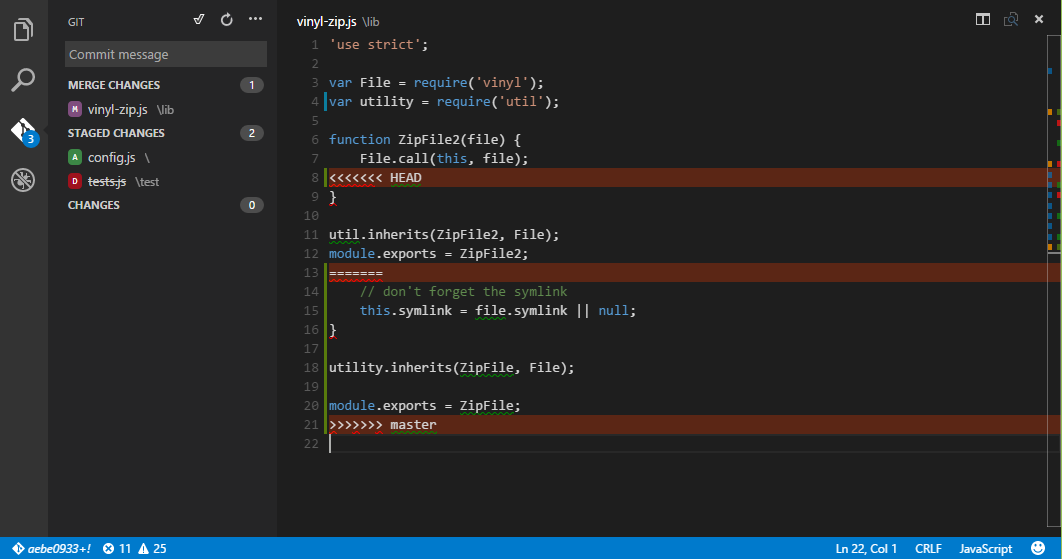
Конфликты
VS Code позволяет осуществлять слияния и разрешение конфликтов при работе с системой контроля версий:
Downloads
Visual Studio 2022
Community
Powerful IDE, free for students, open-source contributors, and individuals
Professional
Enterprise
Scalable, end-to-end solution for teams of any size
Preview
Get early access to latest features not yet in the main release
Preview
Get early access to latest features not yet in the main release.
A standalone source code editor that runs on Windows, macOS, and Linux. The top pick for Java and web developers, with tons of extensions to support just about any programming language.
By using Visual Studio Code you agree to its license & privacy statement.
Still not sure which tool is best for you? We can help
Visual Studio Code for Windows
Lightweight yet powerful source code editor with tons of extensions for many languages and runtimes.
Hundreds of programming languages supported
Visual Studio Code for Mac
Hundreds of programming languages supported
Visual Studio for Mac
A complete array of development tools and features in native macOS experience for every stage of your software development.
Visual Studio Code for the Web
Visual Studio Code for the Web provides a free, zero-install Microsoft Visual Studio Code experience running entirely in your browser, allowing you to quickly and safely browse source code repositories and make lightweight code changes. To get started, go to https://vscode.dev in your browser.
VS Code for the Web has many of the features of VS Code desktop that you love, including search and syntax highlighting while browsing and editing, along with extension support to work on your codebase and make simpler edits. In addition to opening repositories, forks, and pull requests from source control providers like GitHub and Azure Repos (in preview), you can also work with code that is stored on your local machine.
VS Code for the Web runs entirely in your web browser, so there are certain limitations compared to the desktop experience, which you can read more about below.
Relationship to VS Code desktop
VS Code for the Web provides a browser-based experience for navigating files and repositories and committing lightweight code changes. However, if you need access to a runtime to run, build, or debug your code, or you want to use platform features such as a terminal, we recommend moving your work to the desktop application or GitHub Codespaces for the full capabilities of VS Code. In addition, VS Code desktop lets you run extensions that aren’t supported in the web version, and use a full set of keyboard shortcuts not limited by your browser.
When you’re ready to switch, you’ll be able to «upgrade» to the full VS Code desktop experience with a few clicks.
Opening a project
By navigating to https://vscode.dev, you can create a new local file or project, work on an existing local project, or access source code repositories hosted elsewhere, such as on GitHub and Azure Repos (part of Azure DevOps).
To work with both GitHub and Azure Repos, VS Code for the Web supports two routes, vscode.dev/github and vscode.dev/azurerepos :
Azure Repos: https://vscode.dev/azurerepos/organization/project/repo
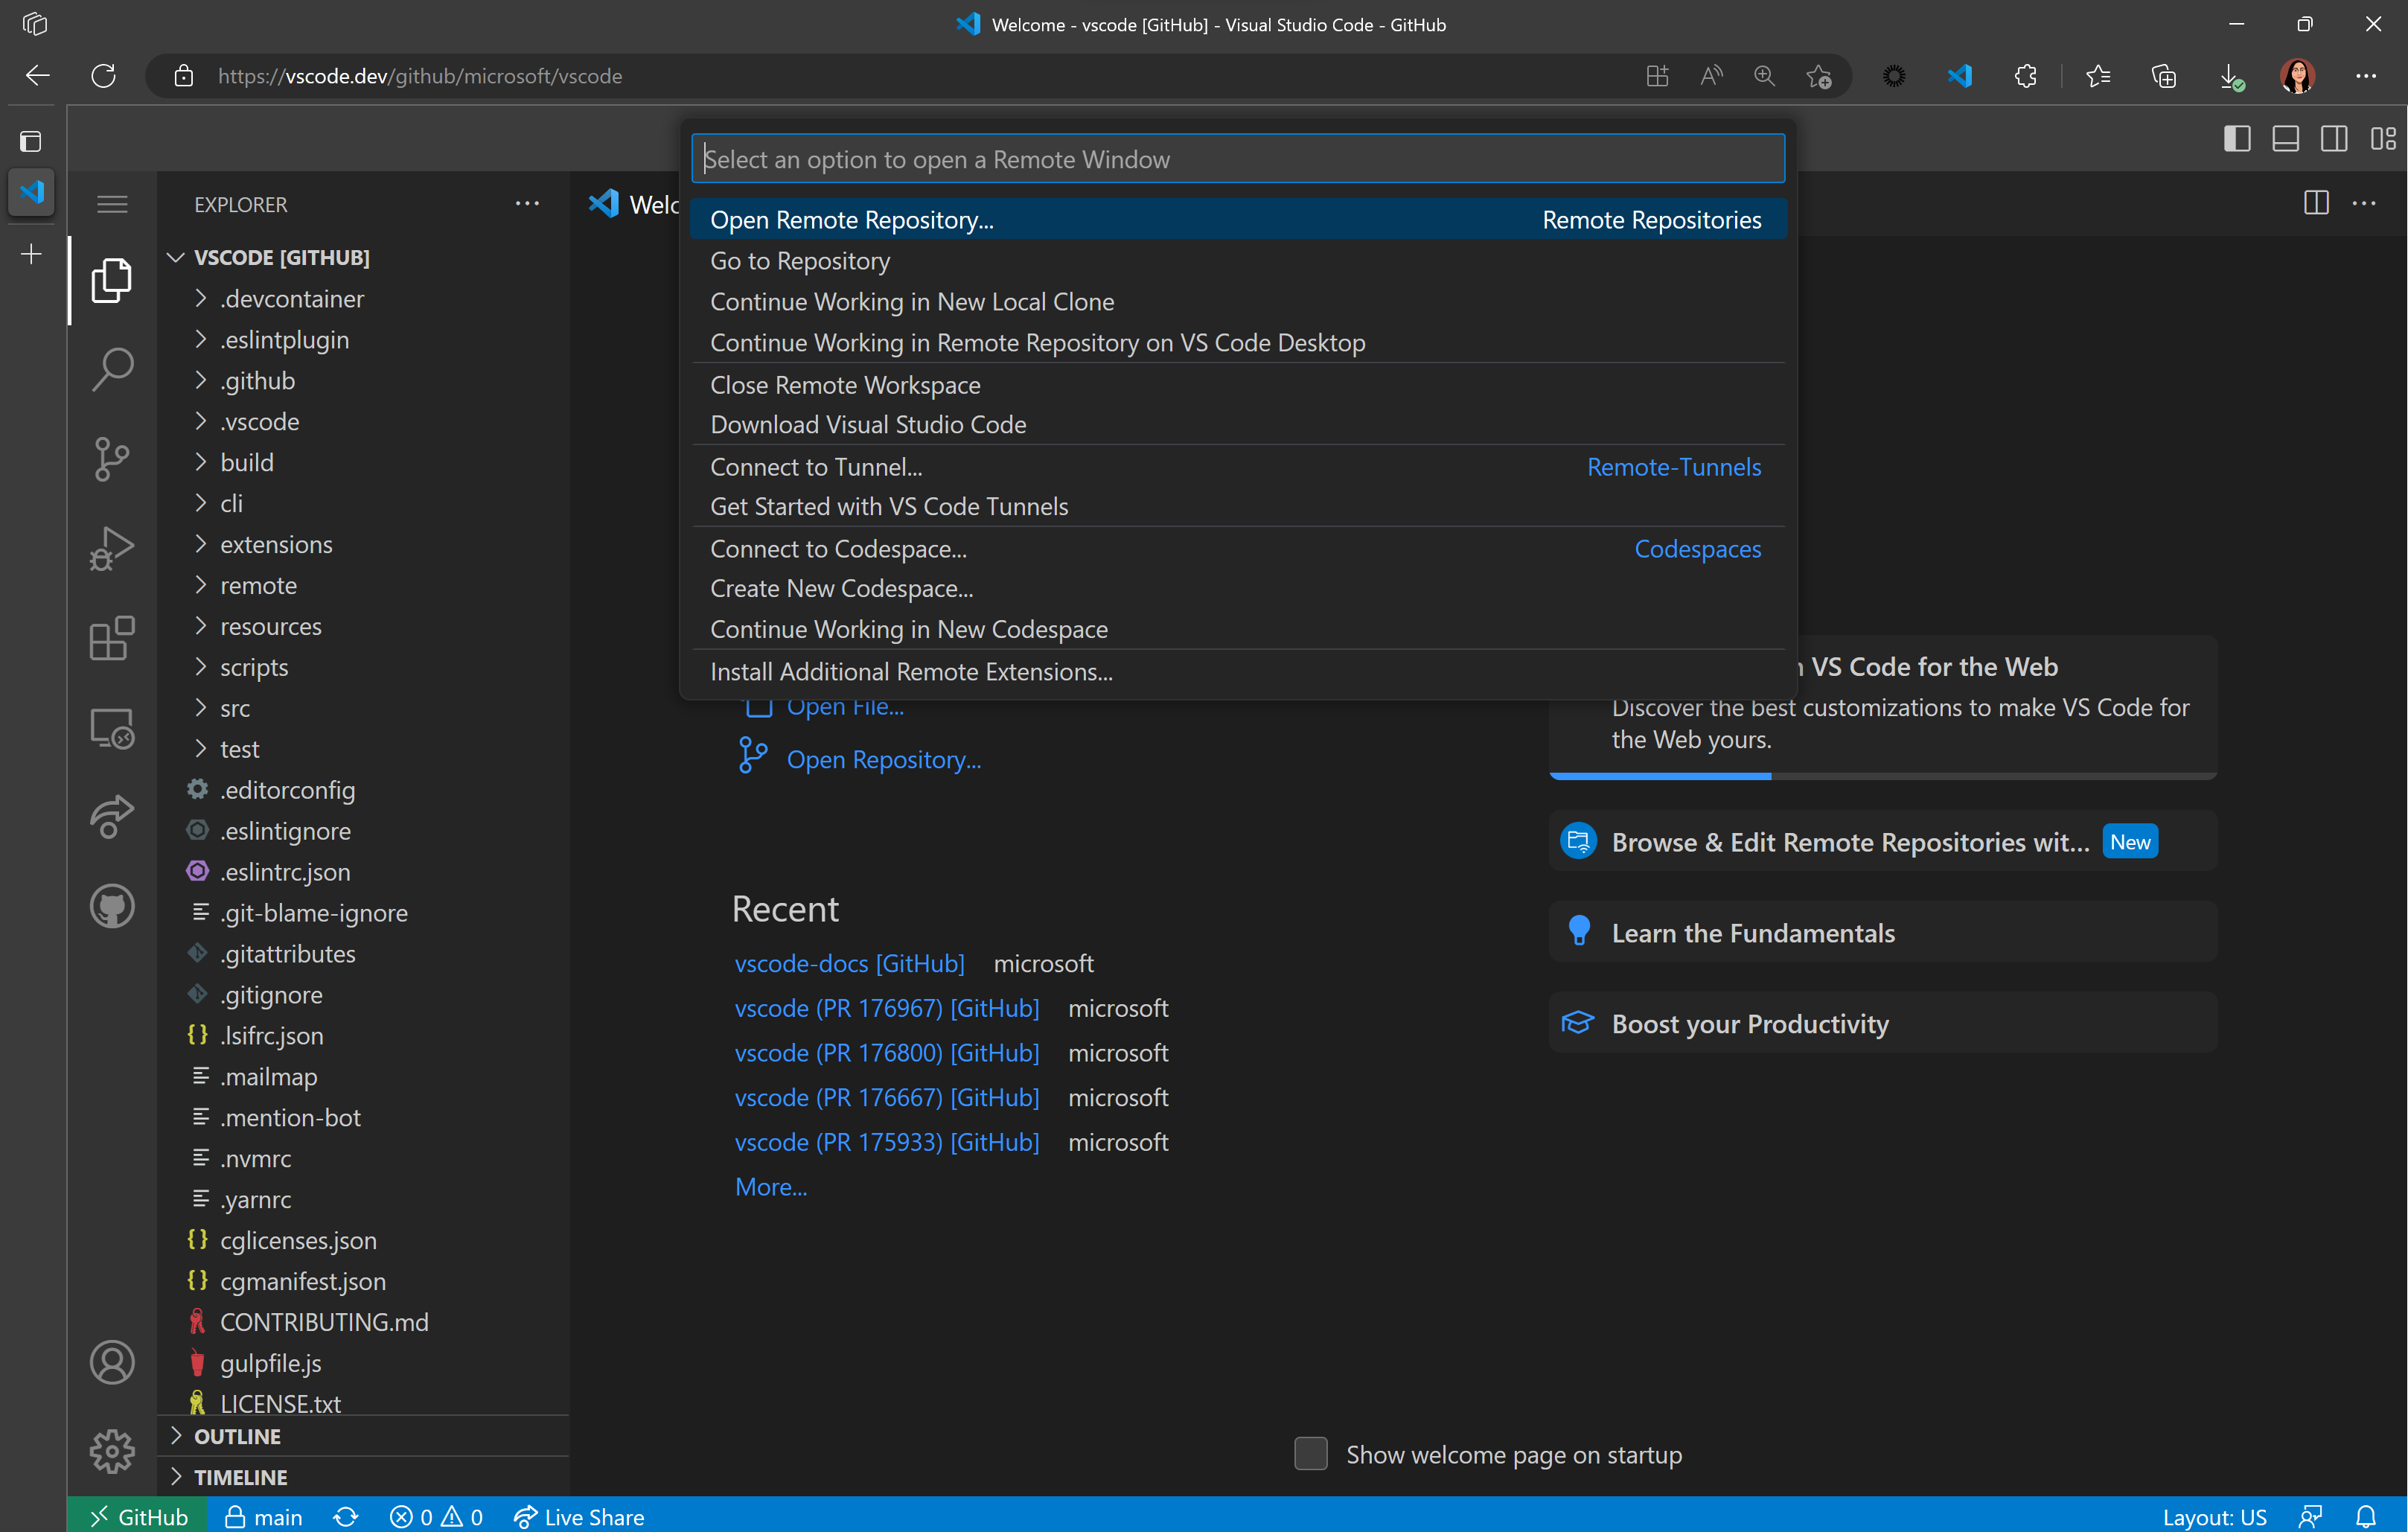
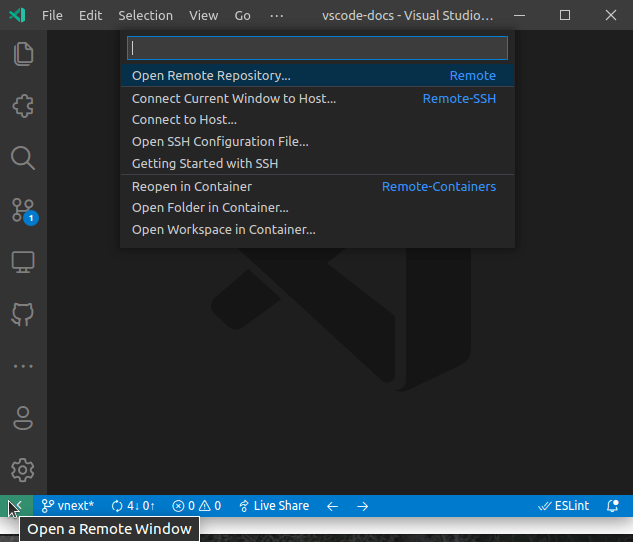
If you’re already in VS Code for the Web at https://vscode.dev, you can alternatively navigate to different repos via the GitHub Repositories extension commands. Select the remote indicator in the lower left of the Status bar, and you’ll be presented with the Open Remote Repository. command.
GitHub Repositories is the core component that provides the ability to remotely browse and edit a repository from within the editor.
Rather than cloning your work, GitHub Repositories creates a virtual file system to access repositories and pull requests, allowing you to become productive quickly without needing to pull code onto your local machine. You can learn more about the extension in our GitHub Repositories guide.
Note: The GitHub Repositories extension works in VS Code desktop as well to provide fast repository browsing and editing.
You can create a new file in the web just as you would in a desktop VS Code environment, using File > New File from the Command Palette ( F1 ).
Azure Repos (preview)
Support for Azure Repos (part of Azure DevOps) in Visual Studio Code for the Web is in preview, and the experience will continue to grow and evolve over time.
You can open any repository, branch, or tag from Azure Repos in VS Code for the Web by prefixing vscode.dev to the Azure Repos URL.
Current limitations
Azure Repos support is currently read-only. Commit, branch, fork, and PR actions are disabled in the Source Control view and Command Palette.
More custom URLs
Like in the desktop, you can customize VS Code for the Web through a rich ecosystem of extensions that support just about every back end, language, and service. Unlike in the desktop, it’s easy for us to deliver customized experiences with pre-installed extensions through unique vscode.dev URLs (like vscode.dev/github and vscode.dev/azurerepos described above).
Themes
For instance, you can go to https://vscode.dev/theme/sdras.night-owl to experience the Night Owl theme without having to go through the download and install process.
Note: The color theme URL scheme works for themes that are fully declarative (no code).
As a theme author, you can add the following badge to your extension readme to allow users to easily try out your theme in VS Code for the Web (replacing with your theme extension’s unique identifier):
Visual Studio Live Share
Live Share guest sessions are available in the browser through the https://vscode.dev/liveshare URL. The sessionId will be passed to the extension to make joining a seamless experience.
Continue working in a different environment
In some cases, you will want to access a different environment that has the ability to run code. You can switch to working on a repository in a development environment that has support for a local file system and full language and development tooling.
The GitHub Repositories extension makes it easy for you to clone the repository locally with the GitHub Repositories: Continue Working on. command available from the Command Palette ( F1 ) or by clicking on the Remote indicator in the Status bar.
Use your own compute power with the VS Code Server
You may develop against another machine in VS Code for the Web using the VS Code Server.
The VS Code Server is a private preview service you can run on a remote development machine, like your desktop PC or a virtual machine (VM). It allows you to securely connect to that remote machine from anywhere through a vscode.dev URL, without the requirement of SSH. This lets you «bring your own compute» to vscode.dev, enabling additional scenarios like running your code in the browser.
You may learn more about the VS Code Server in its documentation.
Safe exploration
VS Code for the Web runs entirely in your web browser’s sandbox and offers a very limited execution environment.
When accessing code from remote repositories, the web editor doesn’t «clone» the repo, but instead loads the code by invoking the services’ APIs directly from your browser; this further reduces the attack surface when cloning untrusted repositories.
When working with local files, VS Code for the Web loads them through your browser’s file system access APIs, which limit the scope of what the browser can access.
Saving and sharing work
When working on a local file in the web, your work is saved automatically if you have Auto Save enabled. You can also save manually as you do when working in desktop VS Code (for example File > Save).
When working on a remote repository, your work is saved in the browser’s local storage until you commit it. If you open a repo or pull request using GitHub Repositories, you can push your changes in the Source Control view to persist any new work.
Run anywhere
Similar to GitHub Codespaces, VS Code for the Web can run on tablets, like iPads.
Language support
Language support is a bit more nuanced on the web, including code editing, navigation, and browsing. The desktop experiences are typically powered by language services and compilers that expect a file system, runtime, and compute environment. In the browser, these experiences are powered by language services running in the browser that provide source code tokenization and syntax colorization, completions, and many single-file operations.
Generally, experiences fall into the following categories:
You can determine the level of language support in your current file through the Language Status Indicator in the Status bar:
Limitations
Since VS Code for the Web runs completely within the browser, some experiences will naturally be more constrained when compared to what you can do in the desktop app. For example, the terminal and debugger are not available, which makes sense since you can’t compile, run, and debug a Rust or Go application within the browser sandbox.
Extensions
Only a subset of extensions can run in the browser. You can use the Extensions view to install extensions in the web, and extensions that cannot be installed will have a warning icon and Learn Why link. We expect more extensions to become enabled over time.
When you install an extension, it is saved in the browser’s local storage. You can ensure your extensions are synced across VS Code instances, including different browsers and even the desktop, by enabling Settings Sync.
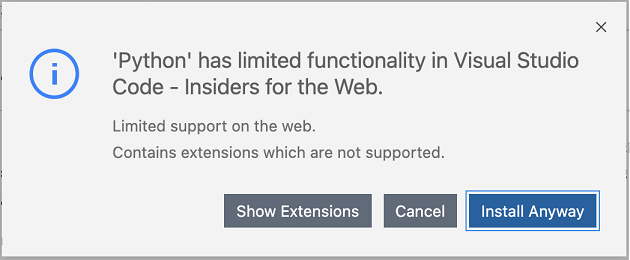
When an Extension Pack contains extensions that do not run in the browser sandbox, you will get an informational message with the option to see the extensions included in the pack.
When extensions are executed in the browser sandbox, they are more restricted. Extensions that are purely declarative, such as most themes, snippets, or grammars, can run unmodified and are available in VS Code for the Web without any modification from the extension authors. Extensions that are running code need to be updated to support running in the browser sandbox. You can read more about what is involved to support extensions in the browser in the web extension authors guide.
There are also extensions that run in the browser with partial support only. A good example is a language extension that restricts its support to single files or the currently opened files.
File system API
Edge and Chrome today support the File System API, allowing web pages to access the local file system. If your browser does not support the File System API, you cannot open a folder locally, but you can open files instead.
Browser support
You can use VS Code for the Web in Chrome, Edge, Firefox, and Safari.
Webviews might appear differently or have some unexpected behavior in Firefox and Safari. You can view issue queries in the VS Code GitHub repo to track issues related to specific browsers, such as with the Safari label and Firefox label.
There are additional steps you can take to improve your browser experience using VS Code for the Web. Review the Additional browser setup section for more information.
Mobile support
You can use VS Code for the Web on mobile devices, but smaller screens may have certain limitations.
Keybindings
Certain keybindings may also work differently in the web.
| Issue | Reason |
|---|---|
| ⇧⌘P (Windows, Linux Ctrl+Shift+P ) won’t launch the Command Palette in Firefox. | ⇧⌘P (Windows, Linux Ctrl+Shift+P ) is reserved in Firefox. As a workaround, use F1 to launch the Command Palette. |
| ⌘N (Windows, Linux Ctrl+N ) for new file doesn’t work in web. | ⌘N (Windows, Linux Ctrl+N ) opens a new window instead. As a workaround, you can use Ctrl+Alt+N ( Cmd+Alt+N on macOS). |
| ⌘W (Windows, Linux Ctrl+W ) for closing an editor doesn’t work in web. | ⌘W (Windows, Linux Ctrl+W ) closes the current tab in browsers. As a workaround, you can use Ctrl+Shift+Alt+N ( Cmd+Shift+Alt+N on macOS). |
| ⇧⌘B (Windows, Linux Ctrl+Shift+B ) will not toggle the favorites bar in the browser. | VS Code for the Web overrides this and redirects to the «Build» menu in the Command Palette. |
Additional browser setup
There are additional browser configuration steps you can take when working with VS Code in a browser.
Opening new tabs and windows
In certain cases, you may need to open a new tab or window while working in VS Code for the Web. VS Code might ask you for permission to access the clipboard when reading from it. Depending on your browser, you may grant access to the clipboard or otherwise allow for pop-up windows in different ways:
Как пользоваться Visual Studio Code
Visual Studio Code – это один из наиболее популярных редакторов кода, разработанный корпорацией Microsoft. Он распространяется в бесплатном доступе и поддерживается всеми актуальными операционными системами: Windows, Linux и macOS. VS Code представляет собой обычный текстовый редактор с возможностью подключения различных плагинов, что дает возможность работать со всевозможными языками программирования для разработки любого IT-продукта.
Несмотря на столь высокую популярность программы, ее функционал до сих пор остается не таким очевидным, из-за чего многие пользователи предпочитают продукт конкурента, нежели VS Code. Чтобы решить все проблемы, возникающие при работе с Visual Studio Code, рекомендую ознакомиться с подробным гайдом по настройке этого редактора кода. В нем я покажу, что VS Code – это мощный инструмент, которым может пользоваться каждый.
Установка Visual Studio Code
С установкой среды не должно возникнуть никаких проблем, но давайте все же проведем небольшой ликбез. Выполним несколько действий:
На этом установка завершена. Теперь мы можем использовать редактор кода по назначению. Обычно с этим не должно возникнуть никаких проблем, однако на слабых машинах запуск утилиты часто прерывается. Вылечить такой недуг можно с помощью добавления нового значения к пути ярлыка. Для этого откроем его свойства через правый клик мыши и в графе «Объект» пропишем —disable-gpu.
Готово! Теперь программа должна работать на любом компьютере.
Интерфейс Visual Studio Code
При первом запуске перед нами отобразится окно приветствия, через которое можно получить быстрый доступ к ранее запущенным проектам либо создать новые. Весь интерфейс на английском языке (всего в несколько кликов он переводится на русский, но об этом чуть позже). Давайте пока разберемся с интерфейсом: откроем для примера файл с кодом, посмотрим, как его идентифицирует программа без предварительных настроек, и разберем каждый блок утилиты.
В результате перед нами отобразится окно с кодом из файла. Давайте визуально разделим интерфейс на блоки и рассмотрим каждый из них более детально.
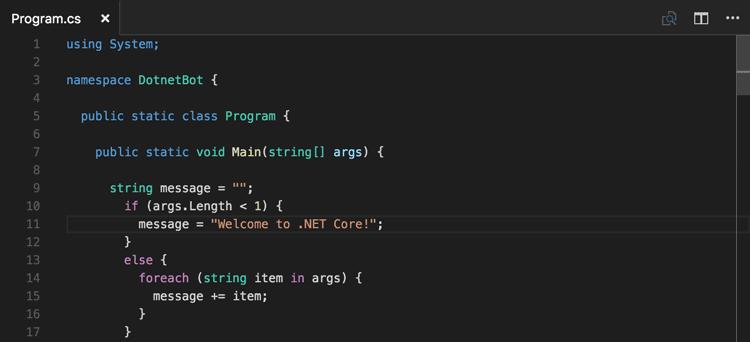
Первое, что бросается в глаза, – это блок кода, для которого отведено больше всего места. Название функций и прочее подсвечено разными цветами. Здесь же указан путь до файла, а чуть выше расположены вкладки-файлы, по которым можно перемещаться. С помощью них мы можем добавлять не просто один файл с кодом, а целый проект.
Следующий блок – левая панель управления, включающая в себя 5 основных вкладок: «Проводник», «Поиск», «Система управления версиями», «Запуск кода» и «Расширения». Первая предоставляет пользователю возможность просматривать содержимое проекта и быстро перемещаться внутри него.
Вторая вкладка – поиск. Используется для нахождения слов в документе. Он также может быть запущен с помощью комбинации клавиш «CTRL+SHIFT+F». Алгоритм использования довольно прост – вводим название в поиск и смотрим результат.
Система управления версиями – предназначена для взаимодействия с git.
Запустить и проверить работоспособность кода мы можем в следующей вкладке:
Еще одна важная вкладка, с помощью которой из Visual Studio Code можно сделать функциональную утилиту, это «Расширения». В ней находятся установочники для всех популярных инструментов, используемых разработчиками.
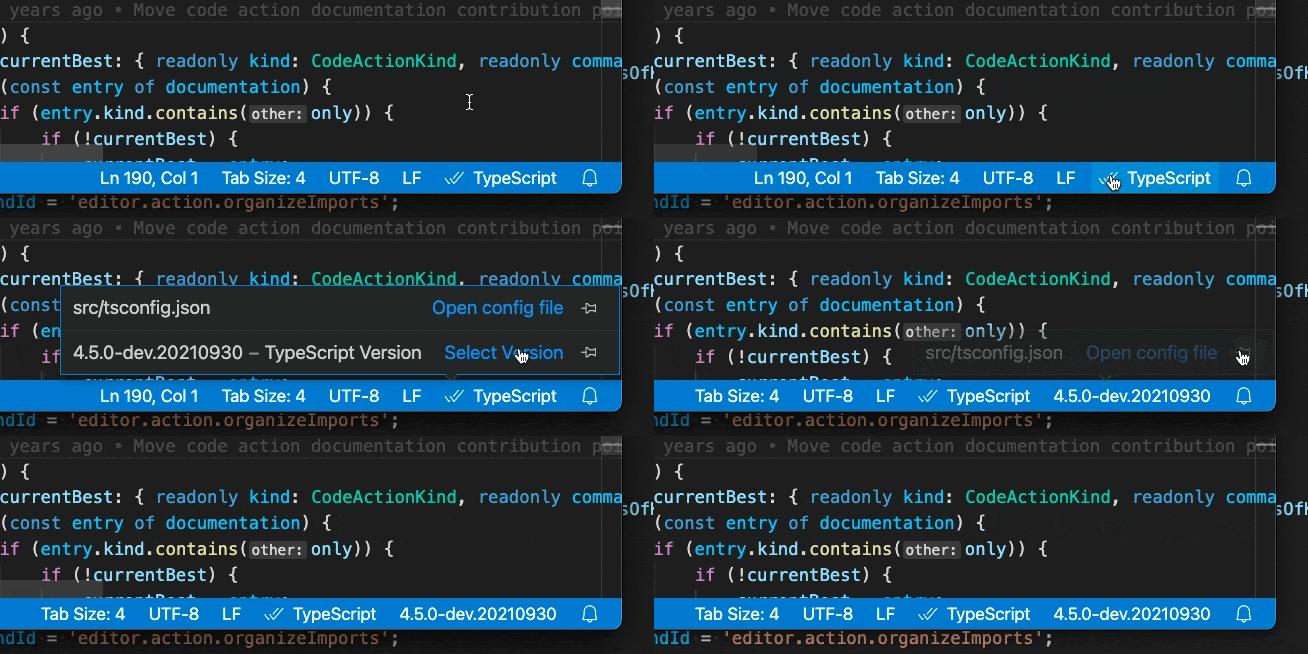
Следующий блок – нижний статус-бар. В нем отображается общая информация о состоянии программы. Обратите внимание, что VS Code автоматически определяет язык программирования и информирует нас об этом.
И еще один раздел – правая панель, включающая в себя небольшой дисплей, который отображает код в уменьшенном варианте, а также позволяет удобно скроллить внутри него. Здесь же мы можем разделить окно кода на несколько столбцов, а также закрыть все файлы одним кликом – для этого используются две верхние кнопки.
Как видите, если пройтись по интерфейсу программы, то она уже не кажется такой сложной. Чтобы сделать все еще проще, давайте проведем русификацию всех элементов интерфейса. О том, как это сделать, поговорим далее.
Русификация Visual Studio Code
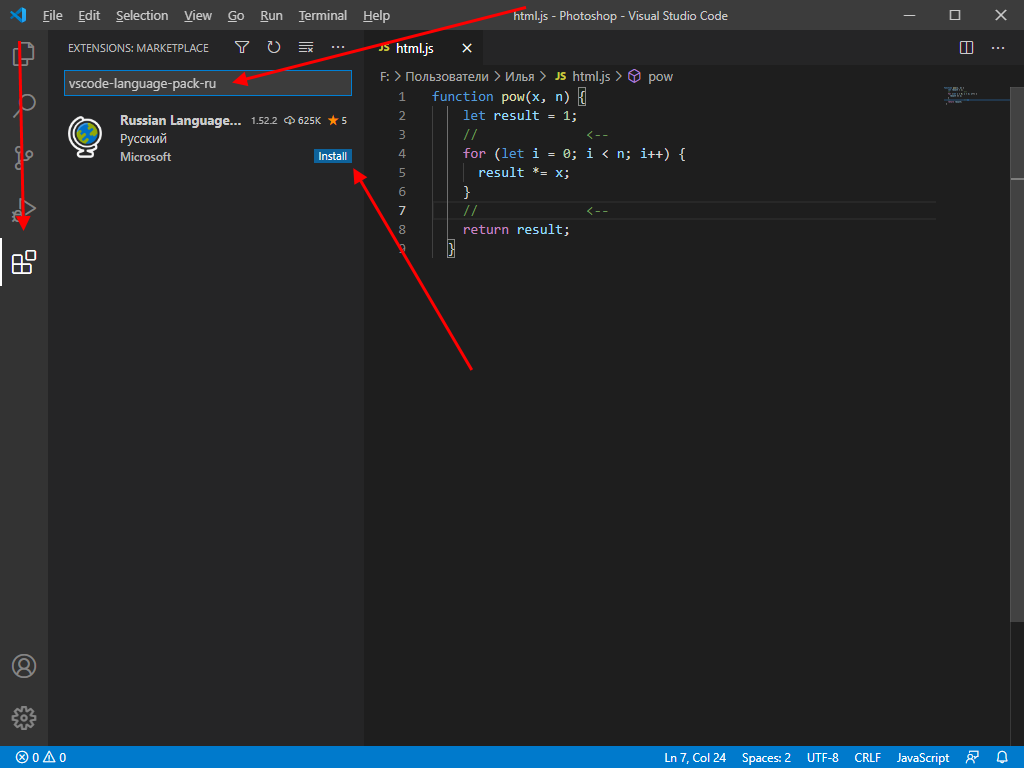
Чтобы провести русификацию программы, открываем вкладку с расширениями и прописываем запрос vscode-language-pack-ru. В результате будет отображен новый элемент с кнопкой «Install» – кликаем по ней и ожидаем завершения установки.
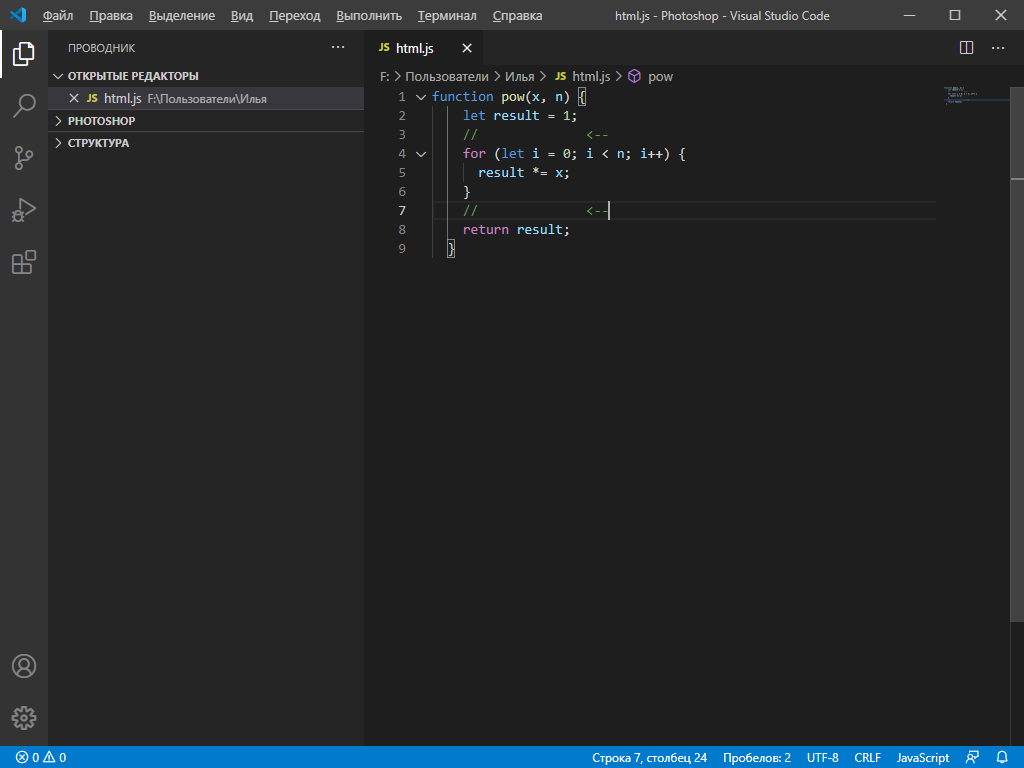
Перезагружаем программу и смотрим, что язык интерфейса был изменен на русский:
Если вы захотите вернуть англоязычный интерфейс, для этого потребуется открыть раздел с плагинами и удалить установленный пакет с русским языком.
Внешний вид
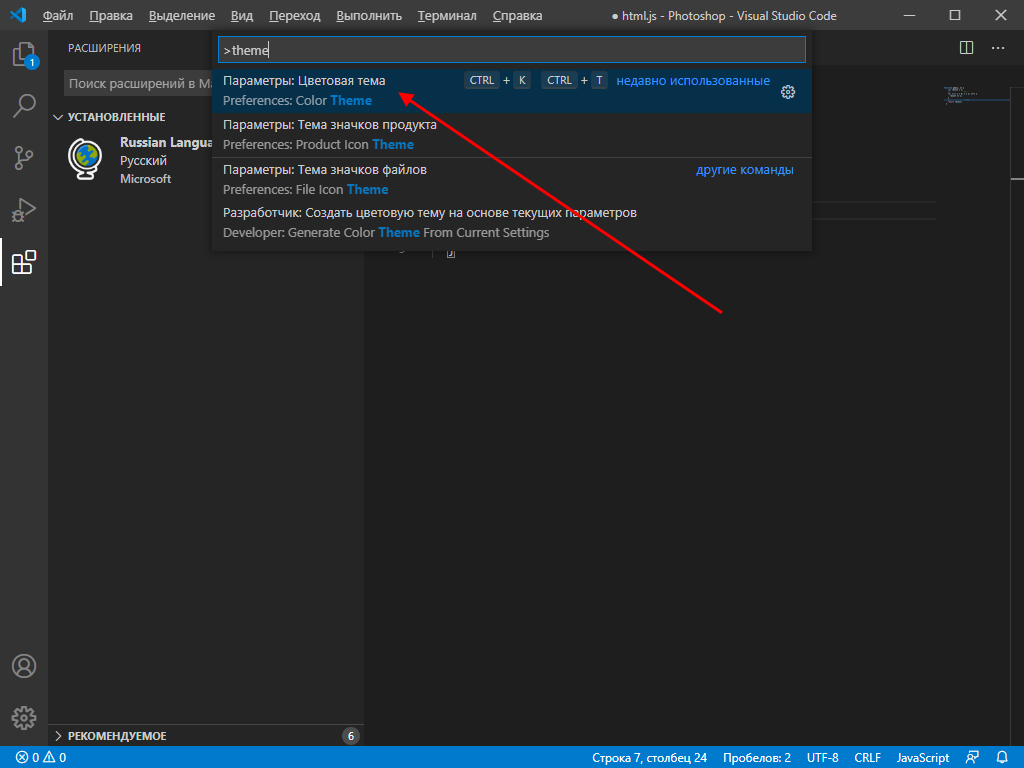
Мы можем полностью изменить цветовую схему утилиты. Чтобы это сделать, воспользуемся комбинацией клавиш «CTRL+SHIFT+P» и введем запрос «theme». В отобразившемся списке выберем «Параметры: Цветовая тема».
В результате отобразится список возможных тем – для примера возьмем солнечную тему.
После применения темы интерфейс примет следующий вид:
Обратите внимание, что это не весь список тем – вы можете установить и другие. Для этого пролистайте в самый низ списка и выберите «Установить дополнительные цветовые темы…». После этого в левой части отобразится дополнительный блок с доступными цветовыми решениями.
Вот так мы можем изменить внешний вид программы. Теперь давайте перейдем к техническим моментам и рассмотрим работу наиболее важных плагинов.
Управление проектами
По умолчанию Visual Studio Code поддерживает работу с несколькими проектами, однако перемещаться между ними не очень удобно. Для удобства обычно используют плагин под названием Project Manager. С его помощью открывается возможность перемещения между рабочими областями всего в один клик. Установка проходит через магазин расширений, о котором мы говорили ранее. После того как менеджер проектов будет установлен, в левой панели управления появится новая вкладка для работы с плагином.
Теперь работа с проектами не должна вызывать никаких трудностей.
Автоформатирование кода
Один из важных этапов программирования – умение приводить все к единому виду с правильными отступами. Для таких задач в VS Code есть специальные плагины, позволяющие форматировать весь текстовый документ. Это такие расширения, как PHP-CS-Fixer для PHP, Prettier для JS/HTML/CSS и другие.
Рассмотрим, как форматируется код, написанный на JavaScript:
Аналогичным образом мы можем отформатировать код, написанный на других языках программирования. Для этого достаточно установить нужное расширение.
Автодополнение
В популярных программах, подобных Visual Studio, встроена функция автодополнения, помогающая завершить код. Например, вы пишите строчку кода, а среда подсказывает, как ее завершить. С помощью этой опции можно не только вспомнить нужную функцию, но и быстро написать код.
По умолчанию функция автодополнения в Visual Studio Code доступна только для некоторых языков. Для прочих языков программирования существуют дополнительные пакеты с окончанием «intellisense».
Посмотреть, какие пакеты доступны, вы можете в магазине плагинов.
Рекомендую установить PHP Intellisense, CSS Intellisense и Path Intellisense.
Управление Vim
Vim – это свободный текстовый редактор, работающий на основе vi. По умолчанию он установлен на каждой операционной системе семейства Unix. Кроме того, он доступен и в Visual Studio Code. Для работы с ним потребуется установить расширение с аналогичным названием:
Теперь мы можем перемещаться по файлу клавишами h, j, k, l, использовать Esc и сохранять файл командой :w.
Отладка кода
В результате в левой части окна будет отображен список доступных плагинов – найдите в нем подходящий для вас и следуйте инструкции.
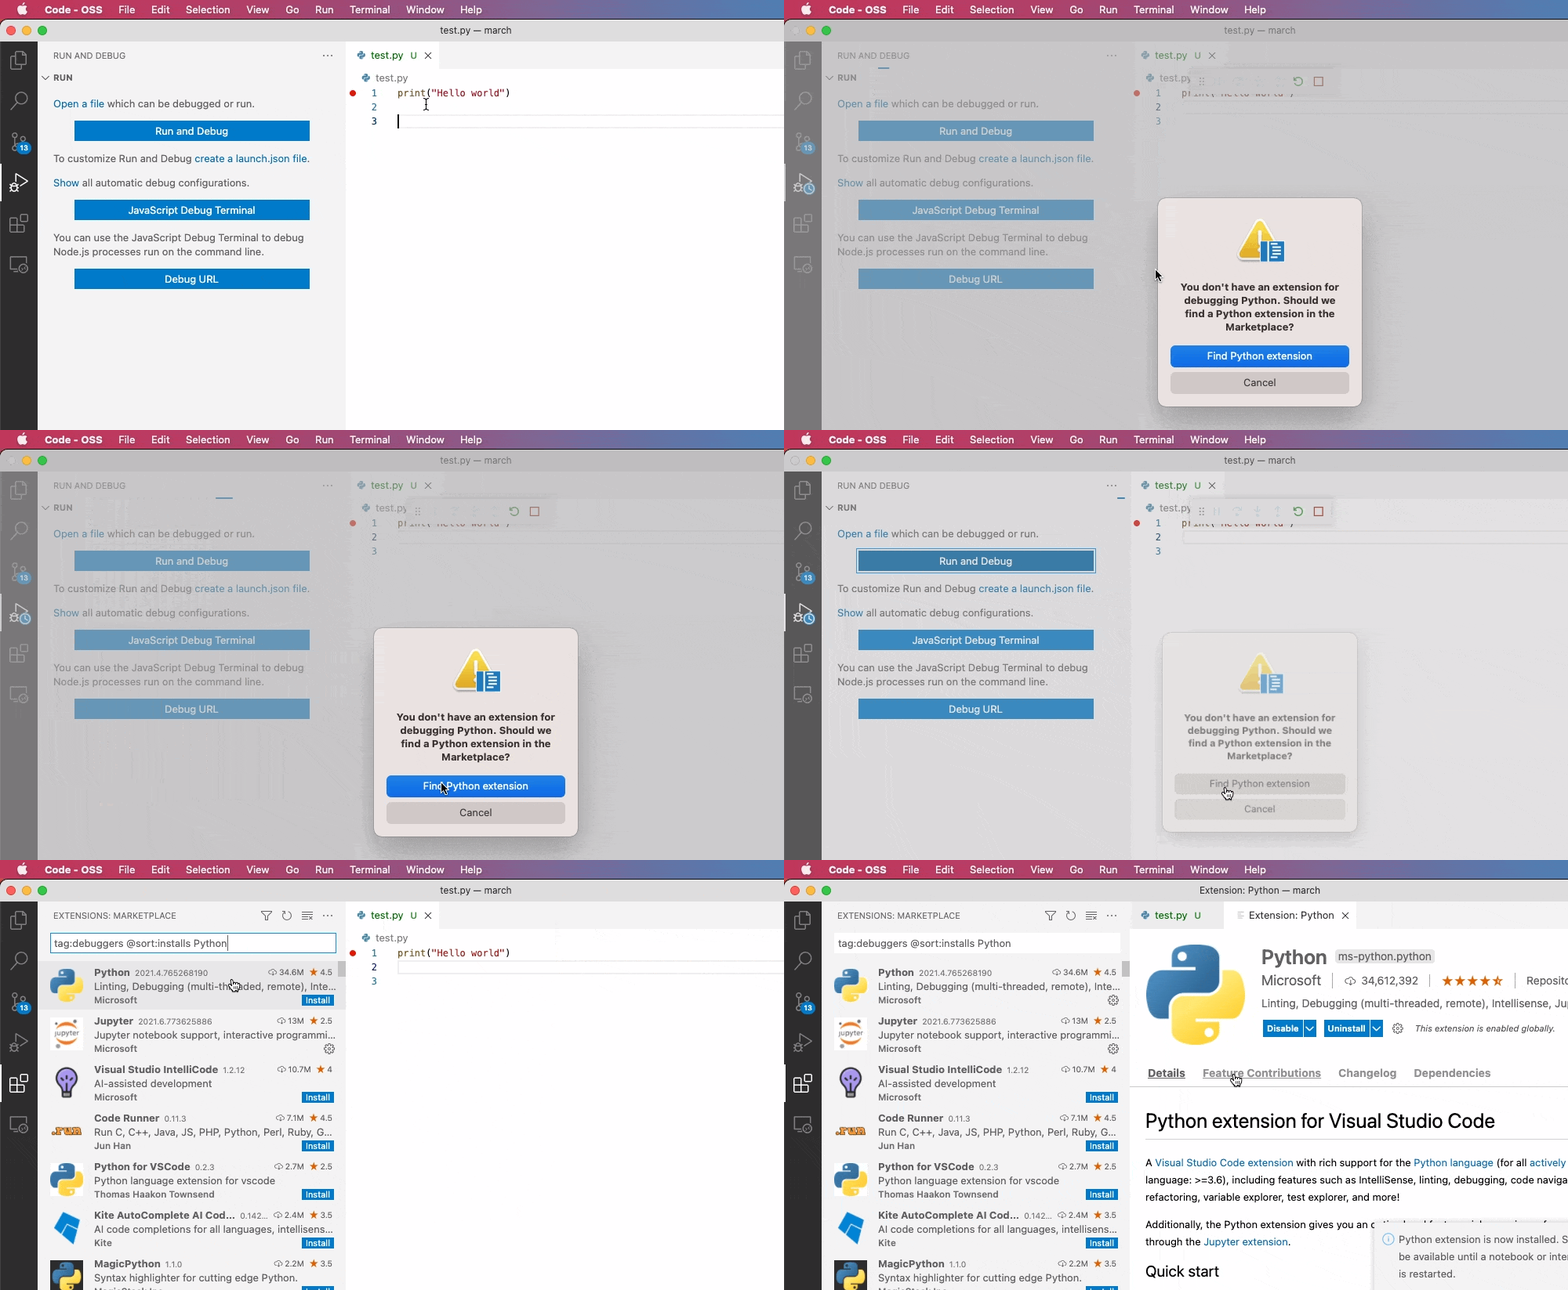
После того как нужный плагин будет установлен, можно запускать отладку кода. Для этого достаточно открыть пункт «Выполнить» и нажать на кнопку «Запустить отладку». Также это можно сделать с помощью клавиши «F5».
С помощью плагинов мы можем отладить код, написанный на любом языке программирования.
Заключение
Сегодня мы разобрали функционал инструмента Visual Studio Code. Данная среда хороша не только для профессионалов, но и для новичков, изучающих основы программирования. Одно из преимуществ программы – это минимальное требование к железу: запустить программу можно практически на любом компьютере.
Надеюсь, что работа в VS Code больше не будет для вас проблемой, а активные проекты ждет успех. Удачи!
Visual Studio Code
Мощный, компактный и бесплатный редактор кода с интегрированными инструментами для простого развертывания кода в Azure.
Один редактор для всех этапов процесса от кода до облака
Уделяйте больше времени на написание кода и меньше на переключение между инструментами. Используйте функции и расширения, которые интегрируются с Azure и GitHub для разработки, отладки и развертывания всего из одного расположения.
Предоставляет локальные эмуляторы и расширения для создания, запуска и отладки облачных приложений непосредственно в редакторе.
Импортирует данные локальных или удаленных баз данных с поддержкой Azure Cosmos DB, MongoDB и т. д и управляет ими.
Содержит пошаговые рабочие процессы для GitHub Actions и Azure Pipelines по созданию и настройке непрерывной интеграции.
Поддерживает почти все типы языков и приложений, включая статические веб-приложения, бессерверные Функции Azure и кластеры Kubernetes.
Локальная разработка облачных приложений перед развертыванием
Создавайте, запускайте и отлаживайте облачные проекты локально, чтобы быстро создавать прототипы. Оптимизируйте затраты, проверяя эффективность работы новых функций в облаке перед развертыванием. Расширения Azure содержат эмуляторы для службы хранилища Azure, Azure Cosmos DB и Функций Azure.
Настройка автоматических развертываний в облако
Используйте расширение Развертывание в Azure, чтобы настроить непрерывную интеграцию и непрерывную поставку (CI/CD) из приложений в облако с помощью GitHub Actions или Azure Pipelines. Легко создайте конвейер CI/CD для Службы приложений Azure, Функций Azure или Службы Azure Kubernetes (AKS) с помощью встроенных автоматических рабочих процессов расширения.
Добавление данных и управление ими
Легко управляйте данными приложения с помощью встроенной поддержки MongoDB и IntelliSense. Подключитесь к локальным или удаленным серверам MongoDB и управляйте базами данных, коллекциями и документами или разместите их в облаке с помощью Azure Cosmos DB уровня “Бесплатный”.
Простая совместная работа
Вам не нужно изменять свой способ работы с другими пользователями, будь то коллеги в той же комнате или разработчики по всему миру, работающие над проектами с открытым кодом. Перенесите запросы на вытягивание и проблемы из GitHub в редактор с расширением Запросы на вытягивание и проблемы GitHub. Или совместно выполняйте редактирование, отладку и предоставляйте общий доступ к приложениям в режиме реального времени в рамках парного программирования либо проверки кода с помощью расширения Live Share.
Контейнеры
Создавайте и развертывайте контейнерные приложения и управляйте ими с помощью расширения Docker. Создавайте файлы Docker из существующего репозитория и управляйте контейнерами, образами и реестрами из Visual Studio Code.
Kubernetes
Наслаждайтесь полностью интегрированным Kubernetes с расширением Kubernetes. Развертывайте контейнерные приложения в локальных и облачных кластерах Kubernetes и выполняйте отладку динамических приложений в Visual Studio Code.
Разработка веб-интерфейса
Расширьте отладку JavaScript на интерфейсную разработку с помощью расширения Microsoft Edge DevTools для VS Code. Установите точки останова и выполните пошаговую отладку интерфейсного кода JavaScript для быстрого устранения проблем. Выполняйте отладку интерфейсного и внутреннего кода одновременно благодаря возможности многоцелевой отладки.
Features of the code editor
The Visual Studio editor provides many features that make it easier for you to write and manage your code and text. You can expand and collapse different blocks of code by using outlining. You can learn more about the code by using IntelliSense, the Object Browser, and the Call Hierarchy. You can find code by using features such as Go To, Go To Definition, and Find All References. You can insert blocks of code with code snippets, and you can generate code by using features such as Generate From Usage. If you have never used the Visual Studio editor before, see Learn to use the code editor.
This topic applies to Visual Studio on Windows. For Visual Studio for Mac, see Source editor (Visual Studio for Mac).
You can view your code in a number of different ways. By default, Solution Explorer shows your code organized by files. You can click on the Class View tab at the bottom of the window to view your code organized by classes.
You can search and replace text in single or multiple files. For more information, see Find and replace text. You can use regular expressions to find and replace text. For more information, see Use regular expressions in Visual Studio.
The different Visual Studio languages offer different sets of features, and in some cases the features behave differently in different languages. Many of these differences are specified in the descriptions of the features, but for more information you can see the sections on specific Visual Studio languages.
Editor features
| Feature | Description |
|---|---|
| Syntax Coloring | Some syntax elements of code and markup files are colored differently to distinguish them. For example, keywords (such as using in C# and Imports in Visual Basic) are one color, but types (such as Console and Uri ) are another color. Other syntax elements are also colorized, such as string literals and comments. C++ uses color to differentiate among types, enumerations, and macros, among other tokens. |
You can see the default color for each type, and you can change the color for any specific syntax element in the Fonts and Colors, Environment, Options dialog box, which you can open from the Tools menu.
You can see the default color for each error and warning squiggle in the Tools > Options > Environment > Fonts and Colors dialog box. Look for Syntax Error, Compiler Error, Warning, and Other Error.
You can set color printing options in the Tools > Options > Environment > Fonts and Colors dialog box. Choose Printer in the Show settings for list to customize color printing. You can specify different colors for printing a file than for editing a file.
Advanced editing features
You can find a number of advanced features on the Edit > Advanced menu on the toolbar. Not all of these features are available for all types of code files.
| Feature | Description |
|---|---|
| Format Document | Sets the proper indentation of lines of code and moves curly braces to separate lines in the document. |
| Format Selection | Sets the proper indentation of lines of code and moves curly braces to separate lines in the selection. |
| Tabify Selected Lines | Changes leading spaces to tabs where appropriate. |
| Untabify Selected Lines | Changes leading tabs to spaces. If you want to convert all the spaces in your file to tabs (or all the tabs to spaces), you can use the Edit.ConvertSpacesToTabs and Edit.ConvertTabsToSpaces commands. These commands do not appear in Visual Studio menus, but you can call them from the Quick Access window or the command window. |
| Make Uppercase | Changes all characters in the selection to uppercase, or if there is no selection, changes the character at the insertion point to uppercase. Shortcut: Ctrl+Shift+U. |
| Make Lowercase | Changes all characters in the selection to lowercase, or if there is no selection, changes the character at the insertion point to lowercase. Shortcut: Ctrl+U. |
| Move selected Lines Up | Moves the selected line up one line. Shortcut: Alt+Up Arrow. |
| Move Selected Lines Down | Moves the selected line down one line. Shortcut: Alt+Down Arrow. |
| Delete Horizontal White Space | Deletes tabs or spaces at the end of the current line. Shortcut: Ctrl+K, Ctrl+\ |
| View White Space | Displays spaces as raised dots, and tabs as arrows. The end of a file is displayed as a rectangular glyph. If Tools > Options > Text Editor > All Languages > Word Wrap > Show visible glyphs for word wrap is selected, that glyph is also displayed. |
| Word Wrap | Causes all the lines in a document to be visible in the code window. You can turn word wrap off and on in the Text Editor All Languages settings (Tools > Options > Text Editor > All Languages). |
| Comment Selection | Adds comment characters to the selection or the current line. Shortcut: Ctrl+K, Ctrl+C |
| Uncomment Selection | Removes comment characters from the selection or the current line. Shortcut: Ctrl+K, Ctrl+U |
| Increase Line Indent | Adds a tab (or the equivalent spaces) to the selected lines or the current line. |
| Decrease Line Indent | Removes a tab (or the equivalent spaces) from the selected lines or the current line. |
| Select Tag | In a document that contains tags (for example, XML or HTML), selects the tag. |
| Select Tag Content | In a document that contains tags (for example, XML or HTML), selects the content. |
Navigate and find code
You can move around in the code editor in several different ways, including navigating backwards and forwards to previous insertion points, viewing the definition of a type or member, and jumping to a specific method using the navigation bar. For more information see Navigate code.
Find references in your code base
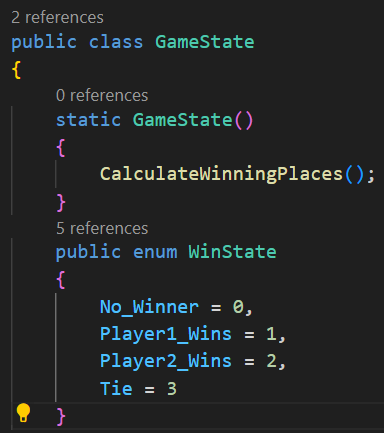
To find where particular code elements are referenced throughout your codebase, you can use the Find All References command or press Shift+F12. Also, when you click on a type or member, the reference highlighting feature automatically highlights all references to that type or member. For more information, see Find references in your code.
Generate, fix, or refactor code
There are numerous ways that Visual Studio can help you generate, fix, and refactor code.
You can use code snippets to insert a template such as a switch block or an enum declaration.
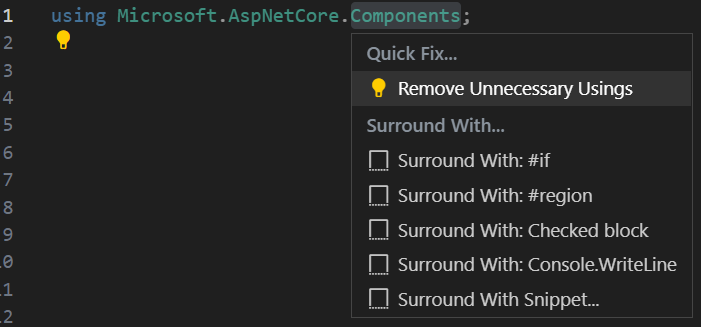
You can use Quick Actions to generate code such as classes and properties, or to introduce a local variable. You can also use Quick Actions to improve code, for example to remove unnecessary casts and unused variables, or to add null checks before accessing variables.
You can refactor code to rename a variable, re-order method parameters, or synchronize a type with its filename, to name a few.
Customize the editor
You can share your Visual Studio settings with another developer, have your settings conform to a standard, or return to Visual Studio default settings by using the Import and Export Settings Wizard command on the Tools menu. In the Import and Export Settings Wizard, you can change selected general settings or language and project-specific settings.
To define new hotkeys or redefine existing hotkeys, go to Tools > Options > Environment > Keyboard. For more information about hotkeys, see Default keyboard shortcuts.
For JavaScript-specific editor options, see JavaScript editor options.
Visual Studio Code on macOS
Installation
Launching from the command line
You can also run VS Code from the terminal by typing ‘code’ after adding it to the path:
Alternative manual instructions
Instead of running the command above, you can manually add VS Code to your path, to do so run the following commands:
Note: Since zsh became the default shell in macOS Catalina, run the following commands to add VS Code to your path:
Touch Bar support
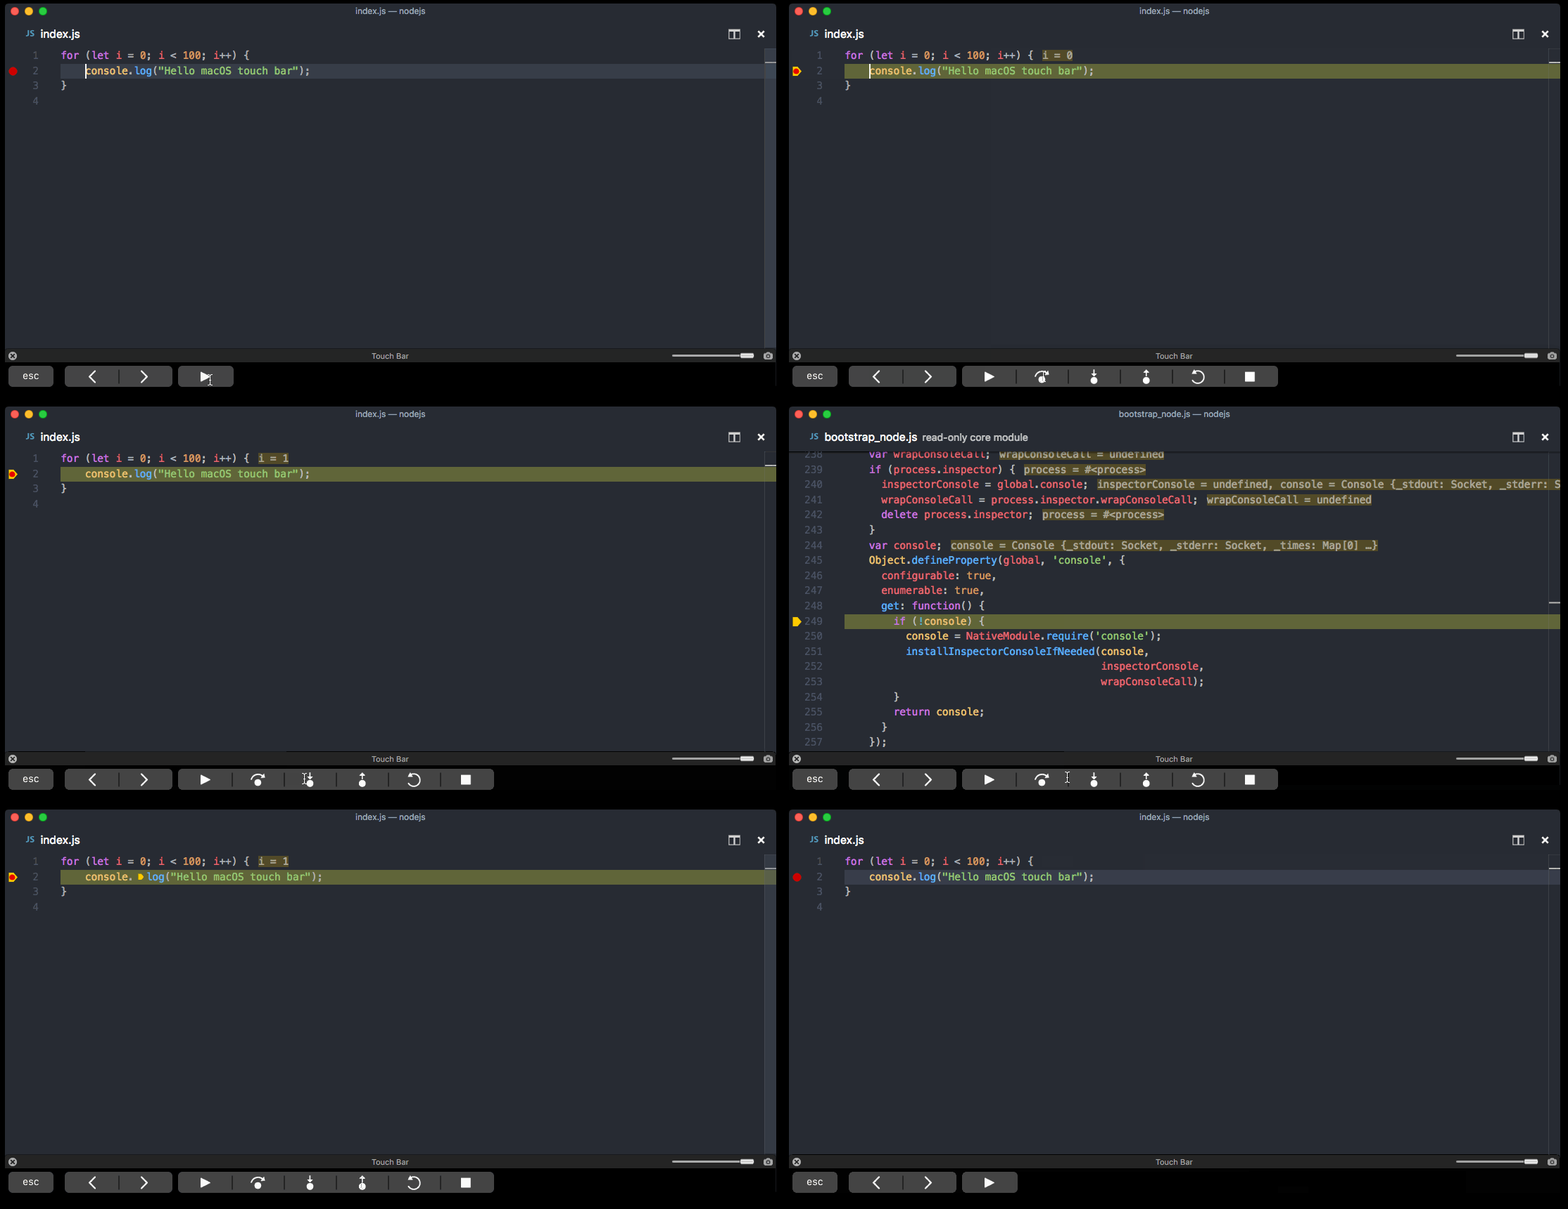
Out of the box VS Code adds actions to navigate in editor history as well as the full Debug tool bar to control the debugger on your Touch Bar:
Mojave privacy protections
After upgrading to macOS Mojave version, you may see dialogs saying «Visual Studio Code would like to access your
Updates
VS Code ships monthly releases and supports auto-update when a new release is available. If you’re prompted by VS Code, accept the newest update and it will get installed (you won’t need to do anything else to get the latest bits).
Note: You can disable auto-update if you prefer to update VS Code on your own schedule.
Preferences menu
You can configure VS Code through settings, color themes, and custom keybindings available through the Code > Preferences menu group.
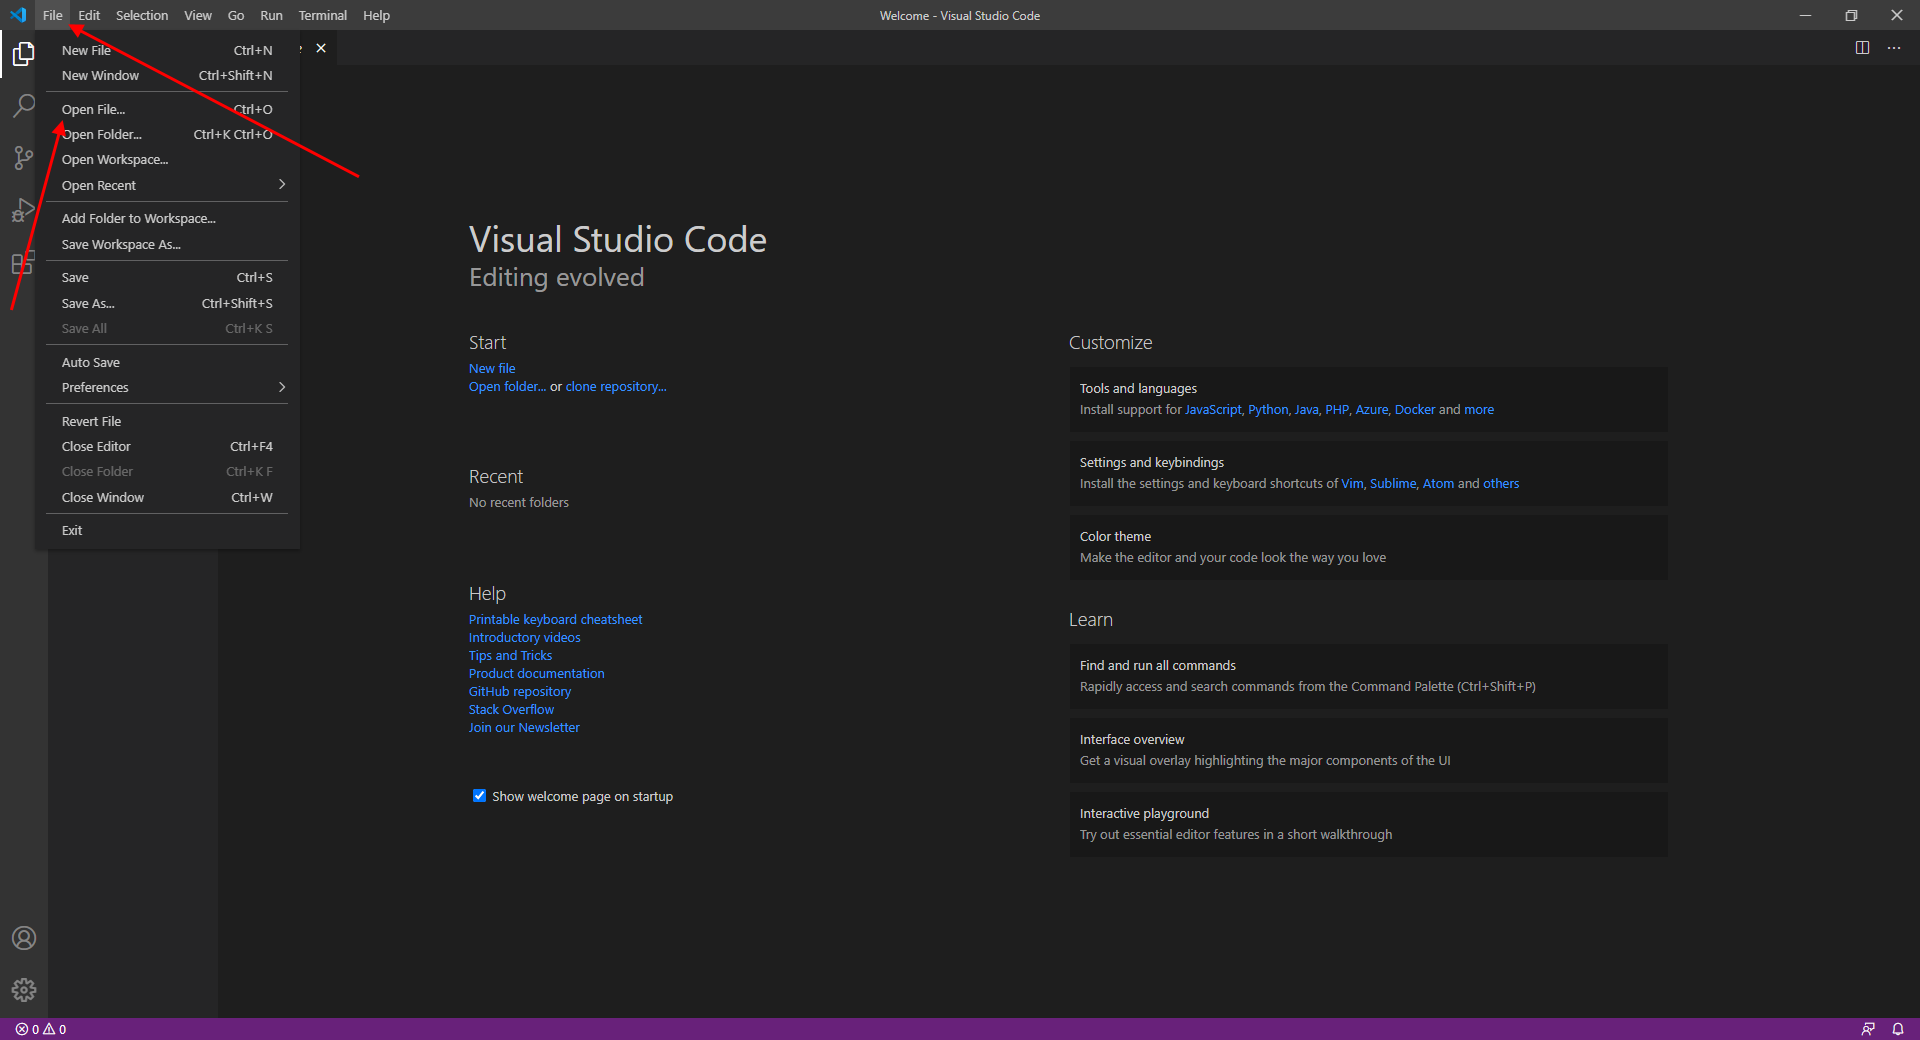
You may see mention of File > Preferences in documentation, which is the Preferences menu group location on Windows and Linux. On a macOS, the Preferences menu group is under Code, not File.
Next steps
Once you have installed VS Code, these topics will help you learn more about VS Code:
Common questions
Why do I see «Visual Studio Code would like access to your calendar.»
If you are running macOS Mojave version, you may see dialogs saying «Visual Studio Code would like to access your
VS Code fails to update
If VS Code doesn’t update once it restarts, it might be set under quarantine by macOS. Follow the steps in this issue for resolution.
Does VS Code run on Mac M1 machines?
Yes, VS Code supports macOS ARM64 builds that can run on Macs with the Apple M1 chip. You can install the Universal build, which includes both Intel and Apple Silicon builds, or one of the platform specific builds.
Custom development environments
What are custom development environments?
Your development environment is where you do your coding. Visual Studio Code allows you to use a development environment different than your local computer through a container, a separate (or remote) machine, or the Windows Subsystem for Linux (WSL). These configurations are known as remote development.
Remote development has benefits such as:
Example scenario
As an example scenario, you could have different dev environments for Python 2.7 and 3.7. Rather than having to worry about managing different versions of Python on your computer, you can connect to separate environments with the appropriate versions of Python already set up for you.
Since you may be working with teammates using Linux or deploying to a Linux production environment, you could also connect to development environments that use a different operating system than your own, or harness the power of the Windows Subsystem for Linux.
How do I get started with remote development?
To get started with remote development in VS Code, you can download the Remote Development extension pack from the Extension Marketplace.
This extension pack includes three extensions (which can also be downloaded individually):
Check out the topics in this section to learn more about each of the remote development extensions in Visual Studio Code.
Visual Studio Code
A powerful, lightweight free code editor with integrated tools to easily deploy your code to Azure
One editor, from code to cloud
Spend more time coding and less time switching between tools. Use features and extensions that integrate with Azure and GitHub to develop, debug and deploy all from one place.
Provides local emulators and extensions to build, run and debug cloud apps directly from the editor
Imports and manages data for local or remote databases, with support for Azure Cosmos DB, MongoDB and more
Has guided workflows for GitHub Actions and Azure Pipelines to create and configure continuous integration
Supports nearly every language and app type, including static web apps, serverless Azure Functions and Kubernetes clusters
Develop cloud apps locally before you deploy
Create, run and debug your cloud projects locally so you can prototype quickly. Optimise costs by testing whether new features run efficiently in the cloud before deploying. Azure extensions include emulators for Azure Storage, Azure Cosmos DB, and Azure Functions.
Set up automated deployments to the cloud
Use the Deploy to Azure extension to set up continuous integration and continuous delivery (CI/CD) from your apps to the cloud using GitHub Actions or Azure Pipelines. Easily create a CI/CD pipeline targeting Azure App Service, Azure Functions, or Azure Kubernetes Service (AKS) using the extension’s built-in automated workflows.
Add and manage data
Easily manage your app’s data using the built-in MongoDB and IntelliSense support. Connect to your local or remote MongoDB servers and manage databases, collections and documents, or host them in the cloud with the Azure Cosmos DB free tier.
Collaborate with ease
You don’t need to change how you work with others, whether they’re teammates in the same room or developers around the world working on open source projects. Bring pull requests and issues from GitHub into the editor with the GitHub Pull Requests and Issues extension. Or collaborate on editing, debugging and app sharing in real-time for pair programming or code reviews with the Live Share Extension.
Containers
Build, manage, and deploy containerized applications using the Docker extension. Generate Docker files from your existing repository and manage your containers, images, and registries from inside Visual Studio Code.
Kubernetes
Enjoy a fully integrated Kubernetes experience with the Kubernetes extension. Deploy containerized applications to local or cloud-hosted Kubernetes clusters and debug your live applications in Visual Studio Code.
Front-end web development
Extend JavaScript debugging to front-end development using the Microsoft Edge DevTools extension for VS Code. Set breakpoints and step through front-end JavaScript code to resolve issues quickly. Debug front-end and back-end code simultaneously with the multitarget debugging capability.
Visual Studio Code
A powerful, lightweight free code editor with integrated tools to easily deploy your code to Azure
One editor, from code to cloud
Spend more time coding and less time switching between tools. Use features and extensions that integrate with Azure and GitHub to develop, debug, and deploy all from one place.
Provides local emulators and extensions to build, run, and debug cloud apps directly from the editor
Imports and manages data for local or remote databases, with support for Azure Cosmos DB, MongoDB, and more
Has guided workflows for GitHub Actions and Azure Pipelines to create and configure continuous integration
Supports nearly every language and app type, including static web apps, serverless Azure Functions, and Kubernetes clusters
Develop cloud apps locally before you deploy
Create, run, and debug your cloud projects locally so you can prototype quickly. Optimize costs by testing whether new features run efficiently in the cloud before deploying. Azure extensions include emulators for Azure Storage, Azure Cosmos DB, and Azure Functions.
Set up automated deployments to the cloud
Use the Deploy to Azure extension to set up continuous integration and continuous delivery (CI/CD) from your apps to the cloud using GitHub Actions or Azure Pipelines. Easily create a CI/CD pipeline targeting Azure App Service, Azure Functions, or Azure Kubernetes Service (AKS) using the extension’s built-in automated workflows.
Add and manage data
Easily manage your app’s data using the built-in MongoDB and IntelliSense support. Connect to your local or remote MongoDB servers and manage databases, collections, and documents, or host them in the cloud with the Azure Cosmos DB free tier.
Collaborate with ease
You don’t need to change how you work with others, whether they’re teammates in the same room or developers around the world working on open source projects. Bring pull requests and issues from GitHub into the editor with the GitHub Pull Requests and Issues extension. Or collaborate on editing, debugging, and app sharing in real time for pair programming or code reviews with the Live Share Extension.
Containers
Build, manage, and deploy containerized applications using the Docker extension. Generate Docker files from your existing repository and manage your containers, images, and registries from inside Visual Studio Code.
Kubernetes
Enjoy a fully integrated Kubernetes experience with the Kubernetes extension. Deploy containerized applications to local or cloud-hosted Kubernetes clusters and debug your live applications in Visual Studio Code.
Front-end web development
Extend JavaScript debugging to front-end development using the Microsoft Edge DevTools extension for VS Code. Set breakpoints and step through front-end JavaScript code to resolve issues quickly. Debug front-end and back-end code simultaneously with the multitarget debugging capability.
April 2021 (version 1.56)
Update 1.56.1: The update addresses these security issues.
Update 1.56.2: The update addresses these issues.
Welcome to the April 2021 release of Visual Studio Code. The VS Code team has been busy this month working on several longer lead time updates so check out the Preview features section to learn what’s upcoming. Here are some of the highlights included in this release:
If you’d like to read these release notes online, go to Updates on code.visualstudio.com.
Join us live at the VS Code team’s livestream on Tuesday, May 11 at 8am Pacific (4pm London) to see a demo of what’s new in this release, and ask us questions live.
Insiders: Want to try new features as soon as possible? You can download the nightly Insiders build and try the latest updates as soon as they are available.
Workbench
Improved action hover feedback
We have changed the mouse hover feedback for actions all around the workbench, to provide a better UX around clickable actions.
Untitled editors hint
We have noticed that many new users are not aware that a language has to be set in order to get full VS Code language support. To help with this problem, we have introduced a hint for untitled editors to help users set the correct language mode. The untitled hint might not be helpful to advanced users, so it goes away immediately as you start typing or you can select don’t show to never display the hint again.
Default custom editor and notebook resolution
If you have two editors that both state they should be your default editor for a resource (for example, an image viewer and an image editor), you will receive a prompt to resolve the conflict.
In the short video below, the user opens a PNG file, which is associated with two editors. The notification lets the user keep using the Luna Paint Image Editor or configure a new default, which they do and start using the binary Hex Editor.
Updated custom dialogs
You can theme the secondary button style by using the following color tokens:
Auto update only enabled extensions
You can now configure VS Code to auto update only your extensions that are currently enabled.
Terminal
Profile improvements
Last iteration, we introduced terminal profiles. The terminal now supports setting a default profile with the terminal.integrated.defaultProfile.
Environment and icon support was also added to the profiles system:
Going forward, these settings are the recommended way to switch out the default terminal configuration and the terminal.integrated.shell and terminal.integrated.shellArgs settings have been deprecated.
New terminal picker
Profiles and setting shortcuts have moved out of the dropdown and into a new + button with a dropdown.
This also supports creating a new split terminal based on a non-default profile.
New keybindings
The terminal has several new default keybindings this release:
As always, these default keybindings can be removed or custom keybindings can be added via the keybindings system.
Linux selection paste command
The new command workbench.action.terminal.pasteSelection is available on Linux to paste into the terminal from the selection clipboard.
Terminal workspace shell permissions changed
When Workspace Trust is enabled by default, we will remove this and use that system.
Tasks
Removal of Tasks 0.1.0 with upgrade
Tasks 2.0.0 has been available and working well for over three years, and tasks 0.1.0 has been deprecated throughout that time. In light of our Node.js-free renderer goal, tasks 0.1.0 has been deleted rather than brought into the Node.js-free world. When you open a folder that contains 0.1.0 tasks, they will be automatically upgraded to version 2.0.0 for you.
No «Task» prefix in terminal tabs
When using the new Terminal tabs feature, the «Task» prefix will no longer be added to the terminal name. Instead, tasks are indicated by the «tools» icon to make better use of the available space.
Better matching with eslint-stylish
Debugging
Breakpoints view improvements
Access type is shown for data breakpoints
For data breakpoints, VS Code now shows the access type («Read», «Write», or «Access») next to its name in the Breakpoints view.
Better status/error reporting for exception breakpoints
For exception breakpoints, VS Code now shows their individual verification status and detailed reason in the Breakpoints view. If an exception breakpoint cannot be verified (for example because its condition contains a syntax error), it will be grayed out and, on hover, the corresponding error message is shown.
Other UI improvements
Alternative behavior for Stop and Disconnect commands
With this release, it is now possible to flip this behavior by pressing the Alt modifier while triggering the command from the Debug toolbar. Altering the behavior makes it possible to leave the debuggee running for launch type debug sessions, and to terminate the debuggee for attach type debug sessions. Apart from using Alt with the default commands, it is also possible to access both the Debug: Stop and Debug: Disconnect commands from the Command Palette for both launch and attach debug sessions.
The alternative behavior is only available for debug extensions that have opted in to this feature.
Improved flow for installing missing debug extensions
We have improved the flow if a user wants to start debugging but hasn’t installed the necessary language extension that provides debugging support (like Python or Java). When this happens, VS Code now prompts the user to install the appropriate extension.
Call stack column stopped indicator
VS Code now renders the Call Stack column indicator every time a debuggee is stopped on a line. This should help identify where on a line the program is currently stopped.
Inline values by default for some languages
VS Code’s debugger UI supports Inline values that show variable values inline in the editor when stepping through source code. This feature is based on a generic implementation in VS Code core and so may not be a perfect fit for all languages, even sometimes showing incorrect values because the generic approach doesn’t understand the underlying source language. For these reasons, the feature was not enabled by default.
With a new debugger extension API, it is now possible for language extensions to provide correct inline value support and we are enabling the Improved inline values feature by default.
The Debugger for Java extension is one of the first debugger extensions to adopt the API. In the screenshot below, the accurate values of the Java variables are displayed right next to their usage.
You can get inline values while debugging PowerShell scripts using the Inline Values support for PowerShell extension.
Debug view displayed on break
The default value of the debug.openDebug setting is now openOnDebugBreak so that on every breakpoint hit, VS Code will open the Debug view. The Debug view is also displayed on first session start.
JavaScript debugging
As usual, the complete list of changes can be found in the vscode-js-debug changelog.
Improved breakpoint diagnostic tool discoverability
Based on heuristics, VS Code will show a notification that suggests opening the breakpoint diagnostic tool if it detects the user may be having trouble getting breakpoints to bind.
This prompt will initially be visible only to a subset of users as we experiment with its efficacy and assertiveness.
Private Class Field Support
Private class fields are now visible and can be inspected in the debugger.
Notebooks
Toggle line numbers
You can now temporarily toggle the line numbers of a cell in the current session from the cell toolbar, or change the visibility of line numbers for all notebooks through the notebook.lineNumbers setting.
Cell toolbar position per file type
The cell toolbar position can be now customized per file type through the notebook.cellToolbarLocation setting. For example, you can have the cell toolbar on the right side for GitHub Issue notebooks but have it on the left for Jupyter notebooks.
Math support in Markdown cells
You can now use math equations inside of notebook Markdown cells:
VS Code uses KaTeX for rendering the equations. There are two ways to embed a math equation into a Markdown cell:
We implemented math support using an experimental notebook markup renders API, which is still in development. Our eventual goal with this API is to also allow extensions to extend the rendering of Markdown in notebooks.
Languages
Markdown preview typographer support
The new markdown.preview.typographer setting lets you enabled smart quotes and simple typographic replacements in the built-in Markdown preview.
In the example below, Markdown text such as (c) gets automatically replaced by copyright symbol © in the preview:
The markdown.preview.typographer setting is disabled by default.
More files recognized as shellscript
Preview features
Terminal tabs
Tabs in the terminal are available as a preview feature and can be enabled with the following setting:
When enabled, the new tabs view will only show by default when there are at least two terminals. For single terminals, the tab is «inlined» into the panel title like so:
Each tab supports several actions via the context menu.
Split and kill terminal are available on hover.
We’ve tried to align how the new tabs behave with how the Explorer works. Here are some of the other behaviors:
Terminal statuses
Along with tabs, we have introduced the concept of statuses to the terminal. A terminal can have many statuses, each of which represents a state the terminal can be in temporarily, with the highest severity one being displayed next to the tab. Status icons appear to the right of the terminal title in the tabs view. On hover, details of the status and any associated actions are presented.
For now, these states are supported:
We plan to support task states soon so that task run status is available at a glance even without activating the tab.
Welcome Page walkthroughs
The short video belows show an example walkthrough to teach users about the Luna Paint extension.
Custom hover support in Activity bar and Panel
Remote Repositories (RemoteHub)
As part of this release, we are previewing a new built-in extension, Remote Repositories (RemoteHub), which allows you to instantly browse, search, edit, and commit to any GitHub repository directly from within VS Code without having to clone or have the repository locally. It is currently only available in the Insiders edition of VS Code.
Getting started
To get started, run the Open Remote Repository. command from the Command Palette. From there, you can paste in any GitHub URL, or choose to search for a specific repository or pull request.
Once you enter a URL or choose a repository or pull request, VS Code will open a new workspace for that repository. The remote status indicator, on the left side of the Status bar, shows the connected remote provider name, for example GitHub, for the remote repository.
Features
Limitations
Tell us what you think
We are very excited for you to play with Remote Repositories (RemoteHub) and can’t wait for your thoughts and feedback. We are just getting started on this journey, so expect the feature set to grow and the limitations to shrink as we continue development. We will also be expanding the set of supported providers. GitHub is just the first provider we are supporting, with Azure Repos coming soon.
TypeScript 4.3
This release continues to improve our support for the upcoming TypeScript 4.3 release. You can read more about the new language features and improvements in TypeScript 4.3 on the TypeScript blog. Here are some of the editor improvements it enables:
To start using the TypeScript 4.3 nightly builds, just install the TypeScript Nightly extension. Please share your feedback and let us know if you run into any bugs with TypeScript 4.3.
Workspace Trust
In last milestone’s release notes, we shared our work on Workspace Trust specifically for extension authors. We made great progress this milestone for both the extension API and user experiences. That being said, Workspace Trust will remain disabled for this release, but we would love for you to try it out and provide feedback.
This dialog is important for allowing the user to make a decision early and understand the impact of their decision. Once you understand the feature, you may want to customize when to display the dialog using the security.workspace.trust.startupPrompt setting.
You can follow the development of Workspace Trust and provide feedback in issue #106488.
Contributions to extensions
Remote Development
Work continues on the Remote Development extensions, which allow you to use a container, remote machine, or the Windows Subsystem for Linux (WSL) as a full-featured development environment.
Feature highlights in 1.56 include:
You can learn about new extension features and bug fixes in the Remote Development release notes.
GitHub Pull Requests and Issues
Work continues on the GitHub Pull Requests and Issues extension, which allows you to work on, create, and manage pull requests and issues.
To learn about all the new features and updates, you can see the full changelog for the 0.26.0 release of the extension.
Extension authoring
Define whether your extension supports a virtual workspace
The new Remote Repositories extension lets you open a folder with content directly from GitHub. It does so by providing a virtual file system and opening a workspace on it. Other extensions do the same. They serve content from ftp-servers, from cloud storage, or from databases and seamlessly provide these as files to the user in VS Code.
The virtual file system feature has existed for some time, however we have observed that not all extensions can support running in a virtual workspace, where the workspace files do not exist physically on disk. For this reason, we have added support for an extension to signal whether it supports running in a virtual workspaces or not. When an extension has opted-out, it will not be activated by VS Code for a virtual workspace and the user will not see errors from this extension.
An extension opts out of a virtual workspace setup in the package.json as shown below:
The goal is that as many extensions as possible support running in a virtual workspace. However, this is not always possible, particularly when an extension is using components that assume that files are physically present. The Virtual Workspaces guide documents how an extension can support a virtual workspace.
Remote indicator menu
Extensions can now contribute to the remote indicator menu:
The statusBar/remoteIndicator menu contribution point adds a command to the remote indicator menu.
To allow the menu to sort entries based on the provider, the group needs to follow a specific syntax:
iframes now used for most webviews
Ever since the webview API was first introduced, we’ve implemented webview using Electron’s webview tag. On the web however, VS Code’s webviews are instead implemented using standard elements since is not available.
We’ve been exploring migrating desktop versions of VS Code to use backed webviews for a while, as this change will give extensions a more consistent webview environment between desktop and web. Migrating off of will also help with our Electron sandboxing efforts.
This iteration, we have switched the majority of webviews over to use iframes. The tag is now only used for webviews that enable the Find widget, and we plan on migrating them to use iframes as well after a bit more engineering work.
This change should not cause issues, however there are some corner cases where the behavior of and elements differ. Be sure to give your extension a quick test pass to verify that everything works as expected.
Easier inspecting of webviews
If you’ve worked with webviews previously, you may remember that you had to use the Developer: Open Webview Developer Tools command to inspect the contents of your webview. This would open a new developer tools panel just for your webview.
This makes it easy to inspect multiple webviews. The developer tools also no longer close when your webview goes away.
In addition, exceptions and console messages that occur inside of webviews are now printed in the top-level developer tools console.
You can also use the developer tools to evaluate expressions in a webview’s context. After opening VS Code’s dev tools with Developer: Toggle Developer Tools, open the console, and select the active-frame for your webview from the context selector.
Overall, being able to use VS Code’s standard developer tools should provide a nicer development experience for webviews.
CodeActionTriggerKind
Providers can use triggerKind to return different sets of results depending on how Code Actions are requested. For example, a refactoring Code Action provider that is triggered automatically may only return refactorings for the exact current selection in order to limit how often the Code Action lightbulb shows up. However when Code Actions are explicitly requested, the same provider may automatically expand the current selection to try to show all the refactorings that a user may be interested in at the current location.
Updated codicons
We’ve added the following new icons to our codicon library:
Keybinding label colors
Keybinding labels are shown when there is a keybinding associated with a command. Usages of the keybinding label include (but are not limited to):
The following customizations are available:
Workspace Trust extension API
Last milestone, we mentioned the work we had been doing on a feature called Workspace Trust. We asked extension authors to keep an eye on issue #120251 for updates and we continue to do so. The following information and updates can be found in that issue as well.
This milestone we moved the Workspace Trust extension API from proposed to stable. This allowed us to release the first cut of our guide for onboarding your extension to Workspace Trust. The API is small, so here is a quick look.
The following example declares that the extension is supported completely in untrusted workspaces. In this case, the extension is enabled in untrusted workspaces.
The next example declares that the extension is not supported in untrusted workspaces. In this case, the extension is disabled in untrusted workspaces.
The third option is to declared limited support. There are three tools provided to you when you select the limited option.
First, if you have a setting that can be configured in the workspace but requires the workspace to be trusted in order to apply the workspace value, then you can include the setting using restrictedConfigurations array property in untrustedWorkspaces object. Doing so, VS Code will ignore the workspace value of these restricted settings when your extension reads these settings values using the VS Code Workspace Configuration API.
The following example declares the settings that are restricted in untrusted workspaces.
Next, you can also check and listen if the current workspace is trusted or not programmatically using the following API:
Lastly, you can hide commands or views declaratively with the isWorkspaceTrusted context key in your when clauses.
Call to Action: Please review the «Workspace Trust Extension Guide» in issue #120251 and set the untrustedWorkspaces.supported value as appropriate for your extension.
Proposed extension APIs
Every milestone comes with new proposed APIs and extension authors can try them out. As always, we want your feedback. This is what you have to do to try out a proposed API:
You cannot publish an extension that uses a proposed API. There may be breaking changes in the next release and we never want to break existing extensions.
Native notebooks
We are preparing large parts of the native notebook API for finalization. We have done numerous little tweaks and also some major changes.
Notebook serializer
We added the NotebookSerializer API. It provides a simplified way to translate «bytes» into NotebookData and vice versa. When you implement this API, your notebook will get features like backup, revert, dirty-state, and others for free. We recommend extension authors adopt this new API and not use the previous content provider-based API.
Notebook controller
The notebook controller API replaces the kernel provider API. Notebook controllers provide the execution engine of your notebook, which create the notebook output. Notebooks can provide multiple controllers or none and VS Code allows users to select controllers. In return, extensions are free to create, modify, and remove controllers as their domain model demands.
Notebook cell Status bar
The NotebookCellStatusBarItemProvider API replaces the createCellStatusBarItem method. It enables extensions to contribute items with labels, icons, and commands, to the Status bar at the bottom of every cell editor. It follows the same provider pattern as many other VS Code extension APIs.
Testing
We intended to finalize a subset of the new testing APIs this month, however we focused on refinement and deferred finalization to next month, tracked in issue #122208. API changes made this iteration were primarily:
With these changes came a few additional features, such as the ability to display raw test output and for extensions to indicate errors in loading tests. We believe these changes provide a solid foundation for additional capabilities going forward and align more closely to our existing extension APIs.
We also created a Test Adapter Converter extension that allows any adapter working with the existing Test Explorer UI extension to automatically plug into native VS Code testing. The converter extension can be installed manually today, and soon it will integrate with the Test Explorer UI for a seamless migration path for existing users and adapters into native testing.
Improved transfer of ArrayBuffers to and from webviews
In current versions of VS Code, sending typed arrays to or from a webview has a few quirks:
While both of these issues are bugs, we also can’t fix them without potentially breaking extensions that rely on the existing behavior. At the same time, there’s zero reason a newly written extension would want the current confusing and inefficient behavior.
If the extension targets VS Code 1.57+, then typed arrays should be recreated on the receiver side and the transfer of large typed arrays to and from webviews should be much more efficient.
Please test out this behavior and let us know if it either doesn’t work as expect or causes unexpected regressions for your existing code.
TerminalOptions.message
This new proposal allows an extension to display a message in the terminal before the process is launched.
Debug Adapter Protocol
Exception breakpoints are better aligned with regular breakpoints
The setExceptionBreakpoints request can now optionally return an array of Breakpoint s similar to other set*Breakpoints requests. This allows clients to show validation error messages for individual exception breakpoints or filters. Starting with this release, VS Code shows these errors in the Breakpoints view.
Restart request can now pick up debug configuration changes
Disconnect debugger and keep debuggee suspended
The disconnect request is used to end a debug session and to either continue execution of the debuggee or to terminate it. There is a new option to keep the debuggee in the suspended state after the debugger disconnects. This makes it possible to pick up debugging with a new session.
A debug adapter implementing this feature must announce its support with the supportSuspendDebuggee capability. A client can use the feature by passing a new optional argument suspendDebuggee to the disconnect request.
Engineering
Electron 12 update
In this milestone, we finished the exploration to bundle Electron 12 into VS Code, thanks to everyone involved with testing and self-hosting on Insiders. This is a major Electron release and comes with Chromium 89.0.4389.114 and Node.js 14.16.0.
Progress on Electron sandbox
This milestone we continued to make the VS Code window ready for enabling Electron’s sandbox and context isolation features.
Service workers now used to load resource in webview
In desktop VS Code, webviews now use service workers to load local resources. Web versions of VS Code have always used service workers for this, but previously desktop VS Code was using an Electron protocol.
Using service workers in the desktop version, lets us better align the behavior of webviews between desktop and web. It also helped us fix a few tricky bugs and let us delete around 1000 lines of code.
While this change should have no impact on the majority of webview extensions, it could cause problems in a few edge cases:
Extensions that make assumptions about how webviews load resources
If your extension was using the vscode-webview-resource: protocol directly or hard coding other assumptions about resource URIs, it may no longer work.
Extensions that set the src of an iframe to point to an HTML file on disk
Service workers cannot not see this request so we no longer support this. This was already the case on web, and we don’t think this pattern is common.
The recommended fix is to not use an iframe and to inline the contents of the HTML file into the webview instead.
No implicit override enabled in codebase
The override keyword has a few benefits:
When reading code, it alerts you that a method is overriding one from the base class
It is an error to try to override a method that does not exist on the base class. This can help catch errors caused by renaming a method in a base class but forgetting to update the method name in the subclasses.
This new strictness rule should also help us catch some common programming mistakes in the future.
Windows installers consolidated in Windows Package Manager
Documentation
Updated introductory videos
The VS Code introductory videos have been updated. The videos range from Getting Started and Using extensions to VS Code features like Debugging and Version Control.
New C++ videos
The C++ extension team has created a set of introductory videos explaining how to configure IntelliSense, build, and debug your C++ projects.
The Story and Technology Behind VS Code
You can read about the history and underlying technology of VS Code in this interview with VS Code engineer, Ben Pasero. Ben talks about the early days of VS Code and what it’s like to use Electron as an application framework enabling VS Code run on macOS, Windows, and Linux.
Partner extensions
Azure Machine Learning
The Azure Machine Learning extension enables you to create and manage powerful cloud computing resources for your machine learning workflows. With its remote capabilities, you can seamlessly connect to your compute resources in a secure, auditable, and compliant manner.
Notable fixes
Thank you
Last but certainly not least, a big Thank You to the following people who contributed this month to VS Code:
Contributions to our issue tracking:
Contributions to vscode :
Contributions to vscode-eslint :
Contributions to vscode-json-languageservice :
Contributions to vscode-vsce :
Contributions to debug-adapter-protocol :
Contributions to vscode-js-debug :
August 2021 (version 1.60)
Update 1.60.1: The update addresses these issues.
Update 1.60.2: The update addresses these issues.
Welcome to the August 2021 release of Visual Studio Code. There are many updates in this version that we hope you will like, some of the key highlights include:
If you’d like to read these release notes online, go to Updates on code.visualstudio.com.
Join us live at the VS Code team’s livestream on Thursday, September 2 at 8am Pacific (4pm London) to see a demo of what’s new in this release, and ask us questions live.
Insiders: Want to try new features as soon as possible? You can download the nightly Insiders build and try the latest updates as soon as they are available.
Workbench
Automatic language detection
Last release, we introduced an experimental feature for untitled files that would automatically set the language mode for the file based on the contents. The automatic language detection feature uses machine learning to guess the language and the machine learning model runs entirely local on your machine. The model is powered by the open-source ML library, Tensorflow.js, and the ML model from Guesslang by GitHub user @yoeo.
This release we are enabling automatic language detection by default and also expanding detection to include files that don’t have a file extension. In Notebooks, we provide an easy way to ask for language detection using the language picker.
We added this feature because we found that some new users of VS Code didn’t know how to set the language mode and didn’t know that this is needed in order to get VS Code’s rich feature set (language colorization and extension recommendations). Enabling new users to quickly see the language features and extensions available for VS Code helps them as they ramp up on the editor.
In addition, power users who use untitled text editors as a scratch pad, no longer need to explicitly set the language mode, which we hope will streamline their workflow.
Below are several fun scenarios enabled by automatic language detection.
Grab an example from online and paste it in an untitled editor:
«Pipe into code» language detection (showing off detection of extension-less files):
Auto detect option in the Notebooks language picker:
Terminal editor confirmation dialog
The dialog presented when closing a terminal editor with running child processes is now specific for the terminal editor and will no longer offer a way to «Save» the terminal.
Keep editors open instead of closing when they fail to restore
Previously, when an editor failed to restore after reload of the window or restart of the application, the editor would automatically close until an editor was found that successfully loads. This behavior led to frustrating results, where a carefully created editor layout would go away due to editors closing.
With this release, an editor that was once successfully opened will not close, even if it fails to restore. The editor indicates the problem and offers to retry the operation:
Syntax highlighting of codeblocks in the Settings editor
Fenced code blocks in setting descriptions are now syntax highlighted:
Open Settings editor to the side
It’s now possible to open the Settings editor in a side group by configuring a keybinding using the openToSide argument.
This also works with the workbench.action.openSettingsJson command.
Editor
High performance bracket pair colorization
The editor now supports native bracket pair colorization:
We implemented this feature to address performance issues of the famous Bracket Pair Colorizer extension by CoenraadS.
Now, even changes in huge documents are reflected immediately:
Inline suggestions in autocomplete
Inline suggestions can now extend the suggestion preview when the autocomplete widget is shown. If a suggestion that is selected in the autocomplete widget can be extended by an inline completion provider, the extension is shown in italic. Pressing Tab once will still only accept the autocomplete suggestion. Pressing Tab a second time will then accept the inline suggestion.
This feature requires the suggest preview to be enabled ( «editor.suggest.preview»: true ).
Updated Peek views
We’ve given the Peek views a visual refresh to align with the rest of the other editor views:
Terminal
Custom rendering of box drawing and block element characters
Box drawing and block element characters now use pixel-perfect custom glyphs instead of using the font when GPU acceleration is on ( terminal.integrated.gpuAcceleration ). This means, for example, that boxes are drawn without gaps, even if you set line height or letter spacing in the terminal.
Here is an example of the terminal app Zenith that shows the box drawing characters around sections as well as block elements for the charts:
Improved rendering of underscore for certain fonts
There were some historical issues with how underscore is rendered in the terminal, most of which were fixed by switching to the WebGL renderer (default). There was one exception to this, where the underscore character in the font is unexpectedly drawn below the bounds of the cell on Linux.
Notice how the underscore on the lower row is rendered below the cell:
While this works fine in most cases, it fails on the bottom row because it is drawn outside the bounds of the canvas.
We now work around this problem by detecting such a font and shifting the underscore texture up until it is within the bounds of the cell. This solution also applies to the canvas renderer, which previously wouldn’t show underscores for any rows because of how it clips the rows to avoid overlapping.
Faster reconnection after reloading the window
Previously, when reloading a window, it could take up to 300 ms to parse the state of a terminal’s buffer and there was also the possibility of corruption. For several busy terminals, this can quickly add up! To fix this, the method of restoring the buffer has changed from recording a large number of recent raw terminal events on the pty host to maintaining a headless terminal frontend on the pty host and writing all data to that.
This approach brings several benefits:
How much of a speedup this new implementation provides depends on many factors, like the number of terminals, hardware, terminal buffer size, and what was happening in the terminal. A rough estimate of restoring a full terminal buffer should yield an approximate speedup of 5-10x.
We also published the new xterm-headless package on npm, so you can use this work in your own project.
Debugging
Set Value in WATCH view
It is now possible to set the value of a watched expression in the WATCH view using the Set Value action in the context menu.
Debug extensions have to opt into this feature in order for Set Value to be available. For now, the JS-debug, C#, and C++ extensions support this, but we expect other debug extensions to follow soon.
Minor UI improvements
VS Code now detects links for values also in the VARIABLES view, WATCH view, and Debug hover. When a variable’s value is a link, this will make it easier to follow that link by clicking on it.
When starting another instance of a debug session that is already running, there is now a modal confirmation dialog to prevent accidentally starting two sessions.
Clicking on a disabled breakpoint in the editor’s breakpoint gutter now enables the breakpoint instead of removing it.
When a debug session is active, the Run To Line action is now available in the editor’s breakpoint gutter context menu:
New settings
JavaScript debugging
Legacy node debuggers are gone
VS Code has long included a built-in Node.js debugger, and published a separate Chrome debugger. Last year we introduced a new debugger for Node.js and Chrome, and since VS Code 1.47 (July 2020) it has been the default, with an ‘opt out’ option.
With this release, the old debuggers have been removed from the product and marked as deprecated on the Marketplace. If you’re among the majority of VS Code users who didn’t opt out of the new JavaScript debugger, nothing will change for you.
If you require the old debuggers—to debug Node.js 6 programs, for example—you can install the [Deprecated] Node Debug or [Deprecated] Debugger for Chrome extension and use the legacy-node or legacy-chrome launch types, respectively.
Improved stepping in async functions and Node.js internals
You can set the debugger’s skipFiles to avoid stepping into certain code, including Node.js internals, which can often be hit when stepping around async functions.
However, Node.js does not always exhibit correct behavior when dealing with «blackboxed» scripts, so this iteration we’ve introduced «synthetic blackboxing» in the debugger. This should result in significantly improved reliability when working with Node.js programs, particularly when stepping into async functions.
In our next release, we plan to make the debugger skip Node.js internals by default.
Installer
Register VS Code for supported file types by default
Windows 11 introduces a new File Explorer context menu that puts Open With to the top of the menu, grouped with Open. The update makes it easier to find all available editors and change defaults.
Following the new best practices, VS Code’s checkbox Register VS Code to be the editor for associated file types will now be checked on by default during Windows installation. We also reviewed the list of associated file types and expanded it to include more of the frequently opened file types.
Microsoft Store on Windows 11
With the upcoming Windows 11, the new Microsoft store can support more traditional application types and installers. If you are already testing Windows 11 via the Windows Insiders program, you can now install the latest release of VS Code today by searching for it in the store. Once installed, you will have the same VS Code that is available as a user install from our website and updates will be handled in-app, just like they are today.
Notebooks
Links between Markdown cells
Notebooks now support links between Markdown cells:
You can create a link to a header in a Markdown cell using:
Performance improvements when dealing with large outputs
We’ve optimized how we deal with large outputs in notebooks to significantly improve performance.
Behind the scenes, VS Code stores notebook outputs as binary data using Uint8Arrays. Previously, when transferring output data between the extension host process and the renderer process, data was first converted to an array of number values and then serialized to JSON.
That data is 11 bytes long. The old implementation would then convert the binary data to a JSON string:
With the new implementation, notebook outputs are kept as binary data while transferring them. You can read more about the details of how this was implemented in the pull request.
This fix significantly improves both loading of notebooks with large outputs saved into them, as well as improving performance when notebooks generate large outputs during execution.
onNotebook activation event improvement
Notebook layout customization
You can now customize the notebook layout settings directly through the editor toolbar.
Language Features
TypeScript 4.4
VS Code now includes TypeScript 4.4. This update brings support for a number of new language features and improvements, including static blocks and new strictness options. It also adds new tooling improvements and fixes some important bugs.
You can read all about TypeScript 4.4 on the TypeScript blog.
Inlay hints for JavaScript and TypeScript
The most significant new tooling feature in TypeScript 4.4 is inlay hint support. Inlay hints add additional inline information to source code to help you understand what the code does.
Parameter name inlay hints, for example, show the names of parameters in function calls:
This can help you understand the meaning of each argument at a glance, which is especially helpful for functions that take Boolean flags or have parameters that are easy to mix up.
To enable parameter name hints, set javascript.inlayHints.parameterNames.enabled or typescript.inlayHints.parameterNames.enabled settings. There are three possible values:
In addition, VS Code also offers inlay hints that show implicit type information in your JavaScript and TypeScript code.
Variable type inlay hints show the types of variables that don’t have explicit type annotations.
Property type inlay hints show the type of class properties that don’t have an explicit type annotation.
Settings- javascript.inlayHints.propertyDeclarationTypes.enabled and typescript.inlayHints.propertyDeclarationTypes.enabled
Parameter type hints show the types of implicitly typed parameters.
Return type inlay hints show the return types of functions that don’t have an explicit type annotation.
We plan to continue improving inlay hints going forward so be sure to share any feedback you have on the new feature!
Spelling suggestions in JavaScript files
VS Code now helps you catch simple spelling mistakes in JavaScript files:
Spelling suggestions are only shown if there is fairly high confidence that they are actual mistakes and not just code patterns that our IntelliSense engine doesn’t understand. You can read more about the details of this in the PR that added the feature.
You also can disable these suggestions by setting:
For more comprehensive checking, try enabling full semantic checking in your JavaScript code. Not only can this help catch more errors, it also enables several helpful Quick Fixes.
typescript.tsserver.useSyntaxServer
The new typescript.tsserver.useSyntaxServer setting allows you to control if TypeScript launches a dedicated server to quickly handle syntax-related operations, such as computing code folding. It replaces the now deprecated typescript.tsserver.useSeparateSyntaxServer setting.
Possible values are:
Preview features
Locked editor groups
With the introduction of terminals in the editor area, we received reports from users who were frustrated that a terminal editor would be replaced with a file editor too easily or by accident. By default, files will always open in the active editor group and thus, even when a terminal was active, a file would open and hide the terminal.
Locked editor groups provide a new way of handling this issue, not only for terminals but for any editor. If you have more than one editor group opened, you can now lock it, either using one of the new commands or from the «. « overflow menu:
Locked groups behave differently than unlocked groups:
See the following demo of how locked editor groups behave in action. Even though the Markdown preview is active, new files will open in the left editor group:
The commands added for this feature are:
A new context key activeEditorGroupLocked is available to conditionally bind commands depending on the locked state of a group.
Note: The associated setting and commands are experimental until we have finalized the design of locked editor groups. We want your feedback on this new feature, so please do not hesitate to report issues.
Auto-lock an editor group
Building on top of the new locked editor groups concept, the new workbench.editor.experimentalAutoLockGroups setting allows you to select editors that should lock a group automatically when they open. This only applies when the editor is the first to open in an otherwise empty or new group.
Terminals are configured by default to cause a new group to lock automatically. In the short video below, even though the terminal is active, the selected file from the terminal will open in the left editor group:
If you want Markdown previews to lock a group automatically, you can add mainThreadWebview-markdown.preview: true to the experimentalAutoLockGroups setting.
In the next milestones, we will work on improving the settings UX to be able to pick editors without having to know their identifiers. The associated setting and commands are experimental until we have finalized the design of locked editor groups. Again we would like your feedback.
Quotes support in the «Search by file name» Quick Pick
This iteration, we have added the ability to exclude fuzzy search results from the «Search by file name» Quick Pick ( ⌘P (Windows, Linux Ctrl+P ) ) by placing the search string in quotes.
Scenarios where this shines:
When a query is only a few characters:
If you want to reduce the «clutter» of the results:
We like this quoting experience and it feels intuitive since most search engines use a similar mechanism, but we’d like your feedback. We are also considering other approaches discussed in issue #131431.
Contributions to extensions
Jupyter
Run By Line
VS Code now supports the Run By Line feature in Jupyter notebooks. This is a simple debug mode that lets you execute the code of a cell line by line. To try it out, make sure that you have ipykernel v6+ installed as your selected kernel, then select the Run By Line button.
Debugging
Jupyter Keymap
We extracted the Jupyter classic keybindings to a separate Jupyter Keymap extension, which you can disable if you prefer to use another set of notebook keybindings from the Marketplace.
Python
Revamped testing interface
Thanks to the new testing API, the Python extension has revamped its testing features. You can now enjoy a more stable experience for test discovery, navigation, and status rendering, as well as new features such as search tests, run a selection of tests, rerun last executed test, and more!
Run and debug Python files in the terminal from the editor
You can now run and debug your Python files in the terminal directly from the editor with the Python extension.
GitHub Pull Requests and Issues
The much requested ability to expand and collapse all comments in the GitHub Pull Requests and Issues extension is now available. All comments can be expanded and collapsed via the commands GitHub Pull Requests: Expand All Comments and GitHub Pull Requests: Collapse All Comments. There is also a setting githubPullRequests.commentExpandState to control the expand collapse state. Finally, you can also collapse all comments from within the commenting UI:
To learn about all the new features and updates, you can see the full changelog for the 0.30.0 release of the extension.
Extension authoring
Web extensions
When VS Code is running in a browser, extensions are loaded into an extension host also running in the browser. The «web extension host» is constrained by the browser and extensions do not have access to the local file system or platform features. To help extension authors update their extensions to support running in VS Code for the web, there is now a Web Extensions authoring guide. Here you will learn which types of extensions work best on the web, how to access the VS Code APIs, and work with virtual file systems.
Along with the web extension guide, the yo code extension generator now has an option to scaffold a Web Extension, and also includes support for the @vscode/test-web module to test web extensions from the command line.
If you haven’t seen Visual Studio Code for the Web in action, you can press ‘.’ (the period key) in the <> Code tab of a GitHub repository and you will launch a web-based version of VS Code to browse and edit the source code.
Short title for commands
The commands contribution point allows extensions to define UI-properties for commands, like title, category, or icon. Menus, on the other hand, are «places» that display commands and menus may present some or all of the command’s UI-properties. For instance, some menus render only icons while others render titles or category plus title. As an extension author, it can be hard to come up with a command title that works equally well for global and local menus. For example, the Command Palette can display more words than a context menu.
To allow for different titles, there is a new shortTitle property. It allows commands to provide a shorter title that works well depending on the UI, such as Notebook: Clear All Cell Output in the Command Palette and shorter Clear All in the notebook toolbar.
Application host added to environment namespace
RendererContext.workspace.isTrusted for notebook renderers
The new workspace.isTrusted property on the context object passed to notebook renderers lets extension authors check if the current workspace is trusted or not:
Platform-specific extensions
We have been making progress on platform-specific extensions, which allow extensions authors to create separate extension versions for different platforms (Windows, macOS, Linux). We have been working with the Marketplace team on this feature and have finalized on a solution. In this milestone, we started on the implementation and plan to bring it to extension authors soon. You can follow issue #23251 for updates and to provide feedback.
Updated codicons
The following new icons were added to our codicon library:
Updates to Walkthrough contributions
Using themeable SVG’s as Walkthrough step media
Walkthrough steps can now specify a svg property in their media object. In addition to better scaling support, SVG’s provide access to theme tokens, which can allow the media to visually fit in with the rest of the workbench. See our guide on theming webview content for more information.
Declaring the files of interest for a Walkthrough
Walkthroughs now support an optional featuredFor parameter, which lists out the file types that a given walkthrough applies to. When these files are found in a workspace folder, the walkthrough will be rendered with higher visual priority.
Tasks default group API
The isDefault property for TaskGroup has been finalized. Extensions can now fetch tasks then read the isDefault property of the task’s group to determine if a task is the default for that group.
Debugger extension authoring
New «managedByParent» property on «DebugSessionOptions»
A new flag managedByParent has been added to the DebugSessionOptions type. When passed to the startDebugging API, it controls whether lifecycle requests like disconnect and restart are sent to the newly created session or its parent session.
Debug Adapter Protocol’s «showUser» property
VS Code no longer registers breakpoints for «noDebug» debug sessions
VS Code now supports the DAP «setExpression» request
If a debug adapter implements the setExpression request (the supportsSetExpression capability is true ), VS Code will use setExpression in two situations:
Suppressing the ‘Open launch.json’ button in DAP error messages
Debug Adapter Protocol
New «memory» event released
The memory event has been finished and is now available in version 1.49 of the Debug Adapter Protocol and the corresponding npm modules. If a debug adapter has received a value true for the supportsMemoryEvent capability of the initialize request, the debug adapter can emit the memory event to indicate that some memory range has been updated.
Proposed extension APIs
Every milestone comes with new proposed APIs and extension authors can try them out. As always, we want your feedback. This is what you have to do to try out a proposed API:
You cannot publish an extension that uses a proposed API. There may be breaking changes in the next release and we never want to break existing extensions.
Support for type hierarchy
There is an API proposal for a TypeHierarchyProvider that allows extensions to provide supertypes and subtypes for symbols. The API is ready to try out and if you find issues or have suggestions, you can enter them in the VS Code repository.
Create terminals anywhere
The proposed terminal location API allows creating both terminal splits in the panel as well as in the editor area.
Query and event for whether a terminal has been «interacted with»
A new proposed API for Terminal.state and window.onDidChangeTerminalState allows querying whether a terminal has been «interacted with». An interaction means that data has been sent to the process, and could happen for various reasons, the main one being keyboard input.
Buttons in QuickPickItems
There is a proposed API for adding and handling buttons in a QuickPickItem. We hope this will enable extensions to provide richer user interactions with the Quick Pick.
Try it out and let us know what you think. One thing to note is that there is currently a known issue around the scroll position of the Quick Pick, which we think will be amplified by this new proposed API. We are working on the right set of APIs to address this issue. Please let us know your thoughts by engaging in the issue.
Test tags
Test tags are a proposed API that provide both a method for organizing tests, as well indicating which tests are runnable.
Non-error test output
The test API supports test failure messages, but previously didn’t have a way to associate non-error output with a certain test case. We’re evaluating a way to do this, by passing an optional TestItem and location to the TestRun.appendOutput method. Please leave feedback on issue #129201 if you have any input!
Inline Completion Provider: Interaction with Autocomplete widget
The InlineCompletionContext has a new field selectedCompletionInfo that contains details of the currently selected suggestion in the autocomplete widget. Also, InlineCompletionItemProvider s are asked for inline suggestions whenever the user changes the selected item in the autocomplete widget. If the inline suggestion extends the selected suggestion item, the extension is shown in italic.
Engineering
Fix support for RHEL7 and Centos7 distros
In VS Code version 1.53, we updated our build images to consume newer Electron versions causing a change in CXXABI requirements for native modules that broke our rpm packages in some distros issue #115784. With update to Electron v13, we are now able to build our native modules with the same compiler toolchain as the runtime, specifically we now use Clang and statically link the libcxx from the runtime. This allows us to bypass the CXXABI requirements for only a small increase in binary size
10 MB and bring back support for these distros. Thanks for your patience and help with testing on Insiders.
Documentation
Julia in VS Code
There is a new Julia in Visual Studio Code topic describing Julia programming language support in VS Code with the Julia extension. The Julia extension includes rich language features such as code completions, code navigation, and debugging as well as an integrated REPL and plot navigator.
Azure Machine Learning
You can read the Azure Machine Learning in VS Code overview to learn how the Azure Machine Learning extension lets you work with Azure Machine Learning cloud-based machine learning models directly from VS Code.
Notable fixes
Thank you
Last but certainly not least, a big Thank You to the following people who contributed this month to VS Code:
Contributions to our issue tracking:
Contributions to vscode :
Contributions to vscode-generator-code :
Contributions to vscode-js-debug :
Contributions to vscode-pull-request-github :
Contributions to debug-adapter-protocol :
Contributions to language-server-protocol :
Contributions to monaco-editor :
July 2021 (version 1.59)
Update 1.59.1: The update addresses these issues.
This release also addresses CVE-2021-26437.
Welcome to the July 2021 release of Visual Studio Code. There are many updates in this version that we hope you will like, some of the key highlights include:
If you’d like to read these release notes online, go to Updates on code.visualstudio.com.
Join us live at the VS Code team’s livestream on Tuesday, August 10 at 8am Pacific (4pm London) to see a demo of what’s new in this release, and ask us questions live.
Insiders: Want to try new features as soon as possible? You can download the nightly Insiders build and try the latest updates as soon as they are available.
Workbench
Extensions
Improved Extensions view on resize. In the following short video, the Extensions view with default width shows all details (previously the icon, ratings, and install count were not shown). As the view shrinks, a smaller extension icon is shown, and when its width reduces further, the icon and ratings are hidden.
The Extensions view now shows a custom hover on an extension. This rich hover includes the complete description of the extension and other useful information such as why an extension is disabled or recommended.
You can now check the runtime status of an extension in the new Runtime Status tab in the extension pane. Status information includes its activation time, whether it is activated on startup, and if it has any warnings or errors. Some of this information is displayed in the Extensions view and its hover (shown in the image above).
The Extension pane Details tab now shows categories, resources links, and other information such as the extension release and update dates. Selecting a category will display other extensions in that category in the Extensions view.
Settings editor
The Settings editor now supports validation on objects. The validation checks for type errors that can be introduced when editing the JSON file directly.
Array settings now have drag and drop support in non-editing mode. Moreover, enum array settings with the property uniqueItems set to true now only show remaining options rather than all options in the dropdowns:
The Settings editor also now supports multiline string settings, where the value is rendered in a multiline text area instead of a single-line input box:
Extended theme customization syntax
The color customization settings listed below allow users to customize colors of the current theme:
There is new syntax to customize multiple themes at once:
Multiple themes can be listed as well as the * wildcard character can be used at the beginning and the end of the name.
Support for Jupyter Notebooks
This month, we moved the code that handles reading *.ipynb files from the Jupyter Notebook extension into a new built-in extension. This means that you can now open Jupyter notebooks in a clean install of VS Code, without having to install the full Jupyter extension. However, if you want to execute cells or view outputs that use ipywidgets or other complex renderer types, you will have to install the Jupyter extension.
Notebook layout improvements
We have made a few improvements to the notebook layout this iteration:
We also updated the default styles for code cells and now show a background color to help distinguish cells apart. Themes can use notebook.cellEditorBackground to customize this color.
Lastly, you can now toggle the text labels on the notebook toolbar using the setting notebook.globalToolbarShowLabel :
Configure the path separator for Copy Relative Path
A new setting explorer.copyRelativePathSeparator allows you to explicitly set the path separator when invoking the Copy Relate Path action.
The available separator options are:
Share view state across editor groups
A new setting workbench.editor.sharedViewState was added to configure how editor view state (for example, the scroll position in the editor) is shared across editor groups.
By default, this setting is disabled to preserve the current behavior. If you open an editor to the side and close that editor group later, only to open the editor again to the side, no view state is restored because you are opening a new editor group. However, when you enable this setting, the most recent editor view state is preserved across all editor groups and will be used, unless more specific view state is found for the editor group.
Below the selection state is preserved when reopening the package.json file to the side.
Editor
Navigate between folding regions
There are new commands to set the cursor location to a corresponding fold:
The commands currently have no default keybindings but you can add you own keyboard shortcuts via Preferences: Open Keyboard Shortcuts ( ⌘K ⌘S (Windows, Linux Ctrl+K Ctrl+S ) ).
Automatically fold imports
Seed search string from selection
The Find control setting editor.find.seedSearchStringFromSelection has been extended to support seeding the search string only from non-empty selection. By default, the editor will use the selection or the word around the empty selection as the search keyboard when the Find control is revealed.
Inline suggestions improvements
We have changed the way inline suggestions are rendered. This not only fixes a lot of bugs, but also makes word wrapping aware of inline suggestions.
In addition, multi-line inline suggestions at non-trailing positions are now supported.
Inlay hints improvements
We have also changed the way inlay hints are rendered. By using the same mechanism as for inline suggestions, inlay hints are now also taken into account for word wrapping. This mechanism also enables separate cursor stops around inlay hints.
Terminal
Drag and drop terminals across windows
Drag and drop terminals from the tabs list or editor area of one window into the tabs list, editor area, or panel of another window.
Child process tracking and close warnings
The existing terminal.integrated.confirmOnExit and new terminal.integrated.confirmOnKill settings use child process tracking to display a warning when trying to close a terminal that has child processes under the shell process. By default, this tracking only affects terminals in the editor area but can now be configured to show warnings for all terminals or those in the panel area.
Set contributed terminal profile as default
Terminal profiles contributed by extensions can now be set as the default profile. The default terminal profile is indicated by the Default suffix in the terminal dropdown.
Underline and strikethrough support
The integrated terminal now supports underline and strikethrough attributes. For example, Git can be configured to use these new attributes:
Create terminal in editor area to the side
There is a new command workbench.action.createTerminalEditorSide to create a terminal in the editor area to the side of the active editor.
Active terminal tab indicator
The color will fall back to tab.activeBorder if terminal.tab.activeBorder is not set.
Disable animation in terminal tab icon
The new setting terminal.integrated.tabs.enableAnimation will disable animation in the terminal tab icon. For tasks, the play button is used, instead of a spinner animation:
Debugging
Improved Run/Debug button in editor title
In the February release, we introduced a dropdown button to group the Run and Debug commands in a central (and compact) location in the editor’s title area (refer to the 1.54 release notes). Based on user feedback, we’ve tried to improve the dropdown button by remembering the last executed action. The dropdown button now has two click zones, one for the default action (left) and another for the dropdown (right) which, when selected, runs the action and remembers it as the new default.
The dropdown behavior:
Contributions to extensions
Live Preview
The Live Preview extension, released last month, has some exciting new features. These include:
To see more details on this month’s progress, see the extension’s release notes.
GitHub Pull Requests and Issues
Work continues on the GitHub Pull Requests and Issues extension, which allows you to work on, create, and manage pull requests and issues. One of this month’s highlights is that Start working on an issue has been expanded to let you work on issues outside of your current repository.
To learn about all the new features and updates, you can see the full changelog for the 0.29.0 release of the extension.
Jupyter
Work continues on the Jupyter extension. To learn about all the new features and updates, you can read the full changelog for the July release of the extension.
If you’d like to know more about VS Code’s path to enabling native support for notebooks, you can read the recent Coming of Age of Notebooks blog post.
Interactive window
The Jupyter Interactive window provides an alternative way to build and work with Jupyter notebooks, using a text file instead of a notebook interface. Last month, we previewed an upgraded version of the Jupyter Interactive window, featuring deeper workbench integration including support for themes, custom keybindings, snippets, compatibility with extensions, and more. Many thanks to our users for providing feedback via GitHub issues on the preview experience. The built-in Interactive window is now the default interface in 1.59. The previous interface will remain available behind the setting «jupyter.enableNativeInteractiveWindow»: false and will be removed in an upcoming release. We look forward to your feedback.
Run By Line
Python
In the Python extension, we’ve improved the sorting of the list of Python interpreters. In the past, virtual environments would be displayed at the bottom of the list, resulting in a lot of scrolling and/or searching. Virtual environments located on the project root are now displayed first, followed by globally installed environments.
Remote Containers devcontainer CLI
You can learn about new Remote Development extension features and bug fixes in the Remote Development release notes.
Preview Features
Automatic language detection of untitled files
We’re excited to announce the initial preview of automatic language detection of untitled files that uses machine learning to detect which language you are coding in and automatically sets the language mode of the untitled file. This feature uses the open-source ML library, Tensorflow.js, and the ML model from Guesslang by GitHub user @yoeo.
In this release, this feature will be off by default but we plan on making it the default next iteration. To enable it, apply the following setting:
To see the feature in action, open an untitled file (File > New File) and paste source code into your editor.
Here’s an example of autodetection of Python code:
Additionally, you can see what language(s) are being detected by opening the language picker.
Note: If language detection isn’t confident enough, then you will stay in your current language mode and no results will show in the language picker until language detection has more confidence.
The setting also allows you to provide language overrides to specify language modes you don’t want to be automatically switched away from.
Here’s an example to not autodetect Markdown files:
With the settings above, automatic language detection will not run while you are editing an untitled Markdown file. However, if you modify an untitled file of any other kind, automatic language detection will run with the contents of those files.
We’ve separated the code that interacts with the ML model into its own library, released as an npm package, in the vscode-languagedetection repo.
Let us know how automatic language detection for untitled files works for you!
TypeScript 4.4
This release includes support for the upcoming TypeScript 4.4 release. You can read more about the new language features and improvements in TypeScript 4.4 on the TypeScript blog. Some tooling highlights:
To start using the TypeScript 4.4 nightly builds, install the TypeScript Nightly extension.
Please share your feedback and let us know if you run into any bugs with TypeScript 4.4.
Disassembly view
Thanks to a large contribution by the Microsoft C++ team, we are happy to include a preview of a debug Disassembly view in this milestone.
The Disassembly view can be opened from an editor’s context menu to show the disassembled source of the active stack frame, and it supports stepping through assembly instructions and setting breakpoints on individual instructions.
The Disassembly view is only available in an active debug session and when the underlying debug extension supports it. As of today only the Microsoft C++ and Mock Debug extensions can feed the Disassembly view.
From a technical perspective, VS Code’s implementation of the Disassembly view now supports four more features of the Debug Adapter Protocol:
Extension authoring
Testing APIs
Last fall we began work on adding native support for running tests in VS Code, and this month the first set of testing-related APIs has been finalized. These APIs provide greater flexibility, better performance, and richer UX over what has been found previously in extensions. Check out the guide on writing testing extensions to dive in.
One of the first extensions to adopt the testing API was the Microsoft Test Runner for Java included in the Extension Pack for Java.
Contribution point for New File menu
Extensions that provide a way to create a new file editor, for instance notebooks or custom editors, can now contribute commands to the new file/newFile menu contribution point. This menu can be accessed from the New File. item on the Welcome page or in the File menu.
Rich Status bar hover
Status bar warning colors
Object settings without additionalProperties
Object settings must have additionalProperties set to false for an object to be supported in the Settings editor. Otherwise, the Settings editor will interpret the setting as a complex setting that can take on any shape, and direct the user to the settings JSON file.
Multiline string settings
To add support for a multiline string setting in the Settings editor, add «editPresentation»: «multilineText» as a key-value pair to the string setting. Changing a string setting to be multiline will cause the Settings editor to render the setting value in a multiline text area instead of a single-line input box.
Updated codicons
We’ve added the following new icons to our codicon library:
Text Document change reason
When the event workspace.onDidChangeTextDocument is fired, a new property reason on the event object indicates whether the text change was caused by an Undo or Redo operation.
Language Server Protocol
A new next version of the Language Server Protocol, together with the corresponding npm modules, has been published. The 3.17 version contains a proposal for the completion item label details that is in line with the latest changes in VS Code itself.
Debug Adapter Protocol
Finalized «writeMemory» request and «memory» event proposal
The writeMemory request has been finalized and is now available in version 1.48 of the Debug Adapter Protocol and the corresponding npm modules. If a debug adapter has a supportsWriteMemoryRequest capability, clients can use the writeMemory request to write bytes to memory at a given location.
The memory event has a proposal that will be added to DAP in the next milestone.
Proposed extension APIs
Every milestone comes with new proposed APIs and extension authors can try them out. As always, we want your feedback. This is what you have to do to try out a proposed API:
You cannot publish an extension that uses a proposed API. There may be breaking changes in the next release and we never want to break existing extensions.
isDefault for TaskGroup
forceRecreate for AuthenticationGetSessionOptions
Until now, the getSession API, which is used to get an authentication session object, never had the ability to ask the user to log in. Prompting a login is needed for authentication services like GitHub, that use SAML/Single Sign On (SSO) with an access token that eventually looses access to resources when an SSO session expires. This proposal adds another property to AuthenticationGetSessionOptions called forceRecreate that allows you to ask the user to sign in again. A modal experience similar to when you specify createIfNone is shown to the user.
Engineering
iframe based webviews now used everywhere on desktop
This month we finished our transition from Electron’s webview tag element to normal element based webviews. This better aligns the implementation of VS Code’s webviews across desktop and web, and also lets us delete a lot of now-redundant code.
Electron 13 update
In this milestone, we finished the exploration to bundle Electron 13 into VS Code and we want to thank everyone involved with testing and self-hosting on Insiders. This is a major Electron release and comes with Chromium 91.0.4472.124. There is no change to the Node.js version with this release and it will remain v14.16.0.
Progress for Electron sandbox support
We were able to preserve these conditions for deb and rpm packages. It is currently not possible to achieve these permissions for snap, and we have tracking issue #127140 to address snap packages moving forward.
As for using the tar archive, if the application cannot use the namespace sandbox, which might the case when running inside containers, it will fail with the following error:
If that happens, you can use either of the following two options to get it working:
Fix the permissions of setuid helper
Smoke test improvements
We run a suite of smoke tests, triggered on each build, that launch VS Code (both desktop and web) and exercise various UI elements to ensure proper functionality. This milestone we invested in this infrastructure to allow us to remove manual smoke testing from our release checklist.
The smoke tests now run on all platforms (macOS, Linux, and Windows). On top of that, one of our more involved smoke test suites that specifically checks for regressions between the last Stable version of VS Code and the new release, has been automated to run on each commit.
Finally, thanks to the awesome Playwright library, which we use for automated web smoke testing, we enabled their tracing capabilities to allow us to replay failing smoke tests using their trace viewer tool.
Notable fixes
Thank you
Last but certainly not least, a big Thank You to the following people who contributed this month to VS Code:
Contributions to our issue tracking:
Contributions to vscode :
Contributions to vscode-extension-samples :
Contributions to vscode-languageserver-node :
Contributions to vscode-pull-request-github :
Contributions to vscode-vsce :
Contributions to debug-adapter-protocol :
Contributions to language-server-protocol :
Contributions to monaco-editor :
Contributions to monaco-languages :
Code editing. Redefined.
Free. Built on open source. Runs everywhere.
By using VS Code, you agree to its license and privacy statement.
Meet IntelliSense.
Go beyond syntax highlighting and autocomplete with IntelliSense, which provides smart completions based on variable types, function definitions, and imported modules.
Print statement debugging is a thing of the past.
Debug code right from the editor. Launch or attach to your running apps and debug with break points, call stacks, and an interactive console.
Git commands built-in.
Working with Git and other SCM providers has never been easier. Review diffs, stage files, and make commits right from the editor. Push and pull from any hosted SCM service.
Extensible and customizable.
Want even more features? Install extensions to add new languages, themes, debuggers, and to connect to additional services. Extensions run in separate processes, ensuring they won’t slow down your editor. Learn more about extensions.
Deploy with confidence and ease
With Microsoft Azure you can deploy and host your React, Angular, Vue, Node, Python (and more!) sites, store and query relational and document based data, and scale with serverless computing, all with ease, all from within VS Code.
VS Code for
Want new features sooner?
Use vscode.dev for quick edits online!
GitHub, Azure Repos, and local files.
License and Privacy Terms
By downloading and using Visual Studio Code, you agree to the license terms and privacy statement. VS Code automatically sends telemetry data and crash dumps to help us improve the product. If you would prefer not to have this data sent please go see How to Disable Crash Reporting to learn how to disable it.
Getting Started with Java in VS Code
This tutorial shows you how to write and run Hello World program in Java with Visual Studio Code. It also covers a few advanced features, which you can explore by reading other documents in this section.
For an overview of the features available for Java in VS Code, see Java Language Overview.
If you run into any issues when following this tutorial, you can contact us by entering an issue.
Setting up VS Code for Java development
Coding Pack for Java
To help you set up quickly, you can install the Coding Pack for Java, which includes VS Code, the Java Development Kit (JDK), and essential Java extensions. The Coding Pack can be used as a clean installation, or to update or repair an existing development environment.
Note: The Coding Pack for Java is only available for Windows and macOS. For other operating systems, you will need to manually install a JDK, VS Code, and Java extensions.
Installing extensions
If you are an existing VS Code user, you can also add Java support by installing the Extension Pack for Java, which includes these extensions:
The Extension Pack for Java provides a Quick Start guide and tips for code editing and debugging. It also has a FAQ that answers some frequently asked questions. Use the command Java: Tips for Beginners from the Command Palette ( ⇧⌘P (Windows, Linux Ctrl+Shift+P ) ) to launch the guide.
You can also install extensions separately. The Extensions Guide is provided to help you. You can launch the guide with the Java: Extensions Guide command.
For this tutorial, the only required extensions are:
Installing and setting up a Java Development Kit (JDK)
To use Java within Visual Studio Code, you need to install a Java Development Kit (JDK) on your local environment. JDK is a software development environment used for developing Java applications.
Supported Java versions
The Extension Pack for Java supports Java version 1.5 or above.
Note: To configure JDKs for your projects, see Configure Runtime for Projects. To enable Java preview features, see How can I use VS Code with new Java versions.
Installing a Java Development Kit (JDK)
If you have never installed a JDK before and need to install one, we recommend you to choose from one of these sources:
Creating a source code file
Note: If you open a Java file in VS Code without opening its folder, the Java Language Server might not work properly.
VS Code will also try to figure out the correct package for the new type and fill the new file from a template. See Create new file.
You can also create a Java project using the Java: Create Java Project command. Bring up the Command Palette ( ⇧⌘P (Windows, Linux Ctrl+Shift+P ) ) and then type java to search for this command. After selecting the command, you will be prompted for the location and name of the project. You can also choose your build tool from this command.
Visual Studio Code also supports more complex Java projects — see Project Management.
Editing source code
You can use code snippets to scaffold your classes and methods. VS Code also provides IntelliSense for code completion, and various refactor methods.
To learn more about editing Java, see Java Editing.
Running and debugging your program
To run and debug Java code, set a breakpoint, then either press F5 on your keyboard or use the Run > Start Debugging menu item. You can also use the Run|Debug CodeLens option in the editor. After the code compiles, you can see all your variables and threads in the Run and Debug view.
The debugger also supports advanced features such as Hot Code Replace and conditional breakpoints.
For more information, see Java Debugging.
More features
The editor also has many more capabilities to assist with your Java workload.
Code editing. Redefined.
Free. Built on open source. Runs everywhere.
By using VS Code, you agree to its license and privacy statement.
Meet IntelliSense.
Go beyond syntax highlighting and autocomplete with IntelliSense, which provides smart completions based on variable types, function definitions, and imported modules.
Print statement debugging is a thing of the past.
Debug code right from the editor. Launch or attach to your running apps and debug with break points, call stacks, and an interactive console.
Git commands built-in.
Working with Git and other SCM providers has never been easier. Review diffs, stage files, and make commits right from the editor. Push and pull from any hosted SCM service.
Extensible and customizable.
Want even more features? Install extensions to add new languages, themes, debuggers, and to connect to additional services. Extensions run in separate processes, ensuring they won’t slow down your editor. Learn more about extensions.
Deploy with confidence and ease
With Microsoft Azure you can deploy and host your React, Angular, Vue, Node, Python (and more!) sites, store and query relational and document based data, and scale with serverless computing, all with ease, all from within VS Code.
VS Code for
Want new features sooner?
Use vscode.dev for quick edits online!
GitHub, Azure Repos, and local files.
License and Privacy Terms
By downloading and using Visual Studio Code, you agree to the license terms and privacy statement. VS Code automatically sends telemetry data and crash dumps to help us improve the product. If you would prefer not to have this data sent please go see How to Disable Crash Reporting to learn how to disable it.
Working with C#
For detailed instructions on:
Installing C# support
C# language support is an optional install from the Marketplace. You can install it from within VS Code by searching for ‘C#’ in the Extensions view ( ⇧⌘X (Windows, Linux Ctrl+Shift+X ) ) or if you already have a project with C# files, VS Code will prompt you to install the extension as soon as you open a C# file.
Roslyn and OmniSharp
Visual Studio Code uses the power of Roslyn and OmniSharp to offer an enhanced C# experience. We offer support for:
On startup the best matching projects are loaded automatically but you can also choose your projects manually. The status bar will show what projects have been loaded and also allows you to select a different set of projects. To do so, click on the status bar projects item and select Change projects…. In the image below a single project has been picked up:
The available options include:
Once the project is loaded the enhanced experiences light up.
Editing Evolved
There is a lot to discover with C# and the editor, such as format on type, IntelliSense, the rename-refactoring, etc.
For a full description of our editing features, go to the Basic Editing and Code Navigation documentation.
Here are a few highlights.
IntelliSense
IntelliSense just works: hit ⌃Space (Windows, Linux Ctrl+Space ) at any time to get context specific suggestions.
Snippets for C#
We have several built-in snippets included in VS Code that will come up as you type or you can press ⌃Space (Windows, Linux Ctrl+Space ) (Trigger Suggest) and we will give you a context specific list of suggestions.
Tip: You can add in your own User Defined Snippets for C#. Take a look at User Defined Snippets to find out how.
Search for Symbols
CodeLens
Another cool feature is the ability to see the number of references to a method directly above the method. Click on the reference info to see the references in the Peek view. This reference information updates as you type.
Tip: You can turn off references information displayed in CodeLens with the editor.codeLens setting.
Find References/Peek Definition
You can click on the references of an object to find the locations of its use in place without losing context. This same experience works in reverse where you can Peek the definition of an object and see it inline without leaving your location.
Quick Fixes / Suggestions
There are some basic quick fixes supported in VS Code. You will see a lightbulb and clicking on it, or pressing ⌘. (Windows, Linux Ctrl+. ) provides you with a simple list of fixes/suggestions.
Next steps
Read on to find out about:
Common questions
My Project won’t load
IntelliSense is not working
This is typically as a result of the current project type not being supported. You can see an indication in the OmniSharp flame in the bottom left hand side of the status bar.
How do I build/run my project?
VS Code supports tasks for build and natively understand the output of MSBuild, CSC, XBuild. Find out more in the Tasks documentation.
Features of the code editor
The Visual Studio editor provides many features that make it easier for you to write and manage your code and text. You can expand and collapse different blocks of code by using outlining. You can learn more about the code by using IntelliSense, the Object Browser, and the Call Hierarchy. You can find code by using features such as Go To, Go To Definition, and Find All References. You can insert blocks of code with code snippets, and you can generate code by using features such as Generate From Usage. If you have never used the Visual Studio editor before, see Learn to use the code editor.
This topic applies to Visual Studio on Windows. For Visual Studio for Mac, see Source editor (Visual Studio for Mac).
You can view your code in a number of different ways. By default, Solution Explorer shows your code organized by files. You can click on the Class View tab at the bottom of the window to view your code organized by classes.
You can search and replace text in single or multiple files. For more information, see Find and replace text. You can use regular expressions to find and replace text. For more information, see Use regular expressions in Visual Studio.
The different Visual Studio languages offer different sets of features, and in some cases the features behave differently in different languages. Many of these differences are specified in the descriptions of the features, but for more information you can see the sections on specific Visual Studio languages.
Editor features
| Feature | Description |
|---|---|
| Syntax Coloring | Some syntax elements of code and markup files are colored differently to distinguish them. For example, keywords (such as using in C# and Imports in Visual Basic) are one color, but types (such as Console and Uri ) are another color. Other syntax elements are also colorized, such as string literals and comments. C++ uses color to differentiate among types, enumerations, and macros, among other tokens. |
You can see the default color for each type, and you can change the color for any specific syntax element in the Fonts and Colors, Environment, Options dialog box, which you can open from the Tools menu.
You can see the default color for each error and warning squiggle in the Tools > Options > Environment > Fonts and Colors dialog box. Look for Syntax Error, Compiler Error, Warning, and Other Error.
You can set color printing options in the Tools > Options > Environment > Fonts and Colors dialog box. Choose Printer in the Show settings for list to customize color printing. You can specify different colors for printing a file than for editing a file.
Advanced editing features
You can find a number of advanced features on the Edit > Advanced menu on the toolbar. Not all of these features are available for all types of code files.
| Feature | Description |
|---|---|
| Format Document | Sets the proper indentation of lines of code and moves curly braces to separate lines in the document. |
| Format Selection | Sets the proper indentation of lines of code and moves curly braces to separate lines in the selection. |
| Tabify Selected Lines | Changes leading spaces to tabs where appropriate. |
| Untabify Selected Lines | Changes leading tabs to spaces. If you want to convert all the spaces in your file to tabs (or all the tabs to spaces), you can use the Edit.ConvertSpacesToTabs and Edit.ConvertTabsToSpaces commands. These commands do not appear in Visual Studio menus, but you can call them from the Quick Access window or the command window. |
| Make Uppercase | Changes all characters in the selection to uppercase, or if there is no selection, changes the character at the insertion point to uppercase. Shortcut: Ctrl+Shift+U. |
| Make Lowercase | Changes all characters in the selection to lowercase, or if there is no selection, changes the character at the insertion point to lowercase. Shortcut: Ctrl+U. |
| Move selected Lines Up | Moves the selected line up one line. Shortcut: Alt+Up Arrow. |
| Move Selected Lines Down | Moves the selected line down one line. Shortcut: Alt+Down Arrow. |
| Delete Horizontal White Space | Deletes tabs or spaces at the end of the current line. Shortcut: Ctrl+K, Ctrl+\ |
| View White Space | Displays spaces as raised dots, and tabs as arrows. The end of a file is displayed as a rectangular glyph. If Tools > Options > Text Editor > All Languages > Word Wrap > Show visible glyphs for word wrap is selected, that glyph is also displayed. |
| Word Wrap | Causes all the lines in a document to be visible in the code window. You can turn word wrap off and on in the Text Editor All Languages settings (Tools > Options > Text Editor > All Languages). |
| Comment Selection | Adds comment characters to the selection or the current line. Shortcut: Ctrl+K, Ctrl+C |
| Uncomment Selection | Removes comment characters from the selection or the current line. Shortcut: Ctrl+K, Ctrl+U |
| Increase Line Indent | Adds a tab (or the equivalent spaces) to the selected lines or the current line. |
| Decrease Line Indent | Removes a tab (or the equivalent spaces) from the selected lines or the current line. |
| Select Tag | In a document that contains tags (for example, XML or HTML), selects the tag. |
| Select Tag Content | In a document that contains tags (for example, XML or HTML), selects the content. |
Navigate and find code
You can move around in the code editor in several different ways, including navigating backwards and forwards to previous insertion points, viewing the definition of a type or member, and jumping to a specific method using the navigation bar. For more information see Navigate code.
Find references in your code base
To find where particular code elements are referenced throughout your codebase, you can use the Find All References command or press Shift+F12. Also, when you click on a type or member, the reference highlighting feature automatically highlights all references to that type or member. For more information, see Find references in your code.
Generate, fix, or refactor code
There are numerous ways that Visual Studio can help you generate, fix, and refactor code.
You can use code snippets to insert a template such as a switch block or an enum declaration.
You can use Quick Actions to generate code such as classes and properties, or to introduce a local variable. You can also use Quick Actions to improve code, for example to remove unnecessary casts and unused variables, or to add null checks before accessing variables.
You can refactor code to rename a variable, re-order method parameters, or synchronize a type with its filename, to name a few.
Customize the editor
You can share your Visual Studio settings with another developer, have your settings conform to a standard, or return to Visual Studio default settings by using the Import and Export Settings Wizard command on the Tools menu. In the Import and Export Settings Wizard, you can change selected general settings or language and project-specific settings.
To define new hotkeys or redefine existing hotkeys, go to Tools > Options > Environment > Keyboard. For more information about hotkeys, see Default keyboard shortcuts.
For JavaScript-specific editor options, see JavaScript editor options.
September 2021 (version 1.61)
Update 1.61.1: The update addresses these issues.
Update 1.61.2: The update addresses these issues.
Welcome to the September 2021 release of Visual Studio Code. There are many updates in this version that we hope you will like, some of the key highlights include:
If you’d like to read these release notes online, go to Updates on code.visualstudio.com.
Watch a highlight of the new features in this version in the VS Code team’s release party. You can find the recording of the event on our YouTube channel.
Insiders: Want to try new features as soon as possible? You can download the nightly Insiders build and try the latest updates as soon as they are available.
Workbench
Split an editor without creating a new group
A new command Split in Group ( ⌘K ⇧⌘\ (Windows, Linux Ctrl+K Ctrl+Shift+\ ) ) was added to split an editor into two sides without requiring a second editor group. This allows you to work in two editors side by side on the same file. You can also toggle the layout between splitting vertically or horizontally via the Toggle Layout button as seen in the short video.
There is a new setting workbench.editor.splitInGroupLayout if you prefer the splitting to be either vertical or horizontal.
There are new commands to use this feature via keybindings:
And to navigate between the sides:
The new color sideBySideEditor.border sets the color for the border to separate one side from the other.
Locked editor groups
We introduced locked editor groups last milestone as an experimental new feature. During this milestone, the settings experience was improved allowing you to easily select an editor that should lock a group automatically when opening:
Indicate deleted and readonly editors via decorations
Opened editors can indicate whether they are readonly or whether their associated resource has been deleted from disk. This indication was given by appending «deleted» and/or «readonly» to the editor label, requiring quite a bit of space.
VS Code now uses decorations for this purpose:
Split an editor into an existing group
When you split an editor to the side, VS Code opens a new editor group, even if an existing group is present to the side. However, there are times when you want to split an editor into an already existing group.
To support this, new commands were added:
Shorter labels for diff editors
When you compare two files, the workspace relative folder path was prefixed on file names, making it hard to see the names of the files being compared.
In this release, the folder is now hidden from the label, unless both file names are the same, matching the behavior for normal editor labels.
If both file names are identical, a description is shown that hints at the folder difference:
macOS: File menu changes
To avoid confusion, we made slight adjustments to the file menu on macOS:
Telemetry settings
The existing settings telemetry.enableTelemetry and telemetry.enableCrashReporter have been marked for deprecation in favor of the new telemetry.telemetryLevel setting but will continue to be respected.
Minimap background transparency
It is now possible to configure the minimap background opacity independently of the minimap text’s opacity using the newly added minimap.foregroundOpacity color.
Updated Help menu items
With the ongoing improvements to the getting started experience, the Help menu items were updated to more commonly used names. This is based on learnings from new users but hopefully make it easier for everyone to find help. Welcome is now Get Started, Introductory Videos is Video Tutorials, and Interactive Playground became Editor Playground. You will find the new names in both the Help menu and the Command Palette. The Help menu also has a Show All Commands entry as an additional entry point to open the Command Palette.
Editor
Bracket pair guides
The editor now supports rudimentary bracket pair guides. Bracket pair guides use the same colors and the same algorithms as the bracket pair colorization feature. The bracket pair matching algorithms are described in detail in the recent «Bracket pair colorization 10,000x faster» blog post.
Similar to indentation guides, the active bracket pair guide is highlighted.
Bracket pair guides can be enabled by configuring the editor.guides.bracketPairs setting (defaults to false ). We will continue iterating on this feature and explore vertical guides in the next release.
Indentation guides settings
Source Control
Publish or Sync «action button» for Git repositories
The Git extension now adds a new «action» button to the Source Control view, to allow you to more easily publish or sync any unpushed changes.
By default, the Git extension will add a Sync Changes button as shown above, if there are unpushed commits, or a Publish Changes button if the branch hasn’t yet been published. Additionally, users can customize this behavior by configuring the git.showUnpublishedCommitsButton setting, which defaults to whenEmpty so that the button will only be shown if there are unpushed commits and there are no other changes in the view.
This new action button is available as a new proposed API for Source Control extensions, see the Proposed API section below for more details.
And finally, users can completely disable the visibility of any action buttons in the Source Control view via the new scm.showActionButton setting, which overrides any Source Control extension’s behavior.
Increased limit on changed files display
Prior to this release, the Git extension had a hard-coded limit of 5000 changes that it could show in the Source Control view. The limit was to prevent the user from having to wait too long while VS Code processed all the changes reported by Git. This limit is now increased to 10,000 changes, and there is a new git.statusLimit setting to allow users to customize the limit (per repository if desired). This setting can also be set to 0 to disable the limit completely, but be aware this could cause updates to take a long time if there are lots of changes.
Additionally, we’ve added the following warning indicator on the input box when the limit has been exceeded.
Terminal
Fixed dimensions
You can now statically set terminal dimensions via the Terminal: Set Fixed Dimensions command ( workbench.action.terminal.setDimensions ). This is useful for cases when line wrapping can be jarring or disruptive.
The command will display a prompt where you can enter the preferred width and/or height.
Custom title and description
Terminal names are usually the name of the process they’re associated with and it can sometimes be difficult to distinguish between terminals.
You can now configure both the title and description using variables in the terminal.integrated.tabs.title and terminal.integrated.tabs.description settings.
The current default values are:
Variables available are:
Emoji IMEs
Emojis are now supported for Input Method Editors (IME) on macOS.
Alt buffer active context key
Languages
New JavaScript and TypeScript language status item
The current TypeScript version and IntelliSense state are now shown in the language Status bar item:
Previously, the TypeScript version was always shown in the Status bar. You can pin the version to restore the old behavior:
The language status item also shows the current file’s jsconfig/tsconfig and will indicate if you are currently in partial mode.
IntelliSense across untitled files
All untitled JavaScript and TypeScript files are now treated as part of the same project. This means that global symbols defined in one untitled file will now show up as suggestions in others.
This better matches the behavior of on-disk files in the workspace. You can add an import or export to an untitled file to turn it into a module, which will hide its global variables from other files.
IntelliSense across files on the web
IntelliSense now works across JavaScript and TypeScript files on vscode.dev or github.dev when VS Code is running in a browser.
Keep in mind that when VS Code is running in the browser, it only has access to your currently opened files, so VS Code cannot provide project-wide IntelliSense features such as automatic imports.
More consistent folding of JSX tags
When you fold a JSX tag in JavaScript or TypeScript, VS Code now continues to show the closing tag:
This matches how folding works in HTML.
Preview features
TypeScript 4.5 support
This update includes initial support for the upcoming TypeScript 4.5 release. See the TypeScript 4.5 beta announcement post for more information about the new language and tooling features. Some tooling highlights:
To start using the TypeScript 4.5 nightly builds, install the TypeScript Nightly extension.
Please share your feedback and let us know if you run into any bugs with TypeScript 4.5.
Restore terminal sessions across application restarts
Terminal processes are disposed of when a VS Code window is closed. In this release, there is a new opt-in setting for recording and restoring the buffer and using it to recreate processes. Set terminal.integrated.persistentSessionReviveProcess to enable this.
Toggle size terminal to content width
You can toggle the terminal width between fitting the full contents and wrapped lines via ⌥Z (Windows, Linux Alt+Z ) or using the tab context menu action Toggle Size to Content Width.
This is similar to, and shares the keybinding with, toggling wrapped lines in the editor.
Contributions to extensions
Jupyter
Table of Contents
Table of Contents for Jupyter Notebooks can now be accessed via the command Jupyter: Show Table of Contents in the Command Palette. This same feature can also be accessed via an icon in the notebook toolbar.
This feature applies to all notebooks within VS Code, hence is accessible via the Outline view in the File Explorer.
Create new Notebooks via New File menu
Debugging
VS Code now supports full debug features for Jupyter Notebooks. To try it out, make sure you have ipykernel v6+ installed as your selected kernel, set a breakpoint, and select the Debug Cell command.
Remote Debugging
You can also use Run by Line and debug Jupyter Notebooks using remote kernels. To try it out, connect to your remote kernel with the Jupyter: Specify local or remote Jupyter server for connections command, make sure you have ipykernel v6+ installed as your selected kernel, and use Run by Line or debugging as usual.
Separate renderer extension
Jupyter Notebook renderers have been split out into a separate extension (Jupyter Notebook Renderers), allowing users to view Notebook outputs such as plotly, vega, latex, and the like on vscode.dev and github.dev.
Python
New Python walkthrough
The Python extension now offers a walkthrough with some basic setup steps to improve the getting started experience for Python in VS Code.
Improved debugging experience
When working with workspaces without a launch.json configuration file, the Python extension would display a debugger configuration menu every time you started debugging a Python file or project. This could be particularly annoying when debugging a web application with custom arguments (such as Flask, Django, or FastAPI).
You now no longer need to choose a configuration every time you start debugging, as the first selection you make is reused for the rest of the session.
GitHub Pull Requests and Issues
Work continues on the GitHub Pull Requests and Issues extension, which allows you to work on, create, and manage pull requests and issues. Check out the changelog for the 0.31.0 release of the extension to see the highlights.
Remote Development
Work continues on the Remote Development extensions, which allow you to use a container, remote machine, or the Windows Subsystem for Linux (WSL) as a full-featured development environment.
Feature highlights in 1.61 include:
You can learn about new extension features and bug fixes in the Remote Development release notes.
Extension authoring
Platform specific extensions
Extensions can now publish different VSIXs for each platform (Windows, Linux, macOS) supported by VS Code. Starting with VS Code version 1.61.0, VS Code looks for the extension package that matches the current platform. Starting with version 1.99.0, the vsce extension publishing tool supports publishing platform-specific extensions.
Platform-specific extensions are useful if your extension has platform-specific libraries or dependencies, so you can control the exact binaries that are included in a platform package. A common use case is when an extension uses native node modules.
Test tags and non-error output
This month we shipped additional APIs for extensions building on the new testing APIs.
Test tags allow you to configure if and how certain tests can be run—or not.
Non-error output allows you to associate additional console output with specific test cases.
Messages from the output are displayed inline, similarly to failure messages.
Enable file system providers to declare a file as readonly
Settings editor extension categories
The Settings editor now displays a subtree for an extension’s contributes.configuration endpoint when there are categories.
To create multiple categories, the contributes.configuration accepts an array of configurations, and the title key of each configuration is used for the section headings. There is also an order field, which allows categories to be reordered within the subtree.
Type hierarchy
The API proposal for adding type hierarchy providers has been finalized.
WebviewOptions.enableForms
We recommend disabling forms unless your webview content needs them.
Terminal state
A new state property is exposed on the Terminal object, in addition to a corresponding window.onDidChangeTerminalState event, and indicates whether or not a terminal has been interacted with by the user. For example, an extension might want to wait until a user has interacted with the terminal to run an action.
Running web extension tests on test data
The @vscode/test-web node module offers a CLI and API to test web extensions in Chromium, Firefox, or Webkit.
New for this milestone is the option folderPath to open VS Code for the Web on test data. An in-memory file system contains the resources of the given location so that tests have files to work with.
Updated codicons
The following new icons were added to our codicon library:
Webview UI Toolkit for Visual Studio Code
The Webview UI Toolkit for Visual Studio Code is a component library for building webview-based extensions in Visual Studio Code.
Features of the library include:
Virtual Workspaces extension guide
There is a new Virtual Workspaces extension guide to help extension authors test and update their extension when VS Code is running in virtual environments. With the introduction of extensions like GitHub Repositories, which creates its own virtual file system, and new workflows like vscode.dev and github.dev, where VS Code is running in your browser, extensions can no longer assume they have direct access to an on-disk file system or platform features.
The Virtual Workspaces extension guide covers:
Proposed extension APIs
Every milestone comes with new proposed APIs and extension authors can try them out. As always, we want your feedback. This is what you have to do to try out a proposed API:
You cannot publish an extension that uses a proposed API. There may be breaking changes in the next release and we never want to break existing extensions.
TaskPresentationOptions close property
The close property, which is a presentation property in the tasks.json schema, is available in the TaskPresentationOptions API. It functions in the same way as the matching tasks.json property by controlling whether the terminal will be closed upon completion of the task.
Tabs API
MarkdownString.supportHtml
The newly proposed supportHtml property on MarkdownString enables rendering of a safe subset of raw HTML that appears inside the Markdown text.
Controller renderer scripts now use JavaScript modules
NotebookController.rendererScripts lets notebook controllers preload a set of JavaScript files into the notebook before any renderers are run. These scripts can initialize the notebook or define global symbols that the renderers depend on.
The renderer scripts were previously normal JavaScript files. These scripts could use a global symbol exported by VS Code to call VS Code specific APIs.
This global symbol was not discoverable and also didn’t give VS Code much control over the renderer scripts themselves. To fix that, renderer scripts now use JavaScript modules that export an activate function. This function is passed the VS Code API:
This change also better aligns the renderer script from a NotebookController with the rendering scripts provided by a contributed notebook renderer.
Quick Pick keepScrollPosition property
The keepScrollPosition property on the QuickPick object that you get back from window.createQuickPick() has been added as a proposed API. This allows you to control whether or not the scroll position ( cursorTop ) in the Quick Pick moves back to the top of the list.
Here are a few use cases for this API:
Without the ability to control scroll position, every one of these operations would force the scroll position of the Quick Pick to jump up to the top of the list. The keepScrollPosition allows extension authors to control this behavior.
SourceControl.actionButton
The source control API now includes a actionButton property on SourceControl object that allows SCM providers to conditionally show an «action» button below the input box. For example, the Git extension uses this new property to show a publish or sync button when there are unpushed changes.
Language Server Protocol
A new next version of the Language Server Protocol, together with the corresponding npm modules, has been published. The new version contains a proposed implementation for type hierarchies.
Engineering
Switching to DOMPurify to sanitize rendered HTML
We’ve switched to using DOMPurify internally to sanitize HTML that is rendered in the main workbench. This is mainly used for sanitizing rendered Markdown.
DOMPurify is well maintained and compliant with trusted types out of the box. This switch helps protect users and gives us more confidence in enabling features such as MarkdownString.supportHtml.
Using the open command for Big Sur CLI
On macOS Big Sur, we now use the open command to spawn VS Code when launched from the command line. This change allows VS Code to open as though it were launched from the macOS Dock, which fixes some issues involving entitlements.
File watching changes
The file watcher used to detect changes to files and folders on disk changed to a library that can handle all of our supported platforms (Windows, Linux, macOS) and reduces the overhead of maintaining different watchers for different platforms. We plan to enable this library by default on all platforms. This iteration we enabled it on Windows and macOS, and plan to enable it on Linux shortly.
You should not notice any difference in your day to day work, but if file watching is broken for you, please report an issue. There is a setting files.legacyWatcher to enable the old watcher if you run into problems.
Documentation
Advanced container configuration
In the container documentation, you can learn how to:
The advanced container configuration documentation has tips and code examples for setting up your development containers as well as short YouTube videos.
Notable fixes
Thank you
Last but certainly not least, a big Thank You to the following people who contributed this month to VS Code:
Contributions to our issue tracking:
Contributions to vscode :
Contributions to vscode-eslint :
Contributions to vscode-html-languageservice :
Contributions to vscode-json-languageservice :
Contributions to vscode-languageserver-node :
Contributions to vscode-pull-request-github :
Contributions to vscode-references-view :
Contributions to vscode-vsce :
Contributions to language-server-protocol :
Contributions to monaco-editor-webpack-plugin :
Built-in Commands
This document lists a subset of Visual Studio Code commands that you might use with vscode.commands.executeCommand API.
Read the Commands guide for how to use the commands API.
The following is a sample of how to open a new folder in VS Code:
Note: You can review the full set of VS Code commands via the Keyboard Shortcuts editor File > Preferences > Keyboard Shortcuts (on macOS Code > Preferences > Keyboard Shortcuts). The Keyboard Shortcuts editor lists all commands built into VS Code or contributed by extensions, along with their keybindings and visibility when clauses.
Commands
The layout is described as object with an initial (optional) orientation (0 = horizontal, 1 = vertical) and an array of editor groups within. Each editor group can have a size and another array of editor groups that will be laid out orthogonal to the orientation. If editor group sizes are provided, their sum must be 1 to be applied per row or column. Example for a 2×2 grid: < orientation: 0, groups: [< groups: [<>, <>], size: 0.5 >, < groups: [<>, <>], size: 0.5 >] >
Code editing. Redefined.
Free. Built on open source. Runs everywhere.
By using VS Code, you agree to its license and privacy statement.
Meet IntelliSense.
Go beyond syntax highlighting and autocomplete with IntelliSense, which provides smart completions based on variable types, function definitions, and imported modules.
Print statement debugging is a thing of the past.
Debug code right from the editor. Launch or attach to your running apps and debug with break points, call stacks, and an interactive console.
Git commands built-in.
Working with Git and other SCM providers has never been easier. Review diffs, stage files, and make commits right from the editor. Push and pull from any hosted SCM service.
Extensible and customizable.
Want even more features? Install extensions to add new languages, themes, debuggers, and to connect to additional services. Extensions run in separate processes, ensuring they won’t slow down your editor. Learn more about extensions.
Deploy with confidence and ease
With Microsoft Azure you can deploy and host your React, Angular, Vue, Node, Python (and more!) sites, store and query relational and document based data, and scale with serverless computing, all with ease, all from within VS Code.
VS Code for
Want new features sooner?
Use vscode.dev for quick edits online!
GitHub, Azure Repos, and local files.
License and Privacy Terms
By downloading and using Visual Studio Code, you agree to the license terms and privacy statement. VS Code automatically sends telemetry data and crash dumps to help us improve the product. If you would prefer not to have this data sent please go see How to Disable Crash Reporting to learn how to disable it.
Visual Studio Code
A powerful, lightweight free code editor with integrated tools to easily deploy your code to Azure
One editor, from code to cloud
Spend more time coding and less time switching between tools. Use features and extensions that integrate with Azure and GitHub to develop, debug and deploy all from one place.
Provides local emulators and extensions to build, run and debug cloud apps directly from the editor
Imports and manages data for local or remote databases, with support for Azure Cosmos DB, MongoDB and more
Has guided workflows for GitHub Actions and Azure Pipelines to create and configure continuous integration
Supports nearly every language and app type, including static web apps, serverless Azure Functions and Kubernetes clusters
Develop cloud apps locally before you deploy
Create, run and debug your cloud projects locally so you can prototype quickly. Optimise costs by testing whether new features run efficiently in the cloud before deploying. Azure extensions include emulators for Azure Storage, Azure Cosmos DB, and Azure Functions.
Set up automated deployments to the cloud
Use the Deploy to Azure extension to set up continuous integration and continuous delivery (CI/CD) from your apps to the cloud using GitHub Actions or Azure Pipelines. Easily create a CI/CD pipeline targeting Azure App Service, Azure Functions, or Azure Kubernetes Service (AKS) using the extension’s built-in automated workflows.
Add and manage data
Easily manage your app’s data using the built-in MongoDB and IntelliSense support. Connect to your local or remote MongoDB servers and manage databases, collections and documents or host them in the cloud with the Azure Cosmos DB free tier.
Collaborate with ease
You don’t need to change how you work with others, whether they’re teammates in the same room or developers around the world working on open source projects. Bring pull requests and issues from GitHub into the editor with the GitHub Pull Requests and Issues extension. Or collaborate on editing, debugging and app sharing in real-time for pair programming or code reviews with the Live Share Extension.
Containers
Build, manage, and deploy containerized applications using the Docker extension. Generate Docker files from your existing repository and manage your containers, images, and registries from inside Visual Studio Code.
Kubernetes
Enjoy a fully integrated Kubernetes experience with the Kubernetes extension. Deploy containerized applications to local or cloud-hosted Kubernetes clusters and debug your live applications in Visual Studio Code.
Visual Studio Code
A powerful, lightweight free code editor with integrated tools to easily deploy your code to Azure
One editor, from code to cloud
Spend more time coding and less time switching between tools. Use features and extensions that integrate with Azure and GitHub to develop, debug and deploy all from one place.
Provides local emulators and extensions to build, run and debug cloud apps directly from the editor
Imports and manages data for local or remote databases, with support for Azure Cosmos DB, MongoDB and more
Has guided workflows for GitHub Actions and Azure Pipelines to create and configure continuous integration
Supports nearly every language and app type, including static web apps, serverless Azure Functions and Kubernetes clusters
Develop cloud apps locally before you deploy
Create, run and debug your cloud projects locally so you can prototype quickly. Optimise costs by testing whether new features run efficiently in the cloud before deploying. Azure extensions include emulators for Azure Storage, Azure Cosmos DB, and Azure Functions.
Set up automated deployments to the cloud
Use the Deploy to Azure extension to set up continuous integration and continuous delivery (CI/CD) from your apps to the cloud using GitHub Actions or Azure Pipelines. Easily create a CI/CD pipeline targeting Azure App Service, Azure Functions, or Azure Kubernetes Service (AKS) using the extension’s built-in automated workflows.
Add and manage data
Easily manage your app’s data using the built-in MongoDB and IntelliSense support. Connect to your local or remote MongoDB servers and manage databases, collections and documents, or host them in the cloud with the Azure Cosmos DB free tier.
Collaborate with ease
You don’t need to change how you work with others, whether they’re teammates in the same room or developers around the world working on open source projects. Bring pull requests and issues from GitHub into the editor with the GitHub Pull Requests and Issues extension. Or collaborate on editing, debugging and app sharing in real-time for pair programming or code reviews with the Live Share Extension.
Containers
Build, manage, and deploy containerized applications using the Docker extension. Generate Docker files from your existing repository and manage your containers, images, and registries from inside Visual Studio Code.
Kubernetes
Enjoy a fully integrated Kubernetes experience with the Kubernetes extension. Deploy containerized applications to local or cloud-hosted Kubernetes clusters and debug your live applications in Visual Studio Code.
Front-end web development
Extend JavaScript debugging to front-end development using the Microsoft Edge DevTools extension for VS Code. Set breakpoints and step through front-end JavaScript code to resolve issues quickly. Debug front-end and back-end code simultaneously with the multitarget debugging capability.
Visual Studio Code on Linux
Installation
See the Download Visual Studio Code page for a complete list of available installation options.
By downloading and using Visual Studio Code, you agree to the license terms and privacy statement.
Debian and Ubuntu based distributions
Note that other binaries are also available on the VS Code download page.
Then update the package cache and install the package using:
RHEL, Fedora, and CentOS based distributions
We currently ship the stable 64-bit VS Code in a yum repository, the following script will install the key and repository:
Then update the package cache and install the package using dnf (Fedora 22 and above):
Or on older versions using yum :
Due to the manual signing process and the system we use to publish, the yum repo may lag behind and not get the latest version of VS Code immediately.
Visual Studio Code is officially distributed as a Snap package in the Snap Store:
You can install it by running:
Once installed, the Snap daemon will take care of automatically updating VS Code in the background. You will get an in-product update notification whenever a new update is available.
Note: If snap isn’t available in your Linux distribution, please check the following Installing snapd guide, which can help you get that set up.
Learn more about snaps from the official Snap Documentation.
openSUSE and SLE-based distributions
The yum repository above also works for openSUSE and SLE-based systems, the following script will install the key and repository:
Then update the package cache and install the package using:
AUR package for Arch Linux
To get more information about the installation from the AUR, please consult the following wiki entry: Install AUR Packages.
Nix package for NixOS (or any Linux distribution using Nix package manager)
There is a community maintained VS Code Nix package in the nixpkgs repository. In order to install it using Nix, set allowUnfree option to true in your config.nix and execute:
Note that other binaries are also available on the VS Code download page.
Updates
VS Code ships monthly and you can see when a new release is available by checking the release notes. If the VS Code repository was installed correctly, then your system package manager should handle auto-updating in the same way as other packages on the system.
Note: Updates are automatic and run in the background for the Snap package.
Node.js
Node.js is a popular platform and runtime for easily building and running JavaScript applications. It also includes npm, a Package Manager for Node.js modules. You’ll see Node.js and npm mentioned frequently in our documentation and some optional VS Code tooling requires Node.js (for example, the VS Code extension generator).
If you’d like to install Node.js on Linux, see Installing Node.js via package manager to find the Node.js package and installation instructions tailored to your Linux distribution. You can also install and support multiple versions of Node.js by using the Node Version Manager.
To learn more about JavaScript and Node.js, see our Node.js tutorial, where you’ll learn about running and debugging Node.js applications with VS Code.
Setting VS Code as the default text editor
xdg-open
You can set the default text editor for text files ( text/plain ) that is used by xdg-open with the following command:
Debian alternatives system
Debian-based distributions allow setting a default editor using the Debian alternatives system, without concern for the MIME type. You can set this by running the following and selecting code:
Windows as a Linux developer machine
Another option for Linux development with VS Code is to use a Windows machine with the Windows Subsystem for Linux (WSL).
Windows Subsystem for Linux
With WSL, you can install and run Linux distributions on Windows. This enables you to develop and test your source code on Linux while still working locally on a Windows machine. WSL supports Linux distributions such as Ubuntu, Debian, SUSE, and Alpine available from the Microsoft Store.
See the Developing in WSL documentation to learn more or try the Working in WSL introductory tutorial.
Next steps
Once you have installed VS Code, these topics will help you learn more about it:
Common questions
Azure VM Issues
I’m getting a «Running without the SUID sandbox» error?
You can safely ignore this error.
Debian and moving files to trash
If you see an error when deleting files from the VS Code Explorer on the Debian operating system, it might be because the trash implementation that VS Code is using is not there.
Run these commands to solve this issue:
Conflicts with VS Code packages from other repositories
Some distributions, for example Pop!_OS provide their own code package. To ensure the official VS Code repository is used, create a file named /etc/apt/preferences.d/code with the following content:
«Visual Studio Code is unable to watch for file changes in this large workspace» (error ENOSPC)
The limit can be increased to its maximum by editing /etc/sysctl.conf (except on Arch Linux, read below) and adding this line to the end of the file:
While 524,288 is the maximum number of files that can be watched, if you’re in an environment that is particularly memory constrained, you may want to lower the number. Each file watch takes up 1080 bytes, so assuming that all 524,288 watches are consumed, that results in an upper bound of around 540 MiB.
Arch-based distros (including Manjaro) require you to change a different file; follow these steps instead.
I can’t see Chinese characters in Ubuntu
Package git is not installed
This error can appear during installation and is typically caused by the package manager’s lists being out of date. Try updating them and installing again:
The code bin command does not bring the window to the foreground on Ubuntu
Under General > General Options > Focus & Raise Behaviour, set «Focus Prevention Level» to «Off». Remember this is an OS-level setting that will apply to all applications, not just VS Code.
This can happen when sources.list.d doesn’t exist or you don’t have access to create the file. To fix this, try manually creating the folder and an empty vscode.list file:
Cannot move or resize the window while X forwarding a remote window
Using the custom title bar
The custom title bar and menus were enabled by default on Linux for several months. The custom title bar has been a success on Windows, but the customer response on Linux suggests otherwise. Based on feedback, we have decided to make this setting opt-in on Linux and leave the native title bar as the default.
The custom title bar provides many benefits including great theming support and better accessibility through keyboard navigation and screen readers. Unfortunately, these benefits do not translate as well to the Linux platform. Linux has a variety of desktop environments and window managers that can make the VS Code theming look foreign to users. For users needing the accessibility improvements, we recommend enabling the custom title bar when running in accessibility mode using a screen reader. You can still manually set the title bar with the Window: Title Bar Style ( window.titleBarStyle ) setting.
Broken cursor in editor with display scaling enabled
Repository changed its origin value
If you receive an error similar to the following:
Use apt instead of apt-get and you will be prompted to accept the origin change:
Возможности редактора кода
Редактор Visual Studio предоставляет множество возможностей, облегчающих написание кода и текста, а также управление им. Используя структуру, вы можете разворачивать и сворачивать различные блоки кода. Получить дополнительные сведения о коде можно с помощью технологии IntelliSense, окна Обозреватель объектов и иерархии вызовов. Для поиска в коде можно использовать такие функции, как Перейти, Перейти к определению и Найти все ссылки. Вставлять блоки кода можно с помощью фрагментов кода. Код также можно создавать с помощью функций, таких как Создание в результате использования. Если вы ранее не работали в редакторе Visual Studio, см. статью со сведениями об использовании редактора кода.
Этот раздел относится к Visual Studio в Windows. Информацию о Visual Studio для Mac см. в статье Редактор исходного кода (Visual Studio для Mac).
Код можно просматривать различными способами. По умолчанию в обозревателе решений код упорядочен по файлам. Чтобы просмотреть код, упорядоченный по классам, можно выбрать вкладку Представление классов в нижней части окна.
Можно выполнять поиск и замену текста в одном или нескольких файлах. Дополнительные сведения см. в статье Поиск и замена текста. Регулярные выражения платформы используются для поиска и замены текста. Дополнительные сведения см. в статье Использование регулярных выражений в Visual Studio.
Разные языки Visual Studio предоставляют разные наборы функций, а в некоторых случаях одни и те же функции ведут себя по-разному в разных языках. Многие из этих отличий указаны в описаниях функций. Дополнительные сведения можно найти в разделах, посвященных конкретным языкам Visual Studio.
Возможности редактора
| Функция | Описание |
|---|---|
| Цветовая раскраска синтаксических конструкций | Некоторые элементы синтаксиса кода и файлов разметки для наглядности выделяются разными цветами. Например, ключевые слова (такие как using в C# и Imports в Visual Basic) выделены одним цветом, а типы (такие как Console и Uri ) — другим. Другие элементы синтаксиса (например, строковые литералы и комментарии) также выделены цветом. Язык C++ использует цвета для различения типов, перечислений и макросов среди других токенов. |
Вы можете узнать, какой цвет задан по умолчанию для каждого типа, и изменить цвет для любого элемента синтаксиса в диалоговом окне Fonts and Colors, Environment, Options Dialog Box, которое можно открыть с помощью меню Сервис.
Дополнительные возможности редактирования
В меню Правка>Дополнительно на панели инструментов есть набор дополнительных функций. Не все они доступны для каждого типа файлов кода.
Перемещение по коду и поиск
Перемещаться по редактору кода можно несколькими способами, включая переход назад и вперед к точкам вставки, просмотр определения типа или члена и переход к определенному методу с помощью панели навигации. Дополнительные сведения см. в статье Навигация по коду.
Поиск ссылок в базе коде
Чтобы найти, где именно в базе кода используются ссылки на элементы кода, можно использовать команду Найти все ссылки или нажать SHIFT+F12. Кроме того, когда вы щелкаете тип или член, функция выделения ссылок автоматически выделяет все ссылки на него. Дополнительные сведения см. в разделе Поиск ссылок в коде.
Создание, исправление или рефакторинг кода
Visual Studio помогает создавать, исправлять код и выполнять его рефакторинг самыми разными способами.
Вы можете использовать фрагменты кода для вставки шаблона, такого как блок switch или объявление enum.
Вы можете использовать быстрые действия для создания кода, например классов и свойств, или для введения локальной переменной. Кроме того, быстрые действия можно использовать для улучшения кода, например для удаления ненужных приведений и переменных либо для добавления проверок значений NULL перед обращением к переменным.
Вы можете выполнять рефакторинг кода, например чтобы переименовывать переменные, изменять порядок параметров метода или синхронизировать тип с его именем файла.
Настройка редактора
Вы можете использовать свои параметры Visual Studio совместно с другим разработчиком, привести параметры в соответствие со стандартом или вернуться к настройкам, заданным по умолчанию в Visual Studio, с помощью команды Мастер импорта и экспорта параметров в меню Сервис. В мастере импорта и экспорта параметров можно изменить выбранные общие параметры, а также зависящие от языка и проекта параметры.
Чтобы определить новые или переопределить существующие сочетания клавиш, выберите Сервис>Параметры>Среда>Клавиатура. Дополнительные сведения о сочетаниях клавиш см. в статье Сочетания клавиш по умолчанию в Visual Studio.
Параметры редактора для JavaScript см. в статье о параметрах редактора JavaScript.
May 2020 (version 1.46)
Update 1.46.1: The update addresses these issues.
Welcome to the May 2020 release of Visual Studio Code.
If you’d like to read these release notes online, go to Updates on code.visualstudio.com.
Accessibility
This milestone we again received helpful feedback from our community, which let us identify and tackle many accessibility issues.
Workbench
Flexible layout
For several iterations, we have announced progress on making our layout more flexible. With this release, that set of features are now ready for general use. Below is an overview of these features.
Moving views between Side Bar and Panel
Perhaps you would prefer a view from the Side Bar to be located in the Panel or vice versa. To do this, you can now drag a view by its header or an entire group by its icon or title from its current placement and move it to the desired location. From the keyboard, the commands View: Move View ( workbench.action.moveView ) and View: Move Focused View ( workbench.action.moveFocusedView ) can be used.
Below is a demonstration of dragging Search to the Panel and Problems into the Side Bar.
Dragging Search to the Panel and Problems into the Activity Bar
Earlier there was a setting for moving the Search view from the Side Bar to the Panel and now that setting is obsolete since drag and drop can be used instead.
Grouping views
You might also want to group some views together that come from different extensions or you feel the default groups of built-in views aren’t quite right for you. You can both move views into existing groups or create new groups for a select set of views. This works across the Side Bar and Panel just as before. Below are a couple of examples of this.
Dragging the Timeline view from Explorer to Source Control
Dragging the Watch view from the Run Side Bar to be next to the Debug Console in Panel
Creating a custom history group in the Side Bar and Panel with Timeline and GitLens
Resetting view Locations
Views and groups of views can be reset to their default locations via their context menus. When a view has been moved from its default location, there will be an entry Reset Location to move it back to its home. There are also commands View: Reset Focused View Location ( workbench.action.resetFocusedViewLocation ) and View: Reset View Locations ( workbench.action.resetViewLocations ) for resetting all views and groups back to their default locations.
For extension authors contributing views or view containers
Lastly, extension authors can now start contributing view containers directly to the panel as opposed to activitybar as outlined in the Tree view extension guide.
Pin tabs
You can now pin tabs either from the context menu or using the new command workbench.action.pinEditor ( ⌘K ⇧Enter (Windows, Linux Ctrl+K Shift+Enter ) ).
Pinned tabs have a number of useful features to help mark files that are important to you:
You can also drag and drop tabs in and out to change the pinned state.
Note: We are still thinking about other ways to present pinned tabs. If you have an opinion, feel free to share your ideas in the existing issues for showing a secondary tab bar or having a setting to show more context for pinned tabs.
Search Editor
There are several new options for configuring how Search Editors are created:
Explorer auto reveal focus without forcing a scroll
There is a new option focusNoScroll for the explorer.autoReveal setting. When using this option, the Explorer will automatically select files when opening them but will not scroll to reveal them in the Explorer view.
Smooth scrolling for lists and trees
Enabling the workbench.list.smoothScrolling setting will make scrolling in lists and trees much smoother with hardware that lacks smooth scrolling (for example, discrete mouse wheel on Windows).
Sash size configuration
You can now use the workbench.sash.size setting to configure the feedback area size in pixels of the dragging area in between views/editors. Set it to a larger value if you feel it’s hard to resize views using the mouse.
Screencast mode font size
The new screencastMode.fontSize setting lets you configure the font size in pixels that is being used in screencast mode.
Trusted link protection
VS Code will now allow directly opening URL links to any GitHub remotes in your workspace. Additionally, if you have signed in with GitHub, all links to pages under your GitHub profile will be trusted.
Editor
Cross file Undo for closed files
It is now possible to Undo across files, even if the files have been closed in the meantime. The edited files will be reopened and a cross-file operation, such as a rename symbol, will be undone in all affected files.
Unusual line terminators
VS Code currently recognizes CR (Carriage Return), LF (Line Feed), and CRLF as line terminators. Some programming languages have different definitions for what constitutes a line terminator. This varies across languages, for example LS (Line Separator) and PS (Paragraph Separator) are line terminators in C# and JavaScript, but not in HTML, PHP, or Java. These line ending differences can cause problems when VS Code communicates with a language server, since various concepts are communicated between VS Code and the language server using (line;char) coordinates. If there are different definitions of a line terminator, it can result in different mappings of lines and locations in the file.
When opening a file, VS Code will now check if LS or PS are present in the opened file, and will prompt and ask for permission to remove these characters. These unusual line terminators are rare in practice and are most likely inserted in source code by accident, via copy-pasting.
Integrated Terminal
Improved link support
The Integrated Terminal link preview from last month has replaced the old implementation. The new links implementation now enables:
Tasks
Source Control
Open in Terminal
You can now open a repository in a terminal from the context menu in the Source Control view.
Add remote from GitHub
You can now add a GitHub repository as a remote to your local repositories using the Git: Add Remote. command.
Input field font family
You can now customize the font family used in the Source Control input field using the Scm: Input Font Family setting. The setting supports the following values:
Abort in progress rebase
You can now abort in progress rebase operations using the Git: Abort Rebase command.
Debugging
Automatic debug configurations improvements
This milestone we have improved the experience for automatic debug configurations:
It is now possible to show all automatic debug configurations from the Run and Debug start view.
The Debug dropdown now remembers the previously chosen automatic debug configuration.
Step Into Targets
Debugging into a statement with many nested function calls can be painful because you might have to step through functions you are not really interested in. To improve this scenario, the Debug Adapter Protocol has supported the «Step Into Target» feature that displays UI for directly stepping into the function you are interested in.
In this milestone, VS Code has started to use this feature. When debugging has stopped on a statement, the context menu shows a new action Step Into Targets. This action presents a list of all targets (typically functions) that are available at the current stack frame. Selecting one of them will step into that target.
Note that every stack frame can have its own set of targets. So the result of the Step Into Targets actions depends on the currently selected frame in the CALL STACK view.
Languages
TypeScript 3.9
VS Code now includes TypeScript 3.9.4. This major TS update brings some new tooling features, performance improvements, and a number of bug fixes. You can read more about TS 3.9 on the TypeScript blog.
CommonJS auto imports
Refactorings preserve newlines
Refactorings for JavaScript and TypeScript, such as Extract to method and Move to new file, now try to preserve the original formatting of the refactored source code. This includes any newlines present in the selection:
Add all missing imports source action
VS Code has long supported a Quick Fix that adds all missing imports in a JavaScript or TypeScript file. This iteration, we introduced a new Add all missing imports source action that lets you trigger this from anywhere in a file.
This also allows you to set up a keybinding for Add all missing imports:
Or even enable Add all missing imports on save:
JS/TS Go to Symbol in workspace includes all opened projects
By default, workspace symbol search for JavaScript and TypeScript now searches all opened jsconfig and tsconfig projects. It previously only included search results from the project the focused file belonged to.
This behavior is controlled by the typescript.workspaceSymbols.scope setting and requires TS 3.9+. To revert to the previous behavior and only search the current project, set «typescript.workspaceSymbols.scope»: «currentProject»
Add missing import Quick Fixes can now be marked preferred
Note that Adding missing import will only be marked as the preferred fix if there is a single valid import. If there are multiple potential imports in your projects, you still need to use the normal Code Actions menu to select which import to use. Also, to enable Add missing import Quick Fixes in JavaScript, you must enable type checking.
JSON offline mode
A warning triangle in the Status bar will appear when the current editor would like to use schemas that cannot be downloaded. Schema-based features like validation, code completion, and hovers will then be limited.
Browser support
Debugging stopped indicator in tab title
When debugging an extension in the browser, the debugged extension shows up in a new browser tab that deactivates (hides) the debugger tab. When the debuggee stops for some reason, for example, hits a breakpoint, we are not able to activate the debugger tab (because browsers don’t provide an API for this). This makes it almost impossible to discover that the debugged extension has stopped.
To alleviate this problem, we now update the tab title to include a red circle indicator 🔴 (resembling a breakpoint). As soon as the debugger tab is activated, the red dot is removed.
Running VS Code from the Integrated Terminal
When you open an Integrated Terminal in VS Code running in the browser, you can type code to get access to several useful commands that all work in the browser.
In this iteration, we expanded support for many options:
In GitHub Codespaces, for example, this enables you to use the browser-based VS Code as an editor for Git:
File/folder upload
VS Code lets you drop files into the File Explorer to upload them. In this iteration, we improved this feature to allow you to drop folders to upload them, including all child folders and files. Since this can be a long running operation, you will see progress reported in the Status bar and you can cancel the operation if needed.
Accounts management
In previous releases, we introduced a preview of a new accounts management UI alongside the preview of the Settings Sync feature. Now, this UI will show up by default. Extensions using the new proposed Authentication Provider API can surface requests to sign in here, and you can view your accounts and manage extension access. There are currently a limited number of extensions using this API, we will work on increasing adoption once the API is stable.
Preview features
Preview features are not ready for release but are functional enough to use. We welcome your early feedback while they are under development.
Settings Sync
We have been working the last couple of months to support synchronizing VS Code preferences across machines and this feature is available for preview on the Insiders release.
In this milestone, we enhanced support for administering and diagnosing Settings Sync.
Synced Machines view
We added the Synced Machines view to show the list of machines synchronizing your VS Code preferences. A default name is provided based on the type of VS Code (Insiders or Stable) and platform you are using, but you can always update the name using the edit action available on the machine entry in the view.
Theme: GitHub Sharp with Customizations
You can open this view using Preferences Sync: Show Synced Data command from the Command Palette.
Synced Data view
We added following enhancements to the Synced Data view.
Theme: GitHub Sharp with Customizations
We now provide more assistance while turning on sync by checking if you are about to sync with data from a different machine and allow you to take appropriate action.
New JavaScript debugger
This month we continued making progress on our new JavaScript debugger. Since mid-May, it has become the default debugger on Insiders, and is included (but not enabled by default) on VS Code Stable in this release. You can start using it with your existing launch configurations by enabling the debug.javascript.usePreview setting.
Progress this month was primarily focused on polishing and stabilizing existing functionality:
TS 4.0 nightly build support
VS Code 1.46 includes preview support for TypeScript 4.0 nightly builds. The nightly build includes support for some new tooling features that we are actively working on, such as more flexible selections for refactoring.
You can try TypeScript 4.0 nightly builds today by installing the TypeScript Nightly extension. Please share feedback and let us know if you run into any bugs with the TypeScript 4.0.
Contributions to extensions
Notebooks
Quick outline
Error and symbol navigation
We have improved how F8 and Find All References work. All code navigation gestures should feel as natural as they to do outside of Notebooks. For instance, the Problems view will now show all errors of all cells grouped by the Notebook, not by cell anymore:
Join/Split cells
We introduced two sets of commands for you to quickly join cells or split cells into smaller fragments:
Retained Notebook
Pinned or dirty Notebook editors are now persistent in the workspace, so users won’t lose the working state in the Notebook if the Notebook is moved to the background or moved to another editor group.
Unified Undo/Redo stack
Users operations of manipulating Notebook cells or modifying Notebook cell content are now tracked in the same Undo/Redo stack.
GitHub Pull Requests and Issues
Work continues on the GitHub Pull Requests and Issues extension, which allows you to work on, create, and manage pull requests and issues. Some updates for this release include:
To learn about all the new features and updates, you can see the full changelog for the 0.17.0 release of the extension.
Remote Development
Work continues on the Remote Development extensions, which allow you to use a container, remote machine, or the Windows Subsystem for Linux (WSL) as a full-featured development environment.
New features in 1.46 include:
You can learn about new extension features and bug fixes in the Remote Development release notes.
Hex Editor
With the custom editor API finalized with support for binary editors, we have developed a hex editor extension to provide a native hex editing experience.
This extension is still under development and currently only supports opening and navigating files as hex. We will continue to work on the navigational experience and then move on to support editing. You can try out the extension and provide feedback or file issues against the vscode-hexeditor repository.
Extension authoring
File path casing
We have fixed a couple of bugs with how VS Code handles paths and URIs on case-insensitive file systems. Before this release, paths with different casing would not open the same document but separate, disconnected documents. That behavior often caused confusion and sometimes data loss.
However, in fixing these bugs, the behavior of the openTextDocument function has changed. The function can now return a document with a URI with different casing than the URI that was passed in. This means extensions should use TextDocument#uri as the source of truth, not the URI that they request it with.
The sample below illustrates the new behavior:
New Debug Console theme colors
There are new colors for styling the Debug Console view:
New input theme colors
New codicon icons
We’ve added the following new icons to our codicon library:
Providers use generic types
Our vscode.d.ts typings now makes all two phase providers—ones that have separate ‘provide’ and ‘resolve’ methods—generic. The goal was to make it clearer that the results from the ‘provide’ call are passed back into the ‘resolve’ call.
For example, here is the new generic definition of DocumentLinkProvider :
All providers have a default generic argument so this change should not cause any errors with your existing extension. If you were previously using casts or type checks while implementing ‘resolve’, consider updating your code to use a generic provider instead:
Writing theme-specific CSS in webviews
The body element of webviews has a new data attribute called vscode-theme-name that stores the full name of the currently active theme. This lets you write theme-specific CSS in webviews:
Custom Binary Editors
We’ve finalized the API for custom binary editors. The custom editor API lets extensions create custom webview-based editors that either replace VS Code’s default text editor or can be switched to by users. This can be used for previewing asset files, such as images or 3D models, directly within VS Code, or for building more specialized editing interfaces for specific file types. With the new binary custom editor API, you can now build read/write editors for non-text based file formats as well.
The custom editor extension guide covers the API in much more detail. Also check out the custom editor extension sample, which includes examples custom editors for both text and binary file formats.
Relaxed resolveCompletionItem
The CompletionItemProvider#resolveCompletionItem function allows providers to lazily enrich completions with more data. This «lazy» data must be optional and must not change the insert behavior of completions. Extensions can still fill in additionalTextEdits and if additional edits arrive after a completion has been inserted, the editor will still attempt to apply them. Note that this only applies to additional edits, not to the main edit ( insertText ) which must not change once provided.
onStartupFinished activation event
We now have a new activation event, similar to the already existing * activation event. The new onStartupFinished activation event should be used when an extension wishes to be activated sometime soon after VS Code startup, but not as part of the startup.
Environment variable collection
The ExtensionContext.EnvironmentVariableCollection API is now stable and allows extensions to contribute to terminal environments.
These collections are extension and workspace-specific and VS Code handles how conflicts between multiple extensions are dealt with. They are persisted across window reloads such that terminals created immediately after the window is loaded do not block on the extension host launching but instead use the last known version. These persisted collections are removed by disposing of the collection or when the extension is uninstalled.
When collections change, an indicator will appear on the terminal. Whether this indicator shows for any active change or just for «stale» terminals is defined by the terminal.integrated.environmentChangesIndicator setting. This API is now also used by the built-in Git extension to let VS Code be an authentication provider.
Debug Adapter Protocol
New instruction breakpoints
Support for «stepping granularity»
Proposed extension APIs
Every milestone comes with new proposed APIs and extension authors can try them out. As always, we want your feedback. This is what you have to do to try out a proposed API:
Note that you cannot publish an extension that uses a proposed API. There may be breaking changes in the next release and we never want to break existing extensions.
Git extension API
There is also now a Git extension API to getBranches based on a BranchQuery :
AccessibilityInformation
Engineering
Windows ARM64 Insiders
There are new official Insider builds for Windows for ARM 64-bit, available on the Insiders download page.
These builds work with the Microsoft Surface Pro X, so give it a try and let us know what you think.
—crash-reporter-directory argument for diagnosing issues
Preload Scripts
We have added Electron preload scripts to VS Code for exposing certain Electron APIs to the window. This is one of the first steps towards a fully sandboxed window. Progress is outlined in issue #92164.
Extension samples now use ESLint
Our extension samples have all been updated to use ESLint for linting instead of the now deprecated TSLint. If your extension is still using TSLint, you can review the TSLint to ESLint Migration guide and our newly updated extension samples to see how to migrate to ESLint.
GitHub Triage Extension
We created an extension for chromium-based browsers to help us with issue triaging on GitHub by providing a single fuzzy-filterable menu of assignees, labels, milestones, and various special comments we use to trigger our triaging GitHub Actions. We have open sourced the code on GitHub.
Documentation and extensions
Visual Studio Code at Build
The VS Code team presented at the Microsoft Build 2020 conference and you can find an overview of the VS Code sessions and online talks in this VS Code at Build blog post.
Several talks by VS Code team members:
Azure extensions
There are several new extensions for working with and deploying Azure assets directly from within VS Code.
New commands
| Key | Command | Command ID |
|---|---|---|
| ⌘K ⇧Enter (Windows, Linux Ctrl+K Shift+Enter ) | Pin Editor | workbench.action.pinEditor |
| ⌘K ⇧Enter (Windows, Linux Ctrl+K Shift+Enter ) | Unpin Editor | workbench.action.unpinEditor |
Notable fixes
Thank you
Last but certainly not least, a big Thank You to the following people who contributed this month to VS Code:
Contributions to our issue tracking:
Contributions to vscode :
Contributions to language-server-protocol :
Contributions to vscode-generator-code :
Contributions to vscode-vsce :
Contributions to debug-adapter-protocol :
Contributions to vscode-js-debug :
Contributions to localization :
We have keenly listened to your feedback over the past year, and decided it was time to provide a more reliable and interactive platform, where you can contribute to VS Code localization development. With this in mind, we officially decommissioned the Microsoft Localization Community Platform (MLCP) in the first week of April, with the intent of continuing the Microsoft Community Localization Program on an alternative platform for open-source localization projects.
Stay tuned in the upcoming weeks for an announcement on our Wiki page about the new community platform. You can also visit the FAQ page for answers about this platform transition.
Источники:
- http://habr.com/ru/company/microsoft/blog/262523/
- http://visualstudio.microsoft.com/downloads/
- http://code.visualstudio.com/docs/editor/vscode-web
- http://timeweb.com/ru/community/articles/chto-takoe-visual-studio-code
- http://azure.microsoft.com/ru-ru/products/visual-studio-code/
- http://docs.microsoft.com/en-gb/visualstudio/ide/writing-code-in-the-code-and-text-editor?view=vs-2019
- http://code.visualstudio.com/docs/setup/mac
- http://code.visualstudio.com/learn/develop-cloud/overview
- http://azure.microsoft.com/en-ca/products/visual-studio-code/
- http://azure.microsoft.com/en-us/products/visual-studio-code/
- http://code.visualstudio.com/updates/v1_56
- http://code.visualstudio.com/updates/v1_60
- http://code.visualstudio.com/updates/v1_59
- http://code.visualstudio.com/?language=tr
- http://code.visualstudio.com/?source=javascriptc.com
- http://code.visualstudio.com/docs/java/java-tutorial
- http://code.visualstudio.com/?language=sq
- http://code.visualstudio.com/docs/languages/csharp
- http://docs.microsoft.com/en-us/visualstudio/ide/writing-code-in-the-code-and-text-editor?view=vs-2022
- http://code.visualstudio.com/updates/v1_61
- http://code.visualstudio.com/api/references/commands
- http://code.visualstudio.com/?language=ca
- http://azure.microsoft.com/en-in/products/visual-studio-code/
- http://azure.microsoft.com/en-gb/products/visual-studio-code/
- http://code.visualstudio.com/docs/setup/linux
- http://docs.microsoft.com/ru-ru/visualstudio/ide/writing-code-in-the-code-and-text-editor?view=vs-2022
- http://docs.microsoft.com/ru-ru/visualstudio/ide/writing-code-in-the-code-and-text-editor?view=vs-2019
- http://code.visualstudio.com/updates/v1_46

