Code composer studio
Code composer studio
CCSTUDIO-KEYSTONE
Code Composer Studio (CCS) Integrated Development Environment (IDE) for Multicore Processors
CCSTUDIO-KEYSTONE
Overview
Code Composer Studio is an integrated development environment (IDE) that supports TI’s Microcontroller and Embedded Processors portfolio. Code Composer Studio comprises a suite of tools used to develop and debug embedded applications. It includes an optimizing C/C++ compiler, source code editor, project build environment, debugger, profiler, and many other features. The intuitive IDE provides a single user interface taking you through each step of the application development flow. Familiar tools and interfaces allow users to get started faster than ever before. Code Composer Studio combines the advantages of the Eclipse software framework with advanced embedded debug capabilities from TI resulting in a compelling feature-rich development environment for embedded developers.
Download
Additional Information
Getting Started
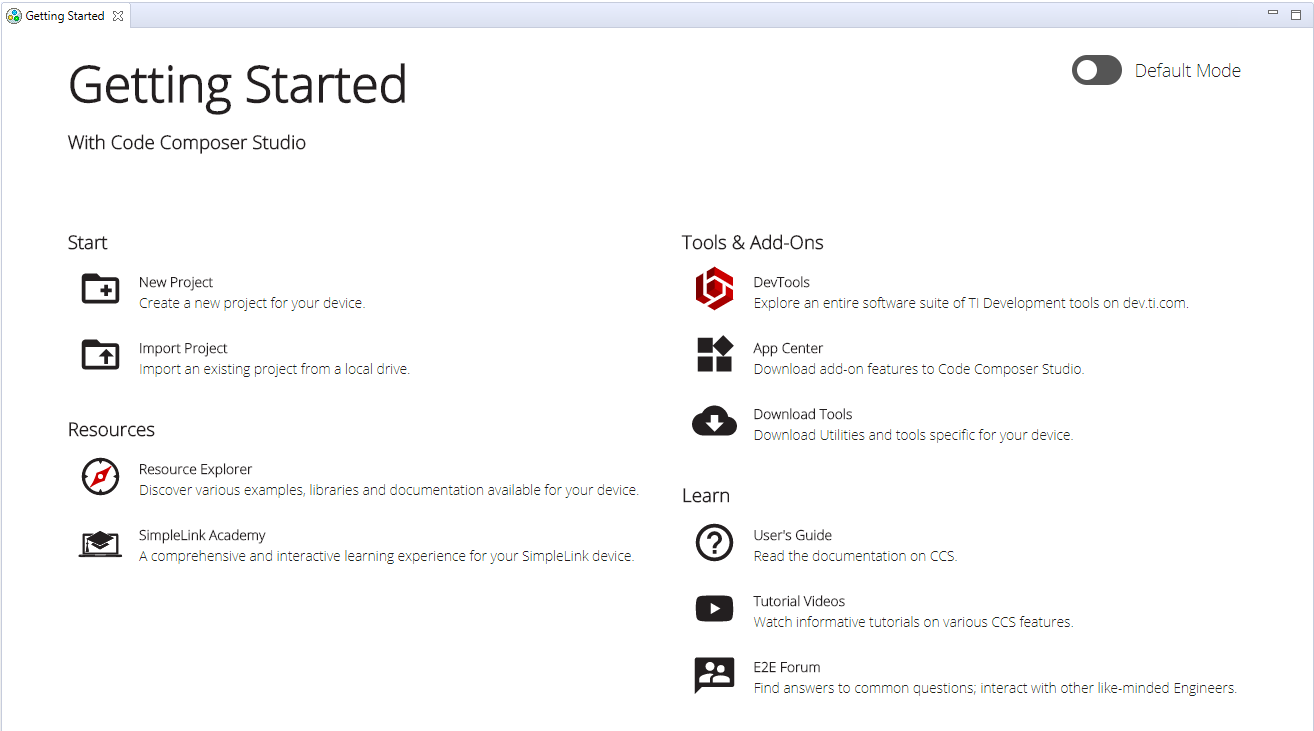
The Getting Started View provides quick access to a number of common actions such as creating a new project or browsing examples. For users who wish to use a very clean user interface, Code Composer Studio has a «simple» mode which trims down the environment to just the essential functionality. Once comfortable with the environment it is easy to switch back to standard mode to expose more advanced capabilities.
App Center
More than just a development environment is required to do meaningful development on a chosen platform. The Code Composer Studio App Center provides access to additional software and tools to help users get up and running faster on their chosen platform.
Compiler
For high performance processors like multicore DSPs it is essential to have a C compiler that can take full advantage of the performance capabilities of the device. The C6000 highly-optimizing C/C++ VLIW compiler is designed with this purpose in mind. It performs a wide variety of optimization techniques including automatically software pipelines inner loops, an extensive set of SIMD operations can speedup algorithms by up to 16x a large range of performance vs. code size options. However it is equally if not more important to ensure the quality of the code produced is of the highest level. The compiler is verified against industry-standard benchmarks (Plum Hall, Perennial, ACE…) and several validation suites. Continual evaluation of the compiler’s performance on thousands of benchmarks, ensures performance stability of compiled code across releases.
Processor Trace
Many high performance TI processors include the ability to perform processor trace. Trace provides detailed, historical account of code execution, timing and data accesses. This advanced capability is extremely useful in detecting complex, intermittent bugs as wells as profiling to help fine tune code performance. Trace data can be captured to dedicated on-chip memory (ETB) or exported over pins to be captured by a trace receiver.
Linux Development
Code Composer Studio supports both Linux kernel and application level development. The kernel can be debugged via JTAG or use GDB for application development. By installing the Linux Development Tools via the App Center you also get access to additional functionality such as the Linux Trace Tools (LTTng).
System Analyzer
System Analyzer provides visibility into the application, OS and hardware across the system at any given time by correlating software and hardware instrumentation from multicores on the same timeline. System Analyzer is made up of two core components:
System Analyzer can obtain data in a number of ways. It can be captured to the on chip embedded trace buffer (ETB), it can be streamed off the device using System Trace via an XDS560v2 System Trace Receiver or you can have the application continually drain the ETB and push the data out over Ethernet. This gives you the flexibility to choose the method that best suites your application needs.
Video Resources
There are several videos available specifically for Code Composer Studio:
CCSTUDIO
Code Composer Studio integrated development environment (IDE)
Select a version
View software details
Windows single file installer for CCS IDE — 1034673 K
Link to Windows single file (offline) installer for Code Composer Studio IDE (all features, devices)
Linux single file installer for CCS IDE — 951128 K
Link to Linux single file (offline) installer for Code Composer Studio IDE (all features, devices)
Mac OS single file installer for CCS IDE — 896478 K
Link to Mac single file (offline) installer for Code Composer Studio IDE (all features, devices)
Windows on-demand installer for CCS IDE — 33470 K
Link to Windows on-demand (web) installer for Code Composer Studio IDE (all features, devices)
Linux on-demand installer for CCS IDE — 23650 K
Link to Linux on-demand (web) installer for Code Composer Studio IDE (all features, devices)
Mac OS on-demand installer for CCS IDE — 22720 K
Link to Mac on-demand (web) installer for Code Composer Studio IDE (all features, devices)
This design resource supports most products in these categories.
Check the product details page to verify support.
Documentation
Feature Overviews, App Notes and How-to Articles
CCSTUDIO
Code Composer Studio integrated development environment (IDE)
Select a version
View software details
Windows single file installer for CCS IDE — 1037458 K
Link to Windows single file (offline) installer for Code Composer Studio IDE (all features, devices)
Linux single file installer for CCS IDE — 961965 K
Link to Linux single file (offline) installer for Code Composer Studio IDE (all features, devices)
Mac OS single file installer for CCS IDE — 908737 K
Link to Mac single file (offline) installer for Code Composer Studio IDE (all features, devices)
Windows on-demand installer for CCS IDE — 33476 K
Link to Windows on-demand (web) installer for Code Composer Studio IDE (all features, devices)
Linux on-demand installer for CCS IDE — 23653 K
Link to Linux on-demand (web) installer for Code Composer Studio IDE (all features, devices)
Mac OS on-demand installer for CCS IDE — 22727 K
Link to Mac on-demand (web) installer for Code Composer Studio IDE (all features, devices)
This design resource supports most products in these categories.
Check the product details page to verify support.
Documentation
Feature Overviews, App Notes and How-to Articles
5.1. Getting Started View¶
First time users of Code Composer Studio (CCS) should start with the aptly named Getting Started view. The Getting Started view is the first screen that is visible once you have launched CCS and selected a workspace. The view can also be explicitly opened via the View в†’ Getting Started menu item.
The purpose of the Getting Started view is to provide fast access to common actions and tasks, especially those that are relevant when first starting to use CCS. This includes browsing examples, creating new projects, and so forth:
For more details, please refer to the Getting Started view feature overview.
5.2. Resource Explorer¶
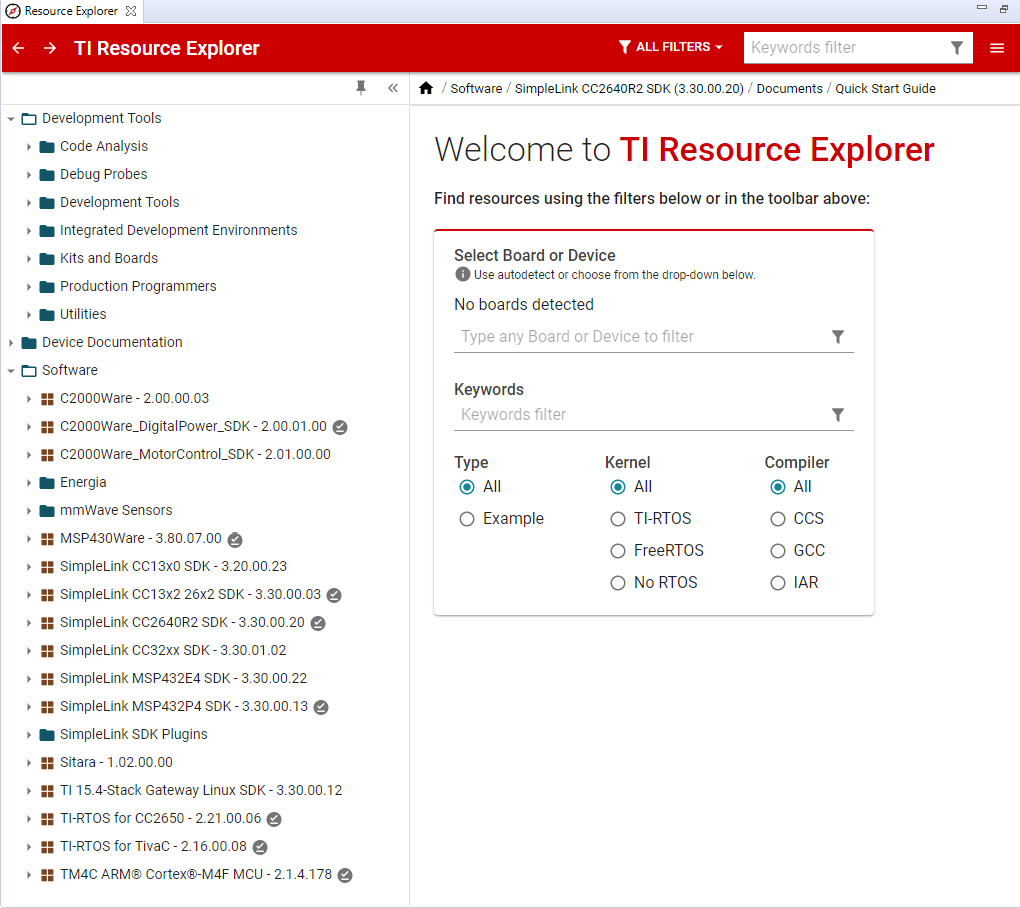
The Resource Explorer helps you find all the latest examples, libraries, demo applications, data sheets, and more for your chosen platform.
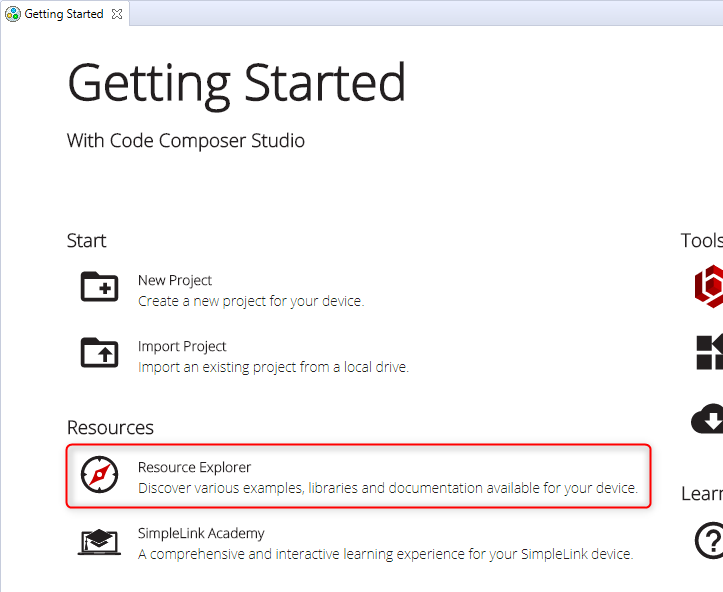
The Resource Explorer can be opened from the Resource Explorer button in the Getting Started view or from the View в†’ Resource Explorer menu item.
Filtering by device, or by TI LaunchPad Kit, the interface enables you to filter the content to only what is relevant to your chosen platform.
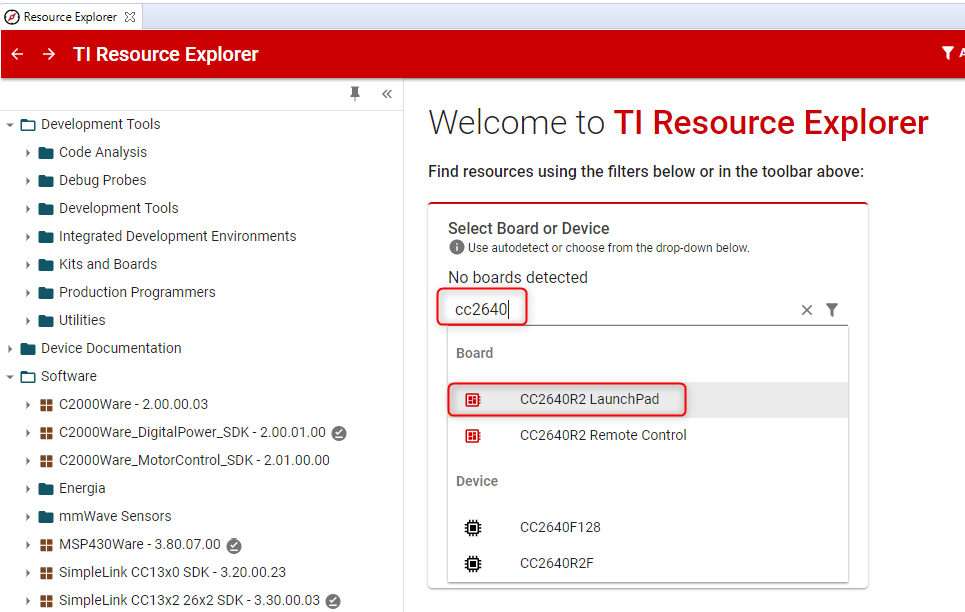
Use the Select Board or Device filter field to search and select the device or TI LaunchPad Kit that you are using. For example, if you are using the CC2640R2 LaunchPad, you can starting typing «cc2640» in the search field to filter the list to easily find your LaunchPad:
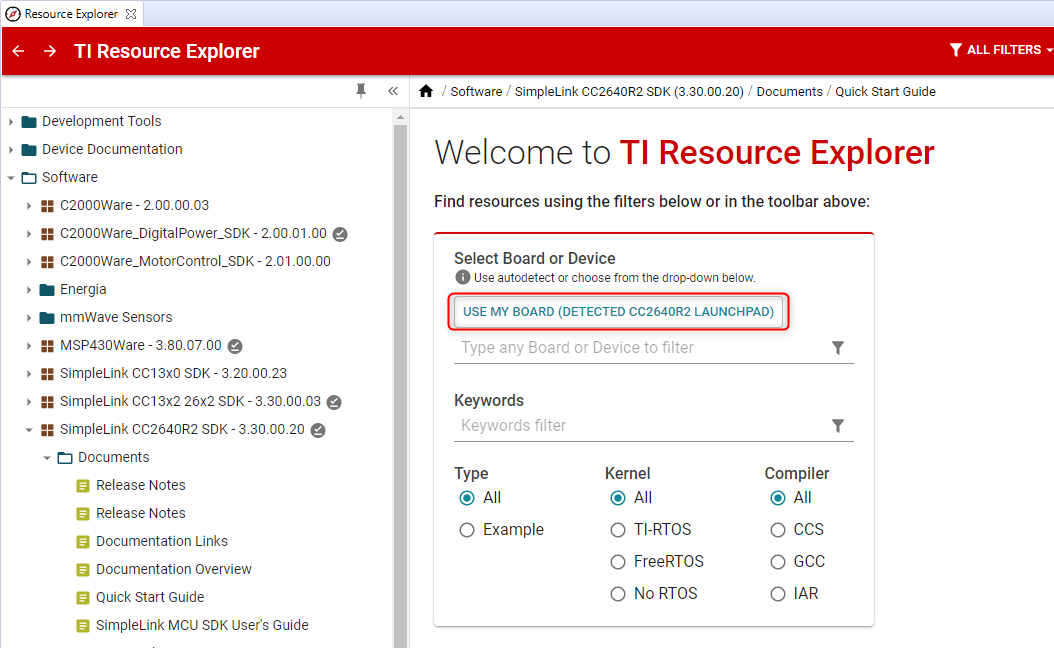
If you have a valid TI kit (such as a LaunchPad Development Kit) connected to your computer, Resource Explorer may be able to autodetect it. If autodetect is successful, you can select the USE MY BOARD option to specify your kit:
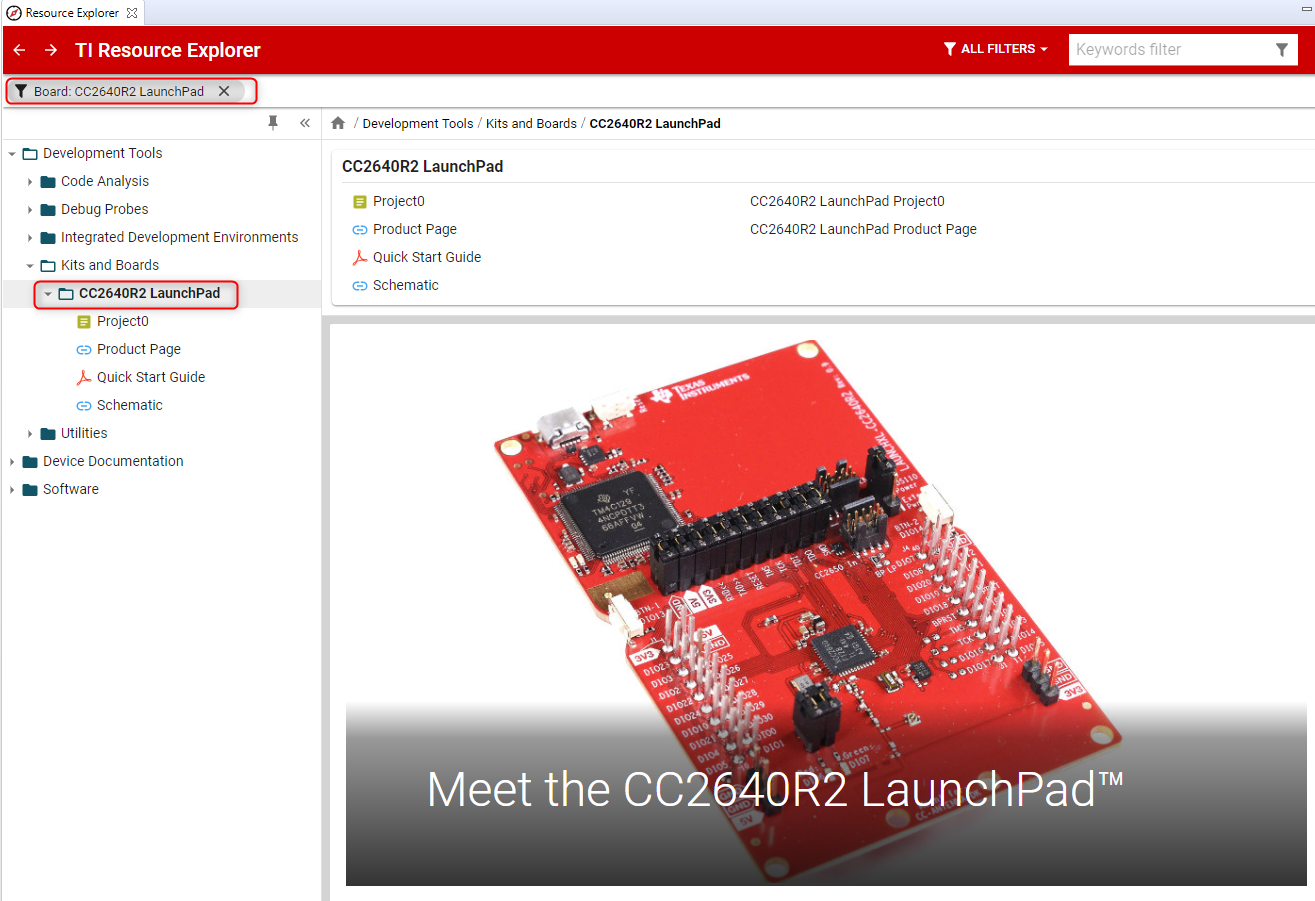
Once your device or TI LaunchPad Kit is selected, the filter will be applied and only content relevant to your selection will be displayed. You can now browse through the displayed content to learn more about your device, board, relevant tools, and available software packages.
The best way to get going with software development on your target is to start with some existing examples for your target. Many examples are included with the software package with supports your device, and many of these software packages are accessible right from Resource Explorer.
Not all devices are supported via Resource Explorer. Please see the device family specific information in the next few sections for more details.
5.3. Device Family Specific Information¶
Please refer to the section below that is applicable for your device.
5.3.1. SimpleLink MCU¶
If you are using a SimpleLink MCU, the recommended starting point is the Quick Start Guide for your SimpleLink SDK.
Note that the above recommendation applies to the newer SimpleLink MCUs. These are:
Following the Quick Start Guide is an excellent way to get introduced to the SimpleLink SDK. A section of the Quick Start Guide will cover a tutorial on how to get started with the examples provided by the SDK with CCS. This is an excellent way to get a taste of the development and debug experience with CCS.
The Quick Start Guide can be found in Resource Explorer by browsing to the following location: Software в†’ SimpleLink [family] SDK в†’ Documents в†’ Quick Start Guide.
Depending on the SDK, there may be multiple relevant «Quick Start» guides. Or the name of the guide may be slightly different. For example, the guide found in the SDK for CC3220 is called Quick Start Guide for SimpleLink CC3220 SDK.
There is also an additional CCS Fundamentals Workshop: English | Chinese (дёж–‡). This workshop can be found in Resource Explorer by browsing to the following location: Development Tools в†’ Code Composer Studio в†’ General and IDE в†’ Training в†’ Workshops.
If you are using an older SimpleLink MCU, the SDK for your device may not appear in Resource Explorer. Please refer to the below list:
5.3.2. C2000В¶
The recommended starting point is the Getting Started Module in the C2000 Academy.
It can be found in Resource Explorer by browsing to the following location: Software в†’ C2000 Academy в†’ Examples в†’ Module 02: Getting Started.
There is also an additional C2000 Fundamentals Workshop for CCS: English | Chinese (дёж–‡).
It can be found in Resource Explorer by browsing to the following location: Development Tools в†’ Code Composer Studio в†’ General and IDE в†’ Training в†’ Workshops в†’ C2000 Fundamentals Workshop for CCS.
More examples, resources, and documentation can be found in the C2000Ware and C2000 Academy packages in Resource Explorer.
5.3.3. mmWave¶
The best place to start is with the user’s guide for the mmWave Out Of Box Demo:
It can be found in Resource Explorer by browsing to the following location: Software в†’ mmWave Sensors в†’ Industrial Toolbox в†’ Labs в†’ Out Of Box Demo в†’ Out Of Box Demo User Guide.
Once the above guide is completed, more examples, resources, and documentation can be found in the mmWave Sensors package in Resource Explorer.
5.3.4. MSP430В¶
The best place to start is with the MSP430 Fundamentals Workshop for CCS.
It can be found in Resource Explorer by browsing to the following location: Development Tools в†’ Code Composer Studio в†’ General and IDE в†’ Training в†’ Workshops в†’ MSP430 Fundamentals Workshop for CCS.
Once the above workshop is completed, more examples, resources, and documentation can be found in the MSP430Ware package in Resource Explorer.
5.3.5. TM4C¶
The best place to start is with the TM4 Fundamentals Workshop for CCS.
It can be found in Resource Explorer by browsing to the following location: Development Tools в†’ Code Composer Studio в†’ General and IDE в†’ Training в†’ Workshops в†’ TM4 Fundamentals Workshop for CCS.
Once the above workshop is completed, more examples, resources, and documentation can be found in the TM4C ARM Cortex-M4F MCU package in Resource Explorer.
5.3.6. Automotive Processors (TDAx/DRAx)В¶
It is recommended to follow the Getting Started Guides for the Processor SDK.
For J721E (TDA4VM, DRA829V):
For AM65XX (AM65xx, DRA80xM):
For AM57x/DRA7xx, 66AK2, C667x:
5.3.7. Sitara MPU¶
It is recommended to follow the Getting Started Guides for the Processor SDK.
For AM335x, AM437x, OMAP-L1x:
5.3.8. Sitara MCU¶
It is recommended to follow the Getting Started Guides for the Processor SDK.
5.3.8.1. C55x¶
It is recommended to start working with the examples found in the C55x Ship Support Library (CSL) and C55x DSP Library (DSPLIB). Please see the C55x Digital Signal Processors Software Overview video module for more information.
Since the examples mentioned in the above libraries are not available from Resource Explorer, manual steps will need to be taken to import/build/debug/run the project into CCS. Please refer to the next few sections below for more information.
CCS does not come bundled with the C55x compiler. It can be obtained from the CCS App Center.
5.4. Importing a CCS Project¶
CCS projects must be imported into the current CCS workspace before they can be used. The most convenient way to import example CCS projects is from Resource Explorer, as mentioned in some of the sections above.
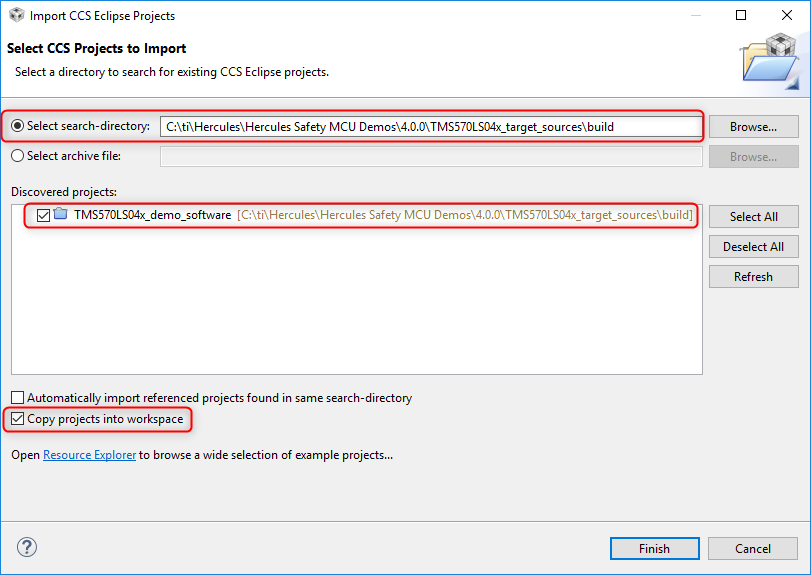
If the example project is not available from Resource Explorer, then the project can be manually imported using the Import CCS Eclipse Projects wizard:
Go to menu Project в†’ Import CCS Projects.
Next to Select search-directory, click Browse and browse to the location of a project OR if the project is available as an archive, then choose Select archive file and click on Browse to browse to archive.
Select the desired project(s) from the list of Discovered projects.
Leave the Copy projects into workspace option checked if you want to copy the projects into the workspace, otherwise uncheck the box. If unchecked, the project will continue to reside in its original location and all modifications/actions taken on the project will modify it in its original location.
If the Copy projects into workspace option is checked, everything in the project folder will be copied to the workspace. That includes the project files and any source files that are present within the project folder. If the original project has linked resources those will NOT be copied to the workspace. Before editing resources make sure to check if the project references linked resources from another location. Refer to this section on linked files for more information.
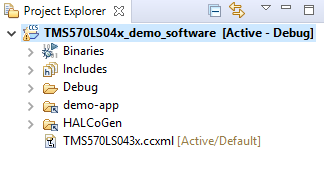
Once the project has been imported into the workspace, it will be visible in the Project Explorer view.
When a project created with an older version of CCS is imported into the workspace of a newer CCS version, the project will be migrated to support the newer version of CCS. This may prevent the project from being imported or opened again with the older CCS version. This is especially true for major CCS revision number differences (CCSv9 в†’ CCSv8) while minor revision number differences (CCS8.3 в†’ CCS8.2) may not be impacted as much.
One way to work around this is to check the option Copy projects into workspace when importing the project into newer CCS. That way each version of CCS can open its own version of the project as they are in different workspaces.
The same rule also applies when a project created in a newer version of CCS is imported into an older version of CCS. CCS projects are not backward compatible. If you want to use a CCS v9 project with CCSv8, for example, it is best to create a new project in CCSv8 and copy over the source files and settings.
For more information on importing CCS projects, please refer to the relevant section in the Projects and Build chapter.
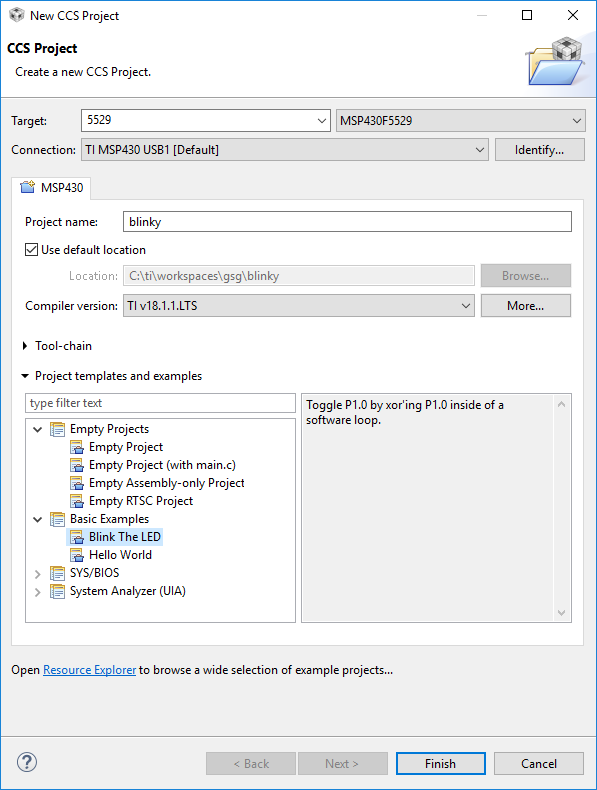
5.5. Creating a New CCS Project¶
To create a new CCS project, follow the steps below:
Go to menu Project в†’ New CCS Project. or File в†’ New в†’ CCS Project.
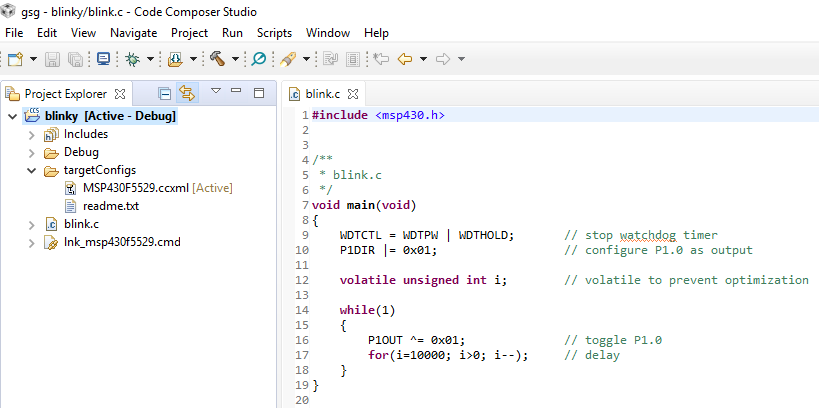
The new project will appear in the Project Explorer view and will be set as the currently active project.
Depending on the template selected, some source files are added to the project by default to ease the process of building and loading the program to the target device. You may add your own source files to the project and customize it further using the Project Properties dialog.
For more information on creating non-CCS projects, please refer to the relevant section in the Project Management and Build chapter.
Depending on the device, compiler, and template used, additional manual changes may be needed to the project. This could include adding additional initialization code or linker command files. This requires additional expertise on the device, hence why it is strongly recommended to start with an existing example if possible.
Once a new project has been created, additional source files can be added or linked to the project. Please refer to the relevant section in the Project Management and Build chapter.
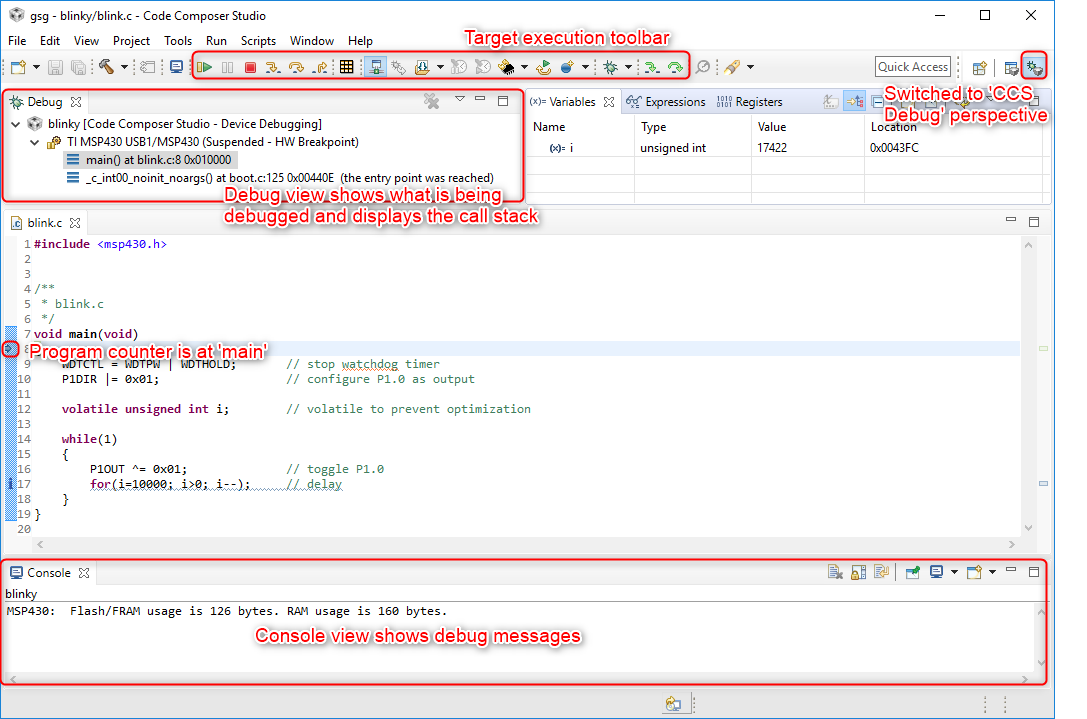
5.6. Building and Running Your Project¶
The above sequence of steps can be customized by modifying the debugger options. It is also possible to just only build the project (Project в†’ Build Project) without starting the debugger. Please refer to the relevant section in the Project Management and Build chapter and the Debugging chapter for more information.
5.7. Customizing the Environment¶
The Eclipse framework that is leveraged by Code Composer Studio allows for extensive personalization. The majority of these settings are located in the Preferences dialog.
5.7.1. Keyboard shortcuts¶
Keyboard shortcuts are associated with many actions in Code Composer Studio. It is possible to change these key combinations and to assign new shortcuts to actions that do not currently have an assignment.
In the Preferences dialog select General в†’ Keys in the tree on the left. Here you will see a list of all commands and any key assignments that have been made. The list of commands is quite long. You can make use of the filter box above the list to filter the list of commands displayed.
Once you have located the command you are interested in, simply select it and then use selections at the bottom to make your new key assignment. If there are any conflicts with existing commands they will be displayed in the conflicts box.
5.7.2. Colors and fonts¶
It is possible to change the color, size, font, background. of most elements in the environment. Many of these settings are captured in collections called Themes that you can switch between to change a group of settings at once.
Individual colors and fonts can be changed by expanding Appearance in the tree on the left and selecting Colors and Fonts.
5.7.3. Menu items and toolbar buttons¶
The menu items and toolbar buttons displayed are defined as part of the Perspective. You can change these settings by going to the menu and selecting Window в†’ Perspective в†’ Customize Perspective. In the dialog that opens you can select which actions are available on the Toolbars and Menus.
Any changes that you make will be applied to your current perspective only. For example if you are currently in the CCS Edit perspective and add a menu item, it will be added to that perspective and not the CCS Debug perspective.
2.1. System Requirements¶
2.1.1. Hardware¶
| Memory | Disk space | Processor | |
|---|---|---|---|
| Minimum | 4GB | 2.5GB | 2.0GHz single core |
| Recommended | 8GB+ | 5.0GB+ | multi-core |
It is strongly advised to have a system that exceeds the recommended requirements. While Code Composer Studio will run on a system that meets the mininum requirements, the performance will likely be poor.
2.1.2. Operating System¶
Please note that Code Composer Studio is a 64bit application and thus will not run on 32bit operating systems.
2.1.2.1. Windows¶
2.1.2.2. Linux¶
Supported distributions include:
Code Composer Studio will run on other distributions but these are the officially supported and tested distributions.
More information on installation instructions as well as debug probe and device support is available in the Linux Host Support page.
2.1.2.3. macOS¶
Code Composer Studio device support on macOS is limited to microcontrollers (MSP, C2000, SimpleLink, Tiva and Hercules) and does not include processors (Sitara, DSP, KeyStone, mmWave).
Versions Supported
Each Code Composer Studio release is validated against a set of macOS releases. This release was validated with:
More information on installation instructions as well as debug probe and device support is available in the macOS Host Support page.
2.2. Eclipse¶
Code Composer Studio is based on the Eclipse open source software framework. Hence understanding some of the basic concepts of Eclipse will lead to a better understanding of Code Composer Studio. Some of the more commonly referenced concepts are described below.
2.2.1. Workbench¶
The Workbench refers to the main user interface. The Workbench contains all the various views and resources used for development. When the Workbench is launched, the first dialog prompts for location of workspace. After the workspace location is chosen, a single Workbench window is displayed. A Workbench window offers one or more perspectives.
Multiple Workbench windows can be opened using the Window в†’ New Window menu. While each Workbench window can differ visually (arrangement of views, toolbars and such), all windows refer to the same workspace and the same running instance of Code Composer Studio. If a project is opened from one Workbench, that same project will be present in all the Workbench windows.
2.2.2. Workspace¶
The workspace is the main working folder for Code Composer Studio. The workspace stores references to all projects even if the projects themselves do not physically reside inside the workspace folder. The default location of new projects will be within the workspace folder. Once a project has been added to the workspace, it will be visible in the Project Explorer view.
Code Composer Studio will prompt for the workspace folder location when you launch the application. It is possible to specify to use the selected folder as the default folder to avoid being prompted in the future
The workspace folder is also used to store user information such as user interface preferences and settings.
Workspaces are user specific and are not typically shared between users. You would not check your workspace into source control to share with other team members. You would check your projects into source control and each user would have their own workspace that references the projects.
It possible to have multiple. Only one workspace is active at a time in Code Composer Studio but you can switch workspaces using the File → Switch Workspace… menu.
2.2.3. Perspective¶
A perspective defines the layout of views, menus and toolbars in the Workbench window. Each perspective provides a set of functionality aimed at accomplishing a specific type of task. For example, the CCS Edit perspective contains views most commonly used during code development, such as the Project Explorer, Editor and Problems view. When a debug session is started, Code Composer Studio will automatically switch to the CCS Debug perspective. This perspective by default contains views associated with debugging.
There is a CCS Simple perspective available that can be accessed from the Getting Started view. This perspective is used for both editing and debugging and has been designed to expose just the most basic functionality to make it easier for users who are familiar with more simple environments.
2.2.4. View¶
Views are windows within the main Workbench window that provide visual representation of information or data. The Workbench window mainly consists of the editor and a collection of views. Examples of some views are Debug, Problems, Memory Browser, Disassembly.
2.2.5. Resource¶
Resources is a collective term for a project, folder or file that exists in the Workspace.
2.2.6. Project¶
Projects typically contain folders and files. Like the workspace, a project maps to a physical folder in the file system. The default location, when creating a new project, is in a subfolder (of the project name) within the workspace folder. However a folder outside the workspace can also be chosen. Once the project is created, a reference to it will be made in the workspace and the project is now available for use within the Workbench and visible from the Project Explorer.
Projects are either open or closed. When a project is closed, it is still part of the workspace, but it cannot be modified by the Workbench. The resources of a closed project will not appear in the Workbench, but the resources still reside on the local file system. Closed projects require less memory and are not scanned during routine activity. Hence closing unnecessary projects can improve performance of Code Composer Studio. Note that closed projects will still be visible in Project Explorer so that they can easily be opened when needed.
A project becomes part of a workspace by being created in the workspace or by being imported into the workspace.
The Project Explorer shows all projects that are part of the active workspace. Note that the view is mostly a representation of the filesystem of the project folder. Hence when creating a subfolder and moving files to that subfolder from within the Project Explorer, the actual file system is being altered. Similarly changes made to the file system will be reflected in the Project Explorer. Note that not all files that appear in the view will exist in the file system and vice versa. Linked files will appear in the view but because they are references and not actual copies, the references do not appear in the actual file system. The Includes folder that appears in the Project Explorer displays all of the include paths setup for the project and is not a physical folder.
2.2.7. File¶
Files can either be added or linked to a project. When a file is added to a project, the file is copied to the root location of the project folder. There is also the option to вЂlink’ a file to a project. This will simply have the project create a reference to the file instead of copying the file into the project folder.
2.3. Licensing¶
There is no license fee associated with Code Composer Studio. Users are free to download and install Code Composer Studio without having to purchase a license. The license terms for Code Composer Studio are shown at installation and available afterwards in the /doc folder.
2.4. Contents¶
Code Composer Studio is a suite of development tools including an editor, project management system, compiler, debugger, profiling and visualization tools.
2.4.1. IDE¶
IDE stands for Integrated Development Environment. It refers to an environment that brings together the tools needed to develop software. Typically this means an editor, build system and debugger. This enables the development of software without having to continually switch between tools.
The editor in Code Composer Studio includes a wide breadth of features to make development easier. Standard features such as customizable syntax highlighting and code completion are present, as well as more unique features such as local history. The local history keeps track of source code changes and enables the comparison or replacement of the current source with those in the history.
The project management system allows for the building of projects with either the TI compiler or GCC. It also integrates with standard source control software such as Git.
The integrated debugger allows for the debugging of applications running on TI embedded devices and is discussed in more detail in the debugging chapter.
2.4.2. Compiler¶
C/C++ Compilers are provided for each instruction set. In most cases this is a TI proprietary compiler. For Cortex A devices GCC is provided but in general it is recommended to use the compiler that is bundled with the SDK for the device. For MSP430 and Cortex M based MCUs a TI proprietary compiler and GCC are provided. GCC is the open source GNU compiler. Additional compilers are available from the App Center.
2.4.3. Resource Explorer¶
Resource Explorer helps you find all the latest examples, libraries, demo applications, datasheets, and more for your chosen platform.
Filtering by device, or by TI LaunchPadв„ў Kit, the interface enables you to filter the content to only what is relevant to your chosen platform. Resource Explorer will show you not only the resources that you have installed on your local computer but also those that are located online and available for download. When you select an example from a software package that you have not yet installed Resource Explorer will allow you to install that package, and any necessary dependencies, and then allow you to import the example into your workspace.
Resource Explorer can be accessed from menu View в†’ Resource Explorer.
More information on Resource Explorer is available here.
2.4.4. App Center¶
Similar in concept to Resource Explorer, App Center is used to obtain additional items required for development. While Resource Explorer is used to obtain software and documentation, App Center is primarily used to obtain extensions or add-ons to the Code Composer Studio environment such as compilers.
Resource Explorer can be accessed from menu View в†’ CCS App Center.
More information on App Center is available here.
2.5. Debug Probes¶
TI offers a wide selection of debug probes that enable software development on TI embedded processors. TI’s debug probes are designed to meet different needs in terms of functionality and budget. Each probe is compatible with Code Composer Studio.
Developing software typically requires downloading the resulting program to the embedded processor it was written for. A debug probe provides a debug communication pathway between a host computer and the embedded processor. This allows for downloading of the program as well as controlling the processor to enable debugging.
More information on the debug probes available for TI embedded processors is available here.
Note that it is possible to add support for additional debug probes to an existing Code Composer Studio installation by running the installer again and pointing it at the current installation.
2.6. Support¶
The E2E support community is the primary method for obtaining support for developing on TI processors. This article provides more information on support resources.
CCSTUDIO
Code Composer Studio™ integrated development environment (IDE)
Select a version
View software details
Windows single file installer for CCS IDE — 1120166 K
Link to Windows single file (offline) installer for Code Composer Studio IDE (all features, devices)
Linux single file installer for CCS IDE — 1076114 K
Link to Linux single file (offline) installer for Code Composer Studio IDE (all features, devices)
macOS single file installer for CCS IDE — 1071622 K
Link to macOS single file (offline) installer for Code Composer Studio IDE (all features, devices)
Windows on-demand installer for CCS IDE — 39223 K
Link to Windows on-demand (web) installer for Code Composer Studio IDE (all features, devices)
Linux on-demand installer for CCS IDE — 24756 K
Link to Linux on-demand (web) installer for Code Composer Studio IDE (all features, devices)
macOS on-demand installer for CCS IDE — 34072 K
Link to macOS on-demand (web) installer for Code Composer Studio IDE (all features, devices)
This design resource supports most products in these categories.
Check the product details page to verify support.
Products
Automotive mmWave radar sensors
Industrial mmWave radar sensors
Documentation
Feature Overviews, App Notes and How-to Articles
Complete User’s Guide
Code_Composer_Studio™ 11.2.0 Manifest
Release Information
The Code Composer Studio™ IDE is a complete integrated suite that enables developers to create and debug applications of all Texas Instruments Embedded Processors (Sitara, DSP, Automotive, Keystone), Microcontrollers (SimpleLink™, C2000 Digital Control, MSP430, TM4C, Hercules), as well as Digital Power (UCD) and Programmable Gain Amplifier (PGA) devices.
3.1. Important Installation Information¶
3.1.1. Installation Types¶
3.1.1.1. Web Installer¶
The web installer was a lightweight installation program. The initial download is very small and enables the selection of features and device support to install. Once the selections are made the installer will then download the appropriate packages to complete the desired selection.
Internet connectivity is required to use the web installer
3.1.1.2. Offline Installer¶
The offline installer, or full installer, is a larger installation program. The download contains all of the available installation options. This installer does not require internet connectivity to run.
3.1.2. System Requirements¶
Each version of Code Composer Studio describes its list of System Requirements. If your system does not meet these requirements you may experience poor performance, or the inability to run the application.
The System Requirements section in the Overview chapter has more information on the requirements for this release.
3.1.3. Security Software¶
During the installation of Code Composer Studio there may be packages downloaded from the internet and installed. Some anti-virus and security software detects this and will block the installation. As a result it is recommended that such software be disabled during installation of Code Composer Studio. This is not a requirement but if the installation fails it is recommended to try again with the security software disabled. The full/offline installation is less susceptible to these issues.
3.1.4. Permissions¶
Depending on what debug probes are selected during installation there will be device drivers that need to be installed on the system. In order to complete this step the appropriate permissions on the system will be required. On Linux this involves running an installation script as sudo at the end of the installation.
3.2. Installation Process¶
Overall the installation process is the same across Windows, Linux and macOS. Where there are differences this will be noted in the installation steps.
3.2.1. Download¶
The installation images for Code Composer Studio can be obtained fron the CCS Download Site.
Select the image that matches the host operating system of the computer that it will be installed on.
3.2.2. Running the Installer¶
Note that most of the installers are provided inside archive files such as a zip file. It is necessary to extract the archive file before proceeding with installation.
For Linux users it is recommended to install as a normal user and not sudo/root.
3.2.2.1. Dependencies¶
The Code Composer Studio installation is dependent on other software packages. For Windows and macOS users these packages will be installed automatically as part of the installation. For Linux users the installer will attempt to identify which packages are missing and display this list. On Linux the dependencies should be installed prior to continuing with installation. More information on dependencies is provided in the Linux Host Support article.
3.2.3. Steps¶
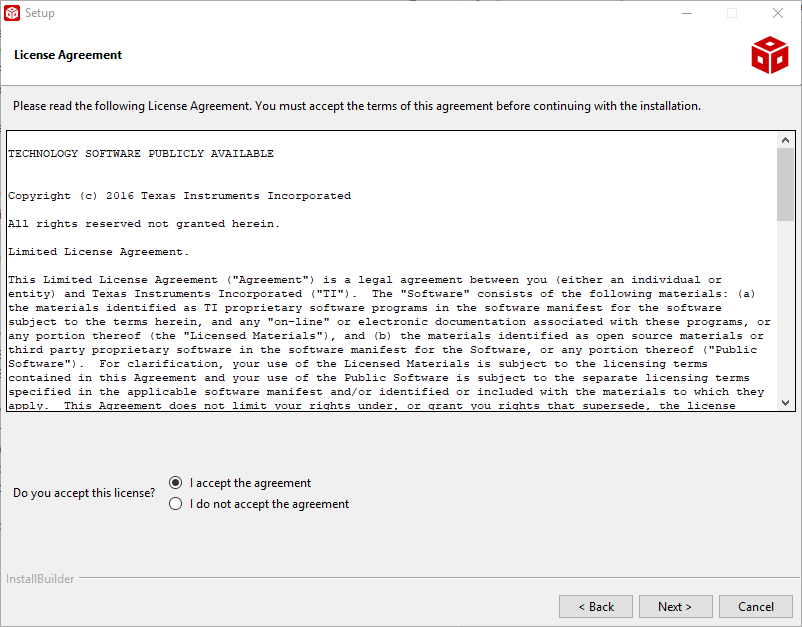
3.2.3.1. License Agreement¶
The end user license agreement is displayed. The agreement can be printed if desired. The license agreement must be accepted to continue.
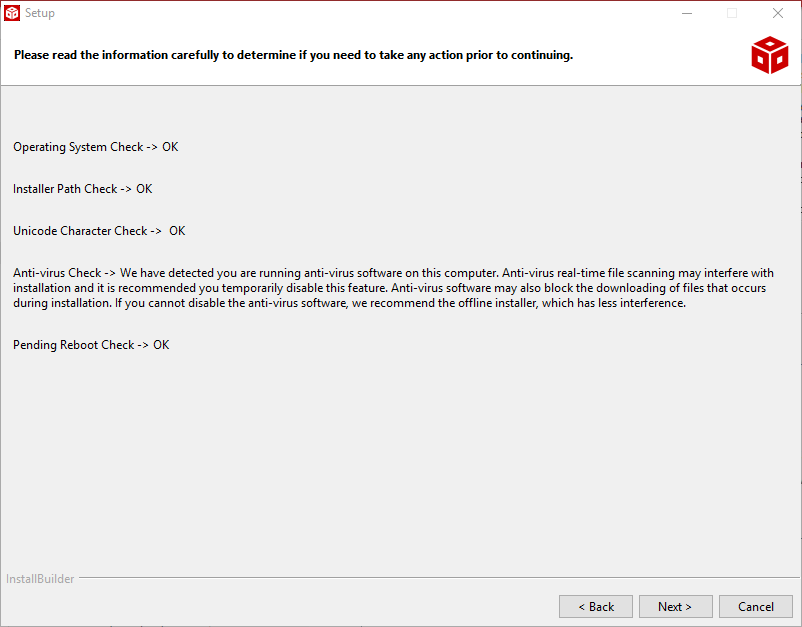
3.2.3.2. System Check¶
The installer will check the system to see if it meets the requirements for installation. Any issues that need to be addressed will be displayed. Disabling security software is recommended but optional.
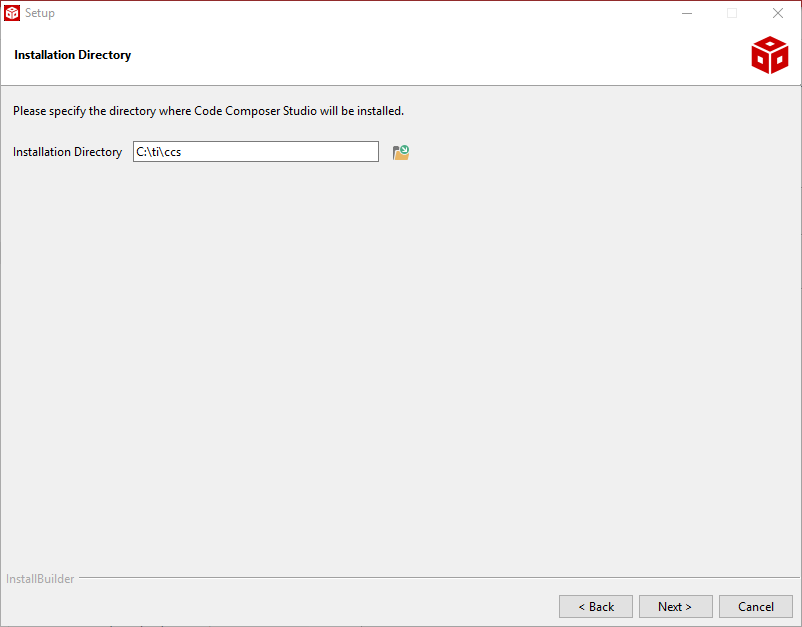
3.2.3.3. Installation Location¶
Choose a location to install Code Composer Studio. This location must not already contain a Code Composer Studio installation. If multiple versions of Code Composer Studio will be installed then it is recommended to install them in versioned folders.
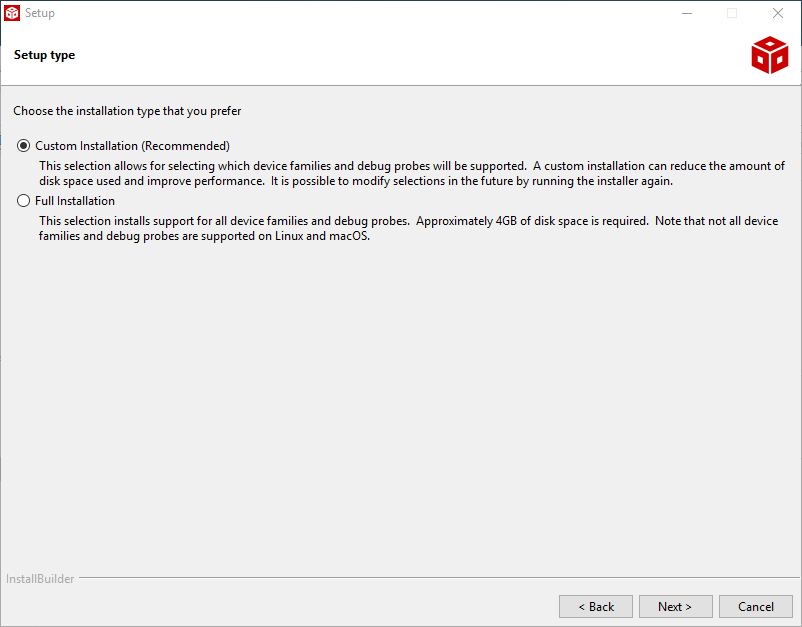
3.2.3.4. Setup Types¶
There are two installation types:
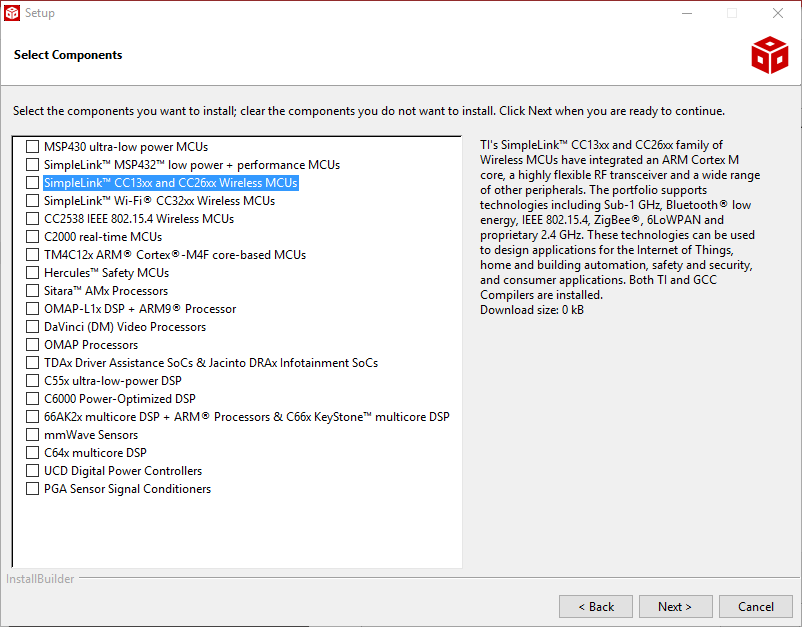
3.2.3.5. Device Support¶
If a Custom Installation was selected, this dialog is used to configure which device families to install support for. When a family is selected on the left hand side, a short description will be displayed on the right. This is useful to help determine which selections to make.
Note that it is possible to add support for families after installation by running the installer again and pointing it at the existing installation.
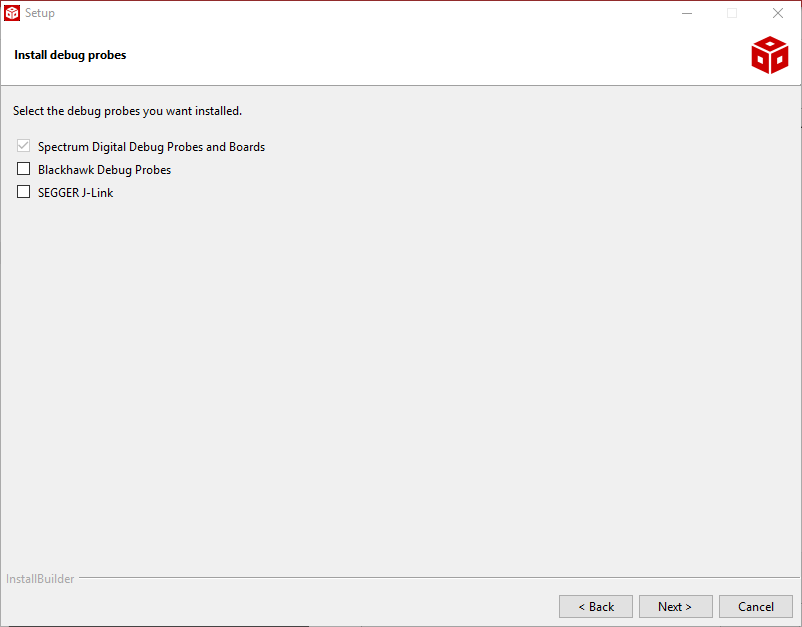
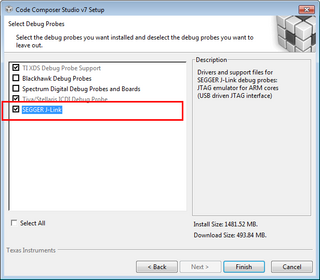
3.2.3.6. Debug Probe Support¶
This dialog allows users to enable support for some common third party Debug Probes. Available options will depend on the device families selected in the previous dialog.
Note that the Spectrum Digital Debug Probes and Boards option includes the support for standard XDS560v2 debug probes.
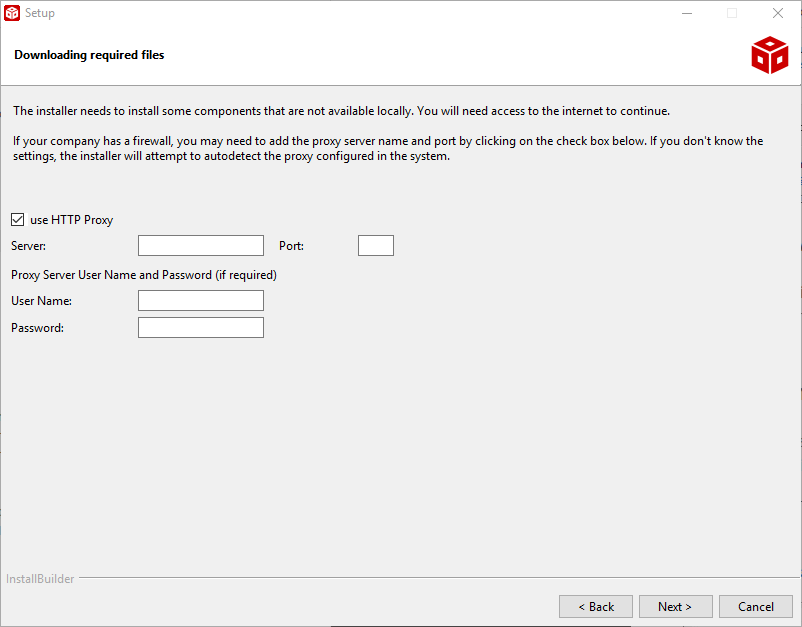
3.2.3.7. Proxy Server¶
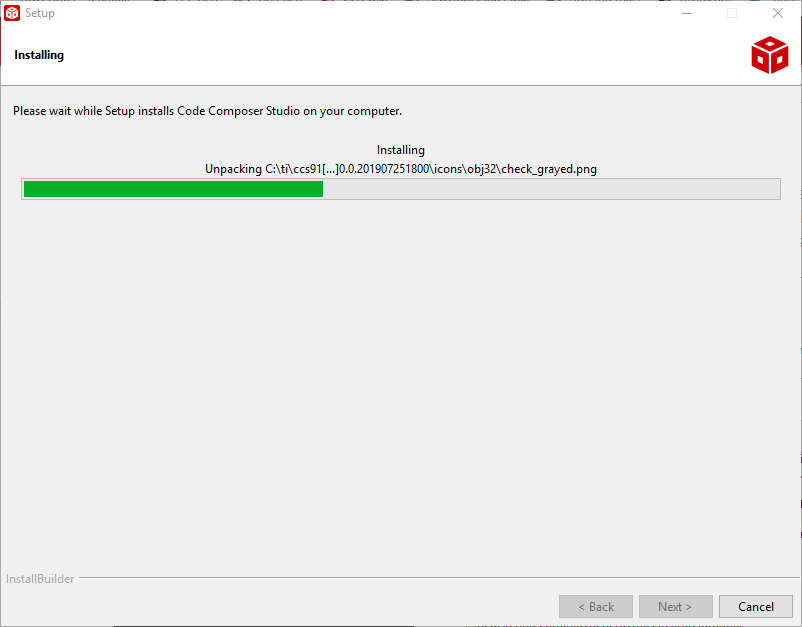
3.2.3.8. Progress¶
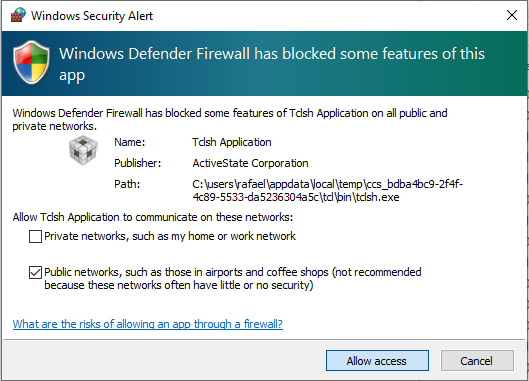
As the installation proceeds the progress screen will show what the installer is doing. Depending on how many device families were selected the installation may take a significant amount of time. The web installer will take additional time as it needs to download the required components from the internet.
Windows only. If you have Windows Defender enabled, at the beginning of this process the alert below may be displayed. Click on “Allow Access” to properly install CCS.
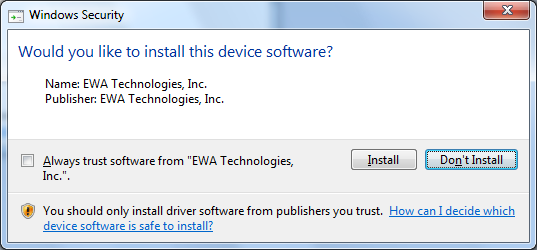
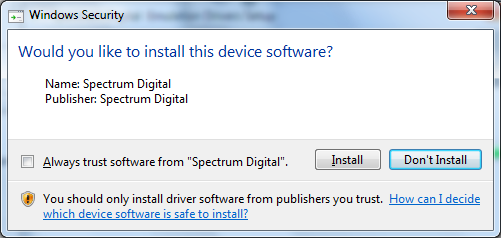
Windows only. If Blackhawk or Spectrum Digital driver install option was chosen, close to the end of the install process the warnings below may be shown.
3.2.3.9. Driver Installation¶
If installing on Linux as a normal user a screen will be shown that provides the location of the driver installation script. It is necessary to run the indicated script as sudo/root. This will ensure that the drivers for the debug probes are installed correctly.
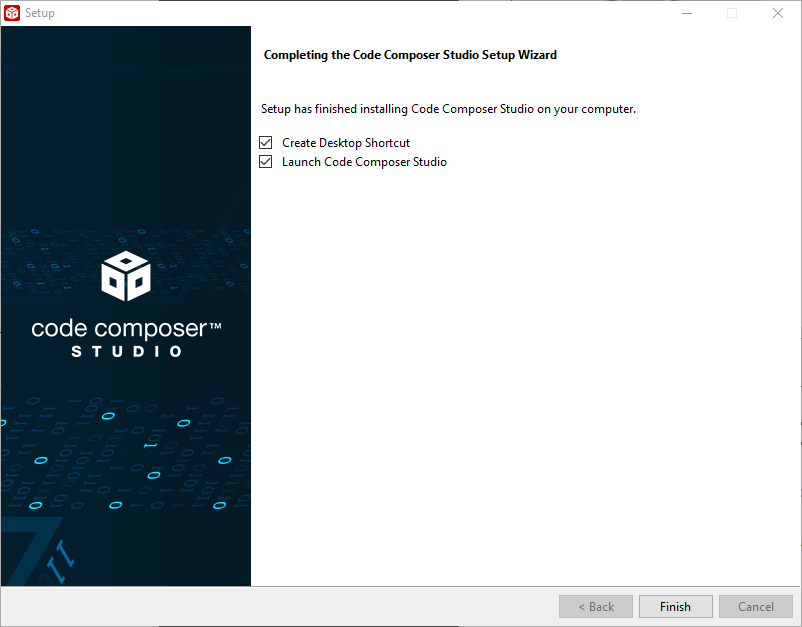
3.2.3.10. Completion¶
The last screen shown during installation is the successful completion screen. This screen provides options to launch Code Composer Studio and to create a desktop shortcut.
3.3. Command Line Installation¶
To install CCS from a command line interface, please refer to this article.
3.4. Uninstalling CCS¶
To uninstall CCS: exit CCS, navigate to /ccsv[x] directory and run the uninstall_ccs executable.
To uninstall the entire installation (including other components like xdctools): delete the entire installation directory.
Code Composer Studio™ IDE & development tools
Our industry-leading integrated development environment is a seamless coding experience
Our robust development environment, centered on Code Composer Studio™ IDE, is built with your convenience and ease-of-use in mind. You need to get to market fast, iterate faster, and scale your innovations quickly and seamlessly across diverse families of equipments. From our unique cloud environment of easy resource exploration and browser-based development tools to advanced debugging on your desktop, our development tools enable your journey from discovery to production. Browse the table below to get started.
TI’s embedded development tool ecosystem
*Offline download available
†Available for cloud-supported use in-browser
Code Composer Studio™ software
Whether you need a desktop environment or are looking to start development in the cloud, you have flexibility using the Code Composer Studio Integrated Development Environment (IDE). These solutions are tailored to your needs to help you scale your designs and develop quicker. Use our industry-leading suite of tools used to develop, compile, debug and analyze embedded applications. The choice is yours: design on your desktop or in the cloud. Have confidence knowing you are using proven development tools that support you from investigation through to production.
8.1. General¶
8.1.1. Does CCS still support 32-bit Windows systems?В¶
The last release to support 32-bit Windows is CCSv8.3.
8.1.2. How can I use my XDS510USB debug probe with CCS?В¶
The last release to support the XDS510USB debug probe is CCSv8.3.
8.1.3. Are simulators no longer included with CCS?В¶
The last release to support simulation is CCSv5.5.
8.1.4. Are C54x devices supported in CCS?В¶
The last release to support C54x is CCSv5.5.
8.1.5. Can I use DSP/BIOS with current releases of CCS?В¶
It is still possible to use DSP/BIOS with current releases of CCS and build projects. However, note that DSP/BIOS has been greatly deprecated in support and many advanced features like RTA are no longer available with current CCS versions.
8.1.6. Which operating systems are supported by CCS?В¶
8.1.7. How do I modify the maximum Java heap size for Eclipse?В¶
Information on the Heap and Java Virtual Machine (JVM) memory settings can be found in the related section in the Troubleshooting chapter.
8.1.8. Why do I need to avoid non-alphanumeric (unicode) characters in my paths?В¶
Paths with non-alphanumeric characters can potentially cause various project management and build issues. In some cases, the build may go fine but clicking the Debug button may not start up the debugger. Or going to Project Properties в†’ Debug may result in error: Error reading Debug Properties. Any of these symptoms could occur when using paths with non-alphanumeric characters.
Examples of non-alphanumeric characters are &, !, (, #, etc. It is recommended to avoid such characters in project names, source/header files/folders, CCS workspace folder names, system temp folder, etc. One exception is the underscore character _, which is normally accepted. A space/whitespace character, while acceptable in most cases, can cause issues with project builds (especially with SYS/BIOS projects) and the GUI Composer runtime. Hence it is recommended to also avoid it.
Note that many CCS files are cached in the user’s home folder. The default workspace location is also in the home folder. If the user’s username has non-alphanumeric characters, then this would cause issues since the path to there user’s home folder is often a folder named the same as the username.
8.1.9. What is the best way to look up a bug?В¶
Visit the TI Bug and Enhancement System. Enter the bug ID in the search box on the upper right. If the search fails, please surround the bug ID with «quotes» and try again.
Note that the system TI uses to maintain reports on bugs and enhancements made a transition in early 2020. The identifiers of the newer entries all begin with EXT (ex: EXT_EP-9524). The identifiers of the older entries begin with something else. As of this writing, finding an older entry requires surrounding the identifier with «quotes».
8.2. Installation¶
8.2.1. How do I troubleshoot CCS Installation Errors?В¶
CCS installation errors may be caused by a variety of reasons.
If the above recommendations do not help resolve the issue, post a new question to the E2E forums.
8.2.2. Can I install multiple versions of CCS on my computer?В¶
Yes. Multiple versions of CCS can be installed on the same machine as long as they are installed in different directories. It is also recommend not to share workspaces between different versions of CCS.
8.2.3. What is the difference between the web installer and the offline installer?В¶
The web installer is a lightweight installation program. The initial download is very small and enables the selection of features and device support to install. Once the selections are made the installer will then download the appropriate packages to complete the desired selection.
The offline installer, or full installer, is a larger installation program. The download contains all of the available installation options. This installer does not require internet connectivity to run. This installer is recommended if your firewall or anti-virus software is blocking the web installer.
8.2.4. My username has Unicode characters and CCS fails to install. How do I resolve this?В¶
8.2.5. Why does the Linux installer just exit without doing anything?В¶
The installer requires some packages to be installed in order to run. You are likely missing one or more of these packages. Please refer to Linux Host Support for more information on installing on Linux.
8.2.6. Why does the Windows installer just exit without doing anything?В¶
There is some software that sets up the TCL_LIBRARY environment variable which is interfering with the CCS installer. Please unset this variable temporarily, before trying the install.
8.2.7. After installing on Linux, why does CCS refuse to open?В¶
When double-clicking the desktop icon nothing happens, and if launching from a command line, the following error is shown:
This may happen when updating or installing a newer version of the same stream of CCS (8.0.0 to 8.1.0, for example). The cause is that, if CCS was previously launched as root, the temporary directory in the user area may have become tainted and its ownership was set to root. In other words, the temporary CCS directory would look similar to:
8.2.8. After installing CCS, I found out some features (such as certain processor families or debug probes) are missing. Is there a way to add these features?В¶
Yes. Simply re-run the installer executable (either online or offline). Follow the installer screens and select the same directory as the original install. Keep following the installer screens and select the missing components.
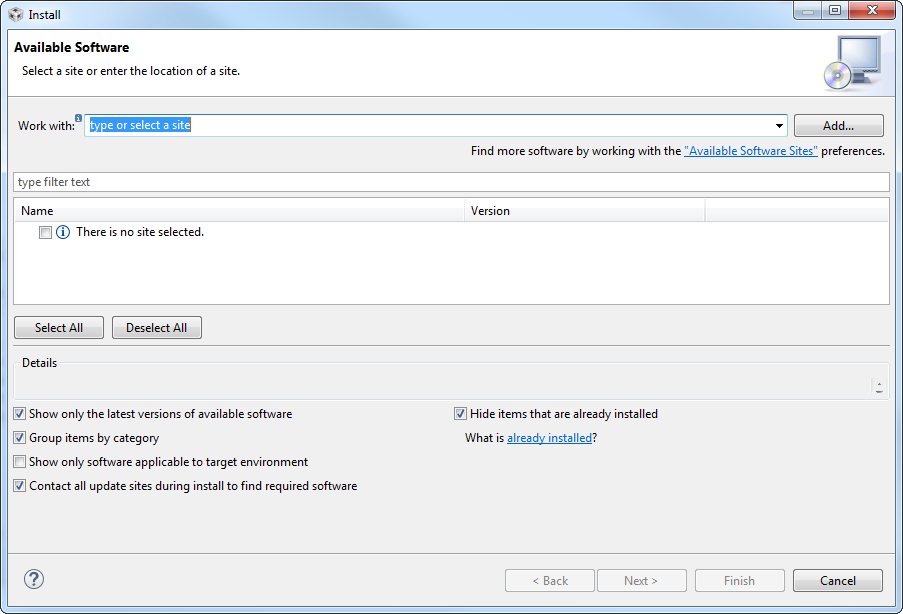
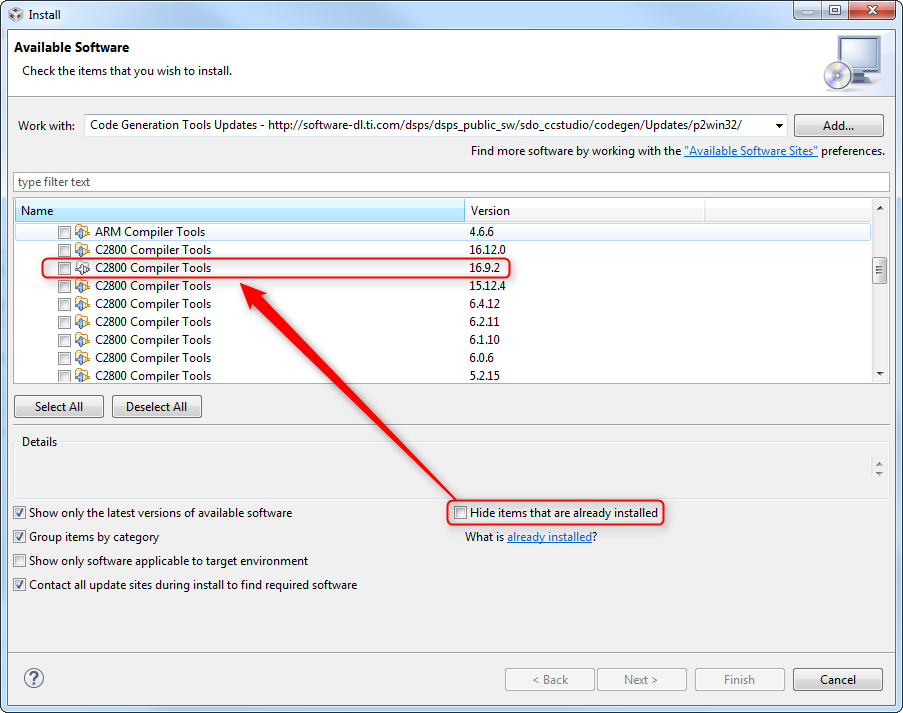
Certain features (such as code generation tools updates) can be installed from inside CCS (using menu Help в†’ Install New Software), however this method cannot be used to add support for additional processsor families and debug probes. You would need to re-run the installer to add this support. Check the CCS Updates page for more details.
8.2.9. When installing CCS it says An error occured: can’t read ”update“: no such variable. How do I resolve this?¶
Make sure you are installing CCS to a clean directory where a previous installation does not exist.
8.2.10. When trying to install compiler tools, CCS says it is already installed but it is actually not. How do I fix it?В¶
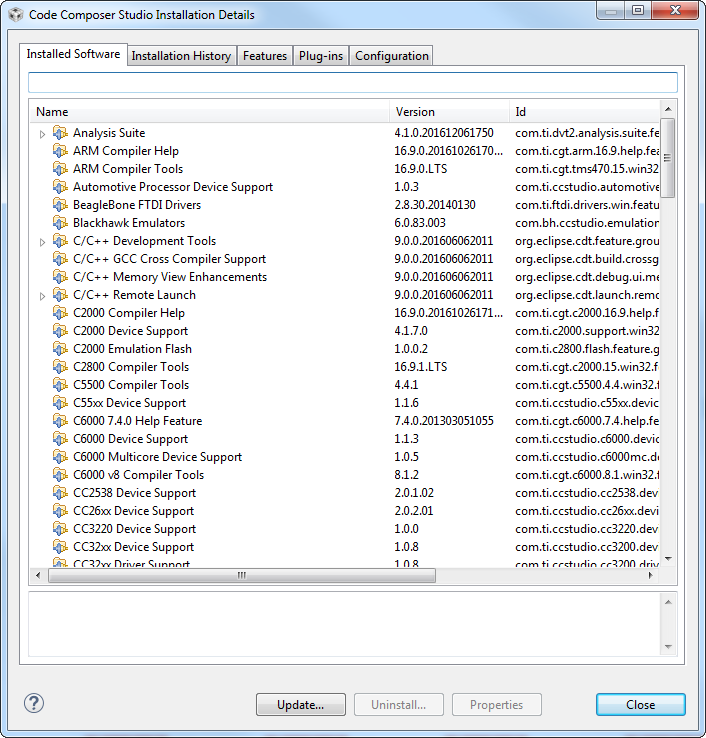
This could happen if a prior attempt at installing the compiler tools did not complete properly. In such cases, the menu Help в†’ Installation Details в†’ Installed Software will list that version of compiler tools as installed, however the files will really not be in the file system and the compiler version will not be in the list of Discovered Tools under menu Window в†’ Preferences в†’ Code Composer Studio в†’ Build в†’ Compilers.
To resolve the issue, look for the compiler installer executable in the folder /ccsv[x]/eclipse/downloads. It will be named something like ti_cgt_tms470_5.0.11_windows_installer.exe, for example. Run the installer manually as administrator and tell it to install into the /ccsv[x]/tools/compiler/arm_ directory.
8.2.11. How can I perform a silent or unattended installation of CCS?В¶
CCS can be installed from command line interface with several options, including unattended installation. Please refer to the CCS Installer Usage article for more details.
8.3. Licensing¶
8.3.1. What is the licensing policy for CCS?В¶
There is no license fee associated with CCS. Users are free to download and install Code Composer Studio without having to purchase a license.
For more details on the license, please refer to Licensing chapter.
8.4. Updates¶
8.4.1. How do I get updates to CCS?В¶
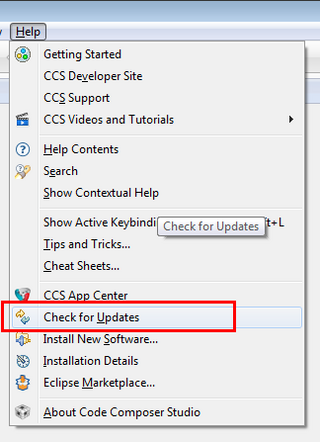
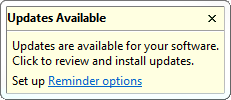
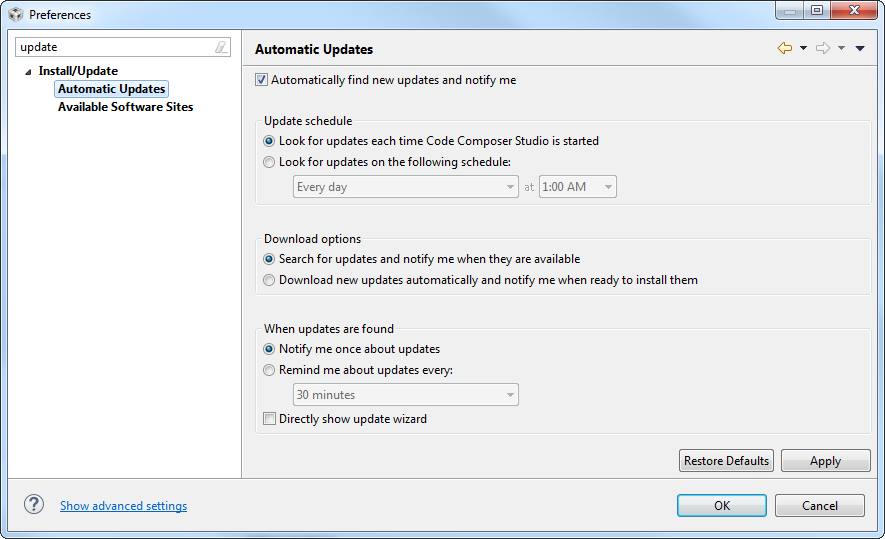
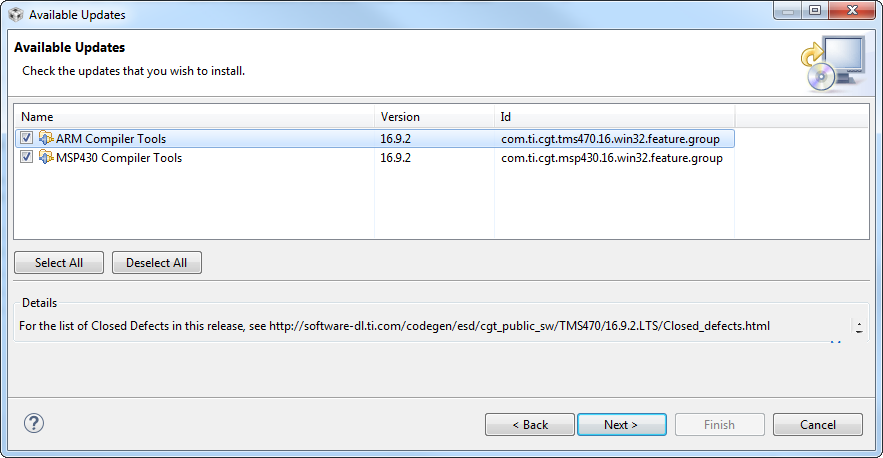
By default CCS automatically checks for updates each time it starts. This update check will find updates to features that are already installed. For example, it will find updates to the CCS IDE, compiler bug fix release, and device support. It will not find new features including new feature revisions of the compiler. See the CCS Updates page for more details.
8.4.2. How do I search for new features for CCS?В¶
The CCS App Center which is accessible from the View menu is useful for finding new features. The App Center will highlight a selection of new features that are relevant to the device families that you have installed.
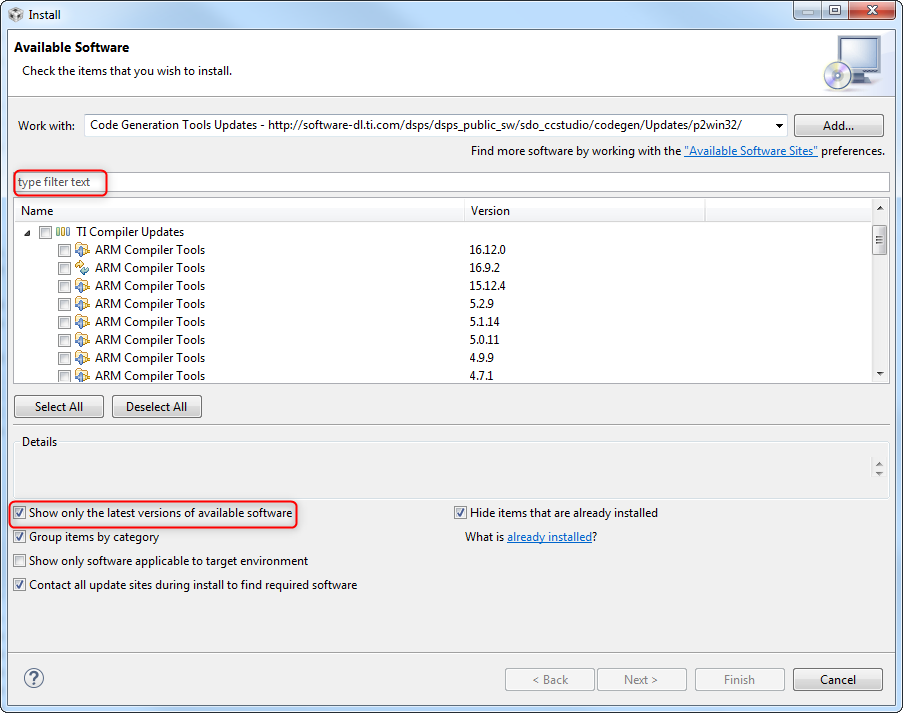
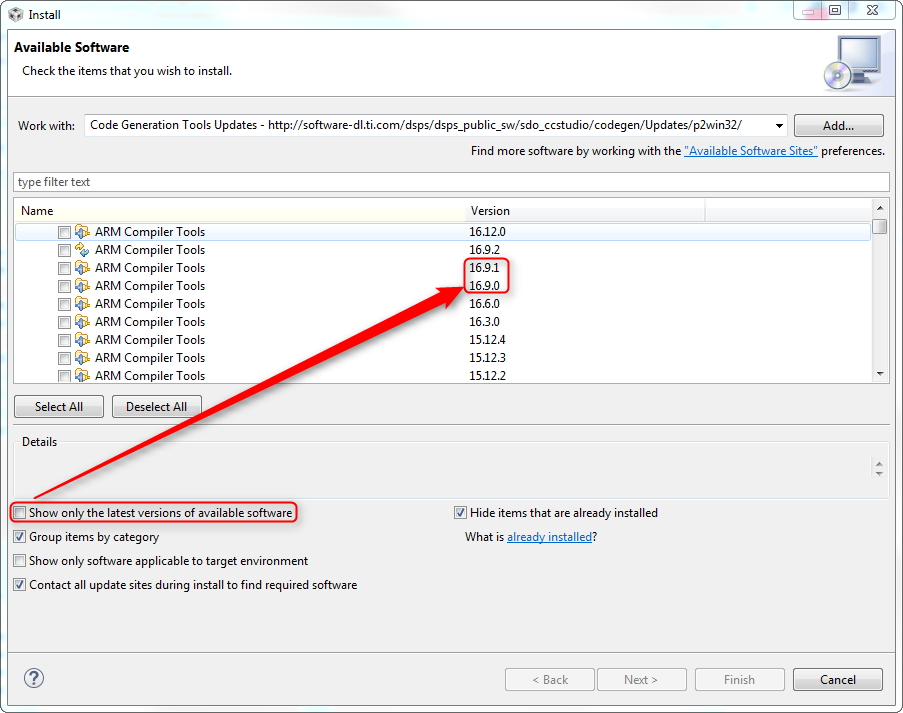
There are a few other ways to find and install new compiler tools. Refer to the procedures described in the Compiler Updates article.
8.4.3. When installing CCS updates I get a dialog box that warns me that the feature is unsigned. Is this a problem?В¶
Most updates released by TI are signed, however not all of them are. Similarly an update or feature from a partner may not be digitally signed. When this happens CCS produces a warning noting that the feature has not been signed. In general these are safe to ignore but it is best to always make sure you know where the update is coming from before installing it.
9.1. Installation¶
9.1.1. General Tips for Installing CCS¶
A temporary directory using the username is created during installation, and Eclipse is unable to handle some non-alphanumeric characters. If your username does have non-alphanumeric characters, please create a temporary admin user for installing CCS.
9.1.2. Installation Error Related to Missing MSVC Redistributable Libraries¶
CCS (on Windows) has a dependency on some Microsoft runtime libraries. These libraries should be installed by the CCS installer. However there are some cases where these libraries fail to get installed properly. In this case, the installer may fail with an error message that points to a log file inside a workspace.
Try installing the latest 64 bit runtime for VS 2019. You can get it from:
9.1.2.1. Windows 7В¶
Another reason for the above issue could be if you are running Windows 7 and the Windows patches are not up to date
To check if you are missing Windows patches, please run the following command in the command prompt: WMIC QFE|find «KB2999226»
It should return information on the updates. If it returns nothing, it is likely that you’re missing the service pack update that’s required to run the MSVC Runtime. You could get the Windows update by downloading from here or by following the procedure here After installing the Windows update, you can proceed with installing CCS into a clean directory.
9.1.3. Installation Fails when «Installing Eclipse»В¶
If the installation fails when installing eclipse with the message: Failed to install eclipse. Cannot recover from this error., take a look at the install log and search for _JAVA_OPTIONS. If this environment variable is set, it may interfere with the Eclipse installation.
The workaround is to temporarily unset the variable, then delete the contents of your aborted installation and try reinstalling CCS. The variable can be reset after the installation is complete.
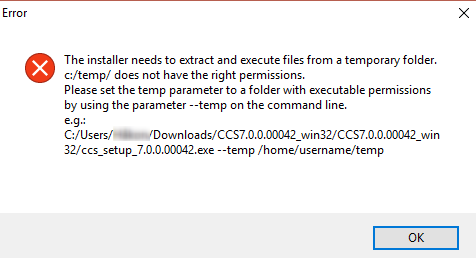
9.1.4. Installation Fails with Error About Permissions on Temporary Folder¶
If CCS installation fails with the following error, it means that the system temporary folder does not have the required permissions, OR that the username, and thereby temporary directory, has non-alphanumeric characters.
First ensure that the username, and thereby temporary directory, does not have any non-alphanumeric characters. See the General Tips for Installing CCS section for more information.
Next, make sure that the system TEMP directory has correct permissions. The CCS installer needs to be able to write to a temporary location and execute programs from it. By default, it uses the system temporary directory %TEMP% but if that directory does not have the right permissions, the installation will fail with the above error.
The solution is to:
9.1.5. MacOS Installation Freezes or Prompts for Proxy Information¶
When installing CCS on MacOS Sierra, if the installation freezes or prompts for proxy information (ie. appears to require internet connection even with the off-line installer), the reason may be due to a new security feature called «Gatekeeper Path Randomization» (or «app translocation», as it’s called on the API level) introduced in MacOS Sierra. (more info at this link).
9.1.6. Clearing Out An Existing Installation¶
To uninstall a failed CCS, delete the entire ccsv[x] folder. Keep in mind this will erase the install information of other CCS versions you may have installed in parallel. If in doubt, check the date and time of each directory and delete the one that matches your attempt of install.
If you need to completely wipe all information from all versions of CCS ever installed in your system, delete all workspace directories created and all directories in the locations below:
In Windows, if the complete removal of JTAG debugger device drivers is necessary, you must follow a more thorough procedure:
9.2. Startup¶
There are several other potential cases that would prevent CCS from starting up:
9.2.1. JVM Max Heap Size is Too High or Too Low¶
Sometimes the default size for the CCS JVM max heap size is either too high or too low. In those cases, it can prevent CCS from starting up. To resolve this, try adjusting the max heap size. See the Heap and JVM settings section for more information.
9.2.2. Failed to Create the Java Virtual Machine¶
This issue is usually related to java virtual memory size. Try lowering the max heap size. See the Heap and JVM settings section for more information.
9.2.3. Antivirus or Other Security Software¶
Some antivirus/security software are more aggressive than others and may block CCS for starting up. Try disabling it and see if that allows CCS to start. If so, it may be necessary to add some exception to the software to allow CCS to run properly.
9.2.4. Missing MSVC Redistributable Libraries¶
CCS (on Windows) has a dependency on some Microsoft runtime libraries. These libraries should be installed by the CCS installer. However there are some cases where these libraries fail to get installed properly, are corrupted, or conflict with other libraries. When this happens, CCS will fail to start. Sometimes the below errors will be reported:
The workaround is to try reinstalling the libraries. First uninstall the MSVC Redistributables (32 bit versions) using Add/Remove Programs. Then download and install those libraries from Microsoft’s download site.
To determine if you are missing Windows updates, please run the following command in the command prompt: WMIC QFE|find «KB2999226»
It should return information on the updates. If it returns nothing, it is likely that you’re missing the update that’s required to run the MSVC Runtime. You could get the update by downloading from here or by following the procedure here.
9.2.5. Corrupt Workspace Folder¶
Sometimes the cached data inside the workspace folder can get corrupted, preventing CCS from starting up. Cleaning the workspace can help. See the General IDE section for tips on how to clean the workspace folder.
9.2.6. «com/ti/dvt/energytrace» ErrorsВ¶
9.3. Updates¶
9.3.1. No Update Sites Found¶
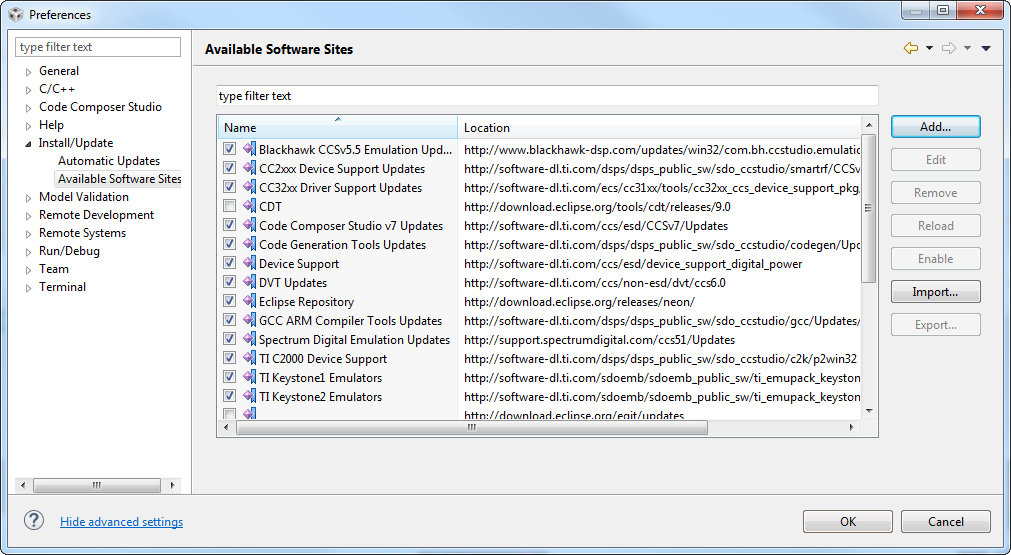
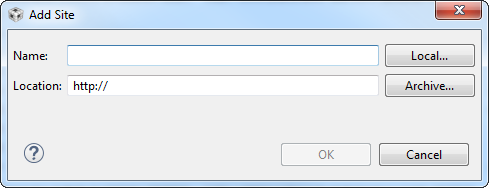
In some cases, when looking for updates (menu Help в†’ Check for Updates or Install New Software), the error «No repository found» can appear. This is due to the fact the list of CCS update sites gets erased, thereby not listing any available updates. The exact reason that triggers that is still unknown, but the solution is simple: to restore the list, request an update bookmarks file for your CCS version on the (TI Support Forums. Then go to CCS menu Window в†’ Preferences в†’ Install/Update в†’ Available Software Sites, click on Import, browse to the bookmarks file and click Ok.
9.3.2. CCS App Center Not Connecting¶
Under certain circumstances the CCS App Center may refuse to connect to its online repository and return the following error message: We are sorry, we cannot access the CCS App Center server. Please check your internet connection and press the ‘Reload’ button in this page.
The reason for that is not yet fully characterized, but it may be due to several conditions discussed in the e2e forum threads below:
9.3.3. Out of Memory Error When Installing Add-ons from CCS App Center¶
In some cases, when installing Add-ons from App Center (usually TI-RTOS for MSP43x or TivaC), the following error may occur:
To resolve this, try adjusting the max heap size. See the Heap and JVM settings section for more information.
9.3.4. Error: Computing size has encountered a problem¶
After installing updates through CCS Updates Available dialog, when prompting to restart CCS, a dialog regarding an internal error being encountered during «Computing Size» may occur. In this case, try deleting the two directories below:
9.3.5. Updates fail with No repository found or Connection reset or artifact for binary not available errors¶
In some cases, CCS updates may fail with these types of errors:
If this happens, try the following steps:
If the above steps do not help, try the tips in this page.
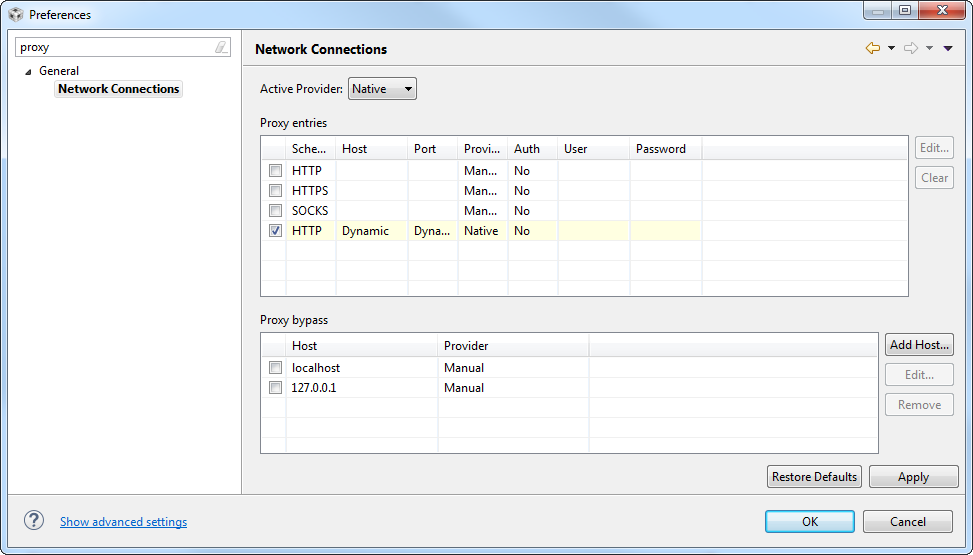
If your network requires a proxy server to be used, then make sure it is configured correctly. Check the reference below for additional details:
For CCS Linux only: The above issue can also occur if CCS was installed under sudo (or similar).
9.4. General IDE¶
CCS is based on the Eclipse open source framework and when experiencing various odd/corrupted behavior (missing menu options, «blank» views, plug-ins are missing or no longer behave properly, random crashes, etc), common tips on cleaning up your Eclipse environment also apply to CCS. Some of these tips are in the sections below:
9.4.1. Reset the Perspective¶
If the issue is strange GUI appearance (missing menu options or strange/empty looking views), often just resetting the perspective can resolve this. This can be done by selecting Window в†’ Reset Perspective
9.4.3. Clean the Workspace (or try using a new one)В¶
CCS stores various information in a folder called .metadata located in the user’s workspace. The contents of this folder can get corrupted over time, causing various instability and strange behavior. Using a new workspace or cleaning the old workspace often helps resolve these issues. To use a new workspace, simply select a new workspace location (File в†’ Switch Workspace). If you wish to clean the old workspace, the simplest way to do this is to delete the .metadata folder in the workspace. This will essentially reset the workspace and restore the environment to the default behavior. All projects that were in the workspace will need to be re-imported into CCS, even though they are still physically in the workspace folder. Also note that any modified preference settings will be lost (set back to the default setting). If you wish to avoid resetting those preferences, export the preferences to a file (outside the workspace) by selecting File в†’ Export. в†’ General в†’ Preferences в†’ To preference file before deleting the workspace. Once the workspace has been cleaned, those preferences can be imported back into CCS by selecting File в†’ Import. в†’ General в†’ Preferences в†’ From preference file.
9.4.4. Heap and JVM settings¶
Usually messages such as Low Memory, Insufficient Heap, or Failed to create the Java Virtual Machine are related to the Java Virtual Machine (JVM) memory settings.
These settings are stored in the ccstudio.ini file located in the below path:
The file contains two important parameters for memory management: -Xms and -Xmx. The current default values of these two options are -Xms128m and -Xmx2048m (this may vary depending on the CCS version).
The flag -Xmx specifies the maximum memory allocation pool for a Java virtual machine (JVM), while -Xms specifies the initial memory allocation pool. This means the JVM will be started with -Xms amount of memory and will be able to use a maximum of -Xmx amount of memory.
There is also an eclipse.ini file in the same directory which also defines the same parameters. Modifying the eclipse.ini file will have no impact since it is not used by CCS.
If memory usage issues are occurring, some of the tips below can help understand and analyze its root cause:
CCS versions (on Windows) prior to CCS 9.x were 32-bit application, and hence limited by the 32-bit JVM that uses up to 2GB of available RAM. Hence increasing -Xmx too much can reduce the available memory for other CCS operations (debugger, etc.). In those scenarios, it is not recommended to increase the max heap size greater than 1024m (-Xmx1024m). For 64-bit CCS versions, the maximum heap size can be higher (assuming there is enough available system memory). A range from 1536-2048 is recommended. Starting with CCS 9.3.0, the default maximum heap size is set to 2048m. Also, avoid increasing the -Xms as it can reduce the available heap that can be freed. Note that all CCS versions for Linux and macOS are 64-bit application.
On systems that do not meet the recommended 8GB of RAM, a large maximum heap size value can potentially cause overall system performance issues. Check the -Xmx and make sure the value is a reasonable one that will not consume too much of the whole system memory. What this value is will depend on the system, and some experimentation may be required to find the best setting.
Unfortunately memory usage is very difficult to minimize due to the thorough mapping performed by the Indexer or the added features on the debugger (Register views, etc.). One attempt to reduce this is to disable certain cores to be shown when the debugger is launched (done via the Debug Configurations settings), or disable the indexer or reduce its scope. To do this, right click on the Project в†’ Properties в†’ C/C++ General в†’ Indexer. Before accessing this option, make sure to click on the Show Advanced Settings link at the bottom of the properties dialog box.
9.4.5. GTK3 (for CCS Linux)В¶
There are several known compatibility issues between some versions of CCS Linux and GTK3. This incompatibility can cause various views to flicker, or display incomplete/empty content. To work around this issue, set the SWT_GTK3 environment variable to 0 and then launch CCS.
Open a terminal and type:
9.4.6. Failed to create the part’s controls Errors (for CCS Linux)В¶
This error may appear when opening one of the jxbrowser based views (Resource Explorer, Getting Started, App Center, etc). The most common cause of this error is some missing dependencies by the jxbrowser libraries. Try running ldd on the libaries in [CCS INSTALL DIR]/ccs/eclipse/configuration/.jxbrowser-chromium-lib to find any missing dependencies that must be resolved.
9.5. Resource Explorer¶
9.5.1. Connection Issues¶
9.5.1.1. Check your Internet Connection¶
A poor internet connection may cause Resource Explorer to timeout when attempting to sync with the server. Try again when you have more bandwidth available.
9.5.1.2. Check the Proxy Setting¶
If Resource Explorer is unable to connect to the internet it may be an issue with the proxy setting. Ensure the setting is correct by performing the following steps:
9.5.1.3. Clear the Resource Explorer Cache¶
9.5.1.4. Clear the CCS Browser Cache¶
Try deleting both the:
9.5.1.5. Check for Running Processes¶
Another potential issue is that if there is an extra «node» process running. Close Resource Explorer. Check Task Manager or Activity Monitor and look for node. If one is running, kill it. Start Resource Explorer.
9.5.1.6. Logs¶
9.6. Project Management and Build¶
For errors encountered during project import or build, refer to this troubleshooting page: Project Import and Build errors in CCS.
9.7. Debug¶
For issues encountered during a debug session (launching a debug session, target connectivity issues, crashes experienced during debugging, etc), see/try the following below. Note that cleaning the workspace can also help resolve debugger issues.
9.7.1. JTAG Connectivity Issues¶
If an error happened during the process of launching the debugger or any JTAG specific issues, see: Debugging JTAG Connectivity Problems.
If running CCS on a Linux host, please make sure the driver install script is run as superuser using sudo after installation. See: CCS Linux Host Support.
9.7.2. Data Verification Issues¶
9.7.3. Delete the debug launch configuration¶
9.7.4. Delete the .launch File¶
The .launch file is created when the Debug button is used to start a debug session for the project (and not independently from the Target Configurations view). To delete the file, open a file browser or a terminal and go to the project directory and check if a directory called .launches exists. If so, delete the file inside it. It typically has the extension .launch.
9.7.5. Delete Target Cache Files¶
The cache files removed by fsclean are saved in a user and CCS installation specific location:
Trace cache files are usually saved in similar locations:
9.7.6. CCS Freezes During Debug¶
CCS may sometimes freeze due to something in the system itself (PC, USB issues, video card issues, etc.).
In other occasions, it may appear frozen when it is waiting for a JTAG debug operation to complete. This can be caused by a communications failure between the host and the target, or due to the application software running on the target that causes the JTAG debugger to lose sync with the connected core and keep retrying the operation.
In these cases it is recommended to follow the sequence below to try to pinpoint the source of the issue:
9.7.7. Hardware Trace Issues¶
For general UI issues such as trace views not opening or displaying any data, try clearing the target cache files as mentioned in section Delete Target Cache Files and also cleaning the workspace folder as mentioned in section Clean the Workspace (or try using a new one).
In some cases, the older trace tools (Statistical Function Profiling, Interrupt Profiling, etc.) may refuse to open when selecting it from the menu. This problem can persist across CCS restarts. One thing to try is deleting the appropriate subfolder in the DVT folder of the current workspace ( [WORKSPACE FOLDER DIR]/dvt/CCSAnalysis/[TOOL] ). This can even be done while CCS is running.
In cases where trace data is successfully collected but the corresponding graph view is empty, reopen the graph view by going to the Trace Viewer view and pressing the Analyze button to select the relevant graph.
9.7.8. RTOS Analyzer Issues¶
For general UI issues such as various views not opening or displaying any data, try clearing the target cache files as mentioned in section Delete Target Cache Files and also cleaning the workspace folder as mentioned in section Clean the Workspace (or try using a new one).
In some cases, the various views (Printf and Error Logs, Execution Analysis, etc.) may refuse to open when selecting it from the menu. This problem can persist across CCS restarts. One thing to try is deleting the DVT folder of the current workspace ( [WORKSPACE FOLDER DIR]/dvt ). This can even be done while CCS is running.
9.8. Getting Support¶
If the troubleshooting tips mentioned above do not help resolve the issue, please contact CCS Support. When contacting a CCS support personnel, it is always very helpful to provide any Diagnostic Logs associated with the issue.
9.9. Diagnostic Logs¶
Diagnostic logs are often generated when an issue occurs with CCS. These logs can contain valuable information pertaining to the root cause of the issue. The information in these logs can be a bit cryptic, hence it is recommended to provide these logs to TI support personnel when Getting Support. For more information on these logs, please see the article: CCS Diagnostic Logs.
3.4.4. Code Composer Studio¶
3.4.4.1. CCS Installation¶
Code Composer Studio (CCS) is the IDE integrated with the Processor Linux SDK and resides on your host Ubuntu machine. This wiki article covers the CCS basics including installation, importing/creating projects and building projects. It also provides links to other CCS wiki pages including debugging through GDB and JTAG and accessing your target device remotely through Remote System Explorer.
CCS is an optional tool for the SDK, and may be downloaded and installed at the same time that the SDK is installed or at a later date. For instructions on how to download the Processor Linux SDK, please see Processor SDK Linux Installer.
CCS uses the Eclipse backend and includes the following plugins:
NOTE You should download CCS from the Processor Linux SDK Download page because it comes with the above plug-ins already installed. Otherwise, you will have to install the plug-ins yourself in order to take advantage of all the features covered in the wiki help pages and wiki training pages.
If you wish to use CCS along with the Processor Linux SDK, there are requirements to consider before you attempt to install and run CCS. To be prepared for development, you should have already setup your host Linux machine and you should already have your target board up and running. Additionally, you should be able to communicate from the host to the target with serial and Ethernet communication.
For more information on setting up your development environment, see the Processor SDK Linux Getting Started Guide.
The Processor Linux SDK comes with an integrated ARM GCC toolchain located on your Ubuntu host. CCS is integated with the SDK allowing you to build, load, run and debug code on the target device. In more recent SDK versions (v06.00, v08.00, v01.00.00.00, v02.00.00.00, etc) for non-ARM 9 devices, a new ARM based toolchain is used and the location of the toolchain has changed. For more information on the GCC toolchain, please see Processor Linux SDK GCC Toolchain.
Latest SDK toolchains use a prefix of arm-linux-gnueabihf-. Versions older than Processor Linux SDK 06.00 and AM18x users may still use the prefix arm-arago-linux-gnueabi-.
Locating the CCS Installer
Using the SD Card Provided with the EVM
When the SD card provided in the box with the EVM is inserted into an SD card reader attached to a Linux system three partitions will be mounted. The third partition, labeled START_HERE, will contain the CCS installer along with the Processor Linux SDK installer. The CCS installer is located inside of the CCS directory and there is a helper script called ccs_install.sh available to help call the installer.
Downloading from the Web
The CCS installer is available for download for Linux as a compressed tarball (tar.gz) file. It is also available for Windows. The installer can be located by browsing to SDK for Sitara Processors and selecting the device being used. The CCS installer can be found on the device’s SDK installer page under the Optional Addons or directly from the Download CCS wiki page.
Clicking this link will prompt you to fill out an export restriction form. After filling out the form, you will be given a download button to download the file and you will receive an e-mail with the download link. Download the tarball and save it to your Linux host development system.
Starting the CCS Installer
Installing CCS from the Linux Command Line
If you want to install CCS apart from the Processor Linux SDK installer, or if you decided not to install it as part of the SDK install and want to install it now, you can install CCS using the following commands:
CCS Installation Steps
NOTE The “Limited 90-day period” language in the CCS installer license agreement applies only for the case of using high-speed JTAG emulators (does not apply to use of the XDS100v2 JTAG emulator or an on-board emulator). If a debug configuration is used that requires a high-speed JTAG emulator, you will be prompted to register your software for a fee. All use of CCS (excluding use of high-speed JTAG emulators) is free and has no 90-day time limit.
When the CCS installer runs, you can greatly reduced the install time and installed disk space usage by taking the defaults as they appear in this CCS installer. The screen captures below show the default installation options and the recommended settings when installing CCS.
Installing Emulator Support
If during the CCS installation you selected to install drivers for the Blackhawk or Spectrum Digital JTAG emulators, a script must be run with administrator privileges to allow the Linux Host PC to recognize the JTAG emulator. The script must be run as “sudo” with the following command:
sudo /ccsv6/install_scripts/install_drivers.sh where is the path that was chosen when the CCS installer was run.
Enabling CCS Capabilities
After opening CCS with a new workspace:
Importing C/C++ Projects
Importing the Projects
Building the C/C++ Projects
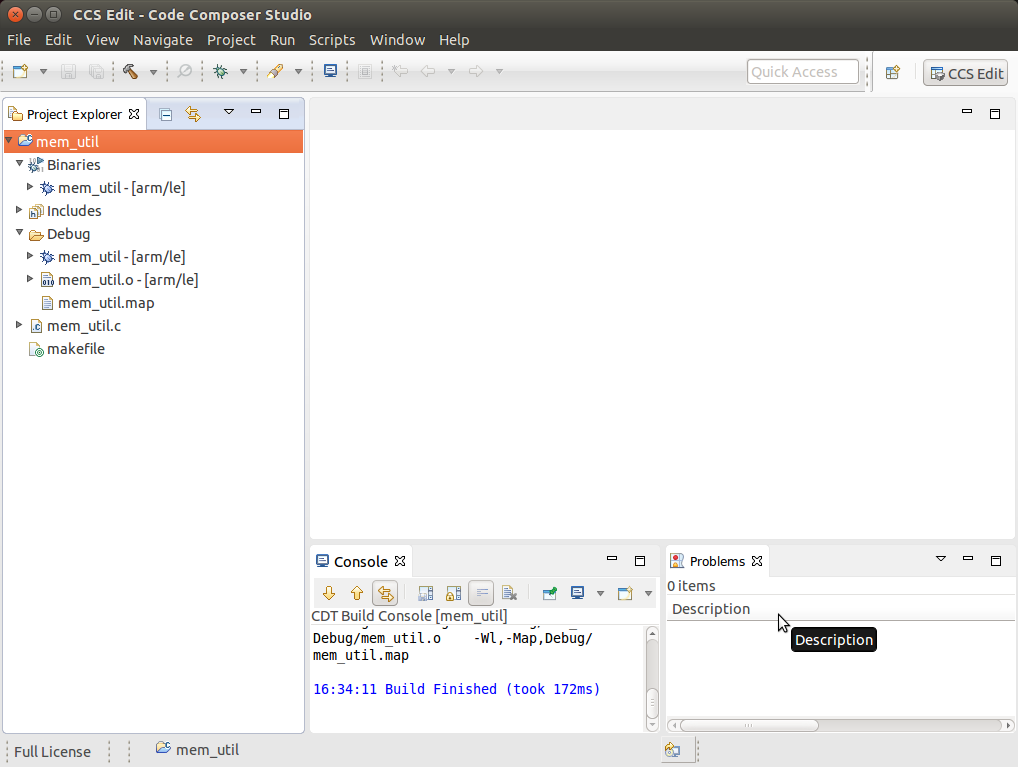
In order to build one of the projects, use the following steps. For this example we will use the mem-util project.
Right-Click on the mem-util project in the Project Explorer.
Select the build configuration you want to use.
Expand the mem-util project and look at the mem_util.elf file in the Debug or Release directory (depending on which build configuration you used). You should see the file marked as an [arm/le] file which means it was compiled for the ARM.
Installing C/C++ Projects
There are several methods for copying the executable files to the target file system:
Use the top-level Makefile in the SDK install directory. See Processor Linux SDK Top-Level Makefile for details of using the top-level Makefile to install files to a target file system. This target file system can be moved via an SD card connected to the host machine and then to the target board, transferred via TFTP, or some other method. For more information on setting up a target filesystem, see Processor SDK Linux Setup Script.
NOTE The top-level Makefile uses the install commands in the component Makefiles and can be used as a reference for how to invoke the install commands.
For all file system types, you can also transfer the file using the drag-and-drop method of Remote System Explorer. See the Remote System Explorer section below for more details.
Files can also be moved from the Linux command line. Typically, executable files are stored in the project’s Debug folder in the workspace.
Creating a New Project
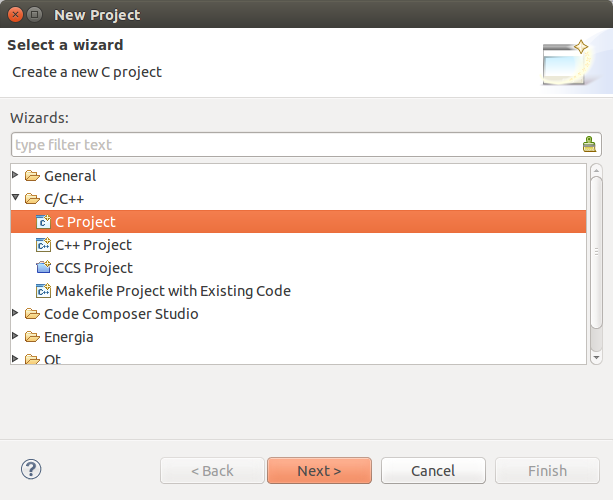
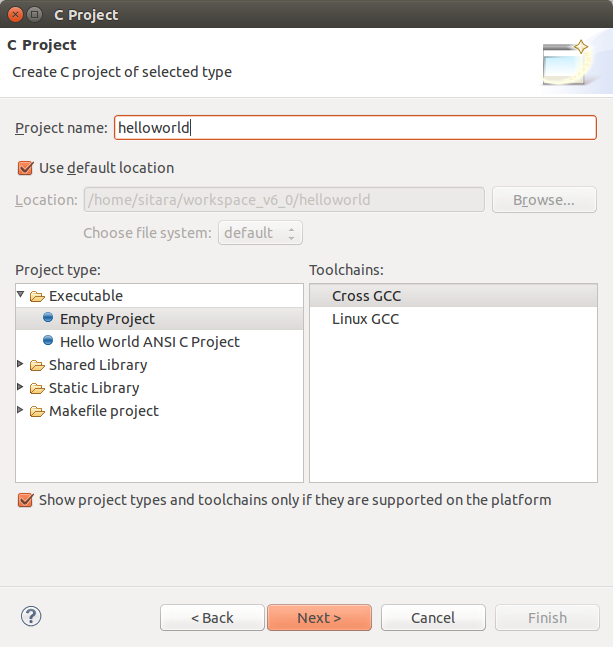
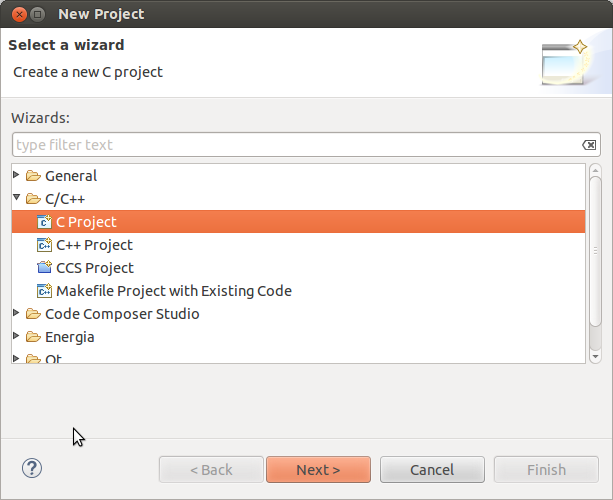
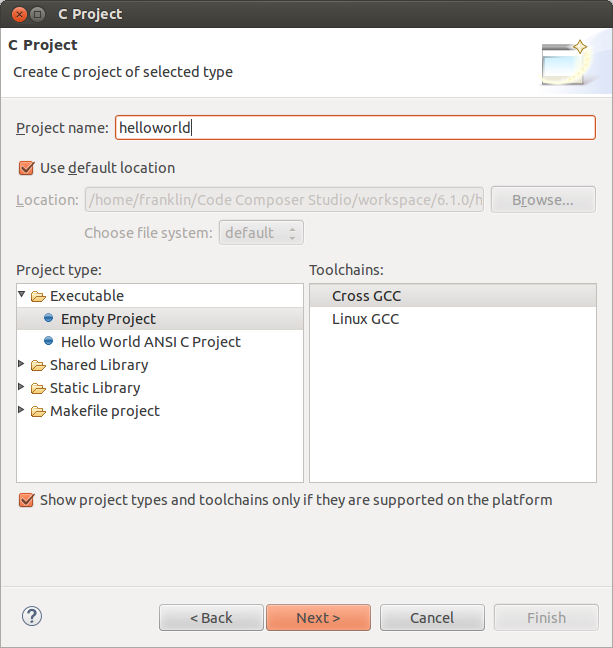
This section will cover how to create a new cross-compile project to build a simple Hello World application for the target.
Configuring the Project
Click Next.
Click Next.
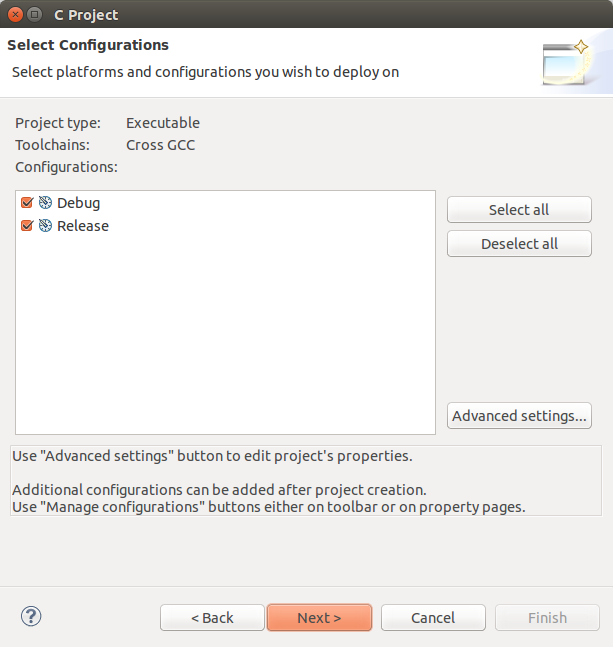
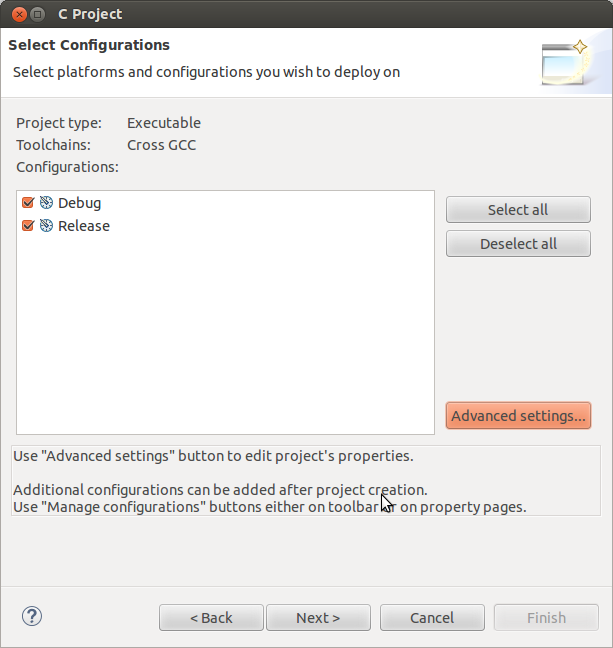
In the Select Configurations dialog, you can take the default Debug and Release configurations or add/remove more if you want.
Click Next.
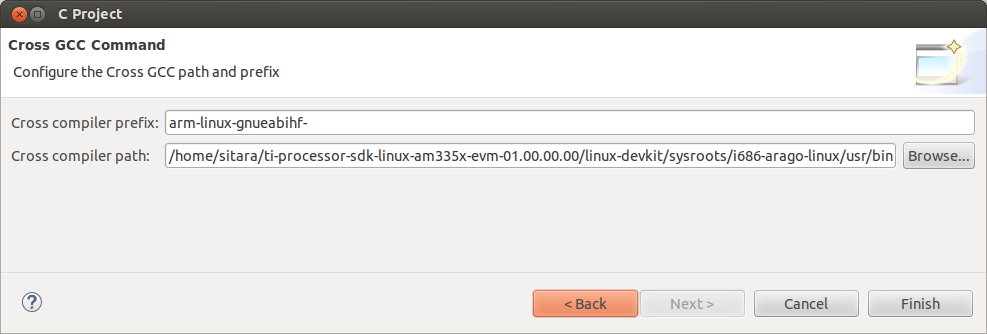
In the Command dialog, set the following values: Tool command prefix: arm-linux-gnueabihf-.
NOTE The prefix ends with a “-”. This is the prefix of the cross-compiler tools as will be seen when setting the Tool command path.
Use the Browse.. button to browse to the Sitra Linux SDK installation directory and then to the linux-devkit/sysroots//usr/bin directory. You should see a list of tools such as gcc with the prefix you entered above.
Click Finish.
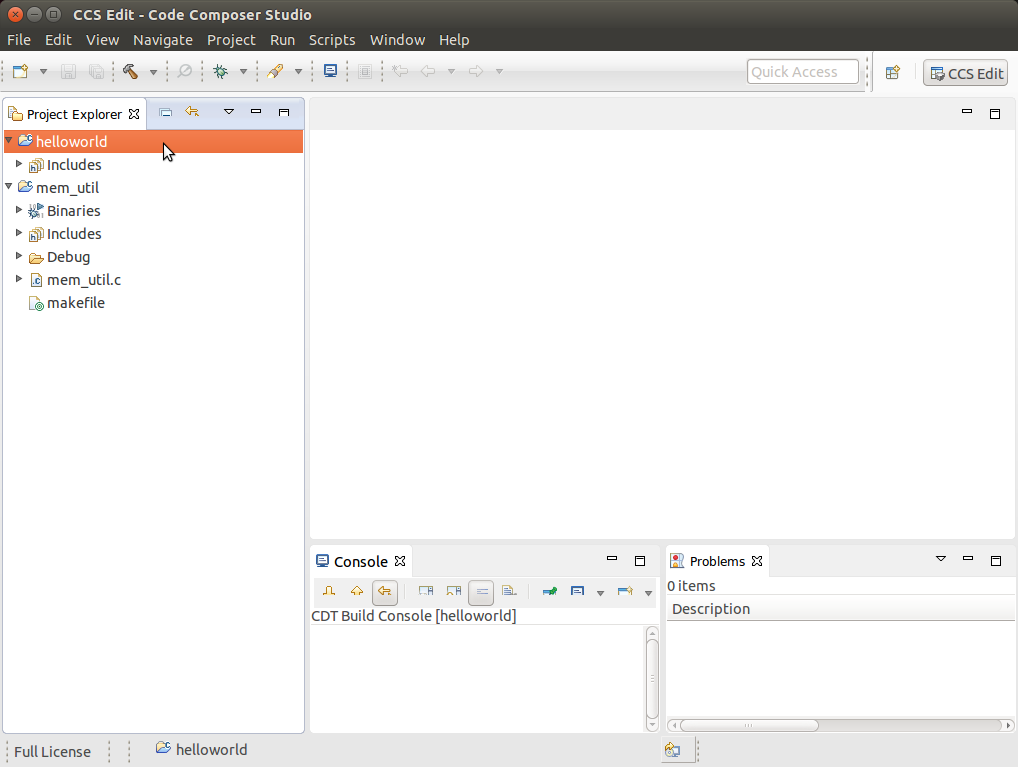
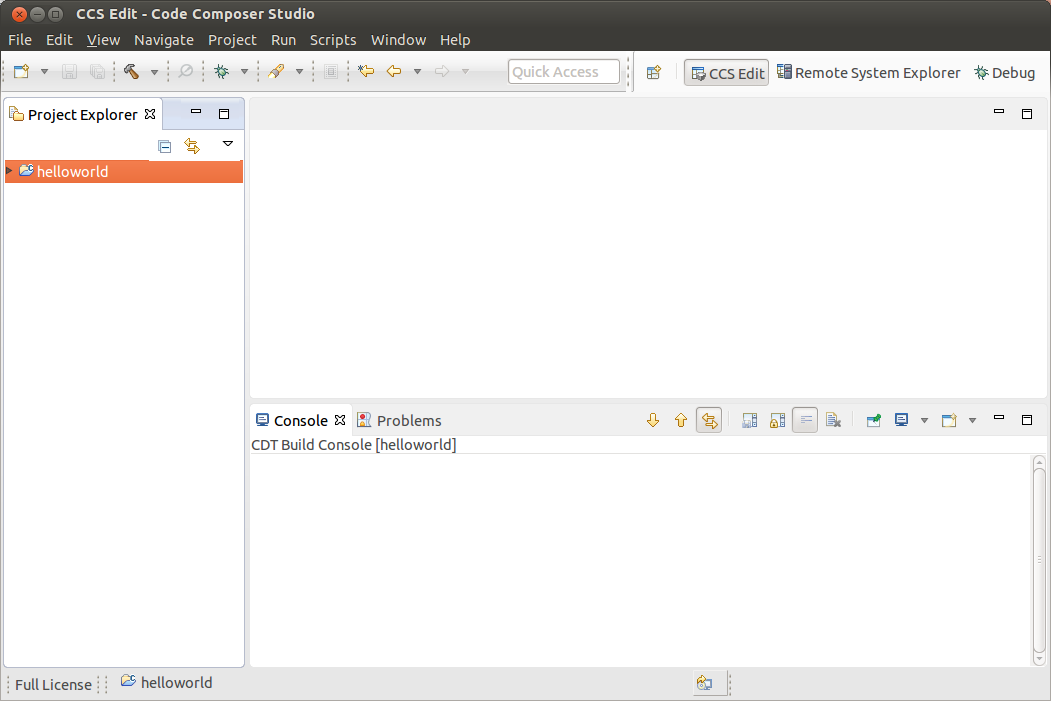
After completing the steps above you should now have a helloworld project in your CCS Project Explorer window, but the project has no sources.
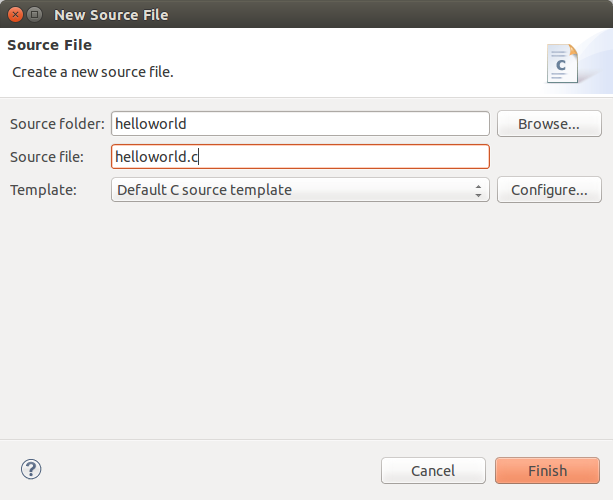
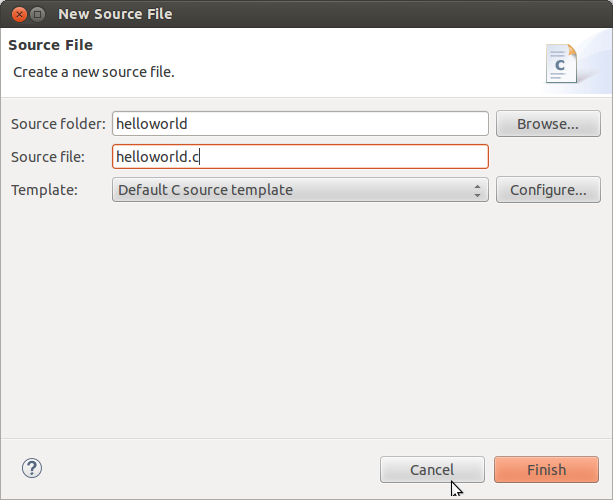
Adding Sources to the Project
In the Source File dialog set the Source file: setting to helloworld.c
Click Finish.
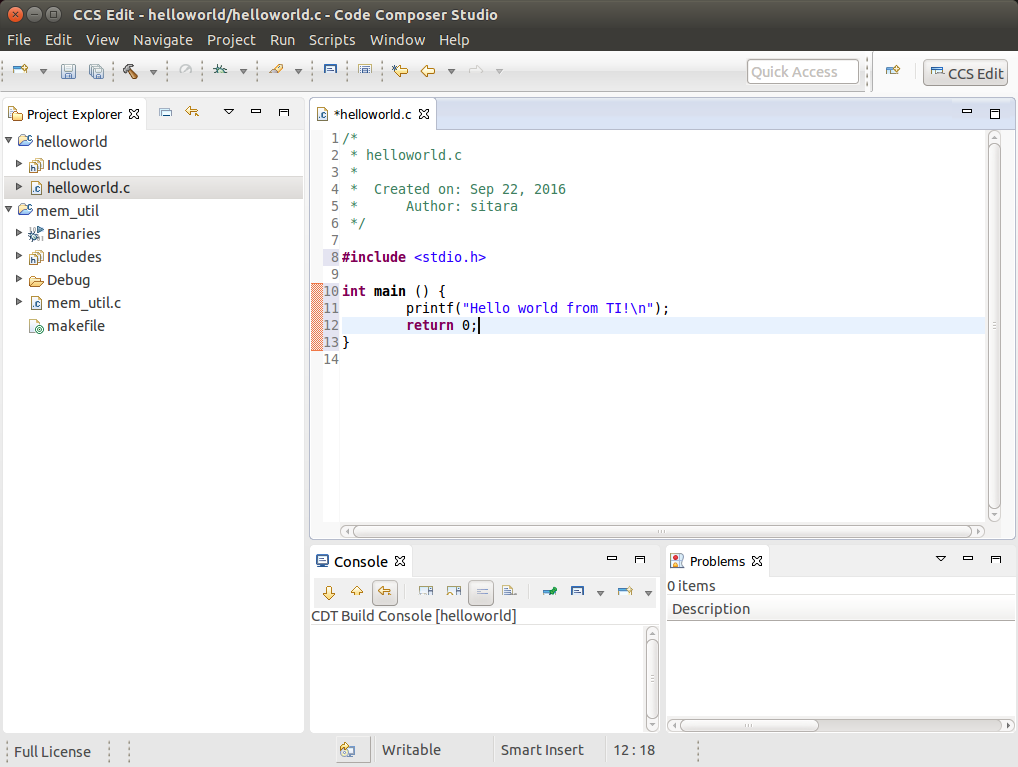
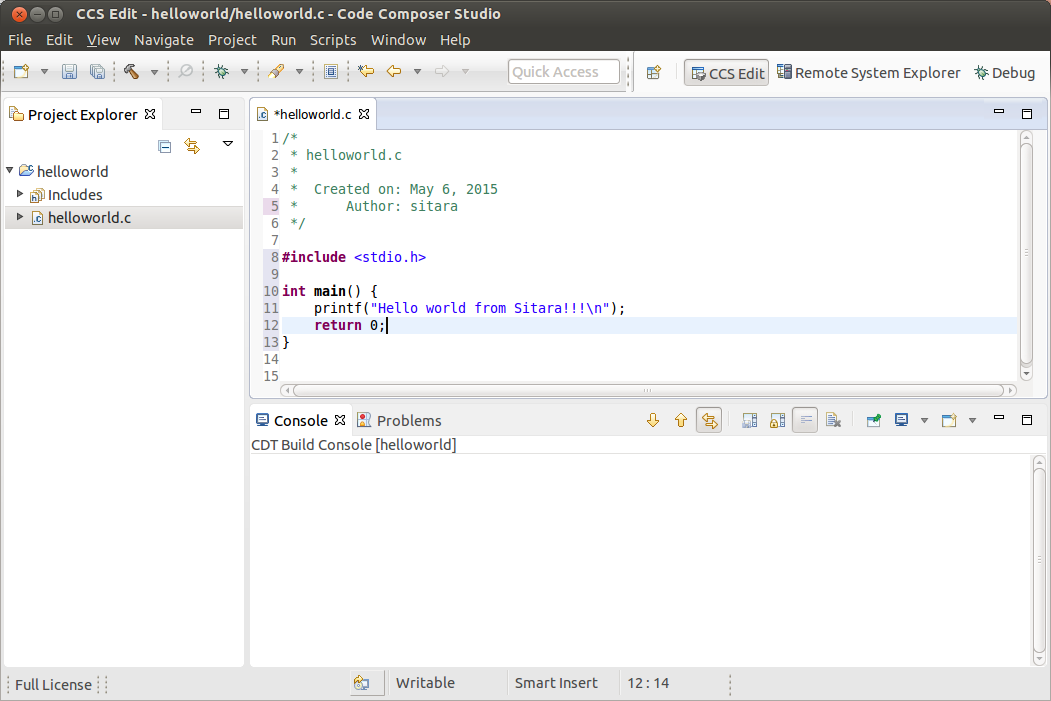
After completing the steps above you will have a template helloworld.c file. Add your code to this file like the image below:
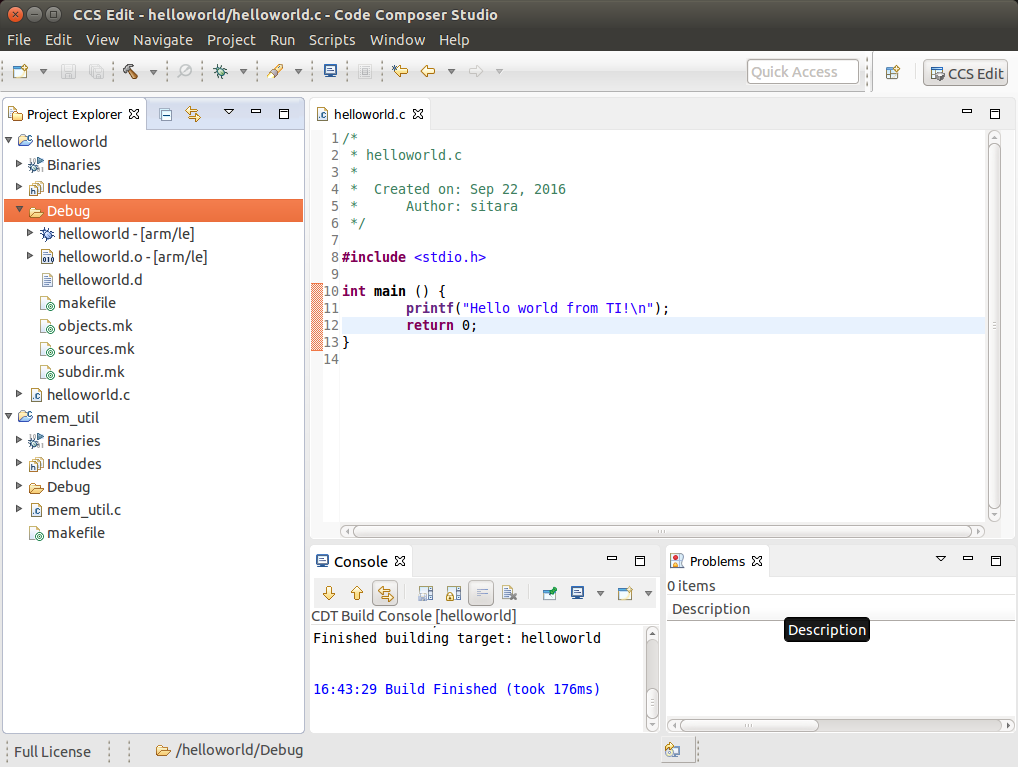
The resulting executable can be found in the Debug directory.
Remote System Explorer
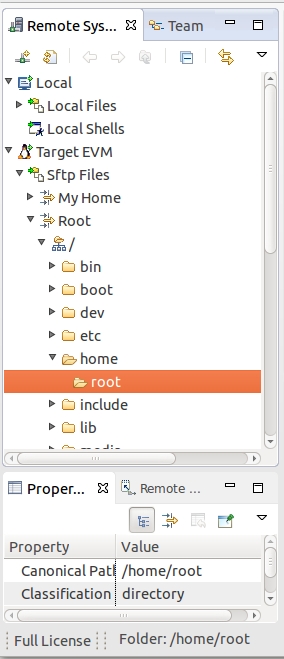
CCS as installed with this SDK includes the Remote System Explorer (RSE) plugin. RSE provides drag-and-drop access to the target file system as well as remote shell and remote terminal views within CCS. Refer to Processor Linux SDK CCS Remote System Explorer Setup to establish a connection to your target EVM and start using RSE. There is also a more detailed training using RSE with the SDK at Processor SDK Linux Training: Hands on with the Linux SDK.
Using GDB Server in CCS for Linux Debugging
In order to debug Linux code using Code Composer Studio, you first need to configure the GDB server on both the host and target EVM side.
Please refer to Processor Linux SDK CCS GDB Setup for more information.
3.4.4.2. CCS Compiling¶
Code Composer Studio (CCS) v6.0 is the IDE integrated with the Sitara SDK and resides on your host Ubuntu machine. This wiki article covers the CCS basics including installation, importing/creating projects and building projects. It also provides links to other CCS wiki pages including debugging through both GDB and JTAG and accessing your target device remotely through remote system explorer.
If you wish to use CCS along with the Sitara Linux SDK, there are some setup steps required before you attempt to install and run CCS.
Building Qt Applications
Although the Processor Linux SDK includes several Qt example applications using Code Composer Studio to build or debug these applications isn’t recommended. QT Creator is the official IDE designed to be used when developing or debugging Qt applications.Please reference to the following link for further information on all the basic to download, install, run, and debug QT applications: Hands on with Qt
Importing Existing C/C++ Projects
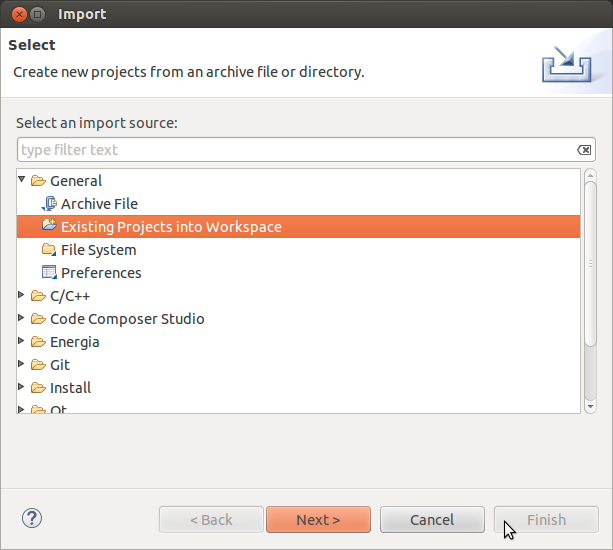
The Processor Linux SDK includes several example applications that already includes the appropriate CCS Project files. The following instructions will help you to import the example C/C++ application projects into CCS.
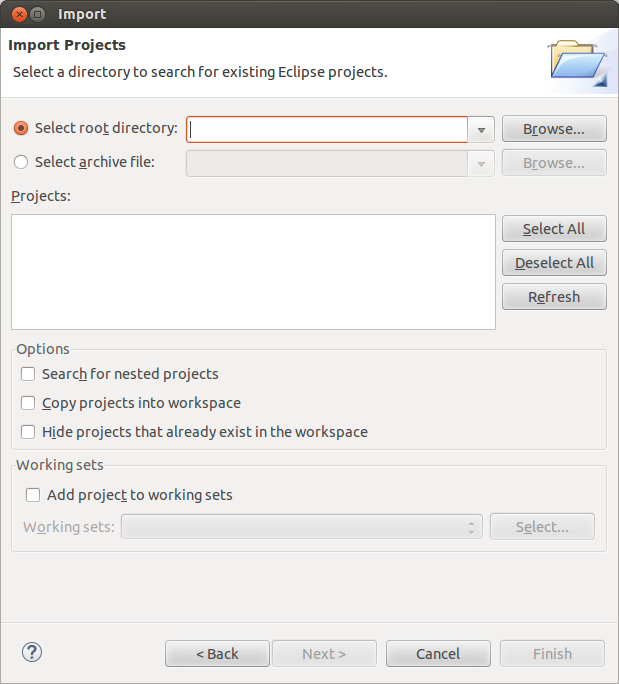
Importing the Project
Click Next
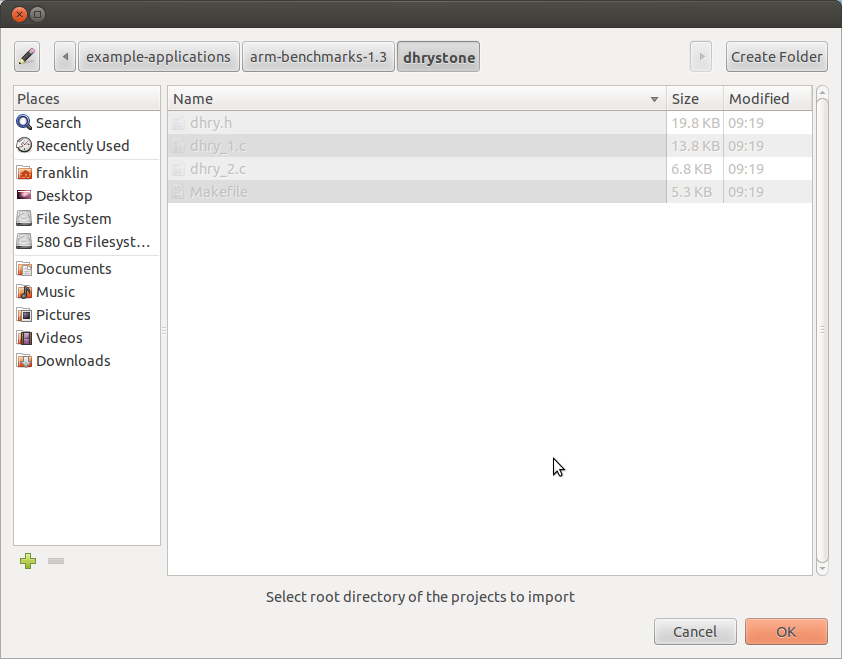
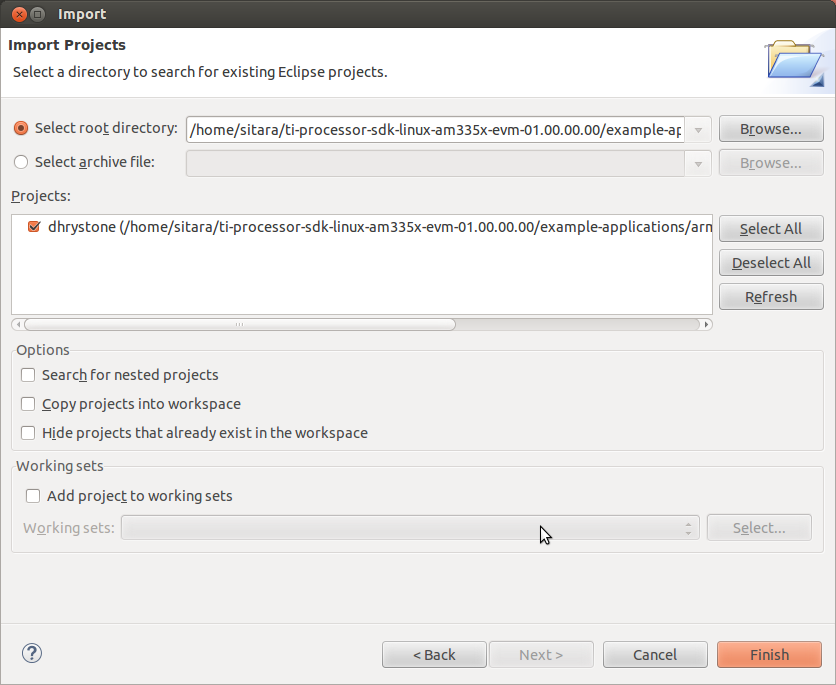
On the Import Projects page click Browse
In the file browser window that is opened navigate to the /example-applications directory and click OK
Select the projects you want to import. The following screen capture shows importing all of the example projects for an ARM-Cortex device, excluding the Qt projects.
Creating a New Project
This section will cover how to create a new cross-compile project to build a simple Hello World application for the target.
Configuring the Project
Click Next
In the C Project dialog set the following values: Project Name: helloworld Project type: Cross-Compile Project
Click Next
In the Command dialog set the following values: Tool command prefix: arm-linux-gnueabihf-. Note the the prefix ends with a “-”. This is the prefix of the cross-compiler tools as will be seen when setting the Tool command path Tool command path: /linux-devkit/sysroot/i686-arago-linux/usr/bin. Use the Browse.. button to browse to the Sitra Linux SDK installation directory and then to the linux-devkit/bin directory. You should see a list of tools such as gcc with the prefix you entered above.
Click Next
In the Select Configurations dialog you can take the default Debug and Release configurations or add/remove more if you want.
Click Finish
Adding Sources to the Project
After completing the steps above you should now have a helloworld project in your CCS Project Explorer window, but the project has no sources.
In the Source File dialog set the Source file: setting to helloworld.c
Click Finish
After completing the steps above you will have a template helloworld.c file. Add your code to this file like the image below:
Compiling C/C++ Projects
Right-Click on the project in the Project Explorer
Select the build configuration you want to use
Copying Binaries to the File system
There are several methods for copying the executable files to the target file system:
Remote System Explorer
CCS v6 by default includes the Remote System Explorer (RSE) plug-in. RSE provides drag-and-drop access to the target file system as well as remote shell and remote terminal views within CCS. It also provides a way for Code Composer Studio to automatically copy and run or debug an executable using a single button. Refer to How to Setup and Use Remote System Explorer to learn how to use this feature.
Debugging Source Code using Code Composer Studio
In order to debug user-space Linux code using Code Composer Studio v6, you first need to configure your project to use gdb and gdbserver included within the SDK.
3.4.4.3. Remote Explorer Setup with CCS¶
Remote System Explorer (RSE) is an Eclipse plug-in that provides:
Before you configure RSE you should make sure the following prerequisites are met:
Opening the Remote System Explorer Perspective
Creating a New Connection
To establish a new connection with the target EVM you must run the New Connection Wizard.
Re-Opening the C/C++ View
If when you enabled RSE and opened the RSE perspective your C/C++ view disappeared you can re-open it using the following commands. This is useful to get back to your projects list to enable copying and pasting files to transfer to the remote system.
Re-Opening the Remote System Explorer View
If you have closed the RSE view and wish to re-open it you can use these steps:
Configuring with a Proxy
In the case that you are behind a proxy (most corporate networks) you may need to configure CCS to bypass all proxies. You want to make sure you also bypass the proxy for your target devices so that your connection does not attempt to go out the proxy and then come back in through the proxy.
To bypass your proxy follow the below steps:
Connecting to the Target
After the New Connection Wizard has been completed and the Remote System Explorer view has been opened, the new connection must be configured to communicate with the target EVM.
The Arago distribution that is used for our SDK is configured to use root as the usernamr and no password.
When prompted for a login use root for the user ID and leave the password blank. NOTE: you can save the user ID and password values to bypass this prompt in the future
The first time the target EVM file system is booted a private key and a public key is created in the target file system. Before connecting to the target EVM the first time, the public key must be exported from the target EVM to the Linux host system. To configure the key do
Under certain circumstances a warning message can appear when the initial SSH connection is made as shown below. This could happen if the user deletes the target file system and replaces it with another target file system that has a different private RSA SSH key established (and the target board IP address remains the same). This is normal. In this case, click Yes and the public key from the target board will be exported to the Ubuntu host overwriting the existing public key.
At this point, all Remote System Explorer functions will be functional.
Target File System Access
To open an SSH Terminal view
Debugging Source Code using Code Composer Studio
In order to debug user-space Linux code using Code Composer Studio v6, you first need to configure your project to use gdb and gdbserver included within the SDK.
3.4.4.4. GDB Setup with CCS¶
Before you configure RSE you should make sure the following prerequisites are met:
Debugging using GDB and GDB Server
Creating the Debug Configuration for the Project
In CCS, select the project you wish to work with by clicking on it and highlighting it.
Double click C/C++ Remote Application. You should then see a new debug configuration named “helloworld Debug” as shown below.
Select your target connection from the Connection drop-down box. In the example the target connection is called My Target EVM.
Click the “Browse. ” button for “Remote Absolute File Path for C/C++ Application”. Navgate to the executable file on the remote file system. For this example, the executable file is found at ”/usr/bin/helloworld”.
Click the Debugger tab. On the Debugger page, the Main tab should be selected.
Click Browse next to “GDB debugger” and browse to the GDB executable. GDB should be located at: /linux-devkit/sysroot/i686-arago-linux/usr/bin/arm-linux-gnueabihf-gdb
TI Code Composer Studio
TI Code Composer Studio (CCS) is an IDE based on eclipse for Texas Instruments (TI) embedded controllers. Code Composer Studio comes with a sample project generator.
Minimum CSS Version Requirements
In order to use J-Link with TI CCS, min. V6.1.3 of TI CCS is required. Earlier versions might work but are not guaranteed to do so. Please understand that SEGGER does not provide any support for CCS versions earlier than V6.1.3.
Adding J-Link support at installation time
Since TI CCS v7, J-Link is supported out-of-the-box if J-Link support is selected to be added at installation time of CCS.
For more information regarding older versions of CCS: Adding J-Link support to older CCS versions.
Updating J-Link inside CCS
Using TI CCS with J-Link
In the following, a short step-by-step tutorial how to configure a Code Composer Studio project to be used with J-Link, is given.
Frequently asked questions (FAQs)
Code Composer Studio™ (CCS) IDE
Where can I purchase a Code Composer Studio license?
Effective with release of Code Composer Studio v7 – TI is no longer charging for CCS licenses. Simply download from www.ti.com/ccstudio and begin.
How do I download the most recent version of Code Composer Studio?
Simply download from www.ti.com/ccstudio and begin.
Where can I get a license for Code Composer Studio v4, v5 or v6?
If you wish to use an older version of Code Composer Studio, then you will need a license file.
Remember: avoid «license verification failed» message
You are no longer required to maintain a local license server to serve floating licenses up to your network.
For CCS v4, v5 and v6 have each client download the unlocked license file.
Remember: avoid “license verification failed” message:
How do I request Code Composer Studio on DVD?
Code Composer Studio is only available via download. DVDs are no longer provided.
Do I still need a Subscription for Code Composer Studio?
Effective August 2015, you are no longer required to have or renew any subscription for Code Composer Studio. Simply download the latest version of Code Composer Studio from www.ti.com/ccstudio.
Where did all the Code Composer Studio part numbers go?
Licenses – Part numbers are no longer sold for CCS licenses. As of December 2016, these were removed from the TI Store, and were discontinued as options for TI Distributors. Example license part numbers were: “TMDSCCS-ALLF05” and “TMDSCCS-ALLN01D”
Subscription renewals – Renewal part numbers are no longer sold. During August 2015, the Subscription Renewal part numbers were removed from the TI Store, and were discontinued as options for TI Distributors. Example renewal part numbers are: «TMDSCCSUB12ALLF05» and «TMDSCCSUBALLN01D-P»
Help with TI software downloads
I have received a link to download, but nothing happens. I’ve clicked the «Download» button but it has not started.
Previous browser changes for Firefox, Internet Explorer and Google Chrome can interrupt your downloads.
Still having issues? Please contact TI at: TI support for further assistance.
Release Notes for Code Composer Studio™ v8.3.1
· General Information
· New in CCSv8.3.1
· New in CCSv8.3.0
· New in CCSv8.2.0
· New in CCSv8.1.0
· New in CCSv8.0.0
· Bug Fixes
· Known Issues
· Component Versions
General Information
Please note that use of anti-virus software or a firewall may cause issues during installation.
McAfee software in particular has been especially troublesome.
If possible, disable anti-virus and firewall software during installation.
If not, use of the Offline Installer is strongly recommended.
On Windows:
If you are using an Offline CCS Installer, the zip file in which it is
distributed must first be extracted:
1. Right-click on CCS_8.x.x.xxxxx_win32.zip and select «Extract All. «.
2. Enter the directory where you wish to extract the files.
3. Click on Extract.
Once extraction has successfully completed, proceed with the installation steps below.
To install Code Composer Studio:
1. Run ccs_setup_8.x.x.xxxxx.exe.
2. Choose where you want to install.
3. Select the components you wish to install.
If you are using an Offline CCS Installer, the zip file in which it is
distributed must first be extracted:
1. Right-click on CCS_8.x.x.xxxxx_osx.zip and select «Open”. This will extract the directory from the zip file..
Once extraction has successfully completed, proceed with the installation steps below.
To install Code Composer Studio:
1. Run ccs_setup_8.x.x.xxxxx by clicking on the application in the Finder
2. Choose where you want to install.
3. Select the components you wish to install.
before installing CCS on Linux. It contains important information on
installing CCS on different Linux distributions, including CCS dependencies that may need to be installed first.
Before installing CCS, the tarball file in which the CCS Installer is distributed must first be extracted:
untar CCS_8.x.x.xxxxx_linux-x64.tar.gz or CCS_8.x.x.xxxxx_web_linux-x64.tar.gz and extract all files.
If installing from DVD, you also need to either mount the DVD with execute permissions first, or copy the files off the DVD to a local drive and change permissions there to run the installer.
Once extraction has successfully completed, proceed with the installation steps below.
Note: To facilitate the installation of emulation drivers, it is necessary to run part of the installation process as root.
You may if you wish install all of CCS as root. However, it is preferred that you first install CCS as a normal user and then install the drivers as root.
To install Code Composer Studio as a normal user and emulation drivers as root:
1. Run ccs_setup_8.x.x.xxxxx.bin as a normal user.
2. Choose where you want to install.
3. Select the components you wish to install.
4. Navigate to directory /ccsv8/install_scripts.
5. As root, execute script «install_drivers.sh».
To install all of Code Composer Studio as root:
1. Run ccs_setup_8.x.x.xxxxx.bin as root.
2. Choose where you want to install.
3. Select the components you wish to install.
New in CCSv8.3.1
New in CCSv8.3.0
New in CCSv8.2.0
New in CCSv8.1.0
New in CCSv8.0.0
Bug Fixes
For up-to-date status information, go to:
Known Issues
For up-to-date status information, go to:
Code composer studio
Operating System
Please note that Code Composer Studio is a 64bit application and thus will not run on 32bit operating systems.
Windows
XDS510 class debug probes are no longer supported
Linux
Supported distributions include:
Code Composer Studio will run on other distributions but those are the officially supported and tested distributions. For more details on installation instructions as well as debug probe and device support please see this article on Linux Host Support.
macOS
Code Composer Studio device support on macOS is limited to microcontrollers (MSP, C2000, SimpleLink, Tiva and Hercules) and does not include processors (Sitara, DSP, KeyStone).
Versions Supported
Each Code Composer Studio release is validated against a set of macOS releases. This release was validated with:
Debug Probe Support
Debug Probes Not Supported
Details of the macOS releases, debug probes and devices supported is available here.
Installation
Please note that use of anti-virus software or a firewall may cause issues during installation.
McAfee software in particular has been especially troublesome.
If possible, disable anti-virus and firewall software during installation.
If not, use of the Offline Installer is strongly recommended.
On Windows:
If you are using an Offline CCS Installer, the zip file in which it is
distributed must first be extracted:
1. Right-click on CCS_10.x.x.xxxxx_win64.zip and select «Extract All. «.
2. Enter the directory where you wish to extract the files.
3. Click on Extract.
Once extraction has successfully completed, proceed with the installation steps below.
To install Code Composer Studio:
1. Run ccs_setup_10.x.x.xxxxx.exe.
2. Choose where you want to install.
3. Select the components you wish to install.
The online web installer and the offline installer are now distributed as disk images (.dmg files)
1. Right-click on CCS_10.x.x.xxxxx_osx.dmg and select «Open”. This will open the disk image and mount it.
To install Code Composer Studio:
1. Run ccs_setup_10.x.x.xxxxx by clicking on the application in the Finder
2. Choose where you want to install.
3. Select the components you wish to install.
before installing CCS on Linux. It contains important information on
installing CCS on different Linux distributions, including CCS dependencies that may need to be installed first.
Before installing CCS, the tarball file in which the CCS Installer is distributed must first be extracted:
untar CCS_10.x.x.xxxxx_linux-x64.tar.gz or CCS_10.x.x.xxxxx_web_linux-x64.tar.gz and extract all files.
e.g. tar xfz CCS_10.x.x.xxxxx_linux-x64.tar.gz
Once extraction has successfully completed, proceed with the installation steps below.
Note: To facilitate the installation of emulation drivers, it is necessary to run part of the installation process as root.
You may if you wish install all of CCS as root. However, it is preferred that you first install CCS as a normal user and then install the drivers as root.
To install Code Composer Studio as a normal user and emulation drivers as root:
1. Run ccs_setup_10.x.x.xxxxx.run as a normal user.
2. Choose where you want to install.
3. Select the components you wish to install.
4. Navigate to directory /ccs/install_scripts.
5. As root, execute script «install_drivers.sh».
To install all of Code Composer Studio as root:
1. Run ccs_setup_10.x.x.xxxxx.run as root.
2. Choose where you want to install.
3. Select the components you wish to install.
New in CCSv10.0.0
· Mac OS installers are now distributed as signed and notarized disk image (DMG) files.
· Bugfixes for IDE, DVT, Debugger
· MCU Compilers LTS 20.02.0
· C6000 Compiler 8.3.6
Bug Fixes
For up-to-date status information, go to:
Начало работы с TI CC13xx-CC26xx и Contiki под Code Composer Studio
Последнее время тематика интернета вещей становится все более и более горячей — однако в большинстве случаев, если речь заходит о работе с какими-то базовыми аппаратными решениями, то беседа сводится либо к готовым модулям, либо, реже, к чипам выпуска прошлых лет. Тем временем, в 2015 году компания Texas Instruments выпустила очередную линейку систему на кристале CC13xx-CC26xx — крайне интересных с точки зрения соотношения производительности, энергопотребления и возможностей. Эти випы имеют на борту основное ядро ARM Cortex-M3, второе ядро Cortex-M0, эксклюзивно обслуживающее радиочасть, и… да, ещё и третье ядро — собственное 16-битное ядро TI для работы с периферией, так называемый Sensor Controller. При этом и по энергопотреблению комбайн получился крайне скромным — даже радиочасть значительно убавила по сравнению с чипами предыдущего поколения, CC2538.
Мы уже писали обзор существующих стандартов связи, в котором остановились на наиболее современном стандарте 6loWPAN. Данный стандарт описывает сетевой и транспортный уровни модели OSI, а физический и канальный уровни стандартизованы IEEE 802.15.4. Texas Instruments позаботились о нас, и отдали обработку MAC-уровня отдельному ядру Cortex-M0. Остальные уровни нужно обрабатывать на Cortex-M3. И тут нам на помощь приходит операционная система реального времени Contiki, в которой реализована поддержка стека 6loWPAN.
Однако традиционная проблема с новыми чипами — нехватка «коллективного опыта», то есть подробных описаний работы с ними, обхода багов и тому подобных вещей.
Что ж, будем его восполнять. Начнём с базового — сборка и отладка операционной системы Contiki для чипов CC2650. Допустим, мы еще любим красивые графические среды и отладку в них. Поэтому мы будем собирать Contiki под TI Code Composer Studio 6. Я пользуюсь Ubuntu 14.04 X86_64 для разработки, шаги под Windows будут очень похожи, за исключением установки тулчейна. В конце есть немного вкусностей.
Toolchain
Собирать будем с помощью родной для проекта системой сборки GNU Make + GCC. Предполагается, что Make у вас уже стоит, виндоюзеры могут поставить его в составе CygWin. Скачиваем gcc-arm-none-eabi для соответствующей операционной системы и распаковываем куда удобно. Не забываем прописать в PATH!
Устанавливаем утилиту для склеивания прошивок SRecord, необходимую для сборки.
Собралось, отлично, идем дальше.
Прошивка
Один из путей залить прошивку на сам чип это пользоваться отдельными флешерами. Техас предлагает под линух софтину Uniflash, скачиваем и устанавливаем. Процесс установки хорошо описан в этом документе, раздел 4.9.
Для отладки я пользовался комплектом TI SRF06EB + CC2650, так что на его примере и буду показывать.Создаем новую таргет конфигурацию. Програматор с чипом должен быть уже подключен.
Заходим в Programs, открываем файл прошивки Add и жмакаем Program.
Все, можно было бы на этом закончить, но иногда в разработке нужно воспользоваться отладкой, поэтому идем дальше.
Code Composer Studio
Скачиваем TI Code composer Studio for Wireless Connectivity для своей платформы. Для установки настоятельно рекомендую воспользоваться installation guide с сайта TI.
Настраиваем отладку
Для отладки необходимо, чтобы папка с сорцами Contiki лежала в рабочей директории CCSv6
Теперь у нас есть возможность полноценной отладки Contiki в Code Composer Studio под CC2650!
Заключение
4.1. Update Overview¶
Code Composer Studio is based on the Eclipse application framework and uses the Eclipse update manager for updates. This allows you to check for new versions of Code Composer Studio, compiler releases, new device support as well as updates to other Eclipse plug-in packages that you have installed.
When checking for updates Code Composer Studio will query a set of update sites. Features and components typically have their own update site.
4.2. Update Availability¶
A new version of Code Composer Studio is released each quarter (4 releases a year). Not all of the releases are available as updates. If the first digit of the version has changed, such as 8.0, 9.0, 10.0… then that is a major release and is not available as an update. If only the second part of the version number changed then the release is available as an update.
For example you can update from 8.0 to any 8.x release but not to a 9.x release.
4.3. Update Process¶
4.3.1. Automatic¶
By default Code Composer Studio automatically checks for updates when the application is launched. If there are updates available a notification will appear at the bottom right corner of the screen.
The updates settings can be changed via the Preferences dialog. Open this dialog by going to Windows → Preferences on the menu. Type “update” in the filter box to quickly find the update settings. Select Automatic Updates in the tree on the left to access the automatic updates settings. Here you can disable the automatic update check, adjust when it runs, change the download settings and control the update reminder notification.
4.3.2. Manually Checking for Updates¶
You can also manually initiate an update check. This is useful if you have disabled the automatic update check or have not restarted Code Composer Studio in a long time.
To initiate an update check go to Help в†’ Check for Updates on the menu. This will parse all the pre-configured update sites and display a list of available updates.
Select the updates that you want to install and click the Next button to continue. This will take you through the update process. For many updates the actual installation of the update will occur when the update manager prompts you to restart Code Composer Studio.
It is also possible to restrict the update check to a specific update site. This method is described in the Installing New Software section below. This method can be useful if you have a slow internet connection or if you are interested in updating a specific component.
4.4. Installing New Software¶
The Install New Software feature is used when a new feature or component needs to be installed. Installing an plug-in to integrate a specific source control tool would be considered a new feature. However some releases of existing features are also considered new features. For example, if you have version 16.9.0 of the compiler installed you would see 16.9.x releases as updates. However a 16.12.x or 17.x.x release of the compiler would be considered a new feature.
If you need to install support for a new device family that was not selected during initial Code Composer Studio installation then you will need to use a different process which is described in the Changing the Code Composer Studio Installation section.
To install a new feature simply go to Help в†’ Install New Software on the menu. A screen like the one below will be shown.
This screen has several fields and options. The Work with: field is used to configure which update site will be checked for updates and new features. You can select a site via the drop-down selection or manually enter the location of a site. The list of sites displayed in the drop down is configured in the Preferences dialog. The Managing Update Sites section describes how to manage the update sites.
Once an update site is selected Code Composer Studio will query the site and then display the features and updates available on the site. Here the Code Generation Tools (compilers) update site has been selected and all of the compiler releases and updates available are displayed.
You can use the filter box above the list to search for a specific item. This can be very useful if the list is long.
4.4.1. Showing all versions¶
By default only the latest version of a feature will be shown. For example in the list above you see the 16.9.2 release of the ARM Compiler. If you uncheck the box labelled Show only the latest versions of available software then you also see the 16.9.0 and 16.9.1 releases.
4.4.2. Display items that are installed¶
If you uncheck the box Hide items that are already installed then you will also see the versions of features that you have installed. The icons for these items will be grey to reflect that they are already installed. Unchecking this box can be useful if you want to see the version you have and be able to quickly tell what the latest update for that version is.
4.4.3. Target environment¶
The Show only software applicable to the target environment controls which host environment packages of an item are shown. For example an update may have different packages for Windows, Linux or MacOS. Unchecking the box will show all packages that are on the update site. For some features there are separate update sites for each host environment. In that case the checkbox will have no impact.
4.4.4. Icons¶
4.5. Proxy Configuration¶
If your computer resides behind a firewall you may have to configure the proxy settings so that Code Composer Studio can access update sites. By default Code Composer Studio attempts to use the proxy configuration set by the operating system. However in some cases the proxy settings need to be set manually.
To configure the proxy settings go to Windows в†’ Preferences on the menu. Type Proxy in the filter box and then select Network Connections in the tree on the left.
There are 3 options for the Active Provider.
4.5.1. Manual Configuration¶
In the box Proxy entries fill in the proxy settings of your network. You may need to contact your system administrator to gather that information. In the box Proxy bypass fill in the hosts that do not need a proxy to be accessed. Basically any host on the company’s intranet.
In rare cases the settings above may not be working correctly. In this case, you can edit the file ccstudio.ini at /ccsv[x]/eclipse (/ccsv[x]/eclipse/Eclipse.app/Contents/Eclipse for MacOS) and add the following entries immediately after the first line:
4.6. Managing Update Sites¶
You can manage the update sites that are searched during an update check. This allows you to both add sites of your choosing, as well as remove repositories that have become unavailable or are simply not necessary.
To have access to the update site manager go to menu Windows в†’ Preferences в†’ Install/Update в†’ Available Software Sites.
4.6.1. Adding a site¶
Click the Add button.
Depending on the type of update site the actions to perform vary.
4.6.2. Other actions¶
4.7. Changing the Code Composer Studio Installation¶
Some actions are not available through the update manager. For example if you need to add support for a new processor family that was not previously installed, or add support for a different debug probe, you will have to run the Code Composer Studio installer to perform this action. This does not mean that you have to completely re-install Code Composer Studio.
Run the installation program. You can download it again if needed. Choose the installation location that matches where your current Code Composer Studio installation is located. Select the Product families or debug probes for which you wish to add support. Click through the rest of the screens. This will update your installation to match the new selections.
4.8. Removing Features¶
Certain components can be uninstalled from within Code Composer Studio.
Important: Certain core components such as DVT, Debug Server, Eclipse and CDT are critical for the operation of Code Composer Studio and will render it unusable if uninstalled. In other words, be careful when uninstalling features and components.
To uninstall a component, go to Help в†’ About Code Composer Studio on the menu and click on the Installation details button. The screen below will be shown.
Click on the item that you wish to remove and click the Uninstall button.
3.5.4. Code Composer Studio¶
3.5.4.1. CCS Installation¶
Code Composer Studio (CCS) is the IDE integrated with the Processor Linux SDK and resides on your host Ubuntu machine. This wiki article covers the CCS basics including installation, importing/creating projects and building projects. It also provides links to other CCS wiki pages including debugging through GDB and JTAG and accessing your target device remotely through Remote System Explorer.
CCS is an optional tool for the SDK, and may be downloaded and installed at the same time that the SDK is installed or at a later date. For instructions on how to download the Processor Linux SDK, please see Processor SDK Linux Installer.
CCS uses the Eclipse backend and includes the following plugins:
NOTE You should download CCS from the Processor Linux SDK Download page because it comes with the above plug-ins already installed. Otherwise, you will have to install the plug-ins yourself in order to take advantage of all the features covered in the wiki help pages and wiki training pages.
If you wish to use CCS along with the Processor Linux SDK, there are requirements to consider before you attempt to install and run CCS. To be prepared for development, you should have already setup your host Linux machine and you should already have your target board up and running. Additionally, you should be able to communicate from the host to the target with serial and Ethernet communication.
For more information on setting up your development environment, see the Processor SDK Linux Getting Started Guide.
The Processor Linux SDK comes with an integrated ARM GCC toolchain located on your Ubuntu host. CCS is integated with the SDK allowing you to build, load, run and debug code on the target device. In more recent SDK versions (v06.00, v08.00, v01.00.00.00, v02.00.00.00, etc) for non-ARM 9 devices, a new ARM based toolchain is used and the location of the toolchain has changed. For more information on the GCC toolchain, please see Processor Linux SDK GCC Toolchain.
Latest SDK toolchains use a prefix of arm-linux-gnueabihf-. Versions older than Processor Linux SDK 06.00 and AM18x users may still use the prefix arm-arago-linux-gnueabi-.
Locating the CCS Installer
Using the SD Card Provided with the EVM
When the SD card provided in the box with the EVM is inserted into an SD card reader attached to a Linux system three partitions will be mounted. The third partition, labeled START_HERE, will contain the CCS installer along with the Processor Linux SDK installer. The CCS installer is located inside of the CCS directory and there is a helper script called ccs_install.sh available to help call the installer.
Downloading from the Web
The CCS installer is available for download for Linux as a compressed tarball (tar.gz) file. It is also available for Windows. The installer can be located by browsing to SDK for Sitara Processors and selecting the device being used. The CCS installer can be found on the device’s SDK installer page under the Optional Addons or directly from the Download CCS wiki page.
Clicking this link will prompt you to fill out an export restriction form. After filling out the form, you will be given a download button to download the file and you will receive an e-mail with the download link. Download the tarball and save it to your Linux host development system.
Starting the CCS Installer
Installing CCS from the Linux Command Line
If you want to install CCS apart from the Processor Linux SDK installer, or if you decided not to install it as part of the SDK install and want to install it now, you can install CCS using the following commands:
CCS Installation Steps
NOTE The “Limited 90-day period” language in the CCS installer license agreement applies only for the case of using high-speed JTAG emulators (does not apply to use of the XDS100v2 JTAG emulator or an on-board emulator). If a debug configuration is used that requires a high-speed JTAG emulator, you will be prompted to register your software for a fee. All use of CCS (excluding use of high-speed JTAG emulators) is free and has no 90-day time limit.
When the CCS installer runs, you can greatly reduced the install time and installed disk space usage by taking the defaults as they appear in this CCS installer. The screen captures below show the default installation options and the recommended settings when installing CCS.
Installing Emulator Support
If during the CCS installation you selected to install drivers for the Blackhawk or Spectrum Digital JTAG emulators, a script must be run with administrator privileges to allow the Linux Host PC to recognize the JTAG emulator. The script must be run as “sudo” with the following command:
sudo /ccsv6/install_scripts/install_drivers.sh where is the path that was chosen when the CCS installer was run.
Enabling CCS Capabilities
After opening CCS with a new workspace:
Importing C/C++ Projects
Importing the Projects
Building the C/C++ Projects
In order to build one of the projects, use the following steps. For this example we will use the mem-util project.
Right-Click on the mem-util project in the Project Explorer.
Select the build configuration you want to use.
Expand the mem-util project and look at the mem_util.elf file in the Debug or Release directory (depending on which build configuration you used). You should see the file marked as an [arm/le] file which means it was compiled for the ARM.
Installing C/C++ Projects
There are several methods for copying the executable files to the target file system:
Use the top-level Makefile in the SDK install directory. See Processor Linux SDK Top-Level Makefile for details of using the top-level Makefile to install files to a target file system. This target file system can be moved via an SD card connected to the host machine and then to the target board, transferred via TFTP, or some other method. For more information on setting up a target filesystem, see Processor SDK Linux Setup Script.
NOTE The top-level Makefile uses the install commands in the component Makefiles and can be used as a reference for how to invoke the install commands.
For all file system types, you can also transfer the file using the drag-and-drop method of Remote System Explorer. See the Remote System Explorer section below for more details.
Files can also be moved from the Linux command line. Typically, executable files are stored in the project’s Debug folder in the workspace.
Creating a New Project
This section will cover how to create a new cross-compile project to build a simple Hello World application for the target.
Configuring the Project
Click Next.
Click Next.
In the Select Configurations dialog, you can take the default Debug and Release configurations or add/remove more if you want.
Click Next.
In the Command dialog, set the following values: Tool command prefix: arm-linux-gnueabihf-.
NOTE The prefix ends with a “-”. This is the prefix of the cross-compiler tools as will be seen when setting the Tool command path.
Use the Browse.. button to browse to the Sitra Linux SDK installation directory and then to the linux-devkit/sysroots//usr/bin directory. You should see a list of tools such as gcc with the prefix you entered above.
Click Finish.
After completing the steps above you should now have a helloworld project in your CCS Project Explorer window, but the project has no sources.
Adding Sources to the Project
In the Source File dialog set the Source file: setting to helloworld.c
Click Finish.
After completing the steps above you will have a template helloworld.c file. Add your code to this file like the image below:
The resulting executable can be found in the Debug directory.
Remote System Explorer
CCS as installed with this SDK includes the Remote System Explorer (RSE) plugin. RSE provides drag-and-drop access to the target file system as well as remote shell and remote terminal views within CCS. Refer to Processor Linux SDK CCS Remote System Explorer Setup to establish a connection to your target EVM and start using RSE. There is also a more detailed training using RSE with the SDK at Processor SDK Linux Training: Hands on with the Linux SDK.
Using GDB Server in CCS for Linux Debugging
In order to debug Linux code using Code Composer Studio, you first need to configure the GDB server on both the host and target EVM side.
Please refer to Processor Linux SDK CCS GDB Setup for more information.
3.5.4.2. CCS Compiling¶
Code Composer Studio (CCS) v6.0 is the IDE integrated with the Sitara SDK and resides on your host Ubuntu machine. This wiki article covers the CCS basics including installation, importing/creating projects and building projects. It also provides links to other CCS wiki pages including debugging through both GDB and JTAG and accessing your target device remotely through remote system explorer.
If you wish to use CCS along with the Sitara Linux SDK, there are some setup steps required before you attempt to install and run CCS.
Building Qt Applications
Although the Processor Linux SDK includes several Qt example applications using Code Composer Studio to build or debug these applications isn’t recommended. QT Creator is the official IDE designed to be used when developing or debugging Qt applications.Please reference to the following link for further information on all the basic to download, install, run, and debug QT applications: Hands on with Qt
Importing Existing C/C++ Projects
The Processor Linux SDK includes several example applications that already includes the appropriate CCS Project files. The following instructions will help you to import the example C/C++ application projects into CCS.
Importing the Project
Click Next
On the Import Projects page click Browse
In the file browser window that is opened navigate to the /example-applications directory and click OK
Select the projects you want to import. The following screen capture shows importing all of the example projects for an ARM-Cortex device, excluding the Qt projects.
Creating a New Project
This section will cover how to create a new cross-compile project to build a simple Hello World application for the target.
Configuring the Project
Click Next
In the C Project dialog set the following values: Project Name: helloworld Project type: Cross-Compile Project
Click Next
In the Command dialog set the following values: Tool command prefix: arm-linux-gnueabihf-. Note the the prefix ends with a “-”. This is the prefix of the cross-compiler tools as will be seen when setting the Tool command path Tool command path: /linux-devkit/sysroot/i686-arago-linux/usr/bin. Use the Browse.. button to browse to the Sitra Linux SDK installation directory and then to the linux-devkit/bin directory. You should see a list of tools such as gcc with the prefix you entered above.
Click Next
In the Select Configurations dialog you can take the default Debug and Release configurations or add/remove more if you want.
Click Finish
Adding Sources to the Project
After completing the steps above you should now have a helloworld project in your CCS Project Explorer window, but the project has no sources.
In the Source File dialog set the Source file: setting to helloworld.c
Click Finish
After completing the steps above you will have a template helloworld.c file. Add your code to this file like the image below:
Compiling C/C++ Projects
Right-Click on the project in the Project Explorer
Select the build configuration you want to use
Copying Binaries to the File system
There are several methods for copying the executable files to the target file system:
Remote System Explorer
CCS v6 by default includes the Remote System Explorer (RSE) plug-in. RSE provides drag-and-drop access to the target file system as well as remote shell and remote terminal views within CCS. It also provides a way for Code Composer Studio to automatically copy and run or debug an executable using a single button. Refer to How to Setup and Use Remote System Explorer to learn how to use this feature.
Debugging Source Code using Code Composer Studio
In order to debug user-space Linux code using Code Composer Studio v6, you first need to configure your project to use gdb and gdbserver included within the SDK.
3.5.4.3. Remote Explorer Setup with CCS¶
Remote System Explorer (RSE) is an Eclipse plug-in that provides:
Before you configure RSE you should make sure the following prerequisites are met:
Opening the Remote System Explorer Perspective
Creating a New Connection
To establish a new connection with the target EVM you must run the New Connection Wizard.
Re-Opening the C/C++ View
If when you enabled RSE and opened the RSE perspective your C/C++ view disappeared you can re-open it using the following commands. This is useful to get back to your projects list to enable copying and pasting files to transfer to the remote system.
Re-Opening the Remote System Explorer View
If you have closed the RSE view and wish to re-open it you can use these steps:
Configuring with a Proxy
In the case that you are behind a proxy (most corporate networks) you may need to configure CCS to bypass all proxies. You want to make sure you also bypass the proxy for your target devices so that your connection does not attempt to go out the proxy and then come back in through the proxy.
To bypass your proxy follow the below steps:
Connecting to the Target
After the New Connection Wizard has been completed and the Remote System Explorer view has been opened, the new connection must be configured to communicate with the target EVM.
The Arago distribution that is used for our SDK is configured to use root as the usernamr and no password.
When prompted for a login use root for the user ID and leave the password blank. NOTE: you can save the user ID and password values to bypass this prompt in the future
The first time the target EVM file system is booted a private key and a public key is created in the target file system. Before connecting to the target EVM the first time, the public key must be exported from the target EVM to the Linux host system. To configure the key do
Under certain circumstances a warning message can appear when the initial SSH connection is made as shown below. This could happen if the user deletes the target file system and replaces it with another target file system that has a different private RSA SSH key established (and the target board IP address remains the same). This is normal. In this case, click Yes and the public key from the target board will be exported to the Ubuntu host overwriting the existing public key.
At this point, all Remote System Explorer functions will be functional.
Target File System Access
To open an SSH Terminal view
Debugging Source Code using Code Composer Studio
In order to debug user-space Linux code using Code Composer Studio v6, you first need to configure your project to use gdb and gdbserver included within the SDK.
3.5.4.4. GDB Setup with CCS¶
Before you configure RSE you should make sure the following prerequisites are met:
Debugging using GDB and GDB Server
Creating the Debug Configuration for the Project
In CCS, select the project you wish to work with by clicking on it and highlighting it.
Double click C/C++ Remote Application. You should then see a new debug configuration named “helloworld Debug” as shown below.
Select your target connection from the Connection drop-down box. In the example the target connection is called My Target EVM.
Click the “Browse. ” button for “Remote Absolute File Path for C/C++ Application”. Navgate to the executable file on the remote file system. For this example, the executable file is found at ”/usr/bin/helloworld”.
Click the Debugger tab. On the Debugger page, the Main tab should be selected.
Click Browse next to “GDB debugger” and browse to the GDB executable. GDB should be located at: /linux-devkit/sysroot/i686-arago-linux/usr/bin/arm-linux-gnueabihf-gdb
Code Composer Studio
Integrated development environment supporting Texas Instruments microcontrollers and embedded processors
Highlights
Description
Code Composer Studio™ is an integrated development environment (IDE) that supports the TI microcontroller and embedded processors portfolio. Code Composer Studio comprises a suite of tools used to develop and debug embedded applications. It includes an optimizing C/C++ compiler, source code editor, project build environment, debugger, profiler, and many other features. The intuitive IDE provides a single user interface taking users through each step of the application development flow. Familiar tools and interfaces allow users to get started faster than ever before. Code Composer Studio combines the advantages of the Eclipse software framework with advanced embedded debugging capabilities from TI, resulting in a compelling feature-rich development environment for embedded developers.
For more information on Code Composer Studio, please visit www.ti.com/ccs.
Explore selected hardware support for Texas Instruments products.
Release Notes for Code Composer Studio™ v9.x.0
· General Information
· New in CCSv9.0.1
· New in CCSv9.0.0
· Bug Fixes
· Known Issues
· Component Versions
General Information
Please note that use of anti-virus software or a firewall may cause issues during installation.
McAfee software in particular has been especially troublesome.
If possible, disable anti-virus and firewall software during installation.
If not, use of the Offline Installer is strongly recommended.
On Windows:
If you are using an Offline CCS Installer, the zip file in which it is
distributed must first be extracted:
1. Right-click on CCS_9.x.x.xxxxx_win64.zip and select «Extract All. «.
2. Enter the directory where you wish to extract the files.
3. Click on Extract.
Once extraction has successfully completed, proceed with the installation steps below.
To install Code Composer Studio:
1. Run ccs_setup_9.x.x.xxxxx.exe.
2. Choose where you want to install.
3. Select the components you wish to install.
If you are using an Offline CCS Installer, the zip file in which it is
distributed must first be extracted:
1. Right-click on CCS_9.x.x.xxxxx_osx.zip and select «Open”. This will extract the directory from the zip file..
Once extraction has successfully completed, proceed with the installation steps below.
To install Code Composer Studio:
1. Run ccs_setup_9.x.x.xxxxx by clicking on the application in the Finder
2. Choose where you want to install.
3. Select the components you wish to install.
before installing CCS on Linux. It contains important information on
installing CCS on different Linux distributions, including CCS dependencies that may need to be installed first.
Before installing CCS, the tarball file in which the CCS Installer is distributed must first be extracted:
untar CCS_9.x.x.xxxxx_linux-x64.tar.gz or CCS_9.x.x.xxxxx_web_linux-x64.tar.gz and extract all files.
If installing from DVD, you also need to either mount the DVD with execute permissions first, or copy the files off the DVD to a local drive and change permissions there to run the installer.
Once extraction has successfully completed, proceed with the installation steps below.
Note: To facilitate the installation of emulation drivers, it is necessary to run part of the installation process as root.
You may if you wish install all of CCS as root. However, it is preferred that you first install CCS as a normal user and then install the drivers as root.
To install Code Composer Studio as a normal user and emulation drivers as root:
1. Run ccs_setup_9.x.x.xxxxx.bin as a normal user.
2. Choose where you want to install.
3. Select the components you wish to install.
4. Navigate to directory /ccs/install_scripts.
5. As root, execute script «install_drivers.sh».
To install all of Code Composer Studio as root:
1. Run ccs_setup_9.x.x.xxxxx.bin as root.
2. Choose where you want to install.
3. Select the components you wish to install.
New in CCSv9.0.1
New in CCSv9.0.0
Bug Fixes
For up-to-date status information, go to:
Known Issues
For up-to-date status information, go to:
3.4.4. Code Composer Studio¶
3.4.4.1. CCS Installation¶
Code Composer Studio (CCS) is the IDE integrated with the Processor Linux SDK and resides on your host Ubuntu machine. This wiki article covers the CCS basics including installation, importing/creating projects and building projects. It also provides links to other CCS wiki pages including debugging through GDB and JTAG and accessing your target device remotely through Remote System Explorer.
CCS is an optional tool for the SDK, and may be downloaded and installed at the same time that the SDK is installed or at a later date. For instructions on how to download the Processor Linux SDK, please see Processor SDK Linux Installer.
CCS uses the Eclipse backend and includes the following plugins:
NOTE You should download CCS from the Processor Linux SDK Download page because it comes with the above plug-ins already installed. Otherwise, you will have to install the plug-ins yourself in order to take advantage of all the features covered in the wiki help pages and wiki training pages.
If you wish to use CCS along with the Processor Linux SDK, there are requirements to consider before you attempt to install and run CCS. To be prepared for development, you should have already setup your host Linux machine and you should already have your target board up and running. Additionally, you should be able to communicate from the host to the target with serial and Ethernet communication.
For more information on setting up your development environment, see the Processor SDK Linux Getting Started Guide.
The Processor Linux SDK comes with an integrated ARM GCC toolchain located on your Ubuntu host. CCS is integated with the SDK allowing you to build, load, run and debug code on the target device. In more recent SDK versions (v06.00, v08.00, v01.00.00.00, v02.00.00.00, etc) for non-ARM 9 devices, a new ARM based toolchain is used and the location of the toolchain has changed. For more information on the GCC toolchain, please see Processor Linux SDK GCC Toolchain.
Latest SDK toolchains use a prefix of arm-linux-gnueabihf-. Versions older than Processor Linux SDK 06.00 and AM18x users may still use the prefix arm-arago-linux-gnueabi-.
Locating the CCS Installer
Using the SD Card Provided with the EVM
When the SD card provided in the box with the EVM is inserted into an SD card reader attached to a Linux system three partitions will be mounted. The third partition, labeled START_HERE, will contain the CCS installer along with the Processor Linux SDK installer. The CCS installer is located inside of the CCS directory and there is a helper script called ccs_install.sh available to help call the installer.
Downloading from the Web
The CCS installer is available for download for Linux as a compressed tarball (tar.gz) file. It is also available for Windows. The installer can be located by browsing to SDK for Sitara Processors and selecting the device being used. The CCS installer can be found on the device’s SDK installer page under the Optional Addons or directly from the Download CCS wiki page.
Clicking this link will prompt you to fill out an export restriction form. After filling out the form, you will be given a download button to download the file and you will receive an e-mail with the download link. Download the tarball and save it to your Linux host development system.
Starting the CCS Installer
Installing CCS from the Linux Command Line
If you want to install CCS apart from the Processor Linux SDK installer, or if you decided not to install it as part of the SDK install and want to install it now, you can install CCS using the following commands:
CCS Installation Steps
NOTE The “Limited 90-day period” language in the CCS installer license agreement applies only for the case of using high-speed JTAG emulators (does not apply to use of the XDS100v2 JTAG emulator or an on-board emulator). If a debug configuration is used that requires a high-speed JTAG emulator, you will be prompted to register your software for a fee. All use of CCS (excluding use of high-speed JTAG emulators) is free and has no 90-day time limit.
When the CCS installer runs, you can greatly reduced the install time and installed disk space usage by taking the defaults as they appear in this CCS installer. The screen captures below show the default installation options and the recommended settings when installing CCS.
Installing Emulator Support
If during the CCS installation you selected to install drivers for the Blackhawk or Spectrum Digital JTAG emulators, a script must be run with administrator privileges to allow the Linux Host PC to recognize the JTAG emulator. The script must be run as “sudo” with the following command:
sudo /ccsv6/install_scripts/install_drivers.sh where is the path that was chosen when the CCS installer was run.
Enabling CCS Capabilities
After opening CCS with a new workspace:
Importing C/C++ Projects
Importing the Projects
Building the C/C++ Projects
In order to build one of the projects, use the following steps. For this example we will use the mem-util project.
Right-Click on the mem-util project in the Project Explorer.
Select the build configuration you want to use.
Expand the mem-util project and look at the mem_util.elf file in the Debug or Release directory (depending on which build configuration you used). You should see the file marked as an [arm/le] file which means it was compiled for the ARM.
Installing C/C++ Projects
There are several methods for copying the executable files to the target file system:
Use the top-level Makefile in the SDK install directory. See Processor Linux SDK Top-Level Makefile for details of using the top-level Makefile to install files to a target file system. This target file system can be moved via an SD card connected to the host machine and then to the target board, transferred via TFTP, or some other method. For more information on setting up a target filesystem, see Processor SDK Linux Setup Script.
NOTE The top-level Makefile uses the install commands in the component Makefiles and can be used as a reference for how to invoke the install commands.
For all file system types, you can also transfer the file using the drag-and-drop method of Remote System Explorer. See the Remote System Explorer section below for more details.
Files can also be moved from the Linux command line. Typically, executable files are stored in the project’s Debug folder in the workspace.
Creating a New Project
This section will cover how to create a new cross-compile project to build a simple Hello World application for the target.
Configuring the Project
Click Next.
Click Next.
In the Select Configurations dialog, you can take the default Debug and Release configurations or add/remove more if you want.
Click Next.
In the Command dialog, set the following values: Tool command prefix: arm-linux-gnueabihf-.
NOTE The prefix ends with a “-”. This is the prefix of the cross-compiler tools as will be seen when setting the Tool command path.
Use the Browse.. button to browse to the Sitra Linux SDK installation directory and then to the linux-devkit/sysroots//usr/bin directory. You should see a list of tools such as gcc with the prefix you entered above.
Click Finish.
After completing the steps above you should now have a helloworld project in your CCS Project Explorer window, but the project has no sources.
Adding Sources to the Project
In the Source File dialog set the Source file: setting to helloworld.c
Click Finish.
After completing the steps above you will have a template helloworld.c file. Add your code to this file like the image below:
The resulting executable can be found in the Debug directory.
Remote System Explorer
CCS as installed with this SDK includes the Remote System Explorer (RSE) plugin. RSE provides drag-and-drop access to the target file system as well as remote shell and remote terminal views within CCS. Refer to Processor Linux SDK CCS Remote System Explorer Setup to establish a connection to your target EVM and start using RSE. There is also a more detailed training using RSE with the SDK at Processor SDK Linux Training: Hands on with the Linux SDK.
Using GDB Server in CCS for Linux Debugging
In order to debug Linux code using Code Composer Studio, you first need to configure the GDB server on both the host and target EVM side.
Please refer to Processor Linux SDK CCS GDB Setup for more information.
3.4.4.2. CCS Compiling¶
Code Composer Studio (CCS) v6.0 is the IDE integrated with the Sitara SDK and resides on your host Ubuntu machine. This wiki article covers the CCS basics including installation, importing/creating projects and building projects. It also provides links to other CCS wiki pages including debugging through both GDB and JTAG and accessing your target device remotely through remote system explorer.
If you wish to use CCS along with the Sitara Linux SDK, there are some setup steps required before you attempt to install and run CCS.
Building Qt Applications
Although the Processor Linux SDK includes several Qt example applications using Code Composer Studio to build or debug these applications isn’t recommended. QT Creator is the official IDE designed to be used when developing or debugging Qt applications.Please reference to the following link for further information on all the basic to download, install, run, and debug QT applications: Hands on with Qt
Importing Existing C/C++ Projects
The Processor Linux SDK includes several example applications that already includes the appropriate CCS Project files. The following instructions will help you to import the example C/C++ application projects into CCS.
Importing the Project
Click Next
On the Import Projects page click Browse
In the file browser window that is opened navigate to the /example-applications directory and click OK
Select the projects you want to import. The following screen capture shows importing all of the example projects for an ARM-Cortex device, excluding the Qt projects.
Creating a New Project
This section will cover how to create a new cross-compile project to build a simple Hello World application for the target.
Configuring the Project
Click Next
In the C Project dialog set the following values: Project Name: helloworld Project type: Cross-Compile Project
Click Next
In the Command dialog set the following values: Tool command prefix: arm-linux-gnueabihf-. Note the the prefix ends with a “-”. This is the prefix of the cross-compiler tools as will be seen when setting the Tool command path Tool command path: /linux-devkit/sysroot/i686-arago-linux/usr/bin. Use the Browse.. button to browse to the Sitra Linux SDK installation directory and then to the linux-devkit/bin directory. You should see a list of tools such as gcc with the prefix you entered above.
Click Next
In the Select Configurations dialog you can take the default Debug and Release configurations or add/remove more if you want.
Click Finish
Adding Sources to the Project
After completing the steps above you should now have a helloworld project in your CCS Project Explorer window, but the project has no sources.
In the Source File dialog set the Source file: setting to helloworld.c
Click Finish
After completing the steps above you will have a template helloworld.c file. Add your code to this file like the image below:
Compiling C/C++ Projects
Right-Click on the project in the Project Explorer
Select the build configuration you want to use
Copying Binaries to the File system
There are several methods for copying the executable files to the target file system:
Remote System Explorer
CCS v6 by default includes the Remote System Explorer (RSE) plug-in. RSE provides drag-and-drop access to the target file system as well as remote shell and remote terminal views within CCS. It also provides a way for Code Composer Studio to automatically copy and run or debug an executable using a single button. Refer to How to Setup and Use Remote System Explorer to learn how to use this feature.
Debugging Source Code using Code Composer Studio
In order to debug user-space Linux code using Code Composer Studio v6, you first need to configure your project to use gdb and gdbserver included within the SDK.
3.4.4.3. Remote Explorer Setup with CCS¶
Remote System Explorer (RSE) is an Eclipse plug-in that provides:
Before you configure RSE you should make sure the following prerequisites are met:
Opening the Remote System Explorer Perspective
Creating a New Connection
To establish a new connection with the target EVM you must run the New Connection Wizard.
Re-Opening the C/C++ View
If when you enabled RSE and opened the RSE perspective your C/C++ view disappeared you can re-open it using the following commands. This is useful to get back to your projects list to enable copying and pasting files to transfer to the remote system.
Re-Opening the Remote System Explorer View
If you have closed the RSE view and wish to re-open it you can use these steps:
Configuring with a Proxy
In the case that you are behind a proxy (most corporate networks) you may need to configure CCS to bypass all proxies. You want to make sure you also bypass the proxy for your target devices so that your connection does not attempt to go out the proxy and then come back in through the proxy.
To bypass your proxy follow the below steps:
Connecting to the Target
After the New Connection Wizard has been completed and the Remote System Explorer view has been opened, the new connection must be configured to communicate with the target EVM.
The Arago distribution that is used for our SDK is configured to use root as the usernamr and no password.
When prompted for a login use root for the user ID and leave the password blank. NOTE: you can save the user ID and password values to bypass this prompt in the future
The first time the target EVM file system is booted a private key and a public key is created in the target file system. Before connecting to the target EVM the first time, the public key must be exported from the target EVM to the Linux host system. To configure the key do
Under certain circumstances a warning message can appear when the initial SSH connection is made as shown below. This could happen if the user deletes the target file system and replaces it with another target file system that has a different private RSA SSH key established (and the target board IP address remains the same). This is normal. In this case, click Yes and the public key from the target board will be exported to the Ubuntu host overwriting the existing public key.
At this point, all Remote System Explorer functions will be functional.
Target File System Access
To open an SSH Terminal view
Debugging Source Code using Code Composer Studio
In order to debug user-space Linux code using Code Composer Studio v6, you first need to configure your project to use gdb and gdbserver included within the SDK.
3.4.4.4. GDB Setup with CCS¶
Before you configure RSE you should make sure the following prerequisites are met:
Debugging using GDB and GDB Server
Creating the Debug Configuration for the Project
In CCS, select the project you wish to work with by clicking on it and highlighting it.
Double click C/C++ Remote Application. You should then see a new debug configuration named “helloworld Debug” as shown below.
Select your target connection from the Connection drop-down box. In the example the target connection is called My Target EVM.
Click the “Browse. ” button for “Remote Absolute File Path for C/C++ Application”. Navgate to the executable file on the remote file system. For this example, the executable file is found at ”/usr/bin/helloworld”.
Click the Debugger tab. On the Debugger page, the Main tab should be selected.
Click Browse next to “GDB debugger” and browse to the GDB executable. GDB should be located at: /linux-devkit/sysroot/i686-arago-linux/usr/bin/arm-linux-gnueabihf-gdb
7.7. Graph Tools¶
An advanced graph and image visualization tool is available in CCS. It can display arrays of data in various graphical types (amplitude X time, FFT, etc.). The arrays of data are stored in a device’s memory in various formats (datapath size, precision, sign, Q values).
The following types of graphs are available:
The supported data formats:
The data can be updated in several ways:
Refresh. Update the data when this button is pressed. Depending on the device and mode of operation, the data will be updated only when the device is halted.
Continuous Refresh. Update the data continuously at a rate defined by CCS Properties (no faster than 100ms).
Refresh on halt. Update the data when the device is halted.
Breakpoints can be set to automatically update the data when reached.
From the main menu click on Tools в†’ Graph, then select a specific graph type from the graph submenu.
7.7.1. How it works¶
The graph utility is basically a Memory Viewer that, instead of displaying the data in raw format, shows it in a X-Y plot format.
The data formatting and plotting is entirely done by the host but using the data present on the target device’s memory. In other words, the graph tool does not modify the data on the target memory but only fetches it via the Debug Probe connection to update its view.
In order to update its view, the graph tool requires a trigger set by a debug halt event such as a Manual halt, a Breakpoint or enabling the option Continuous update in the Graph Toolbar.
In sequence, the trigger causes the graph tool to perform several tasks:
When the option is selected from the menu Tools в†’ Graph в†’ type of graph, the Graph Properties view is opened.
7.7.1.1. Time domain¶
When a time domain graph view is opened, it contains several regions of interest:
7.7.1.1.1. Normal time plot¶
During normal operation, the graph shows each sampled data in horizontal sequence following the X axis from left to right and its corresponding value vertically correlated to the magnitude on the Y axis.
To illustrate, the image below shows a data buffer of 64 samples that depicts two periods of a sinewave. The maximum number of samples plotted at each update is defined by the value of the Acquisition Buffer Size, which is equal to 64 in this example.
At the second update, the contents of the display are replaced with the new incoming data (which now shows three periods of 64 samples). This second screenshot now shows the origin of the X axis starting at 64, which is set by the Display Data Size value, which is also equal to 64 in this case.
The process is repeated for as many updates as required by the debug process.
7.7.1.1.2. Keeping history¶
If it is desired to maintain a history of the sample data, making the Display Data Size greater than the Acquisition Buffer Size allows to sequentially display the past behaviour of the sampled data.
To illustrate this, take the screenshot below which shows two sample buffer updates: the first 64 samples, set by the Acquisition Buffer Size option, show the buffer starting with a value of 0 and the next 64 samples show the updated values. The Display Data Size option is set to 256, but there are not yet enough samples to reach this limit.
Updating once more shows the additional 64 samples loaded from the target but still did not yet reach the limit of the Display Data Size option.
The fourth update shows the entire history of the samples, reaching the limit of the Display Data Size option.
The fifth update discarded the initial buffer size and reflects this by setting the origin of the X axis as a multiple of the Acquisition Buffer Size value of 64. Subsequent updates will keep increasing the origin of the X axis.
Despite the resemblance, the graph utility cannot be equivalent to a high speed real-time oscilloscope, given the update rate through the Debug Probe and the latencies involved with the breakpoints can only reach as low as 0.1s under extremely ideal conditions. Also, the Sampling Rate is entirely arbitrary and does not reflect any peripherals configured on the target device.
In summary, consider the graph tool as a post-processing utility for signal analysis.
7.7.1.2. Frequency domain¶
When a frequency domain graph view is opened, it contains the same regions of interest shown in the Time domain graph, with the only difference being located in the X axis:
Given there is no Display Data Size parameter for a frequency domain graph (FFT Magnitude, Complex FFT, FFT Magnitude and Phase), the sample history is not available and requires changing the graph to a Waterfall.
To illustrate, the image below shows a basic FFT Magnitude graph of the same signal shown in the Time domain section above.
This graph is plotted using the same Acquisition Buffer Size, a Hamming FFT Window Function and a FFT Order of 5 or 32 bins (FFT Frame Size). Also, the Sampling Rate is set to 1HZ to facilitate calculations.
Increasing the FFT Order to 6 improves the accuracy of the FFT. This allows finding the value of the frequency component using the mouse cursor. Simply click on the waveform with the left click mouse to find the amplitude and frequency at that specific point.
Calculating the center frequency: The first waverform has two periods over 64 samples, yielding a sampling frequency 32 times higher than the fundamental component. This is reflected in the X axis as:
A FFT Order too high can cause severe aliasing and magnitude distortion.
The second update shows the waverform with three periods over 64 samples, which yields a frequency center of X1 = 0.046875. In this screen the Measurement Marks were used to perform a more accurate measurement of the frequency. Simply right-click with the mouse in the middle of the main graph area and select the option Insert Measurement Mark.
The third and fourth updates show the correlated frequencies of the newer updates X2 = 0.0625 and X3 = 0.078125, and the measurement markers also show the differences between the various measurements.
Despite the resemblance, the graph utility cannot be made equal to a high speed spectrum analyzer, given the update rate through the Debug Probe and the latencies involved with the breakpoints can only reach as low as 0.1s under extremely ideal conditions. Also, the Sampling Rate is entirely arbitrary and does not reflect any peripherals configured on the target device.
In summary, consider this tool as a post-processing utility for signal analysis.
7.7.2. Graph properties¶
7.7.2.1. Properties available for all graphs¶
Can be shown in one of the forms below depending on the graph and the signal types (i.e. Real/Complex) and data interleaving
7.7.2.2. Properties only available for time domain graphs¶
Single and Dual time graphs
7.7.2.3. Properties only available for frequency domain graphs¶
FFT Magnitude, FFT Magnitude & Phase, FFT Complex, FFT Waterfall
7.7.2.4. Properties only available for FFT Waterfall¶
7.7.2.5. Detailed descriptions:В¶
7.7.2.5.1. Acquisition Buffer Size¶
This option sets the number of samples that the graph tool will read from the target at every data refresh.
In other words, this is the size of the acquisition buffer located at the target and starting at the memory address specified by the option Start Address. When a graph is updated, the acquisition buffer is read from the target and updates the display buffer on the host.
If the target application performs processing of samples one at a time, this option must be set to 1. Otherwise, set it to the size of the array present on the target.
Usually a constant value is used for this option (the array size), but any valid C expressions can be specified as well. The expression is recalculated every time samples are read from the target.
7.7.2.5.2. DSP Data Type¶
This option allows selecting the following data types:
The data type is specified by the application running on the target and is a common source of errors in the graphed data. Special attention is always required to properly set this option.
7.7.2.5.3. Index Increment¶
This option allows specifying the sample index increment to be plotted. In other words, the value on this option tells the graph tool to skip the positions on the array in order to fetch the subsequent samples.
This offset permits parsing the data array extracting signal data from multiple sources using a single graphical display. Therefore, multiple data sources can be specified for display by entering a corresponding offset value in this option.
This option only makes sense to be used when the Acquisition Buffer Size is greater than 1.
For example, the array below (my_array) has three interleaved signals (S1, S2 and S3).
This option provides a general specification for interleaved sources. If the Interleaved Data Sources option is enabled, the index increment option is disabled.
7.7.2.5.4. Interleaved Data Sources¶
Setting this option to Yes implies a 2-source input buffer, where the odd samples represent the first source and even samples represent the second as shown in the illustration below.
This is a special case of the Index Increment option.
This option is only shown in certain types of graphs that require multiple data sources such as Dual Time, FFT Magnitude with Signal Type set to Complex and all other frequency domain graphs.
Setting Interleaved Data Sources to No adds two options: Start Address A and Start Address B.
Setting this option to Yes removes the option Index Increment and the Start Address B.
7.7.2.5.5. Q-Value¶
This option contains a nonzero Q-Value, which are fractional normalized representations of integer values (2’s complement). The data is interpreted using the Q-Value. They are formed by inserting a decimal space in the binary representation of an integer, resulting in greater precision.
The Q-Value indicates amount of the displacement of the decimal point starting from the LSB, according to the equation:
For example, a 16-bit signed integer number with a Q-Value of 11 (for a 12-bit ADC) and sign extended is represented as follows:
| S | S | S | S | n | n | n | n | n | n | n | n | n | n | n | n |
Additional details can be found at the Wikipedia page Q (number_format)
7.7.2.5.6. Sampling Rate (Hz)В¶
This option contains an arbitrary value for the sampling frequency, which is used to calculate the time and frequency values displayed on the graph.
Note that this sampling frequency is only arbitrarily related to the data acquisition system running on the target, given the graph tool does not have any awareness about the hardware.
For a time domain graph, this option modifies the values for the X axis when the option Time Display Units is set to either “s”, “ms” or “us”. The X axis range is:
For a frequency domain graph (FFT Magnitude, Complex FFT, FFT Magnitude and Phase), this option sets the range of the X axis to:
7.7.2.5.7. Start Address¶
Start Address is the memory address on the target device that contains the variable or the start of the buffer to be graphed. When the graph is updated, the acquisition buffer, starting at this location, is fetched from the target board. This acquisition buffer then updates the display buffer, which is plotted according to the configured formatting options.
Depending on the type of graph and options used, the Start Address can be expanded to two entries called Start Address A and Start Address B.
Any valid C variables and expressions in the Start Address option can be entered, being the most common both C pointers and arrays. This expression is recalculated every time samples are read from the target device.
7.7.2.5.8. Auto Scale¶
This option enables the automatic scale of the Y axis based on the displayed data values.
Disabling Auto Scale opens two more options: Max Y Value and Min Y Value.
7.7.2.5.9. Axis Display¶
This option enables or disables the axis:
7.7.2.5.10. Data Plot Style¶
This option sets how the data is visually represented in the graph. You can choose between the following options:
7.7.2.5.11. Display Data Size¶
This option sets the number of samples (X axis) that are displayed in the graph at a given time. This option changes the maximum value of the X axis, although the actual value shown will be dependent on the Time Display Units (either samples or time) and the size of the Acquisition Buffer Size.
Any valid C expression can be used to specify the Display Data Size option. This expression is recalculated every time samples are read from the target. This allows to dynamically adjust the size of the display as the buffer on the target is increased.
Signed integer in combination with the Q-Value option can be used to normalize fixed-point values.
7.7.2.5.12. Grid Style¶
This option enables a Minor (dense) or Major (sparse) grid array on the plot. The actual intersection points are heavily dependent on the size of the view, but the minor grid is always an exact subset of the major grid.
7.7.2.5.13. Magnitude Display¶
This option adjusts the Y axis for Linear or Logarithmic display. The linear display is more commonly used for time domain and phase frequency domain graphs (FFT), while the logarithmic is commonly used for magnitude frequency domain graphs (FFT).
7.7.2.5.14. Time Display Units¶
This option adjusts the units to be displayed in the X axis in one of the following formats:
7.7.2.5.15. Use DC Value for Graph¶
This option sets a fixed DC offset value to the center of the Y axis. Enabling this option opens a new option DC Value For Graph.
The effect is that this will plot the graph centered around the value specified on the DC Value For Graph option. For graphs with 2 plots there will be 2 entries (one for each plot).
If the DC value is not enabled, the center of the Y axis will be set as the average of the minimum and maximum values of the data.
7.7.2.5.16. DC Value For Graph¶
This option sets the DC offset value for the Y axis. It is only enabled when the option Use DC Value For Graph is enabled.
7.7.2.5.17. Max Y Value¶
This option allows specifying the maximum value for the Y axis when Auto Scale is disabled.
7.7.2.5.18. Min Y Value¶
This option allows specifying the minimum value for the Y axis when Auto Scale is disabled.
7.7.2.5.19. Signal Type¶
This option specifies the type of data that will be used to plot the graph:
7.7.2.5.20. FFT Frame Size¶
This is a read-only field that shows the number of bins applied to the sample data and used to calculate the FFT. It is a direct correlation of the FFT Order option.
This helps evaluate the maximum limit of the FFT Order that can be applied to the sampled data. This maximum limit is the Acquisition Buffer Size value.
7.7.2.5.21. FFT Order¶
This option sets the order of the FFT applied to the calculations, which is directly reflected by the FFT Frame Size.
7.7.2.5.22. FFT Windowing Function¶
FFT Windowing Function allows you to choose among the following types of window functions:
These functions are applied to the data before the FFT calculation is performed.
Additional details about Window functions can be seen at this TI Precision Labs training module
7.7.2.5.23. Waterfall Height¶
Waterfall Height (%) specifies the percentage of vertical window height used to display a window frame.
7.7.2.5.24. Number of Waterfall Frames¶
Number of Waterfall Frames specifies the number of waterfall frames to be displayed.
7.7.3. Troubleshooting¶
7.7.3.1. Data type considerations¶
Given the graph tool is able to work with several different data types, it is mandatory to keep close track of how the data samples are represented in the device memory for a proper data plot.
A very common scenario is to have signed integers on the target and use an unsigned integer as a parameter to the DSP Data Type. That causes very distorted waveforms that still resemble the expected signal.
Another very common mistake is to use a different Q-Value, which shows the waveform correctly but with incorrect values on the Y axis.
A bit less common is to use a completely different DSP Data Type (float instead of integer or vice-versa), which tends to produce either a graph with very high limits or completely random data.
3.4.4. Code Composer Studio¶
3.4.4.1. CCS Installation¶
Code Composer Studio (CCS) is the IDE integrated with the Processor Linux SDK and resides on your host Ubuntu machine. This wiki article covers the CCS basics including installation, importing/creating projects and building projects. It also provides links to other CCS wiki pages including debugging through GDB and JTAG and accessing your target device remotely through Remote System Explorer.
CCS is an optional tool for the SDK, and may be downloaded and installed at the same time that the SDK is installed or at a later date. For instructions on how to download the Processor Linux SDK, please see Processor SDK Linux Installer.
CCS uses the Eclipse backend and includes the following plugins:
NOTE You should download CCS from the Processor Linux SDK Download page because it comes with the above plug-ins already installed. Otherwise, you will have to install the plug-ins yourself in order to take advantage of all the features covered in the wiki help pages and wiki training pages.
If you wish to use CCS along with the Processor Linux SDK, there are requirements to consider before you attempt to install and run CCS. To be prepared for development, you should have already setup your host Linux machine and you should already have your target board up and running. Additionally, you should be able to communicate from the host to the target with serial and Ethernet communication.
For more information on setting up your development environment, see the Processor SDK Linux Getting Started Guide.
The Processor Linux SDK comes with an integrated ARM GCC toolchain located on your Ubuntu host. CCS is integated with the SDK allowing you to build, load, run and debug code on the target device. In more recent SDK versions (v06.00, v08.00, v01.00.00.00, v02.00.00.00, etc) for non-ARM 9 devices, a new ARM based toolchain is used and the location of the toolchain has changed. For more information on the GCC toolchain, please see Processor Linux SDK GCC Toolchain.
Latest SDK toolchains use a prefix of arm-linux-gnueabihf-. Versions older than Processor Linux SDK 06.00 and AM18x users may still use the prefix arm-arago-linux-gnueabi-.
Locating the CCS Installer
Using the SD Card Provided with the EVM
When the SD card provided in the box with the EVM is inserted into an SD card reader attached to a Linux system three partitions will be mounted. The third partition, labeled START_HERE, will contain the CCS installer along with the Processor Linux SDK installer. The CCS installer is located inside of the CCS directory and there is a helper script called ccs_install.sh available to help call the installer.
Downloading from the Web
The CCS installer is available for download for Linux as a compressed tarball (tar.gz) file. It is also available for Windows. The installer can be located by browsing to SDK for Sitara Processors and selecting the device being used. The CCS installer can be found on the device’s SDK installer page under the Optional Addons or directly from the Download CCS wiki page.
Clicking this link will prompt you to fill out an export restriction form. After filling out the form, you will be given a download button to download the file and you will receive an e-mail with the download link. Download the tarball and save it to your Linux host development system.
Starting the CCS Installer
Installing CCS from the Linux Command Line
If you want to install CCS apart from the Processor Linux SDK installer, or if you decided not to install it as part of the SDK install and want to install it now, you can install CCS using the following commands:
CCS Installation Steps
NOTE The “Limited 90-day period” language in the CCS installer license agreement applies only for the case of using high-speed JTAG emulators (does not apply to use of the XDS100v2 JTAG emulator or an on-board emulator). If a debug configuration is used that requires a high-speed JTAG emulator, you will be prompted to register your software for a fee. All use of CCS (excluding use of high-speed JTAG emulators) is free and has no 90-day time limit.
When the CCS installer runs, you can greatly reduced the install time and installed disk space usage by taking the defaults as they appear in this CCS installer. The screen captures below show the default installation options and the recommended settings when installing CCS.
Installing Emulator Support
If during the CCS installation you selected to install drivers for the Blackhawk or Spectrum Digital JTAG emulators, a script must be run with administrator privileges to allow the Linux Host PC to recognize the JTAG emulator. The script must be run as “sudo” with the following command:
sudo /ccsv6/install_scripts/install_drivers.sh where is the path that was chosen when the CCS installer was run.
Enabling CCS Capabilities
After opening CCS with a new workspace:
Importing C/C++ Projects
Importing the Projects
Building the C/C++ Projects
In order to build one of the projects, use the following steps. For this example we will use the mem-util project.
Right-Click on the mem-util project in the Project Explorer.
Select the build configuration you want to use.
Expand the mem-util project and look at the mem_util.elf file in the Debug or Release directory (depending on which build configuration you used). You should see the file marked as an [arm/le] file which means it was compiled for the ARM.
Installing C/C++ Projects
There are several methods for copying the executable files to the target file system:
Use the top-level Makefile in the SDK install directory. See Processor Linux SDK Top-Level Makefile for details of using the top-level Makefile to install files to a target file system. This target file system can be moved via an SD card connected to the host machine and then to the target board, transferred via TFTP, or some other method. For more information on setting up a target filesystem, see Processor SDK Linux Setup Script.
NOTE The top-level Makefile uses the install commands in the component Makefiles and can be used as a reference for how to invoke the install commands.
For all file system types, you can also transfer the file using the drag-and-drop method of Remote System Explorer. See the Remote System Explorer section below for more details.
Files can also be moved from the Linux command line. Typically, executable files are stored in the project’s Debug folder in the workspace.
Creating a New Project
This section will cover how to create a new cross-compile project to build a simple Hello World application for the target.
Configuring the Project
Click Next.
Click Next.
In the Select Configurations dialog, you can take the default Debug and Release configurations or add/remove more if you want.
Click Next.
In the Command dialog, set the following values: Tool command prefix: arm-linux-gnueabihf-.
NOTE The prefix ends with a “-”. This is the prefix of the cross-compiler tools as will be seen when setting the Tool command path.
Use the Browse.. button to browse to the Sitra Linux SDK installation directory and then to the linux-devkit/sysroots//usr/bin directory. You should see a list of tools such as gcc with the prefix you entered above.
Click Finish.
After completing the steps above you should now have a helloworld project in your CCS Project Explorer window, but the project has no sources.
Adding Sources to the Project
In the Source File dialog set the Source file: setting to helloworld.c
Click Finish.
After completing the steps above you will have a template helloworld.c file. Add your code to this file like the image below:
The resulting executable can be found in the Debug directory.
Remote System Explorer
CCS as installed with this SDK includes the Remote System Explorer (RSE) plugin. RSE provides drag-and-drop access to the target file system as well as remote shell and remote terminal views within CCS. Refer to Processor Linux SDK CCS Remote System Explorer Setup to establish a connection to your target EVM and start using RSE. There is also a more detailed training using RSE with the SDK at Processor SDK Linux Training: Hands on with the Linux SDK.
Using GDB Server in CCS for Linux Debugging
In order to debug Linux code using Code Composer Studio, you first need to configure the GDB server on both the host and target EVM side.
Please refer to Processor Linux SDK CCS GDB Setup for more information.
3.4.4.2. CCS Compiling¶
Code Composer Studio (CCS) v6.0 is the IDE integrated with the Sitara SDK and resides on your host Ubuntu machine. This wiki article covers the CCS basics including installation, importing/creating projects and building projects. It also provides links to other CCS wiki pages including debugging through both GDB and JTAG and accessing your target device remotely through remote system explorer.
If you wish to use CCS along with the Sitara Linux SDK, there are some setup steps required before you attempt to install and run CCS.
Building Qt Applications
Although the Processor Linux SDK includes several Qt example applications using Code Composer Studio to build or debug these applications isn’t recommended. QT Creator is the official IDE designed to be used when developing or debugging Qt applications.Please reference to the following link for further information on all the basic to download, install, run, and debug QT applications: Hands on with Qt
Importing Existing C/C++ Projects
The Processor Linux SDK includes several example applications that already includes the appropriate CCS Project files. The following instructions will help you to import the example C/C++ application projects into CCS.
Importing the Project
Click Next
On the Import Projects page click Browse
In the file browser window that is opened navigate to the /example-applications directory and click OK
Select the projects you want to import. The following screen capture shows importing all of the example projects for an ARM-Cortex device, excluding the Qt projects.
Creating a New Project
This section will cover how to create a new cross-compile project to build a simple Hello World application for the target.
Configuring the Project
Click Next
In the C Project dialog set the following values: Project Name: helloworld Project type: Cross-Compile Project
Click Next
In the Command dialog set the following values: Tool command prefix: arm-linux-gnueabihf-. Note the the prefix ends with a “-”. This is the prefix of the cross-compiler tools as will be seen when setting the Tool command path Tool command path: /linux-devkit/sysroot/i686-arago-linux/usr/bin. Use the Browse.. button to browse to the Sitra Linux SDK installation directory and then to the linux-devkit/bin directory. You should see a list of tools such as gcc with the prefix you entered above.
Click Next
In the Select Configurations dialog you can take the default Debug and Release configurations or add/remove more if you want.
Click Finish
Adding Sources to the Project
After completing the steps above you should now have a helloworld project in your CCS Project Explorer window, but the project has no sources.
In the Source File dialog set the Source file: setting to helloworld.c
Click Finish
After completing the steps above you will have a template helloworld.c file. Add your code to this file like the image below:
Compiling C/C++ Projects
Right-Click on the project in the Project Explorer
Select the build configuration you want to use
Copying Binaries to the File system
There are several methods for copying the executable files to the target file system:
Remote System Explorer
CCS v6 by default includes the Remote System Explorer (RSE) plug-in. RSE provides drag-and-drop access to the target file system as well as remote shell and remote terminal views within CCS. It also provides a way for Code Composer Studio to automatically copy and run or debug an executable using a single button. Refer to How to Setup and Use Remote System Explorer to learn how to use this feature.
Debugging Source Code using Code Composer Studio
In order to debug user-space Linux code using Code Composer Studio v6, you first need to configure your project to use gdb and gdbserver included within the SDK.
3.4.4.3. Remote Explorer Setup with CCS¶
Remote System Explorer (RSE) is an Eclipse plug-in that provides:
Before you configure RSE you should make sure the following prerequisites are met:
Opening the Remote System Explorer Perspective
Creating a New Connection
To establish a new connection with the target EVM you must run the New Connection Wizard.
Re-Opening the C/C++ View
If when you enabled RSE and opened the RSE perspective your C/C++ view disappeared you can re-open it using the following commands. This is useful to get back to your projects list to enable copying and pasting files to transfer to the remote system.
Re-Opening the Remote System Explorer View
If you have closed the RSE view and wish to re-open it you can use these steps:
Configuring with a Proxy
In the case that you are behind a proxy (most corporate networks) you may need to configure CCS to bypass all proxies. You want to make sure you also bypass the proxy for your target devices so that your connection does not attempt to go out the proxy and then come back in through the proxy.
To bypass your proxy follow the below steps:
Connecting to the Target
After the New Connection Wizard has been completed and the Remote System Explorer view has been opened, the new connection must be configured to communicate with the target EVM.
The Arago distribution that is used for our SDK is configured to use root as the usernamr and no password.
When prompted for a login use root for the user ID and leave the password blank. NOTE: you can save the user ID and password values to bypass this prompt in the future
The first time the target EVM file system is booted a private key and a public key is created in the target file system. Before connecting to the target EVM the first time, the public key must be exported from the target EVM to the Linux host system. To configure the key do
Under certain circumstances a warning message can appear when the initial SSH connection is made as shown below. This could happen if the user deletes the target file system and replaces it with another target file system that has a different private RSA SSH key established (and the target board IP address remains the same). This is normal. In this case, click Yes and the public key from the target board will be exported to the Ubuntu host overwriting the existing public key.
At this point, all Remote System Explorer functions will be functional.
Target File System Access
To open an SSH Terminal view
Debugging Source Code using Code Composer Studio
In order to debug user-space Linux code using Code Composer Studio v6, you first need to configure your project to use gdb and gdbserver included within the SDK.
3.4.4.4. GDB Setup with CCS¶
Before you configure RSE you should make sure the following prerequisites are met:
Debugging using GDB and GDB Server
Creating the Debug Configuration for the Project
In CCS, select the project you wish to work with by clicking on it and highlighting it.
Double click C/C++ Remote Application. You should then see a new debug configuration named “helloworld Debug” as shown below.
Select your target connection from the Connection drop-down box. In the example the target connection is called My Target EVM.
Click the “Browse. ” button for “Remote Absolute File Path for C/C++ Application”. Navgate to the executable file on the remote file system. For this example, the executable file is found at ”/usr/bin/helloworld”.
Click the Debugger tab. On the Debugger page, the Main tab should be selected.
Click Browse next to “GDB debugger” and browse to the GDB executable. GDB should be located at: /linux-devkit/sysroot/i686-arago-linux/usr/bin/arm-linux-gnueabihf-gdb
